|
|
 iter iter |
|
 Ace Ace Posts: 512
Time Online: 309 days 1 hours 7 minutes
|
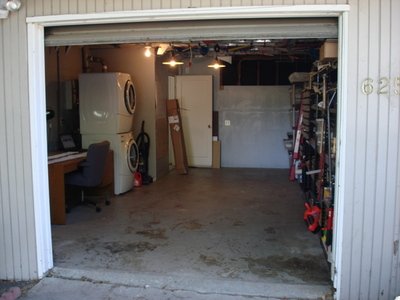
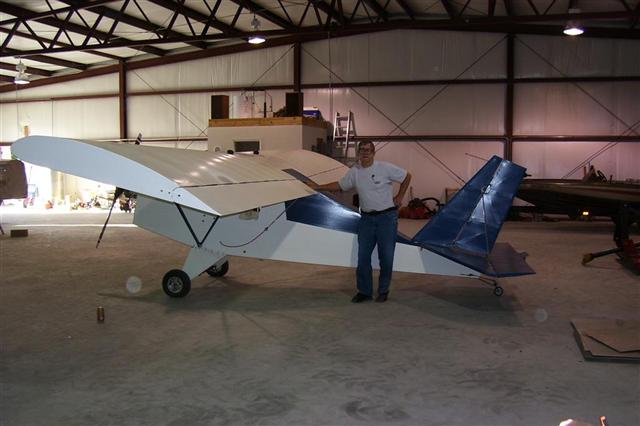
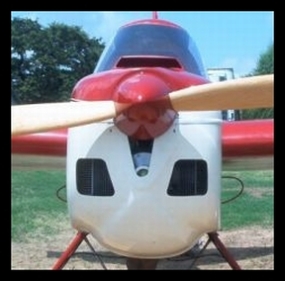
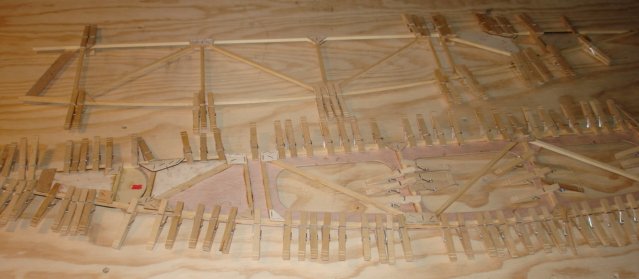
This thread is very long. I'm posting some photos in this first message to show current state of the project. For full details, read on. I have the fuselage on gear, the tail is complete, left wing is complete through trailing edge installation. Right wing spars and ribs complete. All metal work complete. Stick assembly in place including aileron and elevator linkages. Many parts custom laser-cut or CNC-milled. 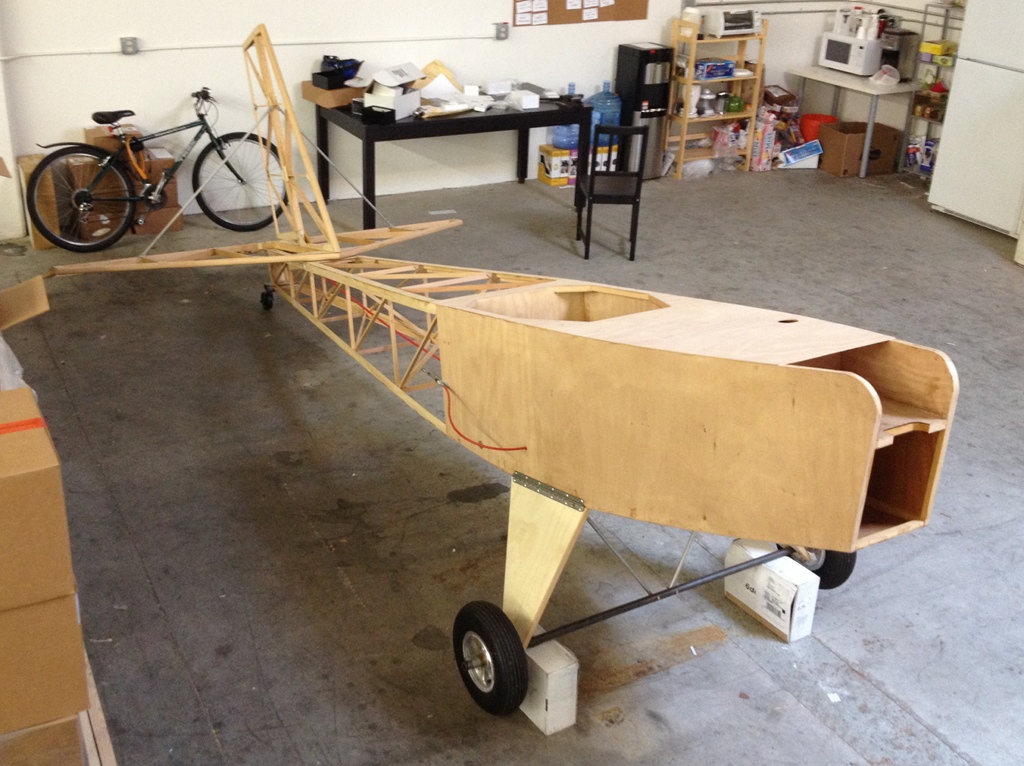 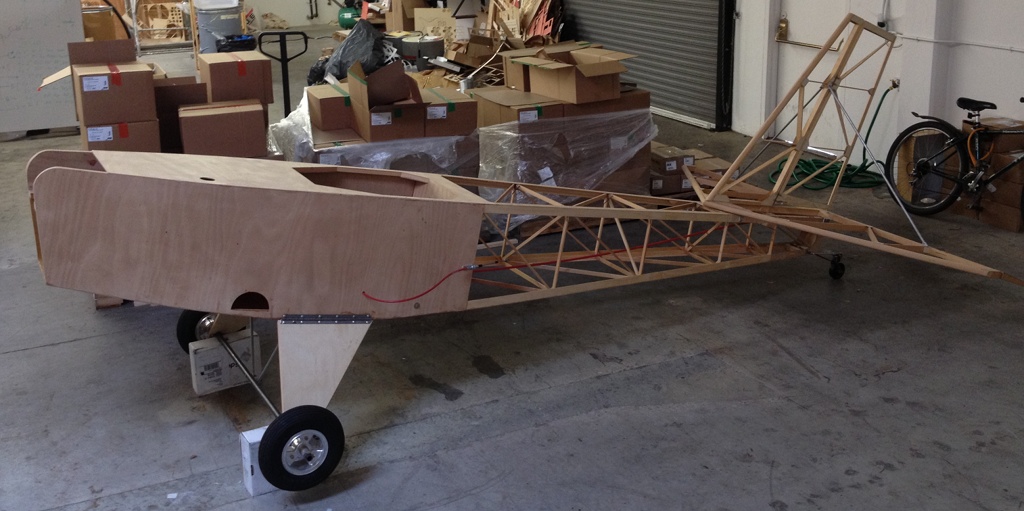 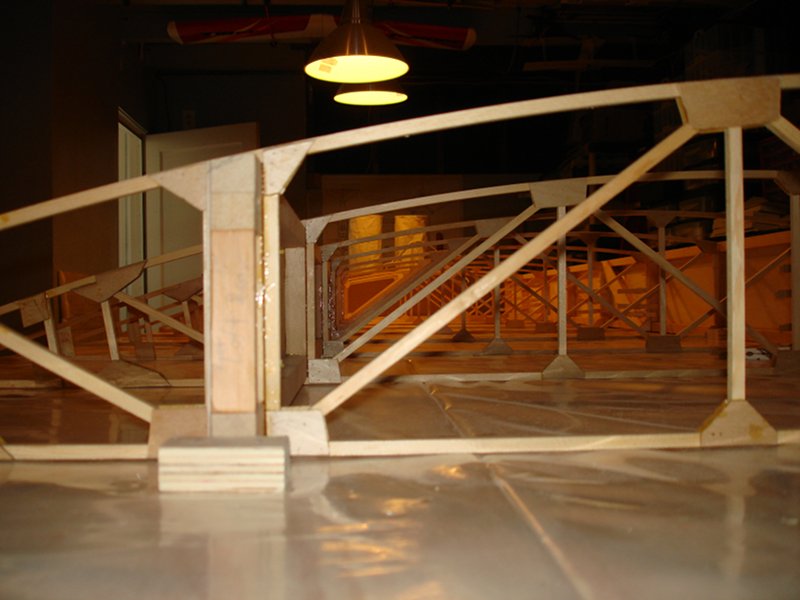  
Below is the original text of my first post here.
A big brown truck brought a rib kit and a set of plans yesterday, and this officially marks the start of my project. I'm going to keep a photo log of my construction here, to document my process and to solicit advice. I have been an EAA member since 1993. I earned my private in 2000 and now own 1/2 of a Skybolt (I'm not the builder). I've built R/C models for a number of years, going so far as to manufacture a kit of my own design (www.slow-g.com). Some of my other models are at http://www.lib.aero/~ari/rc/ I decided I really wanted to build an airplane I could fly. I also wanted a design I could finish in a reasonable amount of time. I'm not looking for super performance or aerobatic ability (already have a Skybolt). I do want something that looks like an airplane--has wings, 3-axis control, etc.The MiniMAX is what I settled on. I cleaned out my garage in preparation for this project, so there should be enough room there. I don't have a table yet, but I figure I don't need it right away--certainly I can build the ribs on the desk I have. Wish me luck! Ari.
|
|
 |
|
|
|
|
|
|
| Arthur Withy |
|
 Happy 1500R owner - building a Jodel D18 AcePosts: 2,532
Time Online: 32 days 12 hours 14 minutes
|
Neat workshop. Will be looking forward to those pics.
regards Arthur |
|
|
|
|
|
| flybob13 |
|
 Ace AcePosts: 222
Time Online: 5 days 20 hours 43 minutes
|
I too am in the early stages of an 1100 project but sense you must be a neat freak, (look at that shop ya'll, wow!) I won't be sending any pictures of my stuff. At least not yet. Actually, I'm not quite finished with my shop and I am using an old door on saw horses as a table at the moment. Just kidding about the neat freak stuff you know. I haven't been on this list very long myself. Welcome, Bob |
|
|
|
|
|
| Bob Hoskins |
|
 Fly Safe AcePosts: 1,208
Time Online: 38 days 16 hours 39 minutes
|
Hi iter;
Welcome to the gang. If you are going to build a MiniMax, this is the groupe to belong to. Don't EVER hesitate to ask questions. This bunch of people will help you all they can.
As for the work shop, too neat, LOL
Enjoy building a great little plane.
Bob Hoskins |
| Fly safe and have fun. |
|
|
|
|
|
| Gene |
|
Ace
Posts: 283
Time Online: 9 days 1 hours 4 minutes
|
Iter,
Good luck with your project....!
Gene |
|
|
|
|
|
| Pilotpeat |
|
 Ace AcePosts: 498
Time Online: 13 days 4 hours 21 minutes
|
A really neat way to do your logging is http://www.expercraft.comIt is free and very easy to use. You can print it as you go as well. It has time loging, and you can write what you do each day. It is diveded into sub categories of all the parts of the airplane so when you are done you can see exactly how much time you have in say, all of the ribs. It also has cost tracking, includes free web pages etc. your log can include writing and photos. check out my web site here: http://websites.expercraft.com/peted/or go to http://www.expercraft.com and click on browse projects. I'm the only one with an airbike on there. You cannot see a lot of the features by just looking at the web page-you have to be signed in to see the cost tracking, etc. Also, you can put an estimated number of hours to coplete the project and it will tell you the average hours you are loging weekly, mothly, and at the current rate the date you will reach your estimated hours to complete. I am averageing about 4.3 hours per week since I started. |
|
|
|
|
|
| Pilotpeat |
|
Ace
Posts: 498
Time Online: 13 days 4 hours 21 minutes
|
Oh, and if you visit sign my guest book and tell me what kind of plane you have/ are working on/ want to have. |
|
|
|
|
|
| Ricardo |
|
 Videos in UTube: ral1951 AcePosts: 2,772
Time Online: 75 days 23 hours
|
Welcome to the board Ari:
I can see you're ready to start your minimax, congratulations on your desition and good luck. We're all ready to help.
Ricardo |
|
|
|
|
|
| iter |
|
Ace
Posts: 512
Time Online: 309 days 1 hours 7 minutes
|
Hours today: 7
Running total: 7
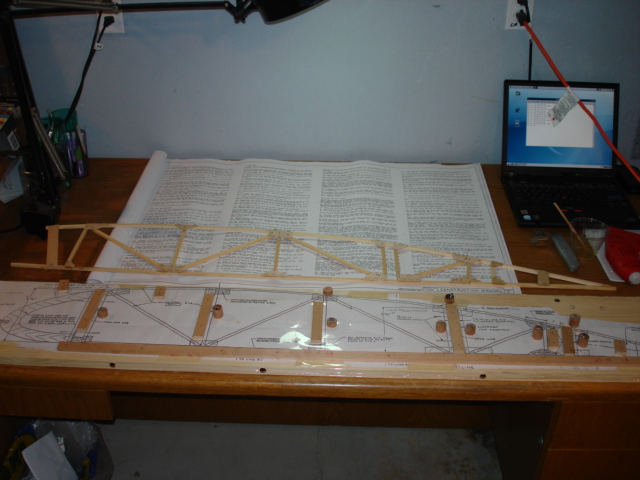
I built the rib jig today and a test rib. Fred Brooks used to say "plan to throw one away (because you will anyway)". I used this rib to learn, and will use it tomorrow to make patterns for plywood gussets that will fit the actual ribs that come out of my jig. I was surprised to see how approximate the drawings were--when I saw the warning "PLANS ARE SUBJECT TO SHRINKING AND STRETCHING," I didn't realize just how much they would shrink. For instance, the back half of the rib outline didn't have a flat bottom in my copy; the lower line, which is supposed to be straight as far as I understand, bows up 5/32". I compensated as best I could, using the dimensions given. Is my copy of the plans strange, did I miss something or is this the normal experience? Also, has anyone tried laser-cutting the gussets?
Speaking about the plans, I was surprised to find they were all scaled down (except the ribs). Earlier, I had bought the plans for FP-303 (another Ison design--I chickened out of it because Fisher Products stopped selling kits and I was afraid of sourcing my own materials). The plans for FP-303 were full-scale blueprints. I also found it easier to follow instructions that were printed on the individual sheets instead of flipping back and forth between a drawing and the text at the front of the plans package. I was surprised to find different plans by the same designer came in such different formats.
Ari.
|
|
 |
|
|
|
|
|
|
| Ricardo |
|
Videos in UTube: ral1951 AcePosts: 2,772
Time Online: 75 days 23 hours
|
|
|
|
|
|
| Ricardo |
|
Videos in UTube: ral1951 AcePosts: 2,772
Time Online: 75 days 23 hours
|
I forgot to mention, it comes with a bonus recipe  |
|
|
|
|
|
| iter |
|
Ace
Posts: 512
Time Online: 309 days 1 hours 7 minutes
|
Ricardo,
I'd read that thread. It was very informative, but unrelated to the question I'm asking. My rib came out perfectly flat on the bottom even without soaking. What was curved was the plan.
Ari. |
|
|
|
|
|
| Randy lewis |
|
 Ace AcePosts: 965
Time Online: 21 days 18 hours 20 minutes
|
Ari
I had the same problems with my plans; the bottom wasn't flat and the two sections didn't splice together well. I built my jig to all the given dimensions and let the top bow be as close and smoth as possible. One wise person on this board said that everybody's ribs will be a little different, just make sure yours are all the same. |
|
|
|
|
|
| Charlie Harris |
|
 Ace AcePosts: 922
Time Online: 23 days 31 minutes
|
Ari: First thing I did was to cut the instructions pages to approx.page size and made sheets which I put in transparent folders and into a 3 ring binder. Also it is a good place to store building reminders you may get from the board just print the rerply you get then put them into the binder for quick ref. mine is about 75 pages long. Then while building ribs I studied the plans a lot. I made notations on every page as to parts size for both wood and all metal peices. such as RS-1 is 1/4 sq. wood. If a page ref. a metal part by RS # you will then have a ref. handy on that page. try it it won't take long and you will like it. Such as what size wood is RS-9 = 3/4 sq. and you don't have to look it up. Soon you will see it will stick in your mind. Good luck I scratch built my Hi-Max and I loved every minute. Charlie |
|
|
|
|
|
| Charlie Harris |
|
Ace
Posts: 922
Time Online: 23 days 31 minutes
|
Iter: Lets see now, thats a very nice shop, and it will probably work, but now you will have to make a trip to the local hardware and clutter it up with maybe a bandsaw, 4inch belt sander is nice,. be sure to get a metal cutting blade about 1/4in. 15-teeth to the inch, works great for cutting aluminum parts, maybe a small table saw, a decent drill press. just kidding but all this is nice,and you may already have. If we can help with any info, just ask and Im sure you will get answers the same day. Good luck, let the fun begin. By the way, I cut all my 1/16th gussets with common sissors. Charlie |
|
|
|
|
|
| iter |
|
Ace
Posts: 512
Time Online: 309 days 1 hours 7 minutes
|
Hours today: 6 Running total: 13 Randy: Thanks for telling me I wasn't going mad. I tried to adjust the drawing where it said "keep this dimension" or "keep that dimension," but I kept getting confused which dimensions I had to hold  One dimension is the height of the rib including cap strips, one is the height excluding them, one is on the short side of a vertical member, one is on the long, etc. All the while the drawings are nowhere near the stated dimensions... I ended up tearing my jig apart and making my own rib drawing based on the dimensions given. I'm almost done making a new jig based on it. I wish they had either included an honest 1:1 drawing of the rib in the plans, or if that is not possible of too expensive, they should have just made a scale drawing with /all/ dimensions, like they did for the fuselage for instance. Ari.
|
|
|
|
|
|
| iter |
|
Ace
Posts: 512
Time Online: 309 days 1 hours 7 minutes
|
Ace:
Thank you for that advice! I was afraid to cut the plans (I always try to avoid cutting things that could possibly stay whole) but your suggestion made so much sense! I cut the 3 sheets of instructions into 24, 12"x24" pages and stapled them together. Wonder why JDT didn't print them like that? I'm sure it would have been cheaper than the large sheets and handier, too. I also put the two part-size-reference sheets on my wall so I don't have to flip back and forth to them. Already I'm feeling better about navigating the plans.
On the power tool front, I have a 10" miter saw and a drill press. I'm afraid I won't be able to resist buying the rest on your list. Trouble is, there isn't enough bench space to put all of this good stuff on. You need /some/ room between these things.
Ari.
|
|
|
|
|
|
| iter |
|
Ace
Posts: 512
Time Online: 309 days 1 hours 7 minutes
|
Hours today: 5 Running total: 18 I cut up a lot of 1/4" square stock for ribs today using a miter saw. The kit contains more stock than needed, so I'm making 26 ribs instead of 24 that are called for. No jokes about spare ribs please In the photo, you can see one set of sticks is in the jig and 25 other sets in small 5x5 bundles next to it. I still need to cut 1/6" ply gussets and then I can start gluing up ribs. The rib kit contains 110 pieces of 1/4" square stock bundled 10x11 with saran wrap. I started pulling sticks out of the middle of this bundle expecting it to fall apart soon. Oddly enough, the structure held until all of the "inside" sticks were gone. My fiancée Irene who helped with some of the cutting today holds the gutted bundle. Ari.
|
|
|
|
|
|
| Reto S |
|
Ace
Posts: 320
Time Online: 13 days 19 hours 26 minutes
|
Wow, that hollow bundle is quite amazing. It's good to see Irene involved. Well.....at least until she dumps you over this whole airplane thing........ |
|
|
|
|
|
| iter |
|
Ace
Posts: 512
Time Online: 309 days 1 hours 7 minutes
|
You're just jealous Rick. Irene loves airplanes.
|
|
|
|
|
|
| Walkabout |
|
 Steve, AB-137 AcePosts: 349
Time Online: 42 days 21 hours 24 minutes
|
Hi Ari, From the looks of your shop, you're one of those "clean guys". You are gonna do really well with this. I think I'm still walking on sawdust from when I beveled my spars back in 2001. ( a good layer of dust will keep that dropped AN nut from bouncing under the cabinets - JMO  A couple of thoughts, the alignment blocks on the ribjig close to the joints are going to be in contact with glue at some time. Whether from squeeze-out or impact from staple gun, gluing a rib to the jig is a real pain. I rubbed my blocks and cams with a crayon as a release... a candle works too or maybe auto wax.. just something as a barrier. And plan ahead for when you enevitably block access to the washer/dryer. You need allies for a project this size, especially in the household. You're gonna do great. Steve |
| Envy the country that has heroes, pity the country that needs them...http://www.jordanlakeaero.com |
|
 Logged Logged |
|
|
|
|
| iter |
|
Ace
Posts: 512
Time Online: 309 days 1 hours 7 minutes
|
Hey Steve, good point on sawdust's shock-absorbing qualities. You can't see it in the photos, but the shelves Irene is standing next to are covered in balsa sawdust as well, from when I cut 250 R/C autogyro kits in January.
Re glue and alignment blocks. The plans say use paste wax to block wood. How well do you think this works?
Thank you for your kind words and good wishes. I'm going to need all the support I can get to get through this it seems :=)
Ari. |
|
|
|
|
|
| Walkabout |
|
Steve, AB-137 AcePosts: 349
Time Online: 42 days 21 hours 24 minutes
|
My Air-Bike plans didn't mention a release, I had to find out the hard way. I've never tried the paste wax, but if Wayne Ison says it works that's good enough for me. |
| Envy the country that has heroes, pity the country that needs them...http://www.jordanlakeaero.com |
|
| Logged |
|
|
|
|
| iter |
|
Ace
Posts: 512
Time Online: 309 days 1 hours 7 minutes
|
Hours today: 5.5
Running total: 23.5
Cut up the ply gussets and /actually/ finished rebuilding the jig. Rib building starts for real tomorrow!
I considered having the gussets laser-cut, but decided against it because I felt bad about throwing away plywood from the kit (can't really laser-cut 7/8"x48" strips) and didn't want the delay. Well, next time I build a wing, I'll have the gussets laser cut. it's a pain to cut them if you're trying to achieve any kind of consistency in shapes. I mostly used the miter, and by the time I was done cutting, I wished I'd have outsourced the job to a laser shop. I'll have to go though the plans tomorrow to see if there are any other pieces that are candidates for laser cutting. I'm sure it will still keep me in the 51% rule :=)
Ari.
|
|
|
|
|
|
| Gene |
|
Ace
Posts: 283
Time Online: 9 days 1 hours 4 minutes
|
Ari,
Everything looks so neat in your rib buildiing set-up. You mentioned having the gussets laser cut so they would be more precise as to shape and form. This is a total waste of time and energy (not to mention cost) that could be better spent elsewhere. One wing rib gusset isn't going to know that it is 1/16" longer or wider than it's neighbor and certainly when it is all covered inside the wing fabric no one else will know either. I'm glad you're building however as sometimes just taking that first step is the longest one....!
Good luck with your project...!
Gene |
|
|
|
|
|
| Walkabout |
|
Steve, AB-137 AcePosts: 349
Time Online: 42 days 21 hours 24 minutes
|
I made one gusset each per the plans and used those as a template to trace to rest onto the wood, backing the diagonals against each other to save material. Then sat down and cut them all with tin snips.
On the notched TE gussets, if I let the snips close completely while in the wood it would split away from the closed point. I learned to stop at the corner with the wood still well between the blades and cranked them out in no time. |
| Envy the country that has heroes, pity the country that needs them...http://www.jordanlakeaero.com |
|
| Logged |
|
|
|
|
| iter |
|
Ace
Posts: 512
Time Online: 309 days 1 hours 7 minutes
|
Hours today: 2.5 Running total: 26 I built 2 ribs today. With all these pre-cut components and preparation, it still took over an hour per rib. The manual says you could build one in 20 minutes. Please tell me I'll get faster at this as I go along. BTW, the T-88 bottle says "Mix ratio by weight 100:83." I take that to mean that for every 100oz of part A, I need 83oz of hardener. Or is it the other way around?
One wing rib gusset isn't going to know that it is 1/16" longer or wider than it's neighbor and certainly when it is all covered inside the wing fabric no one else will know either.
I'm still entertaining the thought of using transparent Tedlar to cover the wing as I mentioned in another thread. Thanks for the kind words and encouragement though. The more time I spend with this project, the less attractive a transparent wing becomes :=) Ari. |
|
|
|
|
|
| Walkabout |
|
Steve, AB-137 AcePosts: 349
Time Online: 42 days 21 hours 24 minutes
|
My bottles say mix equal portions by volume. I guess by equal volume it comes out to be 100:83 by weight. |
| Envy the country that has heroes, pity the country that needs them...http://www.jordanlakeaero.com |
|
| Logged |
|
|
|
|
| iter |
|
Ace
Posts: 512
Time Online: 309 days 1 hours 7 minutes
|
Hours today: 1.5
Running total: 27.5
Built another rib today--this time "only" spent 50 minutes on it. Also pulled the staples out of the two ribs I'd made yesterday. This took 20 minutes per rib.
OK. I guess this happens to every homebuilder at one point or another, and it's happened to me today. I find myself asking, will I finish this plane this decade? In this context, I want to ask, has anyone actually finished a MiniMAX in the 250-300 hours that JDT advertises?
Ari. |
|
|
|
|
|
| Mickvds |
|
 Wing Man  Posts: 71
Time Online: 2 days 47 minutes
|
A friend of mine built several mini-max's and Air-bikes, probably around 12-15 planes total. One of the last mini-max's he built was done in 90 days and that one was a 1500R, I have no idea how many hours he spent on the plane. I was impressed and wish I could build that fast. |
|
|
|
|
|
| iter |
|
Ace
Posts: 512
Time Online: 309 days 1 hours 7 minutes
|
Was he building them for sale?
Ari. |
|
|
|
|
|
| Mickvds |
|
Wing Man Posts: 71
Time Online: 2 days 47 minutes
|
Yes, he built and flew as well as building for other people. His name was George Nuber, he past away a couple years ago. He lived in Columbia Tennessee and was a good friend, we miss him. |
|
|
|
|
|
| Richard Wessel |
|
Guest User |
Iter, I'm in the process of rebuilding a 1500 and I like you wonder if I'll ever see It done. 90% done and 90% to go as they say! I always try to get something done every weekend (the only time I get to work on it) no matter how small, it puts me 1 step closer. So keep them ribs a comeing . BTW, On the tool front, I think you'll find a bandsaw a most valuble item to have. I don't think I could build a thing without it and I belive you'll find the same thing out when you have one. And one other thing, Your a lucky man to have a gal like Irene---better hang on to her! Anyway, good luck and keep us posted. Happy Landings, Rich |
|
| Logged |
|
|
|
|
| George Sychrovsky |
|
Guest User |
I don’t know what you mean be this decade, year 2010 or 10 years from now but observing your building so far unless you have a major attitude change how you go about it if you keep going like this it will take over 10 years to finish it. |
|
| Logged |
|
|
|
|
| skyblazer |
|
Ace
Posts: 213
Time Online: 29 days 11 hours 48 minutes
|
I don't like posting negative comments and I may get banned from this forum all together but here goes!!! George, you don't have Stas to push around any more because he ignoes you but now your on the prowl for a new victim. I know your gonna have a good come back so give it to me bud, im gonna ignore you too. |
|
|
|
|
|
| George Sychrovsky |
|
Guest User |
I simply confirmed his own observation based on building two of these airplanes myself, I don't know what your problem is with stating the facts.
George |
|
| Logged |
|
|
|
|
| skyblazer |
|
Ace
Posts: 213
Time Online: 29 days 11 hours 48 minutes
|
|
|
|
|
|
| iter |
|
Ace
Posts: 512
Time Online: 309 days 1 hours 7 minutes
|
Hours today: 7.5 Running total: 35 Built 9 more ribs today, I have a total of 12 now. Still takes about 45 minutes per rib, but it's easier to see progress. I got Irene to mix my epoxy today, and things went quicker. She brought her laptop into the garage and watched DVDs of Sex and the City between mixing batches of glue. I can live with that if that's what it takes :=)
Quoted from 199
And one other thing, Your a lucky man to have a gal like Irene---better hang on to her!
Not only that, I'm going to marry her, too! Thanks for the kind words and encouragement Rich! Ari.
|
|
|
|
|
|
| Will Leonard |
|
 Flying puts more fun in your life! AcePosts: 300
Time Online: 8 days 19 hours 31 minutes
|
Keep up the good work Ari!
It is obvious you are a perfectionist...as time goes by you will get over that!
This in turn will speed up your building.
There is a state called "good enuf" and you will soon recognize it!
Probably everybody feels in the beginning that they have to be ever
so careful in following to the nth degree every instruction given in the building plans!
We all felt in the beginning that if every little piece of work wasn't absolutely perfect that the plane might break!
I'm not saying throw caution to the winds but you'll get a lot more comfortable cutting material, mixing glue and forming up as time goes by. These are extraordinarily strong and durable little Airplanes! Have no fears, get it "good enuf" and you'll soon have a reliable and excellent aircraft!
This will speed up your building.
Best of Luck...
Will leonard |
|
|
|
|
|
| 10 |
|
Guest User |
Ari, You've got my support and help! When you run into problems, we'll all help you out! You might want to plan your progress like a "project plan". Write it down if you haven't already. Don't get too specific. Be general, because if you don't meet your goals by a certain date, it won't be as dissapointing. I did meet my completion date on my Max, but just barely. You can't believe the self-satisfaction when you go one step-at-a-time and meet your goals as planned! Your progress will get faster and "smarter" (search the bbs for past topics).
As for your fiance Irene, don't let her go!! She's one of them we pilots call "keepers". I re-married last year to a woman just like her. She'll mix my T-88, clean my windsheild and BBQ pork ribs where the meat falls off the bone at the same time! This is about as close to heaven I can get (while flying on earth)! Yahoo!!! Harold |
|
| Logged |
|
|
|
|
| iter |
|
Ace
Posts: 512
Time Online: 309 days 1 hours 7 minutes
|
Hours today: 3
Running total: 38
Pulled staples out of the 9 new ribs.
Thanks Will and Harold! I knew I could turn to the board for encouragement and support. This "good enuf" is hard to figure out. I'm taking comfort in your suggestion that as time goes by I'll find it easier to find the "good enuf" state.
Irene is the best thing that happened to me in my life. bar none. I never knew a relationship could be this good.
Ari. |
|
|
|
|
|
| Pilotpeat |
|
Ace
Posts: 498
Time Online: 13 days 4 hours 21 minutes
|
I must be a little slower. I just pulled my 9th rib from the jig and I have 85 hours. The only other things I have done are nose ribs (main and aileron) and a wing table. I must be to perfectionistic. |
|
|
|
|
|
| iter |
|
Ace
Posts: 512
Time Online: 309 days 1 hours 7 minutes
|
I haven't started on either of these yet. I think I'm going to laser-cut the nose ribs and the 1/4" supports for aileron hinges. I'll let you guys know how these come out, and how many hours I'll have spent by then :=)
Speaking of tables, how big does it need to be? Does it need to be bigger than the wing's planform, or does it only need to support the spars?
Ari. |
|
|
|
|
|
| Pilotpeat |
|
Ace
Posts: 498
Time Online: 13 days 4 hours 21 minutes
|
I routered both my aileron ribs and nose ribs. It worked really well. I could do two each of the 1/4 inch ones and three each of the 1/16 ones at a time. The only one I had to make by hand was a template. Check out my notes and pictures here: http://websites.expercraft.com/peted/Pete |
|
|
|
|
|
| iter |
|
Ace
Posts: 512
Time Online: 309 days 1 hours 7 minutes
|
Hours today: .5
Running total: 38.5
Do you count time spent shopping towards build time? It would be too depressing if I did. Never knew I could spend so much time at a hardware store. Anyway, bought the plywood and 2x4s today. Looks like the table is going to be a pretty tight fit in the garage. I'm planning to use the black metal selves (you can see them in the first picture) as legs for the table. Hope that will work.
Ari.
|
|
|
|
|
|
| Gene |
|
Ace
Posts: 283
Time Online: 9 days 1 hours 4 minutes
|
Oh my, that is a tight space to build an airplane, but it has been done before and will be again. I built my Evans VP-1, back in the late 1960's, in a space no bigger than this. Good luck with your project and keep us posted....!
Gene |
|
|
|
|
|
| George Sychrovsky |
|
Guest User |
For the maximum utility the bench needs to be built as double decker with a full size shelf half way up that’s where you store all your stock and parts. For the top most people use particle board because its more stable and doesn’t twist with humidity. I suggest another trip to lumber get particle board for the top, 2x6 for the top frame , use the 2x4 and plywood for the lower shelf and build it with regular legs. |
|
| Logged |
|
|
|
|
| Gene |
|
Ace
Posts: 283
Time Online: 9 days 1 hours 4 minutes
|
George,
Your suggestions are excellent and generally overlooked....! That wide open area under the bench is valuable storage space that is critically needed, especially in a small shop. I always use 3/4" particle board on the top for the reason you have outlined.
Have a SUPER day....!
Gene |
|
|
|
|
|
| iter |
|
Ace
Posts: 512
Time Online: 309 days 1 hours 7 minutes
|
Thanks for the comments guys. Is plywood really this bad? I thought particle board couldn't take the hammering that was required for jigging wings and fuselage.
I do intend to make use of the mid-height shelves on the metal frames---there is no such thing as too much storage space. The reason I didn't want to build the table with traditional all-wood construction is that if I do, I'l have to throw it out when I'm done with my Max--there is nowhere to store a table this size, and I can't keep it where it sits now, the space is needed for other things. If I just build a table-top and reuse shelves for legs, I can disassemble the thing when I'm done, put the table-top against the wall behind the shelves, and put the shelves back to their original use.
Ari. |
|
|
|
|
|
| Gene |
|
Ace
Posts: 283
Time Online: 9 days 1 hours 4 minutes
|
Ari,
My workbench has 2x4 legs on it which are screwed in place using deck screws. The workbench has been taken apart and reassembled so many times I have lost count of them. Actually, the legs, framing and lower shelf go back to my first attempt at building when I lived in Quebec back in the late 1960's.
They then went from Quebec to Wisconsin and later out to the West Coast (Vancouver, WA) and then back to Northern Wisconsin and now are in their final resting place here in Southern Wisconsin.
If you do decide to use wood (and I suggest that you do) make sure that you mark each joint with a permanent marker so you can take it apart and put it back together again easily....!
I had said that I always use particle board for my workbench tops and this always has been true up until a few year ago when I lucked out and came across a couple of "fire-proof" flush doors that are so heavy one can't hardly lift them alone. They are really stable and I love them....!
Gene |
|
|
|
|
|
| iter |
|
Ace
Posts: 512
Time Online: 309 days 1 hours 7 minutes
|
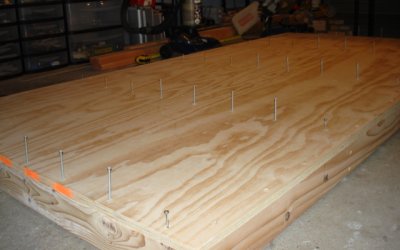
Hours today: 6
Running total: 44.5
Built 1 4x8 table. One more to go. I used the 3/4 plywood I bought yesterday. I'll see how bad it is, and if I find have to replace it with particle board, I will.
You can see how it will be very easy to put a shelf under this table, or several.
Ari.
|
|
|
|
|
|
| Mike Howe |
|
 MiniMax, Hawk, GA (Tipacer), another Max to finish AcePosts: 375
Time Online: 7 days 7 hours 30 minutes
|
Something is missing... The mess I would normally make! Great looking shop. Table looks good too. I went with 2 x 6 boards. I've seen others with engineered floor beams. As long as it is straight and solid, good.
Mike |
|
Mike Howe
howetyr@yahoo.com
|
|
|
|
|
|
| djohn |
|
 Ace AcePosts: 648
Time Online: 24 days 19 hours 31 minutes
|
Ari,
Would one consider table building, airplane building? I'm interested to see just how long it will take an accomplished guy like yourself to build one of the birds.
That is a tight space, but I'm sure shear drive as well as your keen organizational skills will make it work.
Dennis |
|
|
|
|
|
| iter |
|
Ace
Posts: 512
Time Online: 309 days 1 hours 7 minutes
|
Ari,
Would one consider table building, airplane building? I'm interested to see just how long it will take an accomplished guy like yourself to build one of the birds.
This is an interesting legal point. I decided to exclude time I spend shopping for parts, tools and materials, either online or offline. I decided to exclude time spent making room for the project--tearing out drywall and 2x4s in the garage. I definitively exclude time I spend reading this forum :=) But things like rib jigs and tables somehow seem in my mind to be more tightly tied to the airplane. In any case, it shouldn't take too many hours to finish, so I don't think it will skew the total time too much :=) Oh, and calling me an accomplished guy... I'm just starting out.
That is a tight space, but I'm sure shear drive as well as your keen organizational skills will make it work.
Hope you're right! Ari. |
|
|
|
|
|
| djohn |
|
Ace
Posts: 648
Time Online: 24 days 19 hours 31 minutes
|
I was just thinking that someone might just have a 16'+ level workbench already. I am interested in just how accurate the build times are for planing purposes. I would like to build one from scratch after I get the two I'm currently working on together.
As for the accomplished, I was more refering to your expertise in models. After all the JDT website says if you know how to build a model ... I have never built a model airplane before but have apprenticed for years as an a&p wannabe on certified production aircraft. In my book that makes you miles ahead of me at the task at hand.
Thanks
Dennis |
|
|
|
|
|
| iter |
|
Ace
Posts: 512
Time Online: 309 days 1 hours 7 minutes
|
Hours today: 3.5
Running total: 48
Built the second table today. Went much quicker second time around! First photo shows tabletop during assembly, after I drilled and deburred the holes and set screws in them, but before I drove them in. Looks kinda like cleco'ed aluminum sheet, doesn't it?
Dennis, thanks for your kind words. For your estimate, just deduct 9.5 hours I took to build my tables from the final total I'll end up with :=) My model building taught me to try to build light, but so far, nothing in my R/C experience prepared me for anything I've had to do on this project. 1/4" square spruce is /very/ heavy wood in my R/C world, and 2x4s? Never once touched those until I started making space in the garage. I'm sure your A&P training will help you immensely, especially closer to the end of the project. What airplanes are you working on?
BTW, on the JDT website, under "Builders' gallery," there is a guy who spent over a thousand hours building his 1100. He says it was so easy because of all his R/C experience... A thousand hours!
Ari.
|
|
 |
|
|
|
|
|
|
| djohn |
|
Ace
Posts: 648
Time Online: 24 days 19 hours 31 minutes
|
Ari, I'm working on a 1400Z and a 1600R. I guess mostly the 1400Z is on hold. I bought the Z @ "100%". after the second trip to get the plane (on the first trip I determined the plane was not in fact airworthy and went to get a trailer) I got it home and now it's disassembled down to about the last stick. Needs too much work to do quickly and I'm ready to go flying. So I bought the 1600R @ 90%. It's really a work of art inside and after spending weeks inspecting and massaging, it was truly over 90%. Some wiring and hardware tweaking and cover the ailerons then paint on ailerons and I will schedule the DAR.
As for the a&p training, it seems to have only added an anal dimension to these projects. For instance to remount the instruments instead of just placing the instruments on plywood marking the holes and cutting them out, I am laying them out as solid models then I will make a program and run the material on the CNC router. I keep wanting to see production type appearances on these machines and it mostly doesn't fit.
In the mean time I have added a tailwheel endorsement to my private ticket to help satisfy my "must fly now" urges.
Your progress looks great. Nothing like a stack of uniform ribs to help keep you fired up. Have you thought about where you will keep the assembled parts while you finish the other large assemblies? I have a similar space restriction and I have resorted to tying up the big parts to the ceiling.
thanks for the inspiration
Dennis |
|
|
|
|
|
| flybob13 |
|
Ace
Posts: 222
Time Online: 5 days 20 hours 43 minutes
|
Ari, so far, everything about you and your endevors is very impressive, my hats off to you. If you were to video the process of constructing and assembling the M/M I feel sure you could make a few bucks selling them. You know, an instructional video series. I would be happy to purchase one because I do much better with visual instruction than written instruction. I'm sure there are a lot of potential builders out there that feel the same way. If I had the time and talent, I would do it. Keep up the good work and thanks for all the post, you are an inspriation. Bob |
|
|
|
|
|
| iter |
|
Ace
Posts: 512
Time Online: 309 days 1 hours 7 minutes
|
You guys make me blush. Thank you for your kind words and the motivation you give me. Dennis, it sounds like you are really close on the 1600R. That is so exciting! Keep us posted!
Have you thought about where you will keep the assembled parts while you finish the other large assemblies? I have a similar space restriction and I have resorted to tying up the big parts to the ceiling.
Storage is a problem. In fact, the reason the ribs are sitting on my new shiny worktable is because they have nowhere else to go at the moment. They used to live on the shelf that became legs for the table and are still looking for a home. The ceiling would have been easy, had it not been for all the R/C airplanes that hang from there. There is some unused ceiling space above the desk and washer, so that's probably where the big parts will go. I might be able to fit the fuse under my worktable. It sends shivers through my spine to think about storing /two/ airplanes in this space. Ari. |
|
|
|
|
|
| djohn |
|
Ace
Posts: 648
Time Online: 24 days 19 hours 31 minutes
|
Quoted Text
You guys make me blush.
Hey watch it now, I said you inspire me not you complete me! Space is tight for the two, keep in mind one is mostly back to stock and I won't get back on it until the "R" flies the coup. I hope I'm close on the "R" and I will post pics soon, It seems much more exciting to look at pics of someone building as apposed to someone buying one thats almost complete. I guess you could say I am currently in it for the flying. I think I will find it easier to stay motivated after I already have one flying. I find flying very stress relieving, It's my happy place. Dennis |
|
|
|
|
|
| iter |
|
Ace
Posts: 512
Time Online: 309 days 1 hours 7 minutes
|
Hours today: 3
Running total: 51
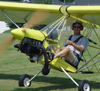
I drew up full-size plans for the fuselage today, now that I have a table big enough to hold them. Wow this thing is long. I know the fuse is not very long as man-carrying airplanes go, but nothing in my R/C experience prepared me for this :=)
You can't see the pencil lines too good in the photo :=( I more or less reproduced everything that's on drawing 1. I drew this on paper instead of on the bench as the instructions suggest. I think I'll do full-size drawings for fin/rudder and stab/elevator the same way, and then I can do the actual building in any order. I'm still waiting for my wood.
That, and an I'm-making-engine-noises photo, one of many to come, I'm sure.
Ari.
|
|
|
|
|
|
| djohn |
|
Ace
Posts: 648
Time Online: 24 days 19 hours 31 minutes
|
Engine noises are good, in fact mandatory but you must get the stick and throttle thing down. This ain't no "yoke" bird. Dennis |
|
|
|
|
|
| iter |
|
Ace
Posts: 512
Time Online: 309 days 1 hours 7 minutes
|
Arthur made a similarly correct observation over here: http://www.lonesomebuzzards.com/cgi-bin/forum/Blah.pl?m-1187319013/
Great photograhpy Ari...gave me a laugh...I like the no shoes concept however there isnt a control yoke in a Minimax...Its a real aeroplane and comes with a stick.....maybe another photo required..!
The smile looks convincing
Irene caught me off-guard in this photo--that's why the smile looks so convincing. I immediately realized the yoke problem and posed for a number of "stick and throttle" pictures, but none of them had that convincing engine nose to them.
I particularly like the "dimensional adjustment instruments" (axes) on the wall.
UARTs is what we call them--Universal Alignment and Readjustment Tools. Cf. http://catb.org/jargon/html/L/LART.html (One of them is a hammer, BTW)
|
|
|
|
|
|
| djohn |
|
Ace
Posts: 648
Time Online: 24 days 19 hours 31 minutes
|
Not nearly as convincing. Irene, you must work on the "unaware" of it all. Dennis |
|
|
|
|
|
| iter |
|
Ace
Posts: 512
Time Online: 309 days 1 hours 7 minutes
|
Hours today: 8
Running total: 59
Drew full-size fin & rudder on paper. Started working on DXF files for laser cutting. I wish JDT would supply the files... or better yet... laser-cut parts... Here's an example--the aileron end rib. White outline is the size of RS-353 that the ribs are made of.
Ari.
|
|
|
|
|
|
| iter |
| September 2, 2007, 6:07am |
|
Ace
Posts: 512
Time Online: 309 days 1 hours 7 minutes
|
Hours today: 3
Running total: 62
Made the 6 "bearing brackets" for ailerons. I think I'm getting closer to finding the "good enuf" bliss. My holes are off-center and the rounded ends are not very round. Is there hope for me yet?
Ari.
|
|
|
|
|
|
| iter |
| September 2, 2007, 9:05am |
|
Ace
Posts: 512
Time Online: 309 days 1 hours 7 minutes
|
Hours tonight: 2.5 Running total: 65.5 I made enough gussets for 27 ribs, except for one particular shape. I found out I didn't have enough of the funkiest-looking piece, so I decided to laser-cut it instead of making it by hand. I have access to a laser cutter at http://www.sawdustshop.com --I'll get them cut Tuesday. Ari.
|
|
|
|
|
|
| iter |
| September 6, 2007, 8:30am |
|
Ace
Posts: 512
Time Online: 309 days 1 hours 7 minutes
|
Hours today: 4
Running total: 69.5
Built 6 ribs today, bringing the total to 18. I'm done with "plain" ribs. The 6 that I still need to build have hinges and relevant reinforcement blocks, and 4 of them have plywood skin on one side.
The laser parts are turning out well. I think I'll be laser-cutting a lot more. Oh, just thinking about all these parts I won't have to saw and sand... Nice thing about the laser is that it can also engrave without cutting--note the hinge center point on the aileron end rib.
Speaking of end ribs. There were 3 pieces labeled RS-535 in the rib kit. As far as I can tell, only 4 ribs are needed, and this type of plywood isn't used anywhere else in the ribs (some is used on the rudder, but that would be in a different kit I assume). Is this a spare piece they gave me, or did I miss parts that I need to make out of it?
Ari.
|
|
|
|
|
|
| djohn |
| September 6, 2007, 11:39am |
|
Ace
Posts: 648
Time Online: 24 days 19 hours 31 minutes
|
That laser really does a good job. What software did you use to lay the parts out in?
Dennis |
|
|
|
|
|
| iter |
| September 6, 2007, 4:09pm |
|
Ace
Posts: 512
Time Online: 309 days 1 hours 7 minutes
|
I used QCad (www.ribbonsoft.com)--this is the only CAD program I know of that runs on Linux. I used to write SVG by hand for laser jobs I outsourced in the past (until I found SawDustShop) and it worked well where the contractors could read it properly. I think I'll go back to writing SVG.
Ari. |
|
|
|
|
|
| iter |
| September 6, 2007, 8:41pm |
|
Ace
Posts: 512
Time Online: 309 days 1 hours 7 minutes
|
Hours today: 1
Running total: 70.5
Pulled staples out of the 6 ribs I made yesterday. 1.4 oz worth of staples were removed. Some got lost in the process, so I estimate a total penalty of 6 oz for the whole wing if you leave the staples in.
Ari.
|
|
|
|
|
|
| iter |
| September 6, 2007, 8:44pm |
|
Ace
Posts: 512
Time Online: 309 days 1 hours 7 minutes
|
My progress so far--18 ribs.
Ari.
|
|
|
|
|
|
| Gene |
| September 6, 2007, 10:54pm |
|
Ace
Posts: 283
Time Online: 9 days 1 hours 4 minutes
|
A box of 5,000 of the Duo-Fast staples I use wouldn't weigh 6 ounces and you don't have to pull them....! Your wing ribs look great....!
Gene |
|
|
|
|
|
| iter |
| September 7, 2007, 1:58am |
|
Ace
Posts: 512
Time Online: 309 days 1 hours 7 minutes
|
A drawing incorrectly printed?
It appears that part of drawing 14 in my set of plans hasn't printed correctly. It looks like a band is missing in the middle of the page (front spar, above "SECTION A-A" at the yellow arrows. Can anyone look at his drawing and tell me if it's different than mine?
Ari.
|
|
|
|
|
|
| djohn |
| September 7, 2007, 2:16am |
|
Ace
Posts: 648
Time Online: 24 days 19 hours 31 minutes
|
Hi Ari, You are correct. My plans are both Team, on the 1400Z it's drawing 16, on the 1600R it's drawing 17. Your copy was obviously a misprint. Mine show a elevation view just like the rear spar below but some of the dimensions and gussets are very different. I don't know what the difference between the 1100R and my two models are, I can take a picture tomorrow evening. My camera is at work.
Let me know
Dennis |
|
|
|
|
|
| Airbike1 Ron Franck |
| September 7, 2007, 4:57am |
|
 Flying an Airbike, building a house. Flight Leader  Posts: 107
Time Online: 2 days 13 hours 2 minutes
|
Man, I wish there was a woodshop like your's in my area. Nice parts. The metal working needs to be more precise. I don't know if its your layout or if you're not using the right fixturing to hold the parts from moving, but try to make them look as good as the wood stuff. I think you'll be happier once you do. Sorry, not picking on you, but the way they are made prevents them from being interchangable if one gets flipped over, etc. |
|
|
|
|
|
| iter |
| September 7, 2007, 5:43am |
|
Ace
Posts: 512
Time Online: 309 days 1 hours 7 minutes
|
Ron, thanks for the feedback. I love that shop, just found it, was looking for a place like that all my life! If only they did metalwork as well...
About the hinges--I agree that they could be better, and my sense of aesthetics hurts. But why would I want to flip them around? If I wanted to redo them, can I use steel bar from the hardware store, or do I need some sort of special material? (BTW, I think the reason they came out like that was that I had my drill press on too low RPM and the bit wandered).
Dennis, thanks for the heads up. I emailed John @ JDT, I assume he can mail me another copy of that drawing. I just wanted to make sure I'm not missing something, that the drawing is actually misprinted.
Ari. |
|
|
|
|
|
| Mike Howe |
| September 7, 2007, 11:30am |
|
MiniMax, Hawk, GA (Tipacer), another Max to finish AcePosts: 375
Time Online: 7 days 7 hours 30 minutes
|
I have a customer here in Grand Rapids, MI that does both wood and metal on the laser cutter! Mark Maker Inc. 616-538-6980. Steve Stout is the VP Production. It's a nice small shop that makes patterns for steel ruled dies and such. They have a couple lasers. One does flat work only, the other does both flat work on the table and round drum work on a special station. http://www.mark-makerco.com/Mike Howe |
|
Mike Howe
howetyr@yahoo.com
|
|
|
|
|
|
| Pilotpeat |
| September 7, 2007, 7:38pm |
|
Ace
Posts: 498
Time Online: 13 days 4 hours 21 minutes
|
Don't know on the minimax but the material called out on my drawings for my airbike say 4130 for the aileron brackets. 4130 is a lot stronger and stiffer than anything you could get at the hardware store. You might be able to find it at a metal supply, or I am sure that A/C spruce would stock it.
I havn't quite got as far as you on making those brackets but I am planning on stack drilling them so they all come out the same.
Pete |
|
|
|
|
|
| djohn |
| September 7, 2007, 8:14pm |
|
Ace
Posts: 648
Time Online: 24 days 19 hours 31 minutes
|
Pete, Stack drilling may not help and may actually hurt. The key is to: 1. have a sharp drill bit that is either a factory grind or the grind is absolutely centered, and make sure the chuck spins it true. you can tap most chucks into running true with little effort 2. center punch the hole location and center drill if you choose, but if you center drill don't use a drill diameter larger than the final drill bit center web thickness, or "fixture" for the holes (clamp a piece of stock on the drill press table with a stop at the end you can change for the different hole locations 3. turn the drill the correct speed (for a 3/8 drill use 800 rpm, it gets you 78 SFM (surface feet per minute)) 700-900 is a good range to hit around 80 SFM (which is appropriate for 4130 at rockwell C hardness from 18-26) much faster you will burn things and may work harden the mtl, any slower you will have a chatter problem and may walk off location. Also try to use some kind of sulfur based cutting oil to make the bit live. This may sound like I'm picking nits, but if you follow the above directions you will happily cut many holes on location with a normal drill bit. Hope your weekend goes well, for me I'm covering and painting my ailerons Dennis |
|
|
|
|
|
| iter |
| September 7, 2007, 10:03pm |
|
Ace
Posts: 512
Time Online: 309 days 1 hours 7 minutes
|
I have a customer here in Grand Rapids, MI that does both wood and metal on the laser cutter! http://www.mark-makerco.com/
Interesting website! Maybe I'll outsource some of the metal work. The cool thing about Sawdust is that they let you use their machines. You don't outsource the work, you do it yourself, and that's so much more fun. Their laser won't cut metal though, I'm quite sure of that. I just started using them, so I don't know what their policies are for cutting metal on their CNC router. Ari. |
|
|
|
|
|
| iter |
| September 7, 2007, 10:06pm |
|
Ace
Posts: 512
Time Online: 309 days 1 hours 7 minutes
|
Don't know on the minimax but the material called out on my drawings for my airbike say 4130 for the aileron brackets. 4130 is a lot stronger and stiffer than anything you could get at the hardware store. You might be able to find it at a metal supply, or I am sure that A/C spruce would stock it.
I haven't quite got as far as you on making those brackets but I am planning on stack drilling them so they all come out the same.
I actually drilled them as a stack. Well, drilled one hole in each and then put a bolt through that one and drilled the rest as a stack. Didn't help me any :=) Ari. |
|
|
|
|
|
| iter |
| September 7, 2007, 10:16pm |
|
Ace
Posts: 512
Time Online: 309 days 1 hours 7 minutes
|
I haven't done any metal work since high school and it shows.
1. have a sharp drill bit that is either a factory grind or the grind is absolutely centered, and make sure the chuck spins it true. you can tap most chucks into running true with little effort
How do you check that the chuck spins true?
if you center drill don't use a drill diameter larger than the final drill bit center web thickness, or "fixture" for the holes
I don't follow. What is the "web" in this context?
3. turn the drill the correct speed (for a 3/8 drill use 800 rpm, it gets you 78 SFM (surface feet per minute)) 700-900 is a good range to hit around 80 SFM (which is appropriate for 4130 at rockwell C hardness from 18-26) much faster you will burn things and may work harden the mtl, any slower you will have a chatter problem and may walk off location.
I had it set up for 660rpm and it walked off like you said.
Also try to use some kind of sulfur based cutting oil to make the bit live.
Anything in particular you can recommend? Again, my metalworking foo is really rusty (pun intended). Good luck with your ailerons! Ari. |
|
|
|
|
|
| djohn |
| September 8, 2007, 1:30am |
|
Ace
Posts: 648
Time Online: 24 days 19 hours 31 minutes
|
Quoted Text
How do you check that the chuck spins true?
I generally use a dial indicator, if you don't have one handy move something stationary very close to the tip of the drill that is mounted in the chuck and rotate the chuck slowly by hand. If the tip of the drill wobbles, bend the drill by hand-gently. They usually have some give or tap the end of the chuck body with a soft faced hammer (brass aluminum lead or something that will not dent the body) until the drill doesn't wobble.
Quoted Text
I don't follow. What is the "web" in this context?
The web I refer to is the center of the drill that is not ground to form the flutes. If you drill a pilot hole slightly smaller than the web, as soon as you break the surface the hole will guide the drill. Ideally, the hole should be "the size of the web". If the hole is larger than the web it has some room to move before it hits the resistance of the side of the pilot hole so it just figures, if you have to err-err to the small side. Make sure you form a good cone shaped dent with the center punch. It isn't just a mark, It should mechanically guide the pilot drill. If you center punch off center the hole will be off center. A good center punch dent and the right sized pilot will accomodate for a lot of drill bit wobble, of course the pilot should also run true.
Quoted Text
I had it set up for 660rpm and it walked off like you ...
That figures out to about 65 SFM which isn't all that far below the window, use pretty good positive pressure on the handle while pulling it through the material and it should help. I hope this helps, Dennis |
|
|
|
|
|
| iter |
| September 9, 2007, 7:36pm |
|
Ace
Posts: 512
Time Online: 309 days 1 hours 7 minutes
|
Hours today: 1.5
Running total: 72
Drew wing and aileron nose ribs.
Dennis, thanks for the explanation, I get it now.
Ari.
|
|
|
|
|
|
| Charlie Harris |
| September 9, 2007, 7:57pm |
|
Ace
Posts: 922
Time Online: 23 days 31 minutes
|
ARI; One thing about it if You know how to cut them this way, they are all the same, and You sure don,t have much waste. Charlie |
|
|
|
|
|
| iter |
| September 10, 2007, 6:24am |
|
Ace
Posts: 512
Time Online: 309 days 1 hours 7 minutes
|
Hours tonight: 4
Running total: 76
So I spent most of today doing CAD. I figure I'd have spent much more time trying to cut all these parts out by hand. I expect it will take a couple of hours to cut all of this on TUesday when I go to the shop.
The funny thing is, this is the second time I re-drafted the rib (first time was on paper when I was making the jig because my copy of the rib drawing was all skewed). This time around, I found myself thinking how much better the CAD drawing was, and how I should really laser-cut a jig and ll the ribs will /really/ be the same and would actually match the 1/4" end rib covers... OK, never mind, I'll just go back to finishing my ribs :=)
Charlie, thank you for your kind words. I hope this actually works out and I haven't made some stupid mistake in the DXF... That would be a good way to produce much waste very quickly :=)
Ari.
|
|
|
|
|
|
| Stilson |
| September 10, 2007, 8:47am |
|
Flight Leader Posts: 136
Time Online: 1 days 5 hours 36 minutes
|
Ari, I have been following your build with great interest. Sort of a real-life 'builder's manual' for me I have just received my Eros rib & tail kits, and this laser cutting seems like just the solution for me. I have found a shop locally that will cut for me. Just a question, does the edge burn on the cut parts need to be sanded, or is it quite deep? Does it affect the glue or should I stop worriyng now and get started? Many thanks for sharing your experience. Colin. |
|
| Logged |
|
|
|
|
| iter |
| September 10, 2007, 3:48pm |
|
Ace
Posts: 512
Time Online: 309 days 1 hours 7 minutes
|
Colin, I'm glad you find my posts useful. I've built a number of laser-cut R/C models and never had problems gluing to a cut line. With my MiniMAX, all glue joints have been on unburnt sides so far--the first time I'll put glue on a cut line will be when I glue nose ribs in. However I don't anticipate trouble there. I'm not sure what you mean by a deep burn. One thing to keep in mind is that in JDT kits a lot of the plywood comes cut into thin strips, e.g. you are supposed to cut rib gussets from a 7/8"x48" strip. These will be difficult to cut on a laser. When you order your next kits, if you decide to go the laser route, you may want to ask JDT to not cut these pieces into strips.
I'm looking forward to reading about your experience with your kit!
Ari. |
|
|
|
|
|
| Stilson |
| September 10, 2007, 4:23pm |
|
Flight Leader Posts: 136
Time Online: 1 days 5 hours 36 minutes
|
Ari, Thanks for your advice. You are correct, I have not unpacked the kit yet so the plywood may be in small strips. I will try check that tonight, I've been too busy studying the plans By deep burn I meant what would happen if you lightly sanded the edges? Or would you have to take off a lot of material before it's clean? I will most definitely start a new thread for my build once it gets going. First have to sort the garage, build a table, finish desks in my home office for junk in garage etc etc. But in the meantime that's the beauty of homebuilding, I can work on the ribs in front of the TV, while wearing my pyjamas  Regards, Colin. |
|
| Logged |
|
|
|
|
| flybob13 |
| September 10, 2007, 8:32pm |
|
Ace
Posts: 222
Time Online: 5 days 20 hours 43 minutes
|
Sweet, thanks for the visual!!! Bob |
|
|
|
|
|
| djohn |
| September 10, 2007, 8:48pm |
|
Ace
Posts: 648
Time Online: 24 days 19 hours 31 minutes
|
Quoted Text
I can work on the ribs in front of the TV, while wearing my pyjamas
I usually work on my ribs in the backyard, fully clothed, with a frosty beverage Dennis |
|
|
|
|
|
| Tom |
| September 10, 2007, 8:52pm |
|
Ace
Posts: 744
Time Online: 16 days 10 hours 21 minutes
|
Water jet might be an option? The plywood would dry in a short time and no burned surface. In my area, western PA, laser cutting is harder to find than water jet. |
|
|
|
|
|
| iter |
| September 11, 2007, 3:41am |
|
Ace
Posts: 512
Time Online: 309 days 1 hours 7 minutes
|
Hours today: 7
Running total: 83
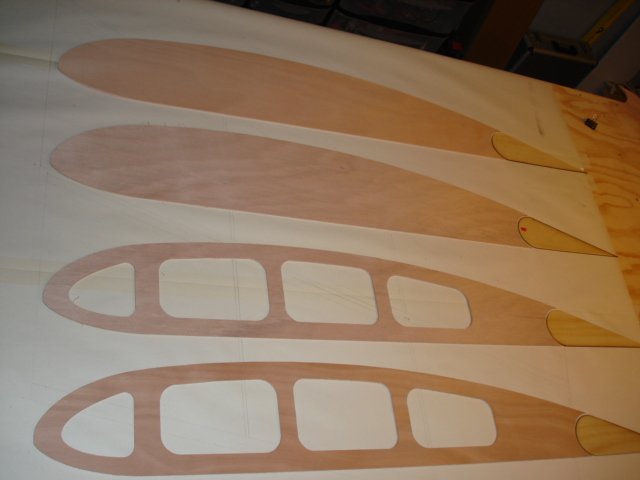
Cut all 1/8" nose ribs, including wing and aileron. Cut 1/8" root and tip rib doublers. Failed to cut 1/4" nose ribs. Sort of cut 1/4" reinforcements for aileron hinges. First the good:
I cut out all 16 main nose ribs and 18 aileron nose ribs in less than an hour. The are all identical, but I marked them win "L" or "R" and station number because I keep getting confused which ribs have 1/8" noses and which have 1/4". Hopefully I got it right when I did the DXF. There are gaps in the sequence because some ribs have only 1/4" noses.
The laser has a working area of 24"x18", so I had to cut the plywood in half (and you wondered why I had a 24" marker in the file) The ribs came out looking very good and uniform. The burn doesn't seem to me to be a problem. You could sand it off, but to me that misses the whole point of using CNC :=) I have no experience with waterjets, but I hear they work pretty well.
|
|
|
|
|
|
| iter |
| September 11, 2007, 3:59am |
|
Ace
Posts: 512
Time Online: 309 days 1 hours 7 minutes
|
Also good--since the biggest piece that can fit in the laser is 24"x18", I used a CNC mill to cut 1/4" root and tip doublers. This machine has a completely different approach to control software and a steeper learning curve. I ruined a 48x7 piece of plywood the first time I tried to use it. But it is also very satisfying to watch the thing do all the hard work for you once you set it up correctly. From one day worth of experience working with it, it seems that the main problem with this type of machine is securing your parts to the worktable. On a laser, a part that you cut out stays on the table. On the mill, it becomes a free projectile if you hadn't nailed it to the table. 1/8" plywood was easy enough to secure--the stapler I use for making ribs works. The problem is knowing before hand where to staple so that both the part and the margin are secured to the table, and so that the router bit doesn't go through a staple. Securing 1/4 plywood is going to be more of a challenge.
The cut is very clean, and since the lasered and the milled parts came from the same DXF, they are identical. They also connect well with the aileron end ribs I cut earlier.
|
|
 |
|
|
|
|
|
|
| iter |
| September 11, 2007, 4:08am |
|
Ace
Posts: 512
Time Online: 309 days 1 hours 7 minutes
|
The bad--I wasted 3 hours trying to laser-cut 1/4" ply. The laser just won't go through it. I tried everything, high power, low power, multiple passes, but all I got was bad burn and flames. The wood actually was on fire inside the laser for a few seconds until I stopped it. I'll have to come back and mill these parts on the CNC router as soon as I figure out how to secure them. It will have to be next week though. Sawdust Shop only lets you use the laser and the CNC mill 2 hours a week each, and I went over quota on both today.
|
|
|
|
|
|
| iter |
| September 11, 2007, 4:15am |
|
Ace
Posts: 512
Time Online: 309 days 1 hours 7 minutes
|
The ugly--I discovered clothespins today. Turns out I can use them instead of stapling gussets to the reverse of a rib. I still need to use them on the front or the rib will fall apart when I pull it out of the jig, but not on the reverse! No staples to drive and no staples to pull. This is a #5 rib which will have an aileron hinge in it and consequently has 1/4" reinforcements. I sort of managed to cut them on the laser today, but the parts came out really ugly, with a lot of burn and took much manual work to finish.
I've gone though almost all of the material in the rib kit. I might redo the metal parts, but otherwise the end of the ribs is in sight.
Ari.
|
|
|
|
|
|
| djohn |
| September 11, 2007, 7:04am |
|
Ace
Posts: 648
Time Online: 24 days 19 hours 31 minutes
|
Ari, I usually predrill "hold down" holes in parts that will be too small for the universal vacuum table to hold on the router I use. I also use tiny wood screws or finishing tacks on parts like the ribs you are trying to cut. Also make one pass around the part at .020 less that the thickness of the plywood. If the plywood is .250 make your first pass at Z-.230 1/8 2 flute end mill (router bit) @24000 rpm and 350 ipm and make last pass at Z-.248 and 250 ipm. The combination of a small screw or tack and leaving just a hair of material on the cut makes for a far better yield (read less flying rib parts) that is until you want them to fly. You will have to very lightly trim the parts to get the remnants of the .002 you left on the part. You may not have to tack thru the parts if your router runs accurate in Z.
HTH
Dennis |
|
|
|
|
|
| iter |
| September 12, 2007, 7:26am |
|
Ace
Posts: 512
Time Online: 309 days 1 hours 7 minutes
|
Hours today: 2
Running total: 85
pulled staples out of last night's rib and built two more--another #5, and the left root rib. This one is covered with 1/8" plywood and took some planning. I figured it out eventually, though I'm still not sure what to do for the two ribs that have plywood on the left side. Instructions have you dry-staple gussets, remove the rib from the jig, staple gussets on the other side, then pull dry staple and glue and staple plywood on the left side. Does this actually work, or will my ribs fall apart by the time I'm done stapling?
I made a slight modification to the jig to allow gluing in 1/4" reinforcement blocks concurrent with making the rib. Plans have you build your rib first, then cut away the relevant gussets and glue in the plywood blocks. I wanted gussets on both sides of the blocks, and to be able to fit things exactly, I removed two cams and a block from the jig, and was able to lay and dry-fit everything without gussets.
The way you build MiniMAX ribs is with cap strips too long and then cut them once the glue is dry. (at point shown in red). That's easy enough for normal ribs, but end ribs have plywood sides, so I'll have to cut the strips on the plywood. You can't cut them until the glue is dry because you need pull their ends together with temporary member outlined in blue.
I have 21 ribs at this point. 3 more to go!
Ari.
|
|
 |
|
|
|
|
|
|
| Pilotpeat |
| September 12, 2007, 7:24pm |
|
Ace
Posts: 498
Time Online: 13 days 4 hours 21 minutes
|
I did it like the plans call for and they turned out good. Dry stapled with just the ends of the capstrip glued, removed from jig, glued stapled second side, then removed dry stapled gussets. Worked perfectly.
I just finished the aileron fillers last weekend. Instead of cutting out the gussets to fit the fillers in I installed the fillers before the second set of gussets went on. This worked well. I just had to do a little sanding on the corners where the filler would have hit the glue that squezed out from the first set of gussets. I epoxied the second side of gussets when I epoxied in the fillers so I wouldn't have to deal with glue squeze out where the second side gussets went.
The end ribs you might epoxy the plywood on at the same time as epoxing the fillers in. I didn't and got carried away and started putting gussets where the plywood was supposed to be. Fortunalty I figured out my mistake before the epoxy cured and I was able to get them back off without too much trouble. |
|
|
|
|
|
| iter |
| September 14, 2007, 8:05am |
|
Ace
Posts: 512
Time Online: 309 days 1 hours 7 minutes
|
I don't know if you can see it in the photos, but I glued two blocks in when I was building the rib. The only part I didn't glue in was the 1/4" aileron nose rib because I don't have them yet (1/4" ply didn't cut on the laser), but these are not that important at this stage because no gussets cover them. I prefer to put the fillers in at the same time with everything else so I don't have to deal with dry glue that interferes with fit. I assemble both sides of a rib on the same batch of epoxy, including the big plywood on end ribs.
Speaking of which, I built the right tip rib. Running total hours: 86.5
Ari.
|
|
|
|
|
|
| iter |
| September 15, 2007, 8:06am |
|
Ace
Posts: 512
Time Online: 309 days 1 hours 7 minutes
|
Hours today: 1.5
Running total: 88
These last ribs are taking a lot of time to make! I built the left tip rib today. One more to go.
JDT kindly mailed me a good copy of the wing spar plan which was misprinted in my set (see post #72 above). Nice of them. Does anyone know if someone from JDT (John?) reads this forum?
Ari. |
|
|
|
|
|
| iter |
| September 16, 2007, 8:10am |
|
Ace
Posts: 512
Time Online: 309 days 1 hours 7 minutes
|
Hours today: 1.5
Running total: 89.5
Built the right root rib. This is the last rib I had to assemble. There is still much cleaning up to do and then the hinges.
Ari. |
|
|
|
|
|
| iter |
| September 21, 2007, 7:28am |
|
Ace
Posts: 512
Time Online: 309 days 1 hours 7 minutes
|
Hours today: 8
Running total: 97.5
CNC-cut 1/4" nose ribs, glued in aileron hinge supports into relevant ribs.
The ShopBot CNC router is a really sweet piece of equipment once you actually get it going, but fiddling with the software can take half the day. Anyway, I cut 1/4" the parts today, following loosely on Dennis' suggestion. The driver software lets you leave "tabs" around parts you cut, it's like having that little bit of material still holding the part like Dennis said, only it isn't all around your part but rather in 1"-long strips. Still, I had to sand a lot of wood after breaking my parts out. Nothing like the clean, ready-to-use finish the laser produces. Too bad it didn't have the teeth to cut 1/4" ply. I laser-etched inscriptions on my pieces after I was done cutting to go along with etching on my 1/8" pieces.
To put aileron hinges in, I need to have 1/4" aileron nose ribs in root, tip and #5 ribs, so I glued those in. I want to leave the other nose ribs off until I'm further along building the wing, in particular, until I have the aileron spar web installed so I can glue the nose ribs to it.
The 1/4" square RS-1 isn't always exactly 1/4", so I had to file verticals on all ribs that need this part to allow a 3/4" square hinge support to contact the plywood.
Root and tip ribs have the 3/4" supports, 4 ribs in all. I drilled pilot holes in them where ailerons will hinge. In hindsight, I should have cut holes in aileron end covers instead of just marking thir centers. Finding these centers took some effort and a flashlight through the pilot hole.
Ari.
|
|
 |
|
|
|
|
|
|
| Chase |
| September 21, 2007, 2:02pm |
|
Guest User |
Ari,
Thanks for the regular updates, photos and time log. It is really informative and clearly illustrates what is involved in building a minimax.
I'm a lurker but hope to build one some day (after getting my sport/private cert). I also have RC background - 9 years flying nitro, gliders and e-helis.
Mike |
|
| Logged |
|
|
|
|
| 10 |
| September 22, 2007, 12:40am |
|
Guest User |
Ari, while you are at this stage of building, I might suggest you "beef" up your gussets on all your ribs where the trailing edge strip will be epoxied. I would epoxy spare1/4" pine strips along each side of the gussets where I marked your photo in black. That would eliminate the "dreaded edge curl" that has been posted in the past. You might want to research past posts on this subject. This is the only (and minor) design flaw in the Minimax line of planes that I know of. Below is what happened to my wing if you don't strengthen the gussets. Harold
|
|
| Logged |
|
|
|
|
| iter |
| September 23, 2007, 10:18pm |
|
Ace
Posts: 512
Time Online: 309 days 1 hours 7 minutes
|
Harold, thanks for your input and graphics. Am I correct thinking that fabric tension causes the curl as it pulls the trailing edge (RS-17?) up? If so, wouldn't it be better to glue in the reinforcements you mention after the trailing edge is in place? This way I'd be sure the will have good fit both to the rib and the trailing edge.
Ari. |
|
|
|
|
|
| 10 |
| September 23, 2007, 11:48pm |
|
Guest User |
Ari, The fabric got tighter for two different reasons. 1. When I applied paint and it dried. 2. When the plane was out in the sun. As for the reinforcements, I think you can do it either way, if you do it now, you'd have to have the 1/4" pieces perfectly flush with the gusset edges (simple clamp job) and then later epoxing the LE to the gussets (and the reinforcements) would be a one step process. If you do it later it would be easier to align the reinforcements onto the LE but you'd have a lot of little parts to watch while the epoxy dries because it may be harder to clamp. Since this problem happend to me "after the fact" I don't now when it would be the best time to beef up your trailing edges. Most importantly, I wanted to let you know of the problem. The pic below is what I had to go through to fix the problem a day before my plane's maiden flight. Harold
|
|
| Logged |
|
|
|
|
| iter |
| September 24, 2007, 2:04am |
|
Ace
Posts: 512
Time Online: 309 days 1 hours 7 minutes
|
Thanks for sharing your experience Harold. I think I will take more complex clamping and easier alignment and delay this job. I wonder how common this curl is?
Ari. |
|
|
|
|
|
| Mike Howe |
| September 24, 2007, 4:48am |
|
MiniMax, Hawk, GA (Tipacer), another Max to finish AcePosts: 375
Time Online: 7 days 7 hours 30 minutes
|
The curl issue is real and could happen to any of us. Most of us have either guled a piece of wood in place like Harold has done, or made deep fillets of epoxy and filler material. Some use flox and epoxy, I used sawdust and epoxy. Either way, if you do this, make a stif mixture and wipe in a fillet on each side. Once it is all hardened up you can grind/sand it to form with a dremel tool. I did this after the trailing edge was on and also went back when fitting the aileron and sanded the wood and fillets for clearance and fit.
Mike |
|
Mike Howe
howetyr@yahoo.com
|
|
|
|
|
|
| iter |
| September 24, 2007, 7:07am |
|
Ace
Posts: 512
Time Online: 309 days 1 hours 7 minutes
|
Guys, thank you so much for bringing this up. I was completely unaware of this problem and would have built per plans if you hadn't generously shared this information with me. I love this forum!
BTW, is there any reason not to use microbaloons for epoxy filler?
Ari. |
|
|
|
|
|
| iter |
| September 24, 2007, 8:31am |
|
Ace
Posts: 512
Time Online: 309 days 1 hours 7 minutes
|
Hours last three days: 7
Running total: 104.5
I drilled root, tip and #5 ribs, cut bushings from a steel tube and installed the hinges. Remembering the difficulties I had when drilling bearing brackets, and realizing how important it is to have hinges that are centered in the aileron, I used better clamping this time. It worked, and my holes were where I wanted them this time. I cut a few extra bushings just in case (4 more are needed)
I finally cut ends off the ribs. I got so used seeing them with protruding cap strips, it felt weird to have them flat.
One thing I did that was maybe not 100% required was go over every rib and sand any gussets that protruded outside its profile. I figure this will make covering that much easier and tidy. In the process, I also found a number of gussets that didn't bond tight enough to the RS, so I went back and touched them up with epoxy.
Ari.
|
|
|
|
|
|
| iter |
| September 24, 2007, 8:38am |
|
Ace
Posts: 512
Time Online: 309 days 1 hours 7 minutes
|
Stacks of ribs always make good photos. I though I was getting carried away taking pictures until Irene decided she could get a better perspective on them :=)
Ari.
|
|
|
|
|
|
| Gene |
| September 24, 2007, 1:20pm |
|
Ace
Posts: 283
Time Online: 9 days 1 hours 4 minutes
|
I would suggest that you modify the trailing edge of your wing and enclose it similar to what is shown in this picture. That avaoids several problems...!
Have a great day...!
Gene
|
|
|
|
|
|
| Gene |
| September 24, 2007, 1:26pm |
|
Ace
Posts: 283
Time Online: 9 days 1 hours 4 minutes
|
My suggestion wasn't very complete....! The "red" portion is a short length of 1/4" x 1/4" spruce that is glued in and then cut out along the line shown in green. This supports the 1/32nd piece of plywood that is glued in where the "green" line is. This totally encloses the back end of the wing and provides lots of strength, etc in this area. No more failures like shown in earlier pictures.
Let me know if you need more info.
gene |
|
|
|
|
|
| Omega |
| September 24, 2007, 6:54pm |
|
Guest User |
BTW, is there any reason not to use microbaloons for epoxy filler?
Microballoons is made to be used as an epoxy filler. The composite plane guys use it as a light weight sandable filler. It is in no way to be used for something structural.
Always use Flox (cotton fiber) in epoxy for fillets. Flox is used for structural joints.
|
|
| Logged |
|
|
|
|
| 10 |
| September 24, 2007, 8:38pm |
|
Guest User |
Gene, I don't understand how your mod will keep the trailing edges from ripping off like in my photo above. What you have shown in red doesn't seem to have any contact with the trailing edges. This has been a major problem for me and a lot of others. On my plane, three out of the four TEs had the center 5 gussets seperated. I took your photo and indicate one of the TE attachment positions in blue to illustrate what I'm saying. The 1/4" reinforcement strips are along each side of the gussets to provide more surface area that the TE can be expoxied to, thus handling the force from the tight fabric. Harold
|
|
| Logged |
|
|
|
|
| 10 |
| September 24, 2007, 8:54pm |
|
Guest User |
Here's what a seperated trailing edge looks like from the outside. I now check that on every pre-flight by looking down standing at the wingtip to see if the the space between the aileron and TE is an even 1/4" the whole length. What you see is about a 1" gap in the middle of the wing. Harold
|
|
| Logged |
|
|
|
|
| Gene |
| September 24, 2007, 8:58pm |
|
Ace
Posts: 283
Time Online: 9 days 1 hours 4 minutes
|
Harold,
You have totally misinterpreted the modification. The portion shown in red is only a short piece of 1/4" stock that is glued in parallel to the vertical in the rib which then provides shape and support for the 1/32" plywood that is shown in green.
The 1/32" plywood does glue to the trailing edge strips, connecting the two together and also closing in the backside of the wing. The trailing edge will never pull up as shown in your picture....! I'll try to find another picture that shows it all put together.
The biggest problem one might have with this concept is leaving enough space between the aileron and the wing as at least three layers of fabric and some paint have to go in that space and it takes a whole lot more than one might guess....!
Gene |
|
|
|
|
|
| 10 |
| September 24, 2007, 10:02pm |
|
Guest User |
Ok I understand now, I wasn't visualizing real well what you were doing. What you have in green is not just at the rib, but down the whole length of the TE. That would work great plus keep them mud daubers out! Harold |
|
| Logged |
|
|
|
|
| Gene |
| September 24, 2007, 11:51pm |
|
Ace
Posts: 283
Time Online: 9 days 1 hours 4 minutes
|
Harold,
I hope these two pictures give you an even better idea of what I'm suggesting. Have a SUPER day....!
Gene
|
|
|
|
|
|
| iter |
| September 25, 2007, 12:06am |
|
Ace
Posts: 512
Time Online: 309 days 1 hours 7 minutes
|
Hard to believe, but I think I've finished the ribs. I spent 95 89 hours and 2 months doing that. Here are my two wings :=)
Thanks for sharing your views on TE curl and remedies. I'll follow this advice when I get to cutting the ailerons off.
Ari.
|
|
|
|
|
|
| 10 |
| September 25, 2007, 12:09am |
|
Guest User |
Thanks Gene, Thats excactly what I thought, Sweet! I wish I would of thought of that in the first place. Shouldn't add too much weight either (my plane is E-LSA certified so it really doesn't matter now). I plan on moving my plane from Texas to Georgia next year and doing some major, major changes. Could I do this mod in the process? Harold
P.S. one of the major changes I have in mind is running a PVC pipe to route all the wiring from the engine fire wall straight to the instrument panel instead of through the firewall, over the gas tank to the panel. Ever hear of that? |
|
| Logged |
|
|
|
|
| Gene |
| September 25, 2007, 1:44am |
|
Ace
Posts: 283
Time Online: 9 days 1 hours 4 minutes
|
Harold,
I don't know why you couldn't go back and do this mod at a later time. As I see it, the only problem you will have is making sure you have enough clearance between the trailing edge of the wing and the aileron. A big part of the required clearance is the straightness of the wing and aileron.
I have never heard of using a PVC pipe for running wires through the firewall, but I suppose it could be done. I'd like to see some pictures after you're done.
Gene |
|
|
|
|
|
| iter |
| September 25, 2007, 3:54am |
|
Ace
Posts: 512
Time Online: 309 days 1 hours 7 minutes
|
Now that I'm done with ribs, I want to start on the fuselage, so that visitors will see something that looks like an airplane. The question comes up about storing ribs. They don't fit into any boxes I have, and some of them (the ones with hinges) are odd shapes and can damage other ribs if I store them in a stack. I'd appreciate any input you guys have on this.
Ari. |
|
|
|
|
|
| Pilotpeat |
| September 25, 2007, 8:16am |
|
Ace
Posts: 498
Time Online: 13 days 4 hours 21 minutes
|
Hey, nice job on those ribs. I think I'm closer to 3 months and 150 hours and I'm not quite to where you are with your ribs. I still have to make and install the plywood sheets for the end ribs, finish up my aileron brackets and a couple other small things. I did finish installing all of my gussets last night though. I promised my wife I would take her out to Outback for "ribs" when I got my "ribs" done. Looks like it might happen in the next week or two. On storing finished ribs, a lot of pictures I've seen has them hanging off of a wall on two hooks. The hooks or dowels need to be longer than the stack of ribs is tall and you just set the ribs on them with the dowel or hook under the top capstrip between the diagonals. I'm sure someone else had a picture. I haven't made a place to hang mine up quite yet but I will be soon. Pete |
|
|
|
|
|
| Randy lewis |
| September 25, 2007, 11:48pm |
|
Ace
Posts: 965
Time Online: 21 days 18 hours 20 minutes
|
Ari,
The wings might be easier to store while you work on the fuse as opposed to the other way around. You can hang them from the ceiling above the garage door, at least I could, giving you more room. |
|
|
|
|
|
| 10 |
| September 26, 2007, 12:00am |
|
Guest User |
Ari, when you finish your wings, they can take up a lot of space. I made a simple PVC hanger for mine and stored them vertically. You could possible make something similar and hang them horizontally from the ceiling. The picture is from an old digital camera, but you can see how it worked. It was easy to slide the wings in and out of the holders. Might be trickier horizontally or almost impossible to do. I don't know. My workshop was 30X30 so it was easier to do it this way. Harold
|
|
| Logged |
|
|
|
|
| Charlie Harris |
| September 27, 2007, 4:37pm |
|
Ace
Posts: 922
Time Online: 23 days 31 minutes
|
I always thought you should put them behind the couch in the Den, but my wife did'nt like it too much. Charlie |
|
|
|
|
|
| iter |
| September 28, 2007, 6:12am |
|
Ace
Posts: 512
Time Online: 309 days 1 hours 7 minutes
|
Hours today: 3
Running total: 107.5
Thanks for storage ideas. I like the two hooks idea. While I'm contemplating rib storage, I started CAD work for the fuselage. I've already drawn full-size paper plans for fuse and the tail feathers, but I decided it was worth my time to redo these in CAD. The main reason is that I'm planning to laser- or CNC-cut the plywood and if I'm doing the plywood pieces I might as well do the whole thing to be sure the frame lines up with the plywood. An added bonus is that I can easily see angles between members which should be handy when I set the miter to cut them. This DXF file reproduces dwg 1"fuselage side view."
Speaking of paper plans, I forgot all about them when I summed my hours. The correct figure is 89 hours to build the ribs.
Ari.
|
|
|
|
|
|
| Charlie Harris |
| September 28, 2007, 11:19am |
|
Ace
Posts: 922
Time Online: 23 days 31 minutes
|
Gotta count it all, building, cutting, sourceing, studying. it's all for the plane injoyment. Charlie |
|
|
|
|
|
| iter |
| September 30, 2007, 8:13pm |
|
Ace
Posts: 512
Time Online: 309 days 1 hours 7 minutes
|
Hours today: 2
Running total: 109.5
I found that my finished ribs fit into the box JDT shipped the wood to me, except the 4 end ribs which are too long. I had a midair with one of my R/C models recently, so space opened up on the ceiling.
I spent a couple more hours drawing DXFs for various parts of the fuselage when it hit me that if I start building the fuselage now, I'll lock myself into a particular kind of engine, and I haven't made that decision yet. So it is possible that I'll start on some other part next, not the fuse.
Ari.
|
|
|
|
|
|
| iter |
|
Ace
Posts: 512
Time Online: 309 days 1 hours 7 minutes
|
Hours today: 3.5
Running total: 113
I decided to wait with the fuselage and build the tail next. I started laminating RS-17 leading edges for fin and elevator and cutting aluminum parts.
Ari.
|
|
|
|
|
|
| iter |
|
Ace
Posts: 512
Time Online: 309 days 1 hours 7 minutes
|
Hours today: 5
Running total: 118
I finished the RS-500 aluminum parts today, and decided to do some more metal work. I wanted to connect the parts I'd made to something, so I made more parts. I now have a finished control stick assembly, the only thing missing is the plastic brackets that mount it to the airframe. The RS-701bearing brackets that hold the stick are the same parts that hold the ailerons. I was amazed how much easier it was to make these compared to the first batch, how much better they came out and how much faster!
Ari.
|
|
|
|
|
|
| skyblazer |
|
Ace
Posts: 213
Time Online: 29 days 11 hours 48 minutes
|
Ari:
Looks like your going to have a nice neat plane when finished, keep on with with the work and PICS of progress..
Dwight (AKA Skyblazer) |
|
|
|
|
|
| iter |
|
Ace
Posts: 512
Time Online: 309 days 1 hours 7 minutes
|
Thanks Dwight! Encouragement like this keeps a builder going.
Ari. |
|
|
|
|
|
| iter |
|
Ace
Posts: 512
Time Online: 309 days 1 hours 7 minutes
|
Hours today: 7
Running total: 125
Finished the stick assembly, including plastic support bearings and thrust collar; installed aileron control horns, made elevator control horn and sundry aluminum fittings for Teleflex cables.
More aluminum shaping today. I think I have most if not all of the aileron and elevator control systems finished. There is nowhere to install them yet, of course, but I think I'm done making fittings for them.
Ari.
|
|
|
|
|
|
| iter |
|
Ace
Posts: 512
Time Online: 309 days 1 hours 7 minutes
|
There are two problems I ended up with today. One is that I can't find any mention of how to connect the elevator horn. I assume there is a bolt and perhaps a bushing involved, but I see no mention of it in the plans. Any suggestions?
The other is that I made the aileron yoke the wrong shape--5/16" shorter than the plans (blue line). This causes the aileron Teleflexes to bind on the elevator one at fairly small stick deflections and reduces effective aileron travel available. And I was so proud of my aluminum work :=) As I see it, I could make a new yoke (where do you buy a small piece of aluminum, and what type of aluminum is it?) or I could add little triangles made out of RS-500 scraps (red line) and use the one I made. Suggestions welcome.
Ari.
|
|
|
|
|
|
| djohn |
|
Ace
Posts: 648
Time Online: 24 days 19 hours 31 minutes
|
Hi Ari, You have really done a great job to date. Don't cheat now. We all make boo boo's and the stock you have cut too short is relatively cheap. My plans call RS500 1/8" 6061 T6. I just looked at Mcmaster Carr's site, a piece of it 12" x 12" is $26 plus shipping. It can be had much cheaper depending on your local sources. There may be a supply house near you that will sell you a "drop" for way cheaper. IMO this is a part you don't want to compromise on. The way you have planned on modifying it it would require one of the "patch plates" on each side of the yoke with a spacer in the middle, then you're rod end fittings will be too short etc...
Sometimes you can find raw material real cheap on ebay and sometimes you also can get a mtl cert with it if you require that.
I have seen steel tubing used for the elevator horn. The tube is just the right size to slide into the clevis and when the bolt is tight the tubing is held stationary in relation to the horn and swivels on the inside of the clevis end. The inside of the tube will barely clear the 10-32 (an3) bolt diameter, and cut the ends very square to keep them from binding in the clevis. Do not let anything move on the bolt diameter, all of the movement must be in relation to the steel tubing and the clevis with a little grease.
Hope this makes sense
Dennis |
|
|
|
|
|
| iter |
|
Ace
Posts: 512
Time Online: 309 days 1 hours 7 minutes
|
Dennis, thanks for your kind words and advice. I hear what you're saying about not compromising. I cut these pieces by hand (SawDushShop doesn't allow metal cutting) and had to spend a lot of time fitting them--not all holes matched, etc. Making a new one means restarting all that... Btw, why do you think I'd need a 3-layer sandwich with "patch plates?" I was going to just use one triangle. The only forces on this part are in the direction of the green arrow. Is there something that is trying to bend the yoke, or is there another reason you'd need the extra thickness?
Re the elevator horn. Is the setup you describe the same as is used on the other side, where the clevis connects to the stick through an RS-600 bushing?
Ari.
|
|
|
|
|
|
| djohn |
|
Ace
Posts: 648
Time Online: 24 days 19 hours 31 minutes
|
Ari, I am not an expert by any means and there are a lot more qualified people on the board to comment on the specifics, I think the patch will create side loads on the yoke which will induce slight twisting of the yoke and possible fatigue of the patches or yoke over time. there would also be three times the hardware for this connection which is just more stuff to check and possibly service. Any deviation in the mounting of a teleflex cable in my opinion is adding risk to your aircraft. Any engineers or fabricators want to step in here, I may be being too precautionary.
I am going to try to cut a similar part on my CNC router at work. The equipment reseller assures me that if I use high speed machining parameters it will cut non-ferrous metals with no problems. If this is the case I might be able to carve one out for you.
Elevator horn is similar to the teleflex cable attachment on the elevator axis of the stick where the bushing is bolted solid and the clevis moves on it.
Dennis |
|
|
|
|
|
| iter |
|
Ace
Posts: 512
Time Online: 309 days 1 hours 7 minutes
|
Dennis, that is a very generous offer and will be most deeply appreciated. I still have a lot of time before I'll actually need the control stick assembly.
Thank you for the elevator horn description. After days of looking for it in the plans, I found it and it was exactly as you described.
Ari.
|
|
|
|
|
|
| iter |
|
Ace
Posts: 512
Time Online: 309 days 1 hours 7 minutes
|
Hours yesterday: 3
Running total: 128
I made hinges for rudder and elevator. I decided I wanted them installed before I assembled the tail surfaces as a single RS is much easier to maneuver around a drill press than a whole elevator for instance. I cut some extra pieces off the hinges because they weren't connected to anything that bears any load. I saved a tiny bit of weight (1.3oz) and ended up with shorter slots in trailing edges. I left of drilling the hinges until after I have slots they fit into so I could meet that the exact clearances specified in the plans. I drilled the wood first, then cut slots, then inserted the hinges and drilled them through existing holes in the wood.
Ari.
|
|
|
|
|
|
| iter |
|
Ace
Posts: 512
Time Online: 309 days 1 hours 7 minutes
|
Hours today: 8
Running total: 136
I finished the CAD for vertical tail and had it printed. The tail is at this odd angle so if would fit on a 36" roll of paper in one piece. For $13.25 including tax, I have a full-size drawing to work with and a guarantee that the gussets I laser-cut will fit what I build. I didn't have time to cut the gussets today, hopefully tomorrow.
I did rout the laminated leading edges, fit rudder hinges and glued up the fin. No gussets today, but it should hold OK until I glue them in.
Ari.
|
|
|
|
|
|
| iter |
|
Ace
Posts: 512
Time Online: 309 days 1 hours 7 minutes
|
BTW, here's what the hinges ended up like. These are both from the rudder side, I can't touch the fin until it's dry.
Ari.
|
|
|
|
|
|
| 10 |
|
Guest User |
Quoted Text
The tail is at this odd angle
I've posted a lot of pictures on this board and no one has noticed that I didn't have that "odd angle" on my tail. The top front of the vertical tail has been lowered by about 2 1/2 inches to be parallel with the bottom of the tail. I just think it gives a sleeker look. That's the only change in original design my plane has. Harold
|
|
| Logged |
|
|
|
|
| iter |
|
Ace
Posts: 512
Time Online: 309 days 1 hours 7 minutes
|
Hours today: 4
Running total: 140
That's a nifty airplane Harold, whichever way you slant the tail! I'm surprised nobody picked up on this modification you made, usually people here are quite keen to point out what they think is a deviation from plans :=)
I had a bad day with the laser today, so I only have about half the gussets I need for the tail. I did cut the fin ribs though. Oh, and where the plans say install blind nuts before installing this member in the fin, they mean it. I wasted an hour trying to screw them in today after the fin was dry.
Ari.
|
|
|
|
|
|
| iter |
|
Ace
Posts: 512
Time Online: 309 days 1 hours 7 minutes
|
Hours yesterday & today: 4
Running total: 144
Finished DXF for horizontal stabilizer.
|
|
|
|
|
|
| iter |
|
Ace
Posts: 512
Time Online: 309 days 1 hours 7 minutes
|
Hours tonight: 2
Running total: 146
Laid up the rudder. I'm still missing some of the gussets--I should have them early next week.
|
|
|
|
|
|
| iter |
|
Ace
Posts: 512
Time Online: 309 days 1 hours 7 minutes
|
Hours today: 3
Running total: 149
I had full-size plans printed for the horizontal tail and started working on it. Tonight I drilled the spars for hinges. It's awkward maneuvering 90" pieces of stock around my garage, and there was no way to drill them where my drill press normally lives. I had to move it to the worktable temporarily and use some plastic boxes to support the other end of the piece.
Ari.
|
|
|
|
|
|
| iter |
|
Ace
Posts: 512
Time Online: 309 days 1 hours 7 minutes
|
Hours today: 11
Running total: 160
I finally cut all the gussets for tail surfaces and started putting them in place. I also laid up the elevator. I love the PVC pipe clamps. I had a piece of black sewer pipe from when I moved the washer around, and I bought some 3" white pipe, 10' for $4, enough to build three airplanes simultaneously :=) Only problem I found was that they tend to slide off the tapered trailing edge (actually, they pull the gussets, and the gussets slide off, wet epoxy is a good lubricant). I had to use staples on the TE. Maybe if I glue the gussets one side at a time, they won't slide as freely with the clamp grabbing on to dry wood on the other side.
Ari.
|
|
|
|
|
|
| iter |
|
Ace
Posts: 512
Time Online: 309 days 1 hours 7 minutes
|
I guess I misjudged the clamping pressure and one of the gussets, on the top of the rudder, didn't stick quite right. Because there is /some/ epoxy between the gusset and the wood, it is not possible to bend the gusset all the way to where it should be even if I managed to get some glue under it. Any suggestions about what I could do to fix this?
Ari.
|
|
|
|
|
|
| Ricardo |
|
Videos in UTube: ral1951 AcePosts: 2,772
Time Online: 75 days 23 hours
|
Iter:
IMO, I think that using staples is the best way to ensure a good tight.
It provides an adecuate and even pressure on all the gluing surfaces.
It is fun and fast when pulling them out with the right tool; also a pleasure to see a really good bond.
Ricardo |
|
|
|
|
|
| Charlie Harris |
| October 16, 2007, 11:54pm |
|
Ace
Posts: 922
Time Online: 23 days 31 minutes
|
Iter: Just Heat it with a heat gun like a model gun and it will come right of with no damage. then clean up and glue it again. You may be able to take it loose just part of the way then bend it and get glue under it. Charlie |
|
|
|
|
|
| flybob13 |
|
Ace
Posts: 222
Time Online: 5 days 20 hours 43 minutes
|
Ricardo, what do you use as a staple puller? Never thought of it as fun. Bob |
|
|
|
|
|
| iter |
|
Ace
Posts: 512
Time Online: 309 days 1 hours 7 minutes
|
Charlie, thanks for the tip! I'll do just that. I wonder if a hair dryer would work?
Ricardo, what is that magic tool you speak of? Like Bob, I haven't been able to find a tool that makes pulling staples "fun." The best I've come up with is a pair of end (or top) cutting pliers.
Ari. |
|
|
|
|
|
| Ricardo |
|
Videos in UTube: ral1951 AcePosts: 2,772
Time Online: 75 days 23 hours
|
About the tool
Get a good short old knife, I used those with wood handle to cut meat, the small knife.
Make a 30 degree bent about 3/8" from the tip. From the bent to the handle knife is about 1". Make the tool short and sturdy.
Grind it off only one side at the end. Make tip about 1/4 " wide so it will fit under the staple. You just have to press the tip under the staple just a little bit , press the knive handle down and it will pop out. Is not a one step job. As everything is a matter of practice. It takes about 3 to 4 seconds for each staple, warning wear safety glasses because it may jump up to your eyes.
I'll place a picture of my tool later today when I get to the shop.
|
|
|
|
|
|
| iter |
|
Ace
Posts: 512
Time Online: 309 days 1 hours 7 minutes
|
Hours yesterday and today: 7
Running total: 167
Thanks for the heat gun advice, I used Irene's hair dryer and it worked great. I've already put the gussets back together using staples. There's a lesson here about gussets on curved surfaces but I'll post my thoughts on that in the morning--I'm too tired now.
The status today: fin is done, rudder needs the long bottom gussets, stab frame is drying, elevator frame is dry and has gussets on one side. With a little luck, I'm looking at test-fitting the tail tomorrow.
Ari.
|
|
|
|
|
|
| Ricardo |
|
Videos in UTube: ral1951 AcePosts: 2,772
Time Online: 75 days 23 hours
|
Stapler remover
Sorry didn´t bring my camera to show the tool.
I did the drawing by memory is pretty close only modification will be : tip is 3/18 width and rounded edges.
Ricardo
|
|
|
|
|
|
| iter |
|
Ace
Posts: 512
Time Online: 309 days 1 hours 7 minutes
|
Thanks again for the debonding tip. It worked perfectly and the gusset is back on the way it should be.
Ari.
|
|
|
|
|
|
| iter |
|
Ace
Posts: 512
Time Online: 309 days 1 hours 7 minutes
|
I have a question about the rudder horn for those who've already been here. I bolted it onto the rudder to check how well my gusset will fit, and it occurred to me that with the gussets on, it is next to impossible to get to the nuts. With the covering on, it seems completely impossible, short of an odd-shaped inspection hole. Does this mean that I'll have to put the bolts in first and then apply fabric on top of them?
Ari.
|
|
|
|
|
|
| iter |
| October 19, 2007, 12:35am |
|
Ace
Posts: 512
Time Online: 309 days 1 hours 7 minutes
|
While you guys are thinking about my bolts and covering them, here's the lesson I learned about gussets on curved surfaces.
The plans call for curved ribs on rudder and elevator. I thought this was for aerodynamic reasons and decided to make simpler, tapered ribs. I reasoned the aerodynamic differences would be negligible. This may be so, but what I overlooked was that where standard ribs create a smooth curve with the trailing edge, mine created sharp corners on the trailing edge as well as the spar. (I couldn't get the camera to focus on the right spot, I hope the diagram clarifies what I mean)
These sharp edges make adhesion difficult as they require excessive bending of the plywood. This is why my rudder gussets came apart, and why in the end I needed staples to hold some of the gussets in place. Hope those who haven't built their tails yet can avoid this problem.
Ari.
|
|
|
|
|
|
| bfhowell |
|
Fledgling Member  Posts: 3
Time Online: 9 hours 21 minutes
|
Buy a inexpensive long box end wrench to fit nuts. Heat the end and bend about 45 degrees to fit on nuts in the corner and clear gusset so you can hold it. Grind outside if necessary to fit between the gussets. With rudderhorn off cover side that rudderhorn sticks out. Install rudderhorn and hold nuts with bent wrench. Cover other side. |
|
|
|
|
|
| Kevin Larke 1300Z |
|
Flight Leader Posts: 140
Time Online: 2 days 11 hours 4 minutes
|
My favorite staple remover came from Office Max. I believe it's made by Stanley-Bostitch. It has a soft rubber handle, metal blade tip, and smooth hard plastic bottom. It's easy to wiggle the blade under the staple wire and pop it out.
Look at your staples. I have some J-21 types that are basically square wire. I think they are Arrow brand. It's harder to get the puller under the staple without marring the wood. I have some with wire that is more round. I think they are Stanley brand. They are easier to remove.
|
|
|
|
|
|
| iter |
|
Ace
Posts: 512
Time Online: 309 days 1 hours 7 minutes
|
With rudderhorn off cover side that rudderhorn sticks out. Install rudderhorn and hold nuts with bent wrench. Cover other side.
J, thanks for the input. The horn sticks out both sides, it's a pull-pull system. Regardless, I don't see any problem installing the gussets over an installed horn. What I'm worried about is that I can't install the horn after I /cover/ the rudder, and so I'll be forced to cover the bolts with fabric. Ari. |
|
|
|
|
|
| iter |
|
Ace
Posts: 512
Time Online: 309 days 1 hours 7 minutes
|
Maybe someone who's already got the rudder covered could post a photo of the horn attach bolts?
Ari. |
|
|
|
|
|
| bfhowell |
|
Fledgling Member Posts: 3
Time Online: 9 hours 21 minutes
|
Would it cause any problems if you added a little flat strip along the bottom drilling out for the bolt heads and washers so the heads of the bolts would be flush? |
|
|
|
|
|
| Pilotpeat |
|
Ace
Posts: 498
Time Online: 13 days 4 hours 21 minutes
|
You might also think about using a captive nut like on some of the aileron bearing bracket bolts. You can then just have the nutplates in the rudder, cover it and then install the bolts and rudder horn. The nutplates can be held in with small #4 by 1/4" long stainless PK screws.
I can post a photo of this when I get home if you need.
Pete |
|
|
|
|
|
| iter |
|
Ace
Posts: 512
Time Online: 309 days 1 hours 7 minutes
|
You might also think about using a captive nut like on some of the aileron bearing bracket bolts. You can then just have the nutplates in the rudder, cover it and then install the bolts and rudder horn.
Blind nuts is the first thing I thought of--I was wondering why the plans call for them on the fin but not on the rudder. Then it dawned on me that you'd need the blind nuts installed on the rudder horn, not on the wood. I suppose I could tap the horn and use thicker bolts, but I'm not sure a 1/8" aluminum is strong enough to hold the loads. Ari.
|
|
|
|
|
|
| iter |
|
Ace
Posts: 512
Time Online: 309 days 1 hours 7 minutes
|
Hours yesterday and today: 7
Running total: 174
Glued gussets to both sides of the stab and made 4 little aluminum fittings that hold the fin-to-stab bracing tubes.
Incredibly, I used up the entire 10-foot length of 3" pipe I bought. Truly, you cannot have too many clamps. I tried a new technique with aluminum fittings. I drilled and rough-cut them before I cut the piece up into separate pieces. I like this approach. It's easier to clamp large pieces than small, and drilling was certainly more precise this way.
Ari.
|
|
|
|
|
|
| bfhowell |
|
Fledgling Member Posts: 3
Time Online: 9 hours 21 minutes
|
I guess those bolts are 1/4-20 and the load is at a right angle to the bolt. Suppose you made a new horn and drilled with a #8 bit and tap for 80% threads and made a mock-up out of scrap for test and just see how much it will hold. I bet the wood would give away first. |
|
|
|
|
|
| JGlassFNP |
|
 Wing Man Posts: 56
Time Online: 8 hours 12 minutes
|
Hey guys, new builder here ... 1103R #173 ...
I started on the end of April or so and have completed the tail-frathers, fuselage, gear, and starboard wing ... I have all of the ribs ands spars done for the port wing done.
I mounted the empenage on the fuselage this week and just finished fitting/installing the strut braces and the elevator control cable. My cable positioning does not "center" the stick. It appears as though I'll have to add a 1.5" block to the forward floor cross member and move the control-stick ass'y forward.
I'm getting ready to order a Hirth F-33, 2.5:1 drive, electric start very soon ...prices are going up due to the $ vs Euro. I'm considering a 2-blade, 54" IVo-prop ... can anyone comment on this combo.
Thanks,
Kurt Satter
Industrial Engineering
Louisiana Tech University |
|
|
|
|
|
| iter |
|
Ace
Posts: 512
Time Online: 309 days 1 hours 7 minutes
|
Suppose you made a new horn and [...] made a mock-up out of scrap for test
J, I appreciate the suggestions. I don't want to reinvent the wheel here. I'm curious how people who've already done it done it. Ari. |
|
|
|
|
|
| iter |
|
Ace
Posts: 512
Time Online: 309 days 1 hours 7 minutes
|
Hours today: 1.5
Running total: 175.5
Glued the last remaining gussets on rudder and elevator.
Ari. |
|
|
|
|
|
| iter |
|
Ace
Posts: 512
Time Online: 309 days 1 hours 7 minutes
|
Hours today: 3
Running total: 178.5
I finished the tail today.
Ari.
|
|
|
|
|
|
| iter |
|
Ace
Posts: 512
Time Online: 309 days 1 hours 7 minutes
|
A few more photos--Irene had a ball with the camera today :=)
|
|
|
|
|
|
| JGlassFNP |
| October 22, 2007, 11:37am |
|
Wing Man Posts: 56
Time Online: 8 hours 12 minutes
|
My plans included a "Light Tail" alternative ... is there a reason you built the one you did?
Kurt |
|
|
|
|
|
| iter |
|
Ace
Posts: 512
Time Online: 309 days 1 hours 7 minutes
|
My plans gave me no alternatives. I've heard about the light tail, what does it look like?
As far as I understand it, the 1030 was designed to stay within Part 103 weight and had the lighter 277 engine up front. This made it impossible to balance with the normal tail, so Ison designed a lighter tail for it. It is also my understanding that the lighter tail comes with a 90 mph Vne restriction as opposed to 100 mph for a regular one. Neither speed is attainable of course except in a steep dive.
I'm very curious about the actual differences between the "regular" and the light tail.
Ari. |
|
|
|
|
|
| iter |
|
Ace
Posts: 512
Time Online: 309 days 1 hours 7 minutes
|
Hours yesterday: 8
Hours today: 5.5
Running total: 192
I spent 3 hours yesterday cleaning my garage after I was done with the tail. Sawdust, shavings, epoxy, bits of RS and plywood--all of it knee-deep--I figured I had to do it at some point. Felt surprisingly good, too.
Anyway, I printed out a full-size fuselage drawing and laid up one side of the fuse on it. I also kept drawing more parts to laser- and CNC-cut. I'll post the DXF when I'm done.
Ari.
|
|
|
|
|
|
| iter |
|
Ace
Posts: 512
Time Online: 309 days 1 hours 7 minutes
|
I was worried about cutting the very sharp edges for longeron splices, especially on the top longeron (where it says "joint") because the two parts have to match. I read on this board about a trick I found useful, so I'll post a few pictures of it, or at least of how I understood it.
I clamped the two pieces together using 4 little C-clamps, then clamped the whole assembly to my bench and used a hacksaw to cut them both at the same time. This produces a cut that us not necessarily straight, but matches on both parts. Last photo shows the splices drying in the layup. I'll post a photo tomorrow of how it turned out.
Ari.
|
|
|
|
|
|
| Pilotpeat |
|
Ace
Posts: 498
Time Online: 13 days 4 hours 21 minutes
|
So when you cut these splices was your blade horrizontal or vertical? (was it going through both pieces or one piece at a time?) I am getting ready to cut the splices on my capstrips for the spars and am planning to do it the same way, only using a coping saw.
Pete |
|
|
|
|
|
| iter |
|
Ace
Posts: 512
Time Online: 309 days 1 hours 7 minutes
|
The blade was vertical, but I don't think it matters. It was just the way I clamped the pieces to my bench.
Good luck with your capstrips!
Ari. |
|
|
|
|
|
| Tom |
|
Ace
Posts: 744
Time Online: 16 days 10 hours 21 minutes
|
Do you sleep occasionally? |
|
|
|
|
|
| iter |
|
Ace
Posts: 512
Time Online: 309 days 1 hours 7 minutes
|
I'm trying to get this project finished so I can get some sleep :=)
Ari. |
|
|
|
|
|
| iter |
|
Ace
Posts: 512
Time Online: 309 days 1 hours 7 minutes
|
Hours today: 2.5
Running total: 194.5
Cut most of the components for the second fuselage half. Here's what the splice looks like dry and sanded.
Ari.
|
|
|
|
|
|
| iter |
|
Ace
Posts: 512
Time Online: 309 days 1 hours 7 minutes
|
Erm, honey, why is there an airplane-looking-thing in our living room?
|
|
|
|
|
|
| Pilotpeat |
|
Ace
Posts: 498
Time Online: 13 days 4 hours 21 minutes
|
How close are those fires to you? I have relatives in San Deago and they had to evacuate.
Pete |
|
|
|
|
|
| iter |
|
Ace
Posts: 512
Time Online: 309 days 1 hours 7 minutes
|
I appreciate your concern. Silicone Valley is located on the San Francisco Bay, some 420 miles from the closest fire I've heard of. I've had people from all over the place express their concern and it's nice, but I'm nowhere near the fires.
Ari. |
|
|
|
|
|
| iter |
|
Ace
Posts: 512
Time Online: 309 days 1 hours 7 minutes
|
Hours today: 6
Running total: 200.5
Cut plywood fuselage sides and other plywood reinforcements, laid up left fuselage half, glued plywood side to right fuselage half.
I spent mode time than I expected with the CNC mill today because it has a 48"x48" worktable, and the fuselage sides are 72" long. I had to make sure I reposition them after I cut one side, and when I do, the new cuts will line up with the initial ones. I think I more or less got it straight. I got a special kick out of cutting small things like the step, aileron cable exit holes etc.
I didn't fancy stapling these large plywood pieces to the frame like the plans suggest. Instead, I laid the plywood flat on my table and dropped the frame (with glue on it) on top. The photo doesn't look like much because pretty much the only things you can see are the wights on top. Better photos when it's dry tomorrow.
Ari.
|
|
|
|
|
|
| iter |
|
Ace
Posts: 512
Time Online: 309 days 1 hours 7 minutes
|
Here I am, trying my fuselage on for size.
Ari.
|
|
|
|
|
|
| iter |
|
Ace
Posts: 512
Time Online: 309 days 1 hours 7 minutes
|
Hours today: 7
Running total: 207.5
I cut some more CNC pieces today, and glued some of them up. Top to bottom, station 4 bulkhead, engine compartment walls, motor mount top and bottom; three of these components stapled to relevant wood pieces. Note the markings on laser-cut plywood--they help align RS pieces on top of them and came in especially handy on the motor mount. I figured, if I'm doing laser work anyway, I might as well avoid having to draw pencil lines on my pieces.
Ari.
|
|
|
|
|
|
| iter |
|
Ace
Posts: 512
Time Online: 309 days 1 hours 7 minutes
|
Hours today: 8.5
Running total: 216
Finished both fuselage sides, including all plywood on them, and the rear spar carry-through.
Ari.
|
|
|
|
|
|
| Tom |
| October 29, 2007, 11:22am |
|
Ace
Posts: 744
Time Online: 16 days 10 hours 21 minutes
|
I can't help but wonder, wood and building in general can have so many variables, +/- a 1/4" here and there, I'll be very interested how all the parts line up after you've programed the parts right off the prints. Might be a good side job for you after you're finished to provide CNC parts for the kit industry! |
|
|
|
|
|
| djohn |
|
Ace
Posts: 648
Time Online: 24 days 19 hours 31 minutes
|
I have been wondering the same thing myself. As Levi Self so aptly pointed out to me, a prudent choice might be to bond a sheet to the fuse and hand router the openings for fit and finish. What Ari might be able to do is school us on properly bonding all the structure under the plywood so that standard "per plans" plywood shapes will work.
My $0.02
Dennis |
|
|
|
|
|
| Randy lewis |
| October 30, 2007, 12:15am |
|
Ace
Posts: 965
Time Online: 21 days 18 hours 20 minutes
|
The true test may be when he starts building 3 dimensionaly. |
|
|
|
|
|
| iter |
|
Ace
Posts: 512
Time Online: 309 days 1 hours 7 minutes
|
I can't help but wonder, wood and building in general can have so many variables, +/- a 1/4" here and there, I'll be very interested how all the parts line up after you've programed the parts right off the prints.
Glad you asked, I wasn't sure anyone was reading this thread anymore. Overall, the fit has been good. Apart from a couple of mistakes I made (more on that later), the two problems I've had have been oversize RS stock in JDT kit and cut-almost-but-not-quite-to-size plywood in the kit. The RSs are cut to reasonable tolerances, and I haven't seen one undersize yet, but the tolerances very. I've seen stock 1/16" oversize. This isn't a problem most of the time, except that you can't build it into the CAD files because you don't know if a particular RS will be its nominal size or not. The other problem is that most of the plywood is cut to outline dimensions. This means if you position a piece 1/8" off-center on the cutter, or at an angle, you'll ruin the piece because the part won't fit on it. With the 48"x48" CNC router, finding the exact center, and aligning the piece exactly on the axes, can get tricky. It would have been much easier to work with full sheets of plywood. Both problems would have been non-issues if I'd have bought raw wood and plywood instead of a full kit. I'll post a few photos of the fit so far for you to decide if it;s acceptable.
Might be a good side job for you after you're finished to provide CNC parts for the kit industry!
I'll sell you the DXFs if you think there's a business opportunity here :=) Ari. |
|
|
|
|
|
| iter |
|
Ace
Posts: 512
Time Online: 309 days 1 hours 7 minutes
|
Step cutout.
Many different angles involved. I was worried about this one, but it fit within 1/64"
|
|
|
|
|
|
| iter |
|
Ace
Posts: 512
Time Online: 309 days 1 hours 7 minutes
|
Motor mount reinforcement and fuselage-end gusset (pay no attention to glue spots)
The fit on both parts is good but note that the tail gussets is missing two corners--lower left and upper right in this photo. This is the result of "position error" in setting plywood on the cutter.
|
|
|
|
|
|
| iter |
|
Ace
Posts: 512
Time Online: 309 days 1 hours 7 minutes
|
Seatbelt reinforcement gusset (matching hole on the other side in fuselage side panel).
I etched the gusset thinking it would ease assembly (and because I could). Since I glued the mahogany side panel first, the etching could not help me align anything because I could not see it. So I glued these gussets with the etching on their visible side just to show off.
|
|
|
|
|
|
| iter |
|
Ace
Posts: 512
Time Online: 309 days 1 hours 7 minutes
|
Motor mount base.
Here I made an honest mistake reading the plans. I sized the base to straddle a horizontal member, but where it's actually supposed to go is under it. The fuselage front is slanted, so pushing a member down requires shortening it. The end result is that the mount's bottom skin is exactly the right size to be its top skin. Before I closed up the structure, bot skins of the mount fit very well where I /thought/ they need to fit. As it is, I'll have to manually trim the mount to fit where it /needs/ to (you can see pencil marks that show ho much I need to trim)
|
|
|
|
|
|
| iter |
|
Ace
Posts: 512
Time Online: 309 days 1 hours 7 minutes
|
Here's a real flop, and I'm not sure what exactly went wrong. Both fuselage sides ended up about 3/32" too short. It stumps me, because I built both sides over the same drawing that I printed from the same DXF that I used to cut the plywood, and all other angles line up.
|
|
|
|
|
|
| iter |
|
Ace
Posts: 512
Time Online: 309 days 1 hours 7 minutes
|
Here's an example of oversize RS showing. The rear spar carry-through ("station 4" bulkhead) straddles a vertical member, touches the fuselage sides from the inside and should be flush with the top and bottom of the fuselage.
The part that I made comes very close, though it will need sanding in areas marked by green arrows. Its outside dimensions are correct (the top and bottom are flush with longerons), but it won't fit between top and bottom longerons, because the longerons are oversize and the cutouts are therefore too small. Also, for the same reason, the bulkhead doesn't touch the fuselage sides--there's about a 3/64" gap there, see last photo.
I expect that it will take very little work to fit this bulkhead in. I also think this is the worst "3D" problem I'm going to encounter with this fuselage.
Ari.
|
|
|
|
|
|
| iter |
|
Ace
Posts: 512
Time Online: 309 days 1 hours 7 minutes
|
As Levi Self so aptly pointed out to me, a prudent choice might be to bond a sheet to the fuse and hand router the openings for fit and finish. What Ari might be able to do is school us on properly bonding all the structure under the plywood so that standard "per plans" plywood shapes will work.
Not sure I follow you here. I don't like schooling people :=) Ari. |
|
|
|
|
|
| iter |
|
Ace
Posts: 512
Time Online: 309 days 1 hours 7 minutes
|
Hours today: 1
Running total: 217
Except for taking and posting a whole bunch of photos, I didn't do much today. I beveled the bottom of rear spar carry-through at 9 degrees on a table saw (first time I used one--pretty cool tool!) and pulled staples out of the fuselage sides.
Ari. |
|
|
|
|
|
| djohn |
|
Ace
Posts: 648
Time Online: 24 days 19 hours 31 minutes
|
Schooling is not derogatory at all. I was just commenting on the fact (maybe theory) that an assembly that has no hard reference points to place the many parts that may affect the dimensions of the final assembly, will probably come out a slightly different shape and size from one builder to another. Some builders choose to make the fuse sides larger than the final shape-size or even as I said blank, then cut the final shape using a hand router. Alternatively one could probably use superfil to make up the difference.
Dennis |
|
|
|
|
|
| Charlie Harris |
|
Ace
Posts: 922
Time Online: 23 days 31 minutes
|
ARI: I think you are doing a great job. I'll bet that on most of the planes we built and cut each part to size as needed, they did not fit any better than yours do. Keep up the good work, I am sure you will be pleased in the end. Also I'll bet that there are not many here that were this far along in only about 63 days. I wonder how fast it would go if you built a second one? Charlie |
|
|
|
|
|
| iter |
|
Ace
Posts: 512
Time Online: 309 days 1 hours 7 minutes
|
Dennis, I see what you mean now. I think the big difference is in using full-size plans. I didn't like any of that snap-a-chalk-line business that's in the manual. Sure it took time and effort to draw them, but I believe I've saved time overall. I can see the value of blank plywood, and I may have to do some minor trimming myself. But having the length of every piece and the angle of every cut printed on a plan makes it easier to produce shapes that match.
Charlie, thanks for your encouragement. I've never seen another MiniMAX built, so you're really putting my mind at ease about average tolerances. I think you missed a month in your calculation though. I started over 3 months ago.
Ari. |
|
|
|
|
|
| iter |
|
Ace
Posts: 512
Time Online: 309 days 1 hours 7 minutes
|
Hours today: 4
Running total: 221
|
|
|
|
|
|
| Knut A |
|
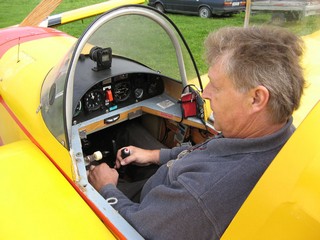 LN-YJE AcePosts: 779
Time Online: 21 days 16 hours 8 minutes
|
Iter...
I have followed your work....and I'm impressed. Of course you will have some minor problems when putting the parts together, but I'm sure everybody else had that too. You will probably end up with a very nice and wellbuild plane.
But at this stage in the prosess I wonder.... do you intend to strengthen the fuselage, like in the Eros, for the future possiblity to choose a heavyer engine, like HKS, R503, full VW or similar?
Keep on, we follow you with great interest.
Knut A |
|
|
|
|
|
| Charlie Harris |
|
Ace
Posts: 922
Time Online: 23 days 31 minutes
|
Knut: If he does not take a break long enough to eat he won't need a bigger engine. Charlie |
|
|
|
|
|
| Knut A |
|
LN-YJE AcePosts: 779
Time Online: 21 days 16 hours 8 minutes
|
He, he...
...yes I see, but with all the food-money he now saves, he could afford a bigger engine.....
I'm quite sure that Irene will feed him properly....
Iter... when you are done with the plane, do you have a hangar facility? And where will you have the plane stationed?
Knut A
|
|
|
|
|
|
| iter |
|
Ace
Posts: 512
Time Online: 309 days 1 hours 7 minutes
|
Knut,
Thank you for your kind words. I gave the engine issue a lot of thought and decided to stick with the plans-recommended 447. I entertained all sorts of ideas, including some preliminary calculations for battery-powered electric motor. I also looked at half-VWs. In the end, I decided to go with a pedestrian 447 because I know I can install one relatively quickly and I won't need to modify the structure. My goal with this project was to build /a/ flyable plane that looked like an airplane. I decided on the MiniMAX because I bought into the advertised 250 hours build time :=) I am not looking for a lifetime achievement project, nor an ultimate travel machine, nor an aerobatic performer (I already own 1/2 of a SkyBolt). I want to fly this airplane sooner than later, and any creative engine choices are going to add unforeseeable amount of time to the build.
As far as hangar goes, the SkyBolt lives in a hangar at KRVH. If I can convince my partner to get rid of all the junk that is stored in the hangar, I could probably fit my Max there as well. I know people in general don't think much of removing Max wings for transport, but it sure would be nice if I could trailer it to the airport.
Thanks again for your comments and continued interest. I'll keep up the work if you guys keep up the feedback :=)
Ari.
P.S. Irene read this and she asks that I clarify that she feeds me well an in a timely fashion, which is true.
Ari. |
|
|
|
|
|
| iter |
|
Ace
Posts: 512
Time Online: 309 days 1 hours 7 minutes
|
Hours today: 4
Running total: 225
I like reading blueprints, but I don't like deciphering them. There was maybe 1.5 hours of actual work today, the rest wasted trying to figure out what goes where. The good news is that tomorrow I might know if I fit inside the fuselage.
Ari.
|
|
|
|
|
|
| iter |
|
Ace
Posts: 512
Time Online: 309 days 1 hours 7 minutes
|
Hours today: 2
Running total: 227
The good news is that I fit inside the fuselage with room to spare. The bad news that half the joints from last night didn't cure right and after I tried to pull the nose sides together, I noticed that some of the cross-members were loose. I glued them back in and will wait until they cure until I try anything else.
I also beveled the edges on motor mount base and floorboard support bulkhead which still needs RS-9 added to the front of it. The motor mount base is done and ready for installation into the fuselage nose.
Ari.
|
|
|
|
|
|
| Knut A |
| November 3, 2007, 10:26am |
|
LN-YJE AcePosts: 779
Time Online: 21 days 16 hours 8 minutes
|
Iter..... do I hear a human engine sound from pict 3985?
By the way,...do you make glue testsamples? |
|
|
|
|
|
| iter |
|
Ace
Posts: 512
Time Online: 309 days 1 hours 7 minutes
|
Of course engine sounds! Not the first, not the last :=)
As far as the samples, there's the leftover stuff that cures in mixing cups. Should I be keeping those?
Ari. |
|
|
|
|
|
| Knut A |
|
LN-YJE AcePosts: 779
Time Online: 21 days 16 hours 8 minutes
|
Use the leftover to glue some small pieces of the wood you use together. Make for instance three of them each time. The first for test if the inspector demands it. The next for test after for instance 3 and 10 years. Mark them and make a register which tells were the gluebatch were used on the plane. I don't think this is mandatory, but why not take this precaution for the sake of security. The gluetest pieces should lay permamently in the plane. In that case they will live in the same environment als the plane. I think the evt. next owner will also be pleased.
Knut A
|
|
|
|
|
|
| iter |
|
Ace
Posts: 512
Time Online: 309 days 1 hours 7 minutes
|
I like the idea of samples living with the plane. But I'm worried about exceeding my gross weight that way :=) I use T-88 epoxy which has a 30 minute pot life. I don't think I can count the batches I've already made, and I'm not close to half-done...
Ari. |
|
|
|
|
|
| iter |
|
Ace
Posts: 512
Time Online: 309 days 1 hours 7 minutes
|
Hours yesterday & today: 1
Running total: 228
I decided to glue in the floor/seat support bulkhead. This will give me more cross-members to distribute the load when I bend fuselage sides.
Is pulling them together /supposed/ to take that much force?
Ari.
|
|
|
|
|
|
| Charlie Harris |
| November 4, 2007, 10:25pm |
|
Ace
Posts: 922
Time Online: 23 days 31 minutes
|
Yes Iter: It take a lot. I had heard about it before and pulled mine in and glued before adding the fus plywood sheeting It was much better. But then its too late, and I should have said something. I have mentioned this before and have caught a couple on time sorry. Charlie |
|
|
|
|
|
| Bill Metcalf |
| November 4, 2007, 10:55pm |
|
 Ace AcePosts: 2,041
Time Online: 22 days 7 hours 24 minutes
|
My airframe is now 18 years old, and just about to be finished. Over the years my bird has been stored indoors and out, trailered around, been twisted, lifted, turned and sat in (much of this with the airframe only partially completed). It's gone through several permutations and mods, and even spent one summer hung from a museum ceiling as an exhibit. It's so old that several parts had to be re-built due to wood shrinkage and/or cracking. I started construction using the now-defunct Excel epoxy, and then changed to T-88. I mixed all my epoxy by eye in plastic Dixie cups. First a squirt of the thicker catalyst, which would form a puddle in half of the tilted cup bottom, followed by a dollop of the other part. It was pretty easy for me to tell if the two puddles(which eventually flatten and snuggle up next to each other) were of relatively equal proportions in the bottom of the cup. In all this time, the only pieces of the structure which have broken free are pieces I have bumped or bashed, and when they did come loose it was always the wood fibers that tore out, not the glue that failed. My glue-mixing technique would certainly not qualify as science, but I think that maybe lots of builders become too concerned about getting absolute perfection when, in reality, the glue holds pretty well even if the mix is not exactly 50/50. Then again I have not yet added flight stresses to the airframe. |
|
| Logged |
|
|
|
|
| iter |
| November 4, 2007, 11:44pm |
|
Ace
Posts: 512
Time Online: 309 days 1 hours 7 minutes
|
I kept thinking, what if I'd not glued the plywood on before I started pulling them together :=) I thought maybe there was some reason it was a bad idea. I wonder if what makes the bending so tough is that the fuselage is 2" wider now than it was in the original design. I imagine that Wane kept the motor mount's dimensions when he widened the fuse, and the angles involved now are sharper.
I use a .1gram scale to mix my epoxy at the 1/.83 ratio that's specified on the bottle. I've used up an equal amount of resin and hardener so far, so it must be working.
Ari,
|
|
|
|
|
|
| Randy lewis |
|
Ace
Posts: 965
Time Online: 21 days 18 hours 20 minutes
|
Iter
One problem that you may be seeing with the full size drawings is expansion of the paper. The changes in humidity can easily add an 1/8 inch to the length of a 12 foot plot. Are you using a heavy bond paper? I think a mylar is more stable or even a vellum media but both are much more expensive. Have you put a tape measure to the full size plot to see what it is? |
|
|
|
|
|
| iter |
| November 5, 2007, 10:56pm |
|
Ace
Posts: 512
Time Online: 309 days 1 hours 7 minutes
|
Rnady, that sounds like a definite possibility. I haven't measured the plans, but you're probably right. It all worked out though, because I'll need to bevel the front uprights to make them parallel, and if the plywood had extended all the way, I'd have had to sand it away anyway.
Hours today: 2
Running total: 230
Ari.
|
|
|
|
|
|
| iter |
|
Ace
Posts: 512
Time Online: 309 days 1 hours 7 minutes
|
Hours today: 2
Running total: 232
The motor mount is glued in, but the fuselage sides aren't parallel. What you see in the photo is only in small part the result of parallax. The lower port side (top left in the photo) is slanted significantly outboard. I expect this would have little effect on airframe integrity, but it's a visual disaster. I'm not sure what I can do about it short of pulling the fuselage completely apart. The amount of heat that will be required to soften 1.3oz of epoxy that went into this joint will soften adjacent joints, which in turn will require pulling off the plywood sides, which in turn... I'll have to go back to before post 178.
Ari.
|
|
|
|
|
|
| Bob Hoskins |
|
Fly Safe AcePosts: 1,208
Time Online: 38 days 16 hours 39 minutes
|
Hi Iter;
I see what you mean. It is almost impossible to get 2 different pieces of wood to dry bend the same way and amount. I believe the T88 glue is water proof. How about wetting the problem longeron and using a heat gun to warm up the wood and make it easier to bend. Don't heat it hot enough to loosen the joints. I believe with a little patience and "fiddling" here you can get the bends correct. Do a little at a time to see how and if it will work. Be careful you don't go to far also. Just an old mans thoughts.
Fly safe, Bob |
| Fly safe and have fun. |
|
|
|
|
|
| Ricardo |
|
Videos in UTube: ral1951 AcePosts: 2,772
Time Online: 75 days 23 hours
|
Ari:
Don't worry too much about it. You still need to place RS 670 plywood on top.
Right now your longerons are bending the way they feel according to their own particular wood fiber.
Once you place that plywood cover both longerons will be symmetrical.
Ricardo |
|
|
|
|
|
| Charlie Harris |
|
Ace
Posts: 922
Time Online: 23 days 31 minutes
|
Why have You left out the cross pcs. on the fus. bottom front. This would have helped to hold it straight. Charlie |
|
|
|
|
|
| George Sychrovsky |
|
Guest User |
A little late for this advice now but you should have made a spacer the right length to get the sides parallel and clamp it between the lower part of the fuselage sides when you were gluing the motor mount in.
George |
|
| Logged |
|
|
|
|
| iter |
|
Ace
Posts: 512
Time Online: 309 days 1 hours 7 minutes
|
Why have You left out the cross pcs. on the fus. bottom front. This would have helped to hold it straight. Charlie
I was going to glue it in next, but then I panicked because of the misalignment. I wanted to do it one step at a time because I thought it would be easier to control fewer parts at any given moment. Ari. |
|
|
|
|
|
| iter |
|
Ace
Posts: 512
Time Online: 309 days 1 hours 7 minutes
|
Ari:
Don't worry too much about it. You still need to place RS 670 plywood on top.
Right now your longerons are bending the way they feel according to their own particular wood fiber.
Once you place that plywood cover both longerons will be symmetrical.
Ricardo
I was thinking about that, but I'm worried that the plywood and the cross-members will just pull the longerons together, so the left will move closer to its correct position, but the right will get skewed closer to centerline than it needs to be. Ari. |
|
|
|
|
|
| iter |
|
Ace
Posts: 512
Time Online: 309 days 1 hours 7 minutes
|
Hi Iter;
I see what you mean. It is almost impossible to get 2 different pieces of wood to dry bend the same way and amount. I believe the T88 glue is water proof. How about wetting the problem longeron and using a heat gun to warm up the wood and make it easier to bend. Don't heat it hot enough to loosen the joints. I believe with a little patience and "fiddling" here you can get the bends correct. Do a little at a time to see how and if it will work. Be careful you don't go to far also. Just an old mans thoughts.
Fly safe, Bob
I will try this today! Thanks for this advice. It gives me hope that I can fix this non-destructively. Ari. P.S. I see you just made "ace" on this board, congratulations! Ari. |
|
|
|
|
|
| iter |
|
Ace
Posts: 512
Time Online: 309 days 1 hours 7 minutes
|
Quoted from 71
A little late for this advice now but you should have made a spacer the right length to get the sides parallel and clamp it between the lower part of the fuselage sides when you were gluing the motor mount in.
George
Thank you. Am I to understand that your advice is to start the fuselage over and use a spacer next time? Ari. |
|
|
|
|
|
| George Sychrovsky |
| November 7, 2007, 10:57pm |
|
Guest User |
That’s not my advice, I would just pull it together as much as its willing to go without straining the parts too much and leave it at that
George |
|
| Logged |
|
|
|
|
| John Riggans |
| November 10, 2007, 1:11pm |
|
Fledgling Member Posts: 37
Time Online: 28 days 4 hours 45 minutes
|
Ari, Did you glue station 5 to the rear spar carry thru before gluing it to the fuse sides ? John Riggans |
|
|
|
|
|
| iter |
| November 12, 2007, 8:49am |
|
Ace
Posts: 512
Time Online: 309 days 1 hours 7 minutes
|
Ari, Did you glue station 5 to the rear spar carry thru before gluing it to the fuse sides ? John Riggans
Not sure what you mean here. Station 5 is not glued in yet as such. Station 4 has 2 plywood pieces and 5 RSs sandwiched between them. I assembled the sandwich first, then glued the whole thing in place, if that's what you were asking about. You can see photos in posts 190 and 191. Some of you may have been wondering about my loss of productivity lately. My mind has been elsewhere :=) This is from earlier today. Ari.
|
|
|
|
|
|
| Knut A |
| November 12, 2007, 9:18am |
|
LN-YJE AcePosts: 779
Time Online: 21 days 16 hours 8 minutes
|
Congratulations Ari and Irene.... may your flight be successful. Be careful during landing... And we don't want or need written and fotographic reports from the next steps.... do we?
Knut A |
|
|
|
|
|
| djohn |
| November 12, 2007, 10:48am |
|
Ace
Posts: 648
Time Online: 24 days 19 hours 31 minutes
|
I'm bettin the next step happens where it doesn't smell like T-88 MEK and fresh cut wood.
Congratlations you two!
Dennis |
|
|
|
|
|
| 10 |
| November 12, 2007, 1:43pm |
|
Guest User |
I happy for the both of you! Wish you happiness for the rest of your lives!
I just want to tell the rest of the people on this BBS because you can't see why Ari is smiling. Irene is putting a AN960C washer on his finger!!! Ahhhh, such love!!! Harold |
|
| Logged |
|
|
|
|
| Knut A |
| November 12, 2007, 2:27pm |
|
LN-YJE AcePosts: 779
Time Online: 21 days 16 hours 8 minutes
|
But in the background...I can se a man carrying a spar...!! Ari...you don't bring with you your MiniMax-project to the church....do you..???
Knut A |
|
|
|
|
|
| Mike Howe |
| November 12, 2007, 5:08pm |
|
MiniMax, Hawk, GA (Tipacer), another Max to finish AcePosts: 375
Time Online: 7 days 7 hours 30 minutes
|
Alright! Congratulations! A man, his wife and his plane. Now, just add in some little airplane building helpers and a dog to keep your feet warm and you'll have the complete picture! I'm sure you two will have a wonderful journey ahead of you.
God bless.
Mike Howe |
|
Mike Howe
howetyr@yahoo.com
|
|
|
|
|
|
| Larry |
| November 12, 2007, 6:07pm |
|
 Ace AcePosts: 1,139
Time Online: 6 days 18 hours 49 minutes
|
Congrates on the new wife. I haven't been following this thread, but should. Understand that with a wood airframe most problems can be fixed without drastic measures. At one point you mentioned the crossmembers in the cockpit area popping loose. They will when you pul the front together unless you leave that area clamped together. We used some blocks and bar clamps this way we could slide the bottom sheeting in place after the front was pulled together without removing the clamps.
Keep it light, don't over build, and don't deviate from the plans. It will perform and fly like it should. Best of luck and have fun.
Larry |
| a mile of road will take you a mile, a mile of runway can take you anywhere. |
|
|
|
|
|
| Cy V |
| November 12, 2007, 6:34pm |
|
 Ace AcePosts: 640
Time Online: 14 days 16 hours 39 minutes
|
But in the background...I can se a man carrying a spar...!! Ari...you don't bring with you your MiniMax-project to the church....do you..???
Knut A
LOL!! It DOES look like a guy carrying a spar, doesn't it? |
| Bad spellers of the world untie! |
|
|
|
|
|
| Bob Hoskins |
| November 12, 2007, 10:22pm |
|
Fly Safe AcePosts: 1,208
Time Online: 38 days 16 hours 39 minutes
|
Hi Ari and Irene;
Congratulations to the both of you. May your life together be full of wonderful things, and some little things, LOL.
My wife and I have been married for 44 years, we met in first grade. I would not trade a minute of it.
I wish you both all the happiness and good health in the world.
Sincerely, Bob |
| Fly safe and have fun. |
|
|
|
|
|
| Ricardo |
| November 13, 2007, 12:36am |
|
Videos in UTube: ral1951 AcePosts: 2,772
Time Online: 75 days 23 hours
|
Ari and Irene:
Thanks for sharing those happy moments.
Congratulations to both of you, I wish you the best and I hope you'll have a beautiful and happy family in the future.
Ricardo |
|
|
|
|
|
| iter |
| November 14, 2007, 7:47am |
|
Ace
Posts: 512
Time Online: 309 days 1 hours 7 minutes
|
Guys, thank you so much for your wishes! I feel like I've known you forever, and being able to share this very special moment with such wonderful friends makes it even more special. Re man carrying a spar. He is holding one pole of the Chuppah. I briefly considered making them out of RS wood, but decided against it. Some chuppahs are very elaborate, but we made ours simple and modest. This works for me in spiritual life as well as in airplane building, so in that sense I did bring the airplane with me :=) Ari.
|
|
|
|
|
|
| Ed Gil |
| November 26, 2007, 12:56pm |
|
Flight Leader Posts: 173
Time Online: 18 days 3 hours 58 minutes
|
Has anyone heard from Iter? Hopefully he is just away on his honeymoon, just hope all is well with him. |
| Ed Gil.... Max owner -Hays, KS |
|
|
|
|
|
| Knut A |
| November 26, 2007, 6:02pm |
|
LN-YJE AcePosts: 779
Time Online: 21 days 16 hours 8 minutes
|
Shhhhhh... Don't disturb them yet ....let Irene have him for herself for a while. Don't remind them about T88, spars, ribs, CAD and so on yet. He may be stressed, and we all knew what can happen then....! Knut A |
|
|
|
|
|
| skyblazer |
|
Ace
Posts: 213
Time Online: 29 days 11 hours 48 minutes
|
Update please Ari, this post has 7,825 hits. thats got to be a record.  |
|
|
|
|
|
| Gene |
|
Ace
Posts: 283
Time Online: 9 days 1 hours 4 minutes
|
Hi,
Re the "Photo of the Moment" which is on right now, I would swear that this is a picture of Jim Chuk's runway....!
Gene |
|
|
|
|
|
| himaxflyer |
|
Ace
Posts: 487
Time Online: 19 days 10 hours 38 minutes
|
I don't kinow Gene, I see a red Airbike with a nosewheel........ You should see the runway right now in real life. It got 13" on snow on it last night. I put the skis on the plane and hope to use them tomorrow. Actually the photo of the moment is kind of neat, it's supriseing how often I see one of my pics there. Jim Chuk |
|
|
|
|
|
| Pilotpeat |
|
Ace
Posts: 498
Time Online: 13 days 4 hours 21 minutes
|
That must be some honny moon they went on... |
|
|
|
|
|
| iter |
| December 6, 2007, 12:18am |
|
Ace
Posts: 512
Time Online: 309 days 1 hours 7 minutes
|
Hi everyone, sorry to keep the suspence up like that. We are stranded on the Pacific island of Maui and don't expect to get rescued until next week. As long as I'm writing here, I want to thank Dennis. I received your metal part just before we left and it looked great! I'll post photos of it when we get back. Thank yo so much!
People have asked me for my DXF files. I'll come up with an orderly way to distribute them when I get back. If you have a /burning/ need for them, let me know.
Also, I don't think anyone from HI is on this board, but if you are, it would be cool to meet in real life.
Ari. |
|
|
|
|
|
| iter |
|
Ace
Posts: 512
Time Online: 309 days 1 hours 7 minutes
|
Hours today: 4 Running total: 236 Back to square 218I haven't touched the project in 2.5 months, in large part because I was stuck with the motor mount at an odd angle to fuselage sides. I finally decided to bite the bullet and redo the front end. I am grateful to all who gave encouragement and advice in this thread-- http://www.lonesomebuzzards.com/cgi-bin/forum/Blah.pl?m-1199673789/s-0/. Using a heat gun, I pulled the joints, cleaned up the epoxy left on surfaces and glued back the joints that delaminated (I posted photos of the damage in the other thread). When the glue dries tomorrow, I'll be back to where I was in early November, but wiser hopefully. Ari.
|
|
|
|
|
|
| Charlie Harris |
|
Ace
Posts: 922
Time Online: 23 days 31 minutes
|
Iter: I see You Have repaired the delaminations on the mount. If you ever need to you can use a litttle low pressure air from a compressor to blow the glue up in the crack if you can't put it in with a blade. Works well. Charlie |
|
|
|
|
|
| iter |
| January 19, 2008, 12:39am |
|
Ace
Posts: 512
Time Online: 309 days 1 hours 7 minutes
|
Hours today: 4
Running total: 240
2.5 months and over $100 worth of bar clamps later, I think I have a square nose drying in the shop. The manual says, "A couple of crank-up bar clamps will hold sides together while the glue cures." For sure. There are 11 clamps in this picture, including 3, 36" ones that hold the middle section together--I had two more cross-member pop out again before I broke down and bought the long clamps. I'm going to follow Randy's advice and keep the clamps there until I'm done gluing in the bottom plywood.
Ari.
|
|
|
|
|
|
| Randy lewis |
| January 19, 2008, 12:52am |
|
Ace
Posts: 965
Time Online: 21 days 18 hours 20 minutes
|
Ari, there is truth to the saying 'one never has enough clamps'. |
|
|
|
|
|
| iter |
| January 20, 2008, 12:12am |
|
Ace
Posts: 512
Time Online: 309 days 1 hours 7 minutes
|
Hours today: 1.5
Running total: 241.5
It looks like the frame cured straight this time and I'm ready to glue in the bottom plywood. When I was gluing up the sides, I could not believe how much epoxy the mahogany plywood soaked up. So this time I traced the frame's outline on plywood and painted it with epoxy. I'll let it sit for a couple of hours and then glue the sheet in place.
I also followed George's advice and rounded sharp edges in the bottom longeron. Thanks George!
Ari.
|
|
|
|
|
|
| Richard Wessel |
|
Guest User |
I'm at this stage in my rebuild myself. I guess I don't understand why you would want to paint the area and then let it set a few hours before gluing the sheet in place. My plan is to paint both the sheet and the frame with a liberal amount of epoxy and staple in place after letting the two parts sit for a short time. This way if the sheet soaks up to much I can add more epoxy if need be before I join the two.
BTW, Good Job! Nice and square! |
|
| Logged |
|
|
|
|
| iter |
|
Ace
Posts: 512
Time Online: 309 days 1 hours 7 minutes
|
Hours tonight: 1.5 Running total: 243 Glued & stapled the bottom sheet in place. This turned out to be harder than I expected, and I'm worried about the seam's quality. The plywood wanted to stay away from the frame in a great many places, and where it wanted to separate, staples didn't hold it. I ended up using small nails in a few places. I had my wife shine a flashlight inside the fuselage which made gaps in the seam visible. I guess I'll know tomorrow if I closed them well enough.
Quoted Text
I guess I don't understand why you would want to paint the area and then let it set a few hours
My idea was that by then epoxy would gel enough to stop soaking into plywood, but not enough to make bonding with fresh epoxy difficult. Ari.
|
|
|
|
|
|
| Randy lewis |
|
Ace
Posts: 965
Time Online: 21 days 18 hours 20 minutes
|
Ari,
Found a picture of how I held mine.
|
|
|
|
|
|
| iter |
|
Ace
Posts: 512
Time Online: 309 days 1 hours 7 minutes
|
Randy, your photos are great! Now if you could post them one step ahead of where I'm currently at instead of one step behind... :=)
Ari. |
|
|
|
|
|
| Randy lewis |
|
Ace
Posts: 965
Time Online: 21 days 18 hours 20 minutes
|
Let me know what your doing next |
|
|
|
|
|
| iter |
|
Ace
Posts: 512
Time Online: 309 days 1 hours 7 minutes
|
I'm waiting for epoxy to cure on the bottom skin (it's fairly cold here at the moment so I'm giving it extra time). Assuming that the bottom skin stuck, or after I fix whatever deficiencies in the glueline , I'll close the tail end and start putting in diagonals and cross-braces.
Ari. |
|
|
|
|
|
| Charlie Harris |
|
Ace
Posts: 922
Time Online: 23 days 31 minutes
|
First 5hrs. need to be at least 50 degrees for a proper cure. That came from Larry Isreal. probably works better. Charlie |
|
|
|
|
|
| Charlie Harris |
|
Ace
Posts: 922
Time Online: 23 days 31 minutes
|
Also on 1/8th sheeting staples should be at least 3/8th to 7/16th. some folks try to use 1/4. just not enough IMO! Charlie |
|
|
|
|
|
| Randy lewis |
|
Ace
Posts: 965
Time Online: 21 days 18 hours 20 minutes
|
No special tricks here just make sure things are straight and square. The book ends used for the front will help with this. I used a lot of T-88 building this section.
|
|
|
|
|
|
| iter |
|
Ace
Posts: 512
Time Online: 309 days 1 hours 7 minutes
|
Randy, did you have and problems bending the longerons to create the straight sections aft of station 5? I was surprised by how much force it took to bend the front, I hope the back will be easier.
Ari. |
|
|
|
|
|
| Charlie Harris |
|
Ace
Posts: 922
Time Online: 23 days 31 minutes
|
Iter: He has a straight edge screwed to the table holding it straight. that's what I did or it would have been crooked. I guess one side was easier to bend than the other. wood properties I guess. charlie |
|
|
|
|
|
| Randy lewis |
|
Ace
Posts: 965
Time Online: 21 days 18 hours 20 minutes
|
There is a strait edge screwed to the table on both sides ( can't see the one on the far side). The back, as I remember, bends a lot easier than the front, but make sure the top(bottom) longerons follow at the same bend. Somehow I wound up with them not the same when looking down on the fuse, so I had to cut the top (bottom) loose and re-glue. This step will be a lot easier if you have a second set of hands, one to bend and measure and one set to screw and clamp. (By that I mean screw blocks to the table, newlyweds) |
|
|
|
|
|
| Charlie Harris |
|
Ace
Posts: 922
Time Online: 23 days 31 minutes
|
Iter: just be sure and extend the center line on the table all the way to the tail end and keep each side the same from the center. as far as vertical just look back at the posts on Jan. 17th for a way to do that. Charlie |
|
|
|
|
|
| iter |
|
Ace
Posts: 512
Time Online: 309 days 1 hours 7 minutes
|
Hours tonight: 4.5
Running total: 247.5
Cut & sanded bottom plywood to shape, repaired about 10" seam breakage, installed straightedges to control rear fuselage curvature, made CAD drawings for RS-0 blocks that hold rear fuselage together as well as related plywood pieces. And I the plane finally has a straight, square nose.
Thanks for your advice Randy and Charlie. Compared to front end, the rear was almost too easy. And with all these long clamps I have now, I didn't even need much help from Irene (not in the shop anyway.)
Ari.
|
|
|
|
|
|
| Randy lewis |
|
Ace
Posts: 965
Time Online: 21 days 18 hours 20 minutes
|
Ari, looks good! If you look at your second picture, you can sort of see what I was talking about. Be real carefull with the top clamps because the wood will not bend evenly and you may get a lopsided edge like I did. In other words the bottom (top) is held straight to the bench but the top (bottom) may not be exactly parallel. Look real close at your photo on the right top longeron and you can see a slight wave right where the clamp is ( actually this looks really good just want to make a point for others going through this part of the build). It may just be the photo but on mine I missed it and had to re do the cross braces.
Man your fast! |
|
|
|
|
|
| iter |
|
Ace
Posts: 512
Time Online: 309 days 1 hours 7 minutes
|
Randy: I see what you mean. Thank you for bringing this to my attention, I'm glad I posted this picture before I put any glue in the joints. I'll take care of this before I do.
Rob: I agree wholeheartedly that you can't have too many clamps. Can I borrow some of yours?
Ari. |
|
|
|
|
|
| iter |
|
Ace
Posts: 512
Time Online: 309 days 1 hours 7 minutes
|
Hours today: 1.5
Running total: 249
I started cutting blocks that hold the tail together and as I was adjusting the rear fuselage sides, I had the bottom ply separate over a significant area. I repaired the damage using Randy's technique for holding down the ply.
Also, I am perplexed at why the RS-0 blocks are different widths top and bottom. Is there a reason the rear should not be rectangular? The way I read the plans, bottom is 3/8" wider than top.
Ari.
|
|
|
|
|
|
| Gene |
|
Ace
Posts: 283
Time Online: 9 days 1 hours 4 minutes
|
The reason for the difference in these two dimensions you remarked about is because the top longerons are coming closer to each other the further back you go and notice that the top is back further, therefore the longerons are closer. OK....?
Have a GREAT day...!
Gene |
|
|
|
|
|
| iter |
|
Ace
Posts: 512
Time Online: 309 days 1 hours 7 minutes
|
I thought about that, but the top longeron is only 1.5" longer than the bottom but the top is a whole 3/8" wider. It makes no sense to me and actually makes the sides not square to the table if I put in the blocks as they appear on the plans.
Ari. |
|
|
|
|
|
| George Sychrovsky |
|
Guest User |
I’m looking at your bottom ply and I have to say there is something seriously wrong with your gluing technique, if such a huge area just popped out by itself just sitting there how can you trust the rest of the glue joint, how much better you think is the rest of it holding and how long it will stay on, maybe only until you turn it right side up or until you start the engine ? Think about it.
Incredible enough , no one else said a word about it.
George |
|
| Logged |
|
|
|
|
| Randy lewis |
|
Ace
Posts: 965
Time Online: 21 days 18 hours 20 minutes
|
Ari, I think George is right here. That much surface area shouldn't have poped free like that. Two thoughts, are you getting glue squeeze out everywhere and are the joints being held closed tight for at least 12 hrs (24 is better) before removing clamps? Secondly, any chance your T-88 has gone south? I don't know if there is an expiration date for it or if it could go bad over temperiture extremes. The ply is springy but with that big a glue surface even 1/2 that area bonded down shouldn't pop. |
|
|
|
|
|
| flybob13 |
|
Ace
Posts: 222
Time Online: 5 days 20 hours 43 minutes
|
The bottom plywood looks kinda thick to me. What thickness did you use here? Could just be my old eyes though!  Bob |
|
|
|
|
|
| Charlie Harris |
| January 25, 2008, 12:24am |
|
Ace
Posts: 922
Time Online: 23 days 31 minutes
|
I sure am glad somebody has spoken about the glue on this project. I surely agree something is wrong with these joints. If when these joints pop and they are sticky between the parts, it has not cured. Also if you cannot pour the glue from the mixing container its not warm enough or it has strated to cure, and you need to mix a new batch. charlie |
|
|
|
|
|
| iter |
|
Ace
Posts: 512
Time Online: 309 days 1 hours 7 minutes
|
Look guys, I appreciate your input, and I welcome your critique, which is why I post problems I encounter in my build, not just successes. I also appreciate your concern for my safety, decision-making ability and sanity. I'm taking until tomorrow to respond to these messages. I'm used to George's communication style, but I came to expect better from the rest of this forum.
Ari. |
|
|
|
|
|
| Randy lewis |
|
Ace
Posts: 965
Time Online: 21 days 18 hours 20 minutes
|
Ari, I don't think anyone is meaning to present any kind of attitude here, just a genuine concern for another member and a chance for all of us to learn. If something seems amiss, and is caught here it could save a life. I've had my work questioned and it has usualy been to my benifit.
Randy |
|
|
|
|
|
| flybob13 |
|
Ace
Posts: 222
Time Online: 5 days 20 hours 43 minutes
|
Ari, you joined this group around the same time I did and I have been very impressed with your work and work habits. I think you have been a great inspriation to a lot of people, me for sure. I look forward to your post each day and even though my project was partially built when I got it, I will be looking back at your stuff, as well as others,for advice and clairification. And like I said, these 61 yr. old eyes don't see as well as they used to, even with cheaters.
Bob |
|
|
|
|
|
| George Sychrovsky |
|
Guest User |
Generally I only post here when it’s a matter safety or when answering the specific questions asked. I have said to people they did things wrong and I mean seriously dangerous in the past and sometimes people would get totally mad at me and wrote personal attack back to me without a single word addressing the substance of what I said. I could get really discouraged and say nothing anymore and stop trying to help anyone but I don’t, I don‘t take it personally either. Next time I see something dangerous and no one points it out I will speak up again. My objective is state the facts not to be gullible, I think we are all Men here talking about how to built our planes and not a bunch of ladies discussing their feelings like on Oprah show. Instead of bending out of shape about how somebody said something focus on what it is you did to end up with such poor glue joint, think if all the other things you glued are any better, how to test it how to fix them if they are as bad and how to do it right next time.
George |
|
| Logged |
|
|
|
|
| Dave Walker |
|
Wing Man Posts: 80
Time Online: 1 days 23 hours 12 minutes
|
Group - concerning temperatures of the T-88 - I have successfully worked with this adhesive at air temperatures of 16-18 degrees C (about 61-65 F). My experience is that temperatures in that range produce acceptable bonds. My shop temperatures drop to about 14 degrees C during the night. I do pre-heat my adhesive to slightly higher temperatures to facilitate pouring and mixing, but the material temperatures where the bond takes place are surely at the room temperatures previously mentioned. I do wait at least 24 hours (usually 48 for springy assemblies) before unclamping to ensure that the cure has sufficient strenght to proceed.
Temperature might be an issue with the failed bonds, but perhaps longer curing times, and adequate glue amounts are more important. Mixture ratios are also a consideration, but the adhesive is apparently quite tolerant of minor deviations. Most of us take only reasonable precautions when determining mixing ratios, and there are many successful projects built with this adhesive.
As far as "pot life" goes, I find that if it spreads with a stick, and is thin enough to flow out some, then it will bond.
Dave W. |
|
|
|
|
|
| Bob Daly |
|
Ace
Posts: 888
Time Online: 45 days 22 hours 25 minutes
|
Looks like not enough curing time to me. Cool temps or inexact mixing will greatly increase full cure time. The good news is that epoxy will eventually fully cure though it may take as much as two weeks. If you're at all worried you can always wrap the outside seam with fiberglass tape in epoxy. |
|
| Logged |
|
|
|
|
| Greg S |
|
Ace
Posts: 255
Time Online: 14 days 9 hours
|
I had the same thought as Bob regarding the thickness of the bottom plywood. It looks like it's closer to 1/4" than 1/8". When gluing on mine, I don't recall having any problems - just used good amt. of epoxy and staples to hold it in place till the glue set. Pulled the staples and that was that. If that ply IS 1/4", that would explain SOME of the problems holding it down.
Greg |
|
|
|
|
|
| Charlie Harris |
|
Ace
Posts: 922
Time Online: 23 days 31 minutes
|
Ari: on those rear end pieces of RS-o just hold the rear vertical and parallel and sand to fit. its not critical. You just need about 2-3/8 inside at the back. Charlie |
|
|
|
|
|
| Dave Walker |
|
Wing Man Posts: 80
Time Online: 1 days 23 hours 12 minutes
|
Thanks, Charlie for clarifying the size of the RS0 pieces at the tail. I, too was scratching my head wondering how this area was to be built. My plans show dimensions for the blocks as do Ari's, but there is also a note on the plans stating that the width dimensions are "approximate". My plans do not say whether the tail area (viewed from the rear) is supposed to be square.
The plans are quite good as far as they go, but the experience available from this group saves sooooo much trouble.
Dave W. |
|
|
|
|
|
| Charlie Harris |
|
Ace
Posts: 922
Time Online: 23 days 31 minutes
|
An old crock pot with 2 or 3 inchs of water works great. or an old coffee pot if shallow also works. charlie |
|
|
|
|
|
| Ricardo |
| January 25, 2008, 10:16pm |
|
Videos in UTube: ral1951 AcePosts: 2,772
Time Online: 75 days 23 hours
|
Ari, I don´t know if this will help, but:
When I glue plywood using clamps I also use staples for the adyacent sides. I have noticed that many areas where clamps are not located don't have enough pressure to push the glue into the wood.
On below picture where arrows are shown I would have placed several staples, but maybe you did .
At very low room temperature glue will be very thick and will not penetrate into wood.
Ricardo
|
|
|
|
|
|
| iter |
|
Ace
Posts: 512
Time Online: 309 days 1 hours 7 minutes
|
What a difference a day makes :=) I take this short break and there's all this engaged discussion happening in my thread! Now I know how to generate traffic :=)
I want to thank you all for your input and insight, especially George, Randy and Dave. It is not always easy to accept advice when you know you've made a mistake. I am learning to do that. I should explain that what ticked me off was mainly that some possible causes people posted where problems I'd anticipated and in fact photographed and posted some of the precautions I took. I wetted both sides with epoxy, I let it cure for 72 hours, etc., it's on the previous page of this thread. Also anyone who bothered to scroll up, even on this page, would see that the plywood is 1/8" mahogany, still stamped with its RS number from the kit.
Now the difficult part: I had a number of glue joint failures lately, and alarmingly, most have been in the glue line, not the wood. In particular, cross-members in the cockpit area kept popping out until I bought long clamps. George is right when he says that where one joint failed, others may, too. To clarify his question, the plywood didn't just pop on its own, the seam opened after I pulled the tail together which introduced a new stress. I had also turned the fuselage over to check how the plywood stuck to cross-members, so George is right again in that turning the fuse over precipitated the failure.
Now the good news: the problem seems to be in my glue, as Randy and Dave suggested. There is no expiration date on T-88 as such, but someone offline speculated that the hardener may have become contaminated with a small amount of resin which made it ineffective. I opened a fresh set of T-88 and mixed a batch. The components were much closer to liquid and easier to pour out of their bottles, the batch set faster, and the joints were strong. I will have to go back and check other joints I made recently to see if any need redoing. I may remove the bottom ply, clean it of old glue and reattach it again--but only after I'm done with top cross-members, cockpit reinforcement etc.--I want to make sure bottom cross-members don't start popping out again :=)
Ari. |
|
|
|
|
|
| iter |
|
Ace
Posts: 512
Time Online: 309 days 1 hours 7 minutes
|
On below picture where arrows are shown I would have placed several staples, but maybe you did .
Ricardo, this is exactly what I did! Stapled where you put the arrows. Seemed to help, too. Ari. |
|
|
|
|
|
| iter |
|
Ace
Posts: 512
Time Online: 309 days 1 hours 7 minutes
|
I had the same thought as Bob regarding the thickness of the bottom plywood. It looks like it's closer to 1/4" than 1/8".
It only looks thicker because I sanded (beveled) the edge. Ari. |
|
|
|
|
|
| iter |
|
Ace
Posts: 512
Time Online: 309 days 1 hours 7 minutes
|
Ari: on those rear end pieces of RS-o just hold the rear vertical and parallel and sand to fit. its not critical. You just need about 2-3/8 inside at the back. Charlie
Thanks. I followed this advice and where's what I ended up with:
|
Code
Top block: 2 3/8"   narrow end, 3 1/16" wide end
Bottom: 2 11/16" narrow end, 4 1/16" wide end |
|
With these numbers, the sides are almost parallel, though there is still some taper toward the bottom. Please forgive the parallax in the photo. Ari.
|
|
|
|
|
|
| iter |
|
Ace
Posts: 512
Time Online: 309 days 1 hours 7 minutes
|
Hours yesterday and today: 8
Running total: 257
Glued the tail ends of the fuselage together, glued in most of the diagonals, laser-cut and glued in triangular gussets on cross-members, laser cut end-plate.
Cloth pins are holding the gussets. I glued in the sticks yesterday with the new epoxy, and it cured very well (I'm keeping a sample though)
Curiously, I ran out of RS-6. I called JDT, and apparently there was an error made in the packing list, and John told me the missing 4 sticks are on their way. Thanks John! He was as surprised as I was at the number of kits that have shipped with this error without any of the builders complaining. Note that I received everything the packing list specified, nothing was missing in that sense. The packing list was in error.
I will glue in the missing 3 bottom and 1 top diagonals when the wood arrives.
Ari
|
|
|
|
|
|
| RedBird |
|
 Ace AcePosts: 1,093
Time Online: 15 days 15 hours 4 minutes
|
Ari - your project is looking great! I look forward to the day when I have made that much progress... - Tony |
| Why focus on proving how great you are, when you could focus on becoming better?... |
|
|
|
|
|
| Charlie Harris |
|
Ace
Posts: 922
Time Online: 23 days 31 minutes
|
Ari: Looking good! Another thing to watch for in T-88 is the glue, or clear bottle will get crystals in it when it gets old. I have been told that you can heat it and it will remix or the crystals will melt, but I aways discarded it or used it as a filler if needed. PLEASE DO NOT EVER HEAT EPOXY IN A MICROWAVE OVEN!! I DID. OPENED BOTH BOTTLES AND HEATED AT THE SAME TIME. JUST ABOUT 2O SECONDS JUST ABOUT PASSED OUT WHEN I OPENED THE DOOR. THE GLUE WENT GUMMY IN ABOUT 8HRS. I GUESS FROM THE FUMES MIXING, AND I HAD TO DISCARD 3/4 OF 1/2 PINT BOTTLES. STUPID MOVE!!! Charlie |
|
|
|
|
|
| Charlie Harris |
|
Ace
Posts: 922
Time Online: 23 days 31 minutes
|
Ari: You asked one time about building times. I just checked my logs and when I was at about the same point as you are, close as I can tell I had about 4oo hrs. But at about 3 1/2 years. I compleately scratch built and milled all the wood from boards and full plywood sheets. and I finished at about 650rs. . this included a lot of pondering how,untill I found this group. But I have never had so much fun. Charlie |
|
|
|
|
|
| Greg S |
|
Ace
Posts: 255
Time Online: 14 days 9 hours
|
Ari,
Didn't mean to demean your abilities in any way regarding the ply maybe being 1/4" rather than 1/8". Just was an observation. After looking at the picture awhile, I thought that just going by the look ot the plywood edge, one could draw a wrong conclusion. But having made a few mistakes myself while building, I know how easy it is to study the prints for what seems like forever, build a part and then see I made what was an obvious boo-boo. Sometimes like they say, you can't see the forest for the trees, that's why the more eyes on something, the better. I'm glad you finally found the probable cause to your grief. They say building is a learning experience. If that's the case, we're all certified geniuses! |
|
|
|
|
|
| iter |
| January 27, 2008, 11:54pm |
|
Ace
Posts: 512
Time Online: 309 days 1 hours 7 minutes
|
Hours yesterday: 3.5
Running total: 260.5
Glued in the 3 RS-4 diagonals that go from top longeron to bottom; glued in cockpit side reinforcement pieces and 2 top-side cross-members.
The plans show curved fuselage sides from front to cockpit and behind the cockpit, but in the cockpit area the side are shown straight and parallel. Mine were curved in one continuous line from the front up to the straight line behind the cockpit. I wish I'd have taken a picture to illustrate. I used lots of clamps to straighten cockpit sides. I hope they will stay straight after I remove the clamps (I will glue in corner reinforcements before I remove the clamps though)
Greg--Didn't mean to single you out. I appreciate the thoughtful feedback this group has been providing. I could never get to this stage in my learning process if it were not for your input.
Also yesterday my local EAA chapter (338) came by for a "project visit." Here are some of our members critiquing my progress. I had the tail assembled for their inspection which normally lives disassembled in the guest bedroom.
Ari.
|
|
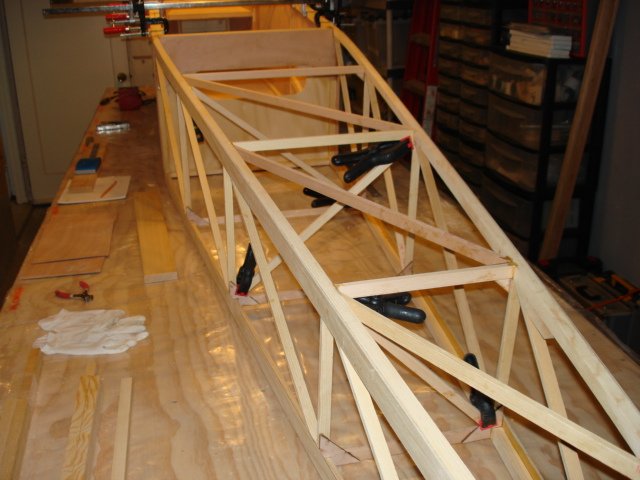 |
|
|
|
|
|
|
| iter |
| January 28, 2008, 12:05am |
|
Ace
Posts: 512
Time Online: 309 days 1 hours 7 minutes
|
Ari: You asked one time about building times. I just checked my logs and when I was at about the same point as you are, close as I can tell I had about 4oo hrs. But at about 3 1/2 years. I compleately scratch built and milled all the wood from boards and full plywood sheets. and I finished at about 650rs. . this included a lot of pondering how,untill I found this group. But I have never had so much fun. Charlie
Charlie, thank you for sharing your figures. If they mean what I think they mean, I'm 1/2 to 2/3 done! That's encouraging. Does your total include covering, installing the engine, etc., or is it just the assembly? I wish I'd done what you have and built from scratch. I now have the confidence to do it, but I didn't have anywhere near that when I started. Ripping the wood would have taken time to be sure, but with plywood it would have actually saved me time. I would have been able to CNC-cut many parts in one sitting from a big piece of plywood with less waste faster than swapping small pre-cut pieces in and out of the machine. Ari. |
|
|
|
|
|
| iter |
|
Ace
Posts: 512
Time Online: 309 days 1 hours 7 minutes
|
Hours today: 2
Running total: 262.5
Fitted and glued in cockpit corner reinforcements & 2 remaining tail block plywood reinforcement plates.
If I had to do the cockpit framing again, I would do it while the fuselage was still upside down on the table when I was just gluing the halves together, while the sides were still flat and parallel, before I pulled the noses and the tails together. I wouldn't have had to deal with bowed sides; the fuselage would have been stronger with fewer cross members popping out; and fixating the parts while the glue cures would have been easier when they were at table level, not suspended as they are now.
Ari.
|
|
|
|
|
|
| Charlie Harris |
|
Ace
Posts: 922
Time Online: 23 days 31 minutes
|
Yes You ar probable about 1/2 done and 3/4 to go. Charlie |
|
|
|
|
|
| iter |
|
Ace
Posts: 512
Time Online: 309 days 1 hours 7 minutes
|
First 90% of a job take 90% of the time. The remaining 10% take 90%.
Ari. |
|
|
|
|
|
| iter |
|
Ace
Posts: 512
Time Online: 309 days 1 hours 7 minutes
|
Hours today: 4 Running total: 266.5 Glued in a few small pieces; made CAD sketches of cockpit opening in top plywood; spent 3 hours planning next steps. I am limited in space, in particular I may have to move the fuse to off-site storage. I want to do as much as possible (short of varnishing) without removing the fuse from bench. This means making some parts out of sequence as it's described in the manual. Next steps according to this plan: fuel tank installation, top decking, windshield, empenage installation, elevator, rudder & tailwheel linkages. I may or may not have enough room to build the landing gear while I still have the fuse here. I appreciate feedback on this plan. Irene took this photo today. Wasn't long ago I was sitting on paper drawing of an airplane making noises. ( http://www.lonesomebuzzards.com/cgi-bin/forum/Blah.pl?m-1185574047/s-60/#num60) I have large wood resonators now (fuselage sides) to help amplify these noises! Ari.
|
|
|
|
|
|
| Charlie Harris |
|
Ace
Posts: 922
Time Online: 23 days 31 minutes
|
Off site storage for fus. In the Den on one of the couch's. worked for Me, But my wife was not pleased. Charlie
|
|
|
|
|
|
| iter |
|
Ace
Posts: 512
Time Online: 309 days 1 hours 7 minutes
|
Hours today: 1.5
Running total: 268
Glued in 3 diagonals and bottom 1.5" plywood strips.
I received 4 sticks of RS-6 from JDT yesterday--remarkable, given that I only called to request them Friday afternoon. Thanks John! I glued them in today, along with the long plywood strips that cover them.
Yesterday, I experimented with fiberglass-reinforced packing tape under my staples. The results are encouraging. Most of the staples came right out when I pulled the tape today, and the staples left much smaller marks on plywood--basically only two holes, no depression between them.
Charlie, my wife is very supportive of my airplane project, but I don't think she'd approve of this type of storage. It would however make a good conversation piece for guests :=)
Ari.
|
|
|
|
|
|
| iter |
|
Ace
Posts: 512
Time Online: 309 days 1 hours 7 minutes
|
Hours today: 1.5
Running total: 269.5
Worked on gas tank holding brackets. I'm almost done with them, but not quite. Tomorrow I'll take them to the workshop and cut the middle parts out on a bandsaw. I drilled 1/2" holes to get the saw blade into position to cut a long parallel line. The holes will also mean that I have nice round edges to match the tank's round corners. To drill so close to the edge, I shimmied the stock with a scrap piece of wood the same height as the RS-10 I was drilling.
Ari.
|
|
|
|
|
|
| Charlie Harris |
|
Ace
Posts: 922
Time Online: 23 days 31 minutes
|
Ari: You will get to use the tape idea a lot on the wings also. Try and run the Cross way the staple, you will get more threads to pull with. But then you probably have thought of that. You know I like the way you are managing this thread, it will cover most of the tipps needed for a new builder. Charlie |
|
|
|
|
|
| iter |
|
Ace
Posts: 512
Time Online: 309 days 1 hours 7 minutes
|
Charlie, you're right about the fiber direction. I had a DUH moment when I tied to pull a tape that ran in the wrong direction and it just tore lengthwise. It also help to double up the tape--one layer of fibers is sometimes weak enough to break.
Ari. |
|
|
|
|
|
| Randy lewis |
|
Ace
Posts: 965
Time Online: 21 days 18 hours 20 minutes
|
Ari, to one of your earlier questions about scheduling and off site storage. There is a lot of work to do on the fuse that takes a lot of time. Everything gets fitted to it and all the stuff that's not in the plans happens there; fuel system, wiring, controls, pito and static lines, gages, et. It is nice to have it on the gear so you can roll it in and out of the shop. The wings can be built and put away, either off site or attached to the ceiling, but are very fragile and hard to handle. The main gear does not take up much space so I would suggest building and attaching them befor storage. Then maybe move on to the wings, and later come back to the fuse assembly. I wont bring up covering and paint yet, that takes lots of space. |
|
|
|
|
|
| Charlie Harris |
|
Ace
Posts: 922
Time Online: 23 days 31 minutes
|
Ari: yes that 650 was comlete and painted. and first engine start and complete break-in and a little taxi with no wing at about 10.5hrs then to the airport for final install of the wings. Charlie |
|
|
|
|
|
| Charlie Harris |
|
Ace
Posts: 922
Time Online: 23 days 31 minutes
|
ari: cut up some 1inx2in strips of 2lt coke bottle. it's tough and works great. Charlie |
|
|
|
|
|
| iter |
|
Ace
Posts: 512
Time Online: 309 days 1 hours 7 minutes
|
Yeah I don't think I can paint in my garage. Cover maybe, but not paint. There's just not enough room to put up a paint booth--there's barely room to walk around the table, and that only if I wheel the lawnmower out. On the other hand, I may be able to secure the hangar (and help) of an experienced builder at my airport for the covering & painting. It's still a long time away though.
Ari. |
|
|
|
|
|
| Charlie Harris |
|
Ace
Posts: 922
Time Online: 23 days 31 minutes
|
Ari: More convenient at home if neighbors will allow. About 6 weeks. Charlie
|
|
|
|
|
|
| iter |
|
Ace
Posts: 512
Time Online: 309 days 1 hours 7 minutes
|
How much did you pay for this setup--frame and plastic and all?
Ari. |
|
|
|
|
|
| Charlie Harris |
|
Ace
Posts: 922
Time Online: 23 days 31 minutes
|
Ari: Lowes has the tent 18x20. But my brother-in-law had one that was damaged by wind and he gave it to me. we spent about $40.00 for bent replacements. and an exterminating co. sold us some (several) butt end rolls of plastic for about $30.00. We lucked up but I'm guessing about $200.00 would do it. And two good box fans for about $18.00 each will vent it. Now we used latex and it dried real fast so back inside double garage at night for the parts. we lucked up and only had some wind damage to the plastic twice in 6 weeks. but no rips just tape came loose. worked real well. Painted April and may so no bugs. Charlie |
|
|
|
|
|
| flybob13 |
|
Ace
Posts: 222
Time Online: 5 days 20 hours 43 minutes
|
Charlie, I didn't see a respirator in that picture  Bob |
|
|
|
|
|
| Larry |
| February 1, 2008, 10:24pm |
|
Ace
Posts: 1,139
Time Online: 6 days 18 hours 49 minutes
|
Ari,
From the pictures you have posted I'd say your doing a great job on your miniMAX. Keep up the good work it will all be worth it the first time you take to the air in an airplane you built.
Larry |
| a mile of road will take you a mile, a mile of runway can take you anywhere. |
|
|
|
|
|
| Charlie Harris |
| February 1, 2008, 11:46pm |
|
Ace
Posts: 922
Time Online: 23 days 31 minutes
|
Ari Sorry, not hijacking the thread, this is to explain. It's latex and two fans running one input one exhaust. and here Mike and my rudder charlie
|
|
|
|
|
|
| iter |
|
Ace
Posts: 512
Time Online: 309 days 1 hours 7 minutes
|
Hours today: 1.5
Running total: 271
Finished cutting the fuel tank brackets; found fuel tank position in fuselage and tank neck position on top deck; cut hole in deck to accommodate tank neck.
Ari.
|
|
|
|
|
|
| Charlie Harris |
|
Ace
Posts: 922
Time Online: 23 days 31 minutes
|
By the way guys all painting was do with a cheap Harbor Freight syphon gun. and setup with a drier air filter and a second small regulator in the air line. If I remember about 25 to 35lbs. of pressure and it worked great. A guy in our EAA chapter that runs a body shop said you do not have the best to get great LPHV results. and at less that $50.00 bucks 5yrs ago we figured why not try it. Also used it on some expensive paint a boat. Worked good on that too, but hard to cleanup. Charlie |
|
|
|
|
|
| iter |
|
Ace
Posts: 512
Time Online: 309 days 1 hours 7 minutes
|
Hours today: .5
Running total: 271.5
Glued top tank brackets to top plywood deck.
I slowed down again in the last week or so. The sad reason behind this is that after a year on "sabbatical," I'm interviewing for jobs again. The interviews take a toll, and soon I may actually be working full-time. Don't you hate how work gets in the way of building?
Ari.
|
|
|
|
|
|
| Knut A |
| February 6, 2008, 10:41am |
|
LN-YJE AcePosts: 779
Time Online: 21 days 16 hours 8 minutes
|
Iter
Put a reference to this thread in your CV, and you will have a job in no time. May be a planebuilderjob as well!!
Seriously, be glad your health admit you to take a job..... suppose you need the exstra income now when you got your own family.
Wish you the best with the family, future jobs and the MiniMax......apropos, will we see a MiniIter soon?
Knut A |
|
|
|
|
|
| iter |
|
Ace
Posts: 512
Time Online: 309 days 1 hours 7 minutes
|
Knut, I have been telling employers about my project as you suggest, and the interest has been overwhelming. It has nothing to do with my trade (software engineering) but people are fascinated with this project.
Future plans for extra passengers is one of the reasons I need to go back to work.
Ari. |
|
|
|
|
|
| iter |
|
Ace
Posts: 512
Time Online: 309 days 1 hours 7 minutes
|
Hours today: 2.5
Running total: 274
Installed lower gas tank brackets.
This was trickier than I expected. The manual says "Temporarily mount the top deck on the fuselage. Locate the tank and hold in place with braces, tape, or whatever is handy." I tried a number of "whatevers" before I was able to get the tank to stay on long enough for me to mark the inside of the fuse. I think bubblegum was what did the trick eventually :=)
Now I'm confused slightly about the plywood "shelf" that goes under the tank. Am I supposed to glue it to the brackets, or is it supposed to just lay on top of them? I'm reluctant to glue it because the brackets mount to fuselage skin with bolts, and movement of the skin will cause stresses on the bolts as well as the glueline, for no apparent structural benefit.
Ari.
|
|
|
|
|
|
| Richard Wessel |
| February 8, 2008, 11:34am |
|
Guest User |
Ari,
The shelf just sits on top of the brackets....do not glue.
Rich |
|
| Logged |
|
|
|
|
| Cy V |
|
Ace
Posts: 640
Time Online: 14 days 16 hours 39 minutes
|
Ari, Just out of curiosity, are you doing work on the project to build a nuclear fusion reactor with the same name as your handle? http://www.iter.org/ |
| Bad spellers of the world untie! |
|
|
|
|
|
| iter |
|
Ace
Posts: 512
Time Online: 309 days 1 hours 7 minutes
|
Richard, thanks. I had the idea I shouldn't glue it, and I appreciate the confirmation.
Cy, no connection. They actually beat me to register that domain in 1997--while I was thinking if I want a .com or a .org, both got registered :=)
Iter means "journey," or "path" in Latin, the English word "iteration" is derived from it. It's been my handle ever since I needed one to log into computers. I even had a logo for it :=) This one must be 15 years old.
Ari.
|
|
|
|
|
|
| iter |
|
Ace
Posts: 512
Time Online: 309 days 1 hours 7 minutes
|
Hours today: 4.5
Running total: 278.5
Cut out and glued in cockpit corner reinforcements, engine compartment rear wall and associated crossmember; attached seat and seatback; glued fuel tank shelf reinforcement member.
I figured the corner reinforcements were mostly gussets, and their middle portions didn't do much, so I drilled holes in them. Didn't save much weight, but made me feel good. As an added benefit, holes made it easier to clamp the pieces together. I coated the gussets in epoxy seeing as I will not be able to varnish them once I glue in the upper deck.
Ari.
|
|
|
|
|
|
| George Sychrovsky |
|
Guest User |
Cutting that hole is a bad idea, that gusset is subjected to very high loads when twist forces are applied to the fuselage like when hitting a pothole with one wheel. This gusset is one of the first things to break. Like this.
|
|
| Logged |
|
|
|
|
| iter |
|
Ace
Posts: 512
Time Online: 309 days 1 hours 7 minutes
|
George, thank you for pointing out my mistake. Do you think I should glue another piece of plywood on top (or the bottom rather) of this gusset? Or perhaps I should add gussets to the front of the crossmember? Or maybe a piece of triangular stock inside the cavity? Or maybe all of these?
Ari.
|
|
|
|
|
|
| beckmore |
|
Fledgling Member Posts: 2
Time Online: 2 hours 35 minutes
|
It seams to me that in both picture above, the grain direction of the plywood was wrong, they shoud be vertical to those members.
am I right? like this
|
|
|
|
|
|
| beckmore |
|
Fledgling Member Posts: 2
Time Online: 2 hours 35 minutes
|
and I find it alot easier to leave the side panel of and put them on the last step, it make it more accessable, espectialy when doing the engine mount base, like this I can make sure they are good fit
|
|
|
|
|
|
| beckmore |
|
Fledgling Member Posts: 2
Time Online: 2 hours 35 minutes
|
and the side can be sanded very flat to make sure the side panel will bond well.
|
|
|
|
|
|
| iter |
|
Ace
Posts: 512
Time Online: 309 days 1 hours 7 minutes
|
Wane, excellent point about the grain direction, I made sure to use transverse grain in this piece. Also, your advice about leaving off side plywood is good, if late. A number of people have already made the same suggestion in this thread in the past,, but after I'd glued them in.
Ari. |
|
|
|
|
|
| iter |
|
Ace
Posts: 512
Time Online: 309 days 1 hours 7 minutes
|
Hours today: 6.5
Running total: 285
Made tailwheel steering bar; installed tailwheel; made fairleads for tailwheel cables; replaced wrong-sized aileron yoke with an excellent part Dennis made for me from my DXFs; routed the back end of the top plywood deck to shape and glued it in place.
I don't have a photo of the top deck today because the fuselage is sittin upside down while glue cures and there isn't much to see.
I found the two plastic parts (pictured above my fairleads) among the kit hardware. Are these the "cable guides" the plans speak of? I found no other use for them, but I'd appreciate it if anyone can confirm this is what I should use them for.
Ari.
|
|
|
|
|
|
| Randy lewis |
|
Ace
Posts: 965
Time Online: 21 days 18 hours 20 minutes
|
Ari, I used nylon toilet seat bolts and nuts for the plastic guide. I just drilled a hole through the center then cut to length. |
|
|
|
|
|
| djohn |
|
Ace
Posts: 648
Time Online: 24 days 19 hours 31 minutes
|
Quoted Text
Are these the "cable guides" the plans speak of?
The "hose barb" fittings you are referring to are in fact the cable guides. Dennis |
|
|
|
|
|
| iter |
|
Ace
Posts: 512
Time Online: 309 days 1 hours 7 minutes
|
Thanks Dennis. And thanks again for the yoke. I remember you mentioned you made the holes slightly undersized. It wasn't too much work to enlarge them, but if you're going to make similar parts for yourself I recommend against it. I filed the holes larger by hand, and their finish is nowhere as good as what you produced. Yours were exceptionally smooth. Thank you again, and let me know if there's anything I can do for you in turn.
Ari. |
|
|
|
|
|
| djohn |
|
Ace
Posts: 648
Time Online: 24 days 19 hours 31 minutes
|
Thanks for all of the kind words Ari. That was the first metal part I produced on the CNC router. there is a little deflection in the Router mechanism which means you don't get what you program. I will just program them a little larger next time, I knew how difficult it would be to enlargen them by hand which is why I warned you in advance about them.
On the "anything I can do in return", I would be pleased as punch to see you complete the plane-thats all.
Thanks
Dennis |
|
|
|
|
|
| Charlie Harris |
|
Ace
Posts: 922
Time Online: 23 days 31 minutes
|
Iter: I'm always late, but a hi-speed Dremal with a fine grinder will produce a smoot hole. also a lot of guys do not have anything to turn a 5/8th or 1in. hole. I You can find a Spade bit that has the short points on the side you can go through the .125 aluminum. Just bore 1/2 way then turn over to the other side. try it on a scrap peice. it works. Someone has just got to get a tip page started. Charlie |
|
|
|
|
|
| Charlie Harris |
|
Ace
Posts: 922
Time Online: 23 days 31 minutes
|
Randy: toilet seat bolts? You must have come up with that idea like the toilet tank washers for the fuel filler neck gasket. Charlie |
|
|
|
|
|
| iter |
|
Ace
Posts: 512
Time Online: 309 days 1 hours 7 minutes
|
Oh, it wasn't difficult, I just hated putting scratch marks on this beautiful surface. And you did warn me that the openings were a couple of thousands undersize, so there was no surprise.
Charlie--I think you're right about a tips page. A wiki perhaps?
Ari. |
|
|
|
|
|
| Larryg |
|
Fledgling Member Posts: 15
Time Online: 2 days 5 hours 59 minutes
|
Hi,
Just found your log. Well done. Where did you get the ordinates for the wing rib? I screwed up my drawing and been looking for the ordinates since.
Larry |
|
|
|
|
|
| iter |
|
Ace
Posts: 512
Time Online: 309 days 1 hours 7 minutes
|
Hours today: 5
Running total: 290
Routed floorboard cutout; cut a thread into and installed tailwheel pushrod; cut cockpit opening & cut top deck to shape; installed control stick and aileron teleflex cables; installed fuel tank.
I know I'll have to take many of these fittings out, perhaps more than once. I wanted to see how they all fit together. I was surprised, for instance, at how much the red teleflexes stick out. Am I supposed to have this huge loop hanging out in the slipstream? Also, there wasn't enough room on the upright for a 970-3 washer, so I cut mine. Is this typical or even acceptable (see photo)?
Ari.
|
|
|
|
|
|
| iter |
|
Ace
Posts: 512
Time Online: 309 days 1 hours 7 minutes
|
I used fiberglass-reinforced strapping tape for staples again. This time I used two layers of it, and it worked really well. In the few places where the tape didn't pull staples clear out of the plywood, it at least pulled one side which made it easy to pull the rest.
|
|
|
|
|
|
| iter |
|
Ace
Posts: 512
Time Online: 309 days 1 hours 7 minutes
|
I used a scroll saw to cut the cockpit opening. I'd strategically drilled four holes before I glued the top deck in to tell me where to start cutting, and then cut along the perimeter. It felt like opening a tin can.
Ari.
|
|
|
|
|
|
| iter |
|
Ace
Posts: 512
Time Online: 309 days 1 hours 7 minutes
|
Hi,
Just found your log. Well done. Where did you get the ordinates for the wing rib? I screwed up my drawing and been looking for the ordinates since.
Larry
Larry, welcome to the board and thank you for your comments. I traced the original drawing because by the time I got to making DXFs, I'd already built a jig and all my ribs, so I had to make my CAD fit the physical "legacy" parts. If you are starting from scratch, I'd suggest using NACA 4414 which is what the airfoil is supposed to be based on. This thread has some relevant discussion: http://www.lonesomebuzzards.com/cgi-bin/forum/Blah.pl?m-1200899724/s-0/Ari. |
|
|
|
|
|
| Larryg |
|
Fledgling Member Posts: 15
Time Online: 2 days 5 hours 59 minutes
|
Hi Ari,
I looked at the 4414. The rear spar would be shallower then the current airfoil.
I owned the 1100 plans since 2000. I love the plane but not sure of the 2 stroke.
Larry |
|
|
|
|
|
| iter |
|
Ace
Posts: 512
Time Online: 309 days 1 hours 7 minutes
|
Hours today: 1.5
Running total: 291.5
Cut and glued top plywood strips; installed rudder cable fairleads & cable guides.
Ari.
|
|
|
|
|
|
| iter |
|
Ace
Posts: 512
Time Online: 309 days 1 hours 7 minutes
|
Larry, don't know about the spar. I'm sure if you called JDT and gave them your plans number and explained that you damaged a drawing, they'd mail you an new one, for a nominal fee at most.
Ari. |
|
|
|
|
|
| Larryg |
|
Fledgling Member Posts: 15
Time Online: 2 days 5 hours 59 minutes
|
Ari,
One of the reason's for the airfoil ordinates is I have a homemade CNC router to cut out the gussets and nose pcs.
I downloaded the dxf file for the airfoil.
What engine are you going to use?
Thanks |
|
|
|
|
|
| iter |
|
Ace
Posts: 512
Time Online: 309 days 1 hours 7 minutes
|
The airfoil is the least-useful part of my drawings, precisely because I had to reverse-engineer it from ribs I'd already made. I'll happy if you find the files useful though.
My plans call for Rotax-447. I have not bought an engine yet.
Ari. |
|
|
|
|
|
| iter |
|
Ace
Posts: 512
Time Online: 309 days 1 hours 7 minutes
|
Hours over the last week and today: 6
Running total: 296
I finished a few odds and ends in the fuselage (a couple of missing gussets, etc.), removed and re-glued the bottom ply and started on the landing gear.
Given the trouble I had last time with the bottom ply, I wanted to make sure I clamped and weighed it down as thoroughly as I could. Don't mind the tree stumps :=)
Ari.
|
|
|
|
|
|
| iter |
|
Ace
Posts: 512
Time Online: 309 days 1 hours 7 minutes
|
Hours today: 5
Running total: 301
Ran the gear legs through a belt sander, glued their other skins and made some metal hardware for the LG.
Two gear legs are stacked one on top of the other. Lower one is wrapped in garbage bag for glue separation.
I've reached the 300 hour mark. I must be done according to JDT literature!
Ari.
|
|
|
|
|
|
| Pilotpeat |
|
Ace
Posts: 498
Time Online: 13 days 4 hours 21 minutes
|
Ari- I recently broke 300 hours on my Tandem Airbike and I had 30 ribs done, all four spars and the metal fittings for the wings (aileron, strut & wing attach). Other than a couple of other small parts that is pretty much all I had.
Pete |
|
|
|
|
|
| Pilotpeat |
|
Ace
Posts: 498
Time Online: 13 days 4 hours 21 minutes
|
Don't mind the tree stumps :=)
Ari.
Those tree stumps look like they are probably part of a honey-do list... |
|
|
|
|
|
| iter |
|
Ace
Posts: 512
Time Online: 309 days 1 hours 7 minutes
|
Hours today: 3.5
Running total: 304.5
Drilled gear legs at 37 degrees for axle, installed axle mounting brackets, drilled axle, temporarily installed axle on gear legs.
The LG is just sitting on top of the fuse in this photo--but I expect that it will be mounted tomorrow.
Peat: I knew that tree needed trimming when I bought the house 4 years ago. Finally got to it.
Ari.
|
|
|
|
|
|
| Pilotpeat |
|
Ace
Posts: 498
Time Online: 13 days 4 hours 21 minutes
|
I'm guesing that the axle is made out of 4130, but I cannot tell from the pictures-do the plans call for a solid round bar or is it a tube? If tube, what wall thickness? My weedhopper had a solid axle.
Pete |
|
|
|
|
|
| Charlie Harris |
|
Ace
Posts: 922
Time Online: 23 days 31 minutes
|
It is a tube. yes it is 4130. I think .058, My plan is at the airport I will check if no one speaks up. Charlie |
|
|
|
|
|
| Charlie Harris |
|
Ace
Posts: 922
Time Online: 23 days 31 minutes
|
Iter: Everything looking good. Don't overlook the little !/4 plate on the bottom of the fus. at the front of the gear. Charlie |
|
|
|
|
|
| Randy lewis |
|
Ace
Posts: 965
Time Online: 21 days 18 hours 20 minutes
|
I think it's more like .125 thk. |
|
|
|
|
|
| iter |
|
Ace
Posts: 512
Time Online: 309 days 1 hours 7 minutes
|
It's indeed 4130, 1" OD x .095
|
|
|
|
|
|
| iter |
|
Ace
Posts: 512
Time Online: 309 days 1 hours 7 minutes
|
Hours today: 4.5
Running total: 309
Installed landing gear.
Ari.
|
|
|
|
|
|
| iter |
|
Ace
Posts: 512
Time Online: 309 days 1 hours 7 minutes
|
A couple of questions:
Why are there no washers specified for gear leg bolts? Washers /are/ specified for the other side of the hinge.
What bolts are supposed to hold diagonal tubes to the axle? I couldn't see a number in the plans. It looked like AN3-16A would be a good fit, but I didn't have any left in the kit. I used AN3-17A's. I wonder if they are needed somewhere else...
Ari.
|
|
|
|
|
|
| HenryBrown |
|
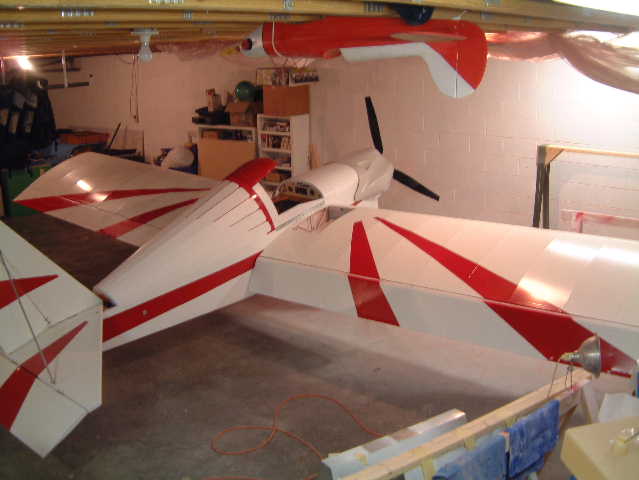 Flight Leader Posts: 119
Time Online: 14 days 10 hours 14 minutes
|
Ari,
One of the purposes of a washer is to spread the pressure from the bolt head or nut over a larger area to prevent crushing/damaging the wood. Where the nut or bolt head is against metal (like the hinge that holds the landing gear on) a washer is not needed because the metal hinge itself does the job of the washer. When a nut is used against a piece of metal, sometimes a split lock-washer or star washer is used to keep the nut from coming loose and backing off. However, no lock-washer is needed here because you are using self locking (Nyloc) nuts.
Hope this helps clear things up a little.
Henry |
|
|
|
|
|
| andrew81401 |
|
Fledgling Member Posts: 9
Time Online: 6 hours 43 minutes
|
hi there ari this is just a question i am currently in the process setting up my garrage to build my kit and i was just wondering how long your work bench is thanks |
|
|
|
|
|
| Richard Wessel |
|
Guest User |
Ari,
Use the large washers on the gear leg bolts. Why it was omitted on the plans I don't know but they are needed there!
Rich
|
|
| Logged |
|
|
|
|
| Bob Hoskins |
|
Fly Safe AcePosts: 1,208
Time Online: 38 days 16 hours 39 minutes
|
Hi Ari;
This log of yours is a wonderfull thing for all of us. This is one of the most active BBS's I've seen so far. You are doing a nice job on your plane. Wait till you fly it, you will love it even more.
As for hours, I quit counting at 700, LOL. The hours didn't matter anyway. I was enjoying the plane.
Just another note, Wayne did a nice job on the plans. You should see what is out there. I am presently building a 7/8 scale Nieuport 11. The "plans" are terrible. I wish Wayne Ison had drawn them.
Keep up the good work Ari, you are helping a lot of people.
Fly safe, Bob |
| Fly safe and have fun. |
|
|
|
|
|
| iter |
|
Ace
Posts: 512
Time Online: 309 days 1 hours 7 minutes
|
Rollout! Fuselage on gear!
Major milestone achieved.
Ari.
Given that I spent 9 hours building my table, I'm exactly 300 hours into the project at this point.
|
|
|
|
|
|
| Richard Wessel |
|
Guest User |
Looking good Ari!! I'm about to the point where your at in my rebuild, but with a bunch more hours in it than you (way to picky for my own good). I was wondering did you build your gear on the bench and transfer it or did you just build it directly on the fuselage? And on my plans the bolts holding the diagonal tubes to the axle are indeed AN3-17A's. My plans do not show any washers on the gear leg bolts also, but they are needed.
Once again Great Job! It is indeed a milestone that I am eagerly looking forward to myself.
Rich |
|
| Logged |
|
|
|
|
| iter |
|
Ace
Posts: 512
Time Online: 309 days 1 hours 7 minutes
|
I built it right on the fuse. It seems to me that the main advantage of building it on the bench like the manual says is that you don't have to reach so far to work on some of the fittings, and it isn't as much of an issue for me--I'm 6'4"
There is a separate, unrelated problem that I ran into though: 2 of the 6 bolts on each side went too close to crossmembers to put nuts on them (right side shown; the same is true on the left.) What can I do? Do I need to plug these holes and drill new ones? Will this weaken the longeron? Suggestions appreciated.
Ari.
|
|
|
|
|
|
| Bob Daly |
|
Ace
Posts: 888
Time Online: 45 days 22 hours 25 minutes
|
Use a Dremel or similar tool and nibble away just enough of the crossmember to get a washer on the bolt end. If you're afraid of removing too much wood, grind the washer edge flat a bit. |
|
| Logged |
|
|
|
|
| Charlie Harris |
|
Ace
Posts: 922
Time Online: 23 days 31 minutes
|
Ater: Mike had this one place and mine did not??? just put a triangle corner block on the rear of the cross peice and grind the cross peice to get a washer and bolt on. Charlie |
|
|
|
|
|
| Larryg |
|
Fledgling Member Posts: 15
Time Online: 2 days 5 hours 59 minutes
|
Hi Iter,
Your log has got me fired up to build my plane. I will keep my A-65 and other stuff from the Jodel for later use.
Are you going to brace your fuselage for crash protection?
Larry |
|
|
|
|
|
| Charlie Harris |
|
Ace
Posts: 922
Time Online: 23 days 31 minutes
|
Build it light to fly>>> You can't build it strong enough to crash, only heavy enough to. Charlie |
|
|
|
|
|
| Larryg |
|
Fledgling Member Posts: 15
Time Online: 2 days 5 hours 59 minutes
|
Hi,
I will follow the plans and build light.
I have read the forward fuselage can come apart in hard landing. Just looking at others opinion at making a great plane safer.
I'm not planning to test it, it would be just in case.
Larry |
|
|
|
|
|
| iter |
|
Ace
Posts: 512
Time Online: 309 days 1 hours 7 minutes
|
Larry & Charlie, thank you for your kind words. I'm glad that you guys find this useful. I received so much information and support from this forum, I'm happy to give back.
Ari. |
|
|
|
|
|
| iter |
|
Ace
Posts: 512
Time Online: 309 days 1 hours 7 minutes
|
Hours today: 1
Running total: 310
Made the 4 aluminum brackets that hold horizontal stabilizer to fuselage. In conjunction with Maker Faire where I'll exhibit my MAX project and my CNC art, our local broadsheet, San Jose Mercury News, interviewed me today and photographed me while I was working on the airplane. They said an article should appear a day or two before the show, which runs this Saturday and Sunday.
Ari. |
|
|
|
|
|
| flybob13 |
|
Ace
Posts: 222
Time Online: 5 days 20 hours 43 minutes
|
Good for you Ari, I know you will do the homebuilding community proud.
Bob |
|
|
|
|
|
| iter |
|
Ace
Posts: 512
Time Online: 309 days 1 hours 7 minutes
|
Yeah, I feel like a real celebrity :=)
Hours today: 1
Running total: 311
Installed stabilizer brackets on fuselage and drilled matching holes in stab. There isn't enough room in my garage to turn the fuse over and install the stab. I'm taking the project to Maker Faire tomorrow and I'll install the tail there for the first time. Hope it fits :=)
Ari. |
|
|
|
|
|
| iter |
|
Ace
Posts: 512
Time Online: 309 days 1 hours 7 minutes
|
I just came back from Maker Faire where I exhibited my miniMAX and some of my CNC art. This was the first time I had the tail on the fuselage and it fir right on. I'm totally exhausted from two days of non-stop talking to people. Over the last 4 days I packed the airplane into a truck, put it together at the show, fought to keep some 60,000 people from fondling it too much, then taking it apart again and hauling it home. Rick Coykendall stopped by this morning and we had a chat about my project and his v-max. This is the first time I met a member of this board in real life and that was very nice. Rick wisely came by early in the morning before the crowds rolled in. You can see some of my CNC art in the background. A couple more photos in Irene's photo bucket: http://s252.photobucket.com/albums/hh22/irina_krupnik/Also, here's the Mercury News article that came out yesterday (amazingly, some of the stuff that got printed is actually related to what I said. not all of it though) http://www.mercurynews.com/ci_9141345Ari.
|
|
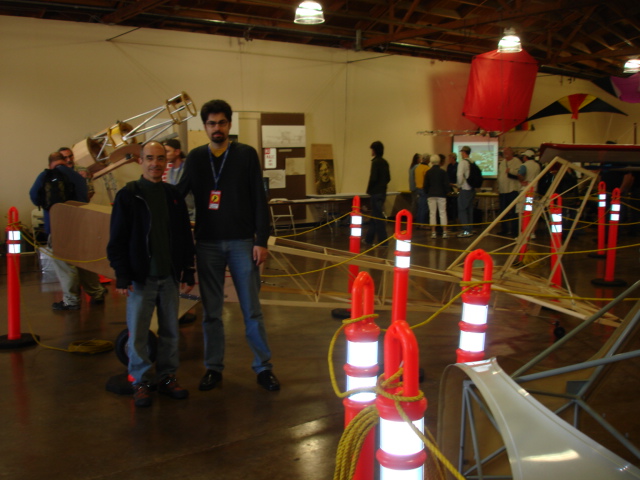 |
|
|
|
|
|
|
| Ricardo |
|
Videos in UTube: ral1951 AcePosts: 2,772
Time Online: 75 days 23 hours
|
Excellent Ari ! I can image the load of questions while attending so many visitors  You couldn't get more inspired after all these events . Regards Ricardo |
|
|
|
|
|
| iter |
|
Ace
Posts: 512
Time Online: 309 days 1 hours 7 minutes
|
Since I did almost no work on the project in the last two months, I have to conclude that I can only do two of these three things at once: Work on airplanes, hold a job and be married. It looks like the project will go on a back burner for a while.
Ari. |
|
|
|
|
|
| skyblazer |
|
Ace
Posts: 213
Time Online: 29 days 11 hours 48 minutes
|
I know where your comming from, Held down my job, worked on my plane and put my wife on the back burner and she is still with me.  It worked out but was not something I could get away with again. Your doing it right!!! |
|
|
|
|
|
| Mike Howe |
|
MiniMax, Hawk, GA (Tipacer), another Max to finish AcePosts: 375
Time Online: 7 days 7 hours 30 minutes
|
I have no idea how hard they work you out in CA, but here in podunk Michigan, we just mozy out to the garage and do one thing each day. Times can get very tough to try to balance all those parts of your life. But, if you can try to do just one small thing each day, and two the day after you miss one day, you'll get through it. Your plane may begin to collect a few cob webs while you get through the tough days. That's OK. It'll still fly just the same. You've worked so hard on this plane. It won't hurt to slow down a bit. After all, you won't be flying very fast in it... why not build the same way.
Best of wishes!
Mike Howe |
|
Mike Howe
howetyr@yahoo.com
|
|
|
|
|
|
| radfordc |
|
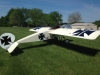 Ace AcePosts: 1,836
Time Online: 18 days 1 hours
|
The trouble with building is that you think you need to spend many hours in order to accomplish things. Budd Davisson ( http://www.airbum.com ) developed what he calls the "Quik-Project Approach". He writes: "First, I can’t change the way my life runs. There are too many deadlines, student’s schedules, financial stuff, etc., that form it into what it is. So, I’ll have to work within that framework and I happened upon the perfect solution last week during a particularly productive Commode Counseling Session (CCS). I’m calling it the Quik-Project Approach to Life. Under this approach, I change my outlook on shop time. Rather than thinking in hours, look at projects, no matter how large, in chucks of a half hour. I can manage a half hour here and there, but an entire hour will never happen. To put this concept into action, I dedicated a big section of my ever-present commode notebook to first breaking the roadster down to half hour segments. Every time I’m in there meditating, I mentally break another section of the car into half hour projects and write them down. For instance, I need to separate a fat bundle of wiring into three smaller ones and arrange them vertically in a squeezed-down Adel clamp to fit between the firewall and the fuse box. I can do that in a half hour easily. And it’ll be major progress on that particular project. I’ve almost finished the roadster list and it has less than 100 steps, 50 hours total. Piece of cake. Next I’ll do a list for The Accuracy Project. However, the desk knife is such an easy project, no more than three hours total, that it may move ahead in priority. I feel so much better just having come up with the Quik-Project concept. And I’ve already done one of the steps on the knife (blanked out the handle). So life is good. And it’s moving ahead. So, what about today? Screw it! Maybe I’ll just go back to bed." |
|
|
|
|
|
| iter |
| September 4, 2008, 7:42am |
|
Ace
Posts: 512
Time Online: 309 days 1 hours 7 minutes
|
Hours today: 2
Running total: 313
After not touching the project for 4 months, I decided to get back and to get serious. I have very good reason to try to finish the apirplane by February. If I don't, it is likely I will have to take a much longer break from building it.
So with this in mind, I glued 1/16" doublers on top of slots in 1/16" strips on top and bottom of fuselage and made drawings to cut plywodd for headrest.
Ari.
|
|
|
|
|
|
| Randy lewis |
| September 4, 2008, 4:42pm |
|
Ace
Posts: 965
Time Online: 21 days 18 hours 20 minutes
|
Great to have you back Ari! Sounds like a full court press to get it done by February. |
|
|
|
|
|
| iter |
| September 4, 2008, 5:16pm |
|
Ace
Posts: 512
Time Online: 309 days 1 hours 7 minutes
|
Sounds like a full court press to get it done by February.
I had to look this up :=) Basically... We're not telling anyone yet... But we've got big changes coming come April or thereabouts... And if I don't fly the thing until then, I don't know when will be the next time I'll get to it. It's an aggressive schedule, but it's either that, or give up on it now. Ari. |
|
|
|
|
|
| Richard Wessel |
| September 5, 2008, 3:58am |
|
Guest User |
Ari,
Let me second Randy and welcome you back! It is indeed good to hear that you have started working once again on your max with an eye towards finishing it soon. Funny thing I was just thinking of you yesterday and had almost posted a message on your where abouts. It is good to see that your back and running.
I look forward to your posts and keeping up with your build.
Rich |
|
| Logged |
|
|
|
|
| iter |
| September 5, 2008, 6:51am |
|
Ace
Posts: 512
Time Online: 309 days 1 hours 7 minutes
|
Thank you Rich! It's good to be back. I missed working on the plane and I missed talking to you guys. Now I just need to make sure I stay on track and finish it in time!
Hours today: 2.5
Running total: 315.5
Cut headrest parts and glued RS-18 frame pieces on them.
Ari.
|
|
|
|
|
|
| Charlie Harris |
| September 5, 2008, 3:21pm |
|
Ace
Posts: 922
Time Online: 23 days 31 minutes
|
ITER: I hope You meant to say 1/8th strips, And 1/8th doublers. (Missed typed).. Charlie |
|
|
|
|
|
| iter |
| September 5, 2008, 5:09pm |
|
Ace
Posts: 512
Time Online: 309 days 1 hours 7 minutes
|
Charlie you are right of course. I can't count at 1 am :=)
Ari. |
|
|
|
|
|
| iter |
| September 6, 2008, 8:23am |
|
Ace
Posts: 512
Time Online: 309 days 1 hours 7 minutes
|
Hours today: 3 Running total: 318.5 Beveled, glued headrest parts; cut out windshield plastic. Table saws are fun! I'm still learning how to use them efficiently. I had to bevel 8 sides on 3 headrest parts tonight. Only took me 2 hours :=) But gluing them together was easier than I anticipated. The bevels just locked in place and I was able to use masking tape instead of my usual staples to hold the pieces together. I will add top piece tomorrow after these pieces are dry. I wonder if with my height (6'4") I should have made the headrest taller. I'll have to try it on for size when it's dry, but I worry that it will be useless in its main function of raising shulder harneses above shoulders. I also cut out plastic for the windshield on a scroll saw. I'm curious about how scratch-prone is this polycarbonate--can I remove protective sheeting before I rivet it onto windshield frame, or should I leave it on until I'm ready to fly?
Quoted from the manual
5. A section is cut out of the windshield at top center so that the top frame tube can be used for a handhold when entering and exiting the cockpit
Polycarbonate sheet that came with my kit had an outline drawn on it that showed no such cutout. Is this something that turned out to be not useful and was dropped in production, or is the outline incomplete? Ari.
|
|
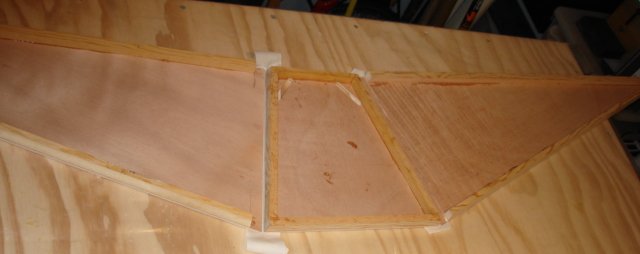 |
|
|
|
|
|
|
| Richard Wessel |
| September 6, 2008, 12:49pm |
|
Guest User |
Ari, Nice work on your headrest! I wish I had that machine you used to cut your wood with. Talk about accurate! My 1500 plans show no hand hold cutout at the top of the windshield. Nor is there any mention of such in the text. I had thought about adding one as you'll be grabbing it anyway to steady yourself as you clime in. My idea was to add a simple hand strap that I could rivet on top the windshield bow through the plastic. I had thought of cutting the plastic for the hand hold but I wondered if that would cause the windshield to be somewhat distorted in this area. I would leave the protective sheeting on till your about ready to go. Just cut a strip around the outside away where you'll be riveting it to the bow and attaching it to the fuselage. The polycarbonate will scratch! When you do remove it just before your ready to go you'll see how much by the differences between the protected area and the area you removed the protective sheeting from in order to rivet. My new windshield has a kind of brown paper protective sheeting which I understand can be a real b#&%^ to get off if they have sat around a while (which mine has). Your looks like the same thing I had on my T-bird and it peeled right off after years of being on there. You wont have any problem. You build fast! With that in mind, is there any chance I could send mine down to ya?? It just might be the only way it ever gets done! LOL Keep up the work my friend, its looking great! Happy Landings, Rich |
|
| Logged |
|
|
|
|
| iter |
| September 6, 2008, 6:32pm |
|
Ace
Posts: 512
Time Online: 309 days 1 hours 7 minutes
|
I guess I'll make a cutout then. It seemed like a good idea, I was just surprized it wasn't in the outline JDT drew on my part. Perhaps this idea was lost in transition from 3-piece windhsield to curved. Thanks for confirming my suspicion about scratches. I wanted to make airplane noises sitting in my cockpit behind a clear windshiled, but I guess I'll have to hold off until I'm done.
Quoted from 199
You build fast! With that in mind, is there any chance I could send mine down to ya??
Thanks Rich. I don't know about sending the whole projec to me, but I'd be more than happy to cut any parts for you on the machine. Ari. |
|
|
|
|
|
| iter |
| September 7, 2008, 8:09am |
|
Ace
Posts: 512
Time Online: 309 days 1 hours 7 minutes
|
Hours today: 5
Running total: 323.5
Glued top of headrest; added missing parts to rear fuselage.
There were a few things missing in rear fuselage, most of them from DWG 11. The bracket that holds elevator cable and shoulder harness wire, the RS- 9 blocks that go next to it to hold it from sliding forward, the little brackets that route rudder cables and their associated RS-9 blocks, the bearing for elevator horn, the missing RS-6 diagonal that never got glued in, that jazz.
Speaking of rudder cables, the plans call for plastic guides for them. My kit had 2, 1/8" nylon barbs from what looked like the plumbing section of HD. These got installed in lower rear of fuse for the benefit of tailwheel cables. I went looking for another pair to use on top of fuse, but the smallest I could find were 1/4" items. Where can I get the 1/8" ones my plans call for?
I found out that I made a mirror image of the elevator horn, and instead of sitting on the centerline of an offset rib, it sits 3/4" to the right of centerline. Fortunately, I /think/ I have just enough RS-201 left over to make a new one.
Ari.
|
|
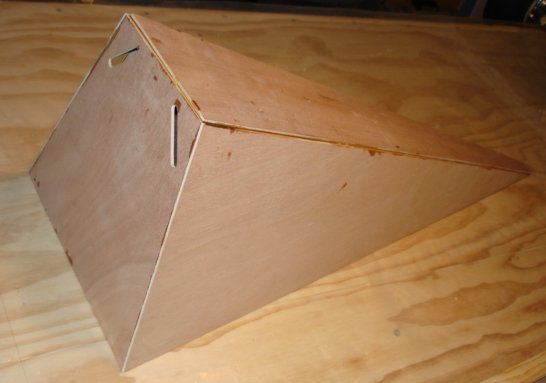 |
|
|
|
|
|
|
| Pilotpeat |
| September 8, 2008, 5:31pm |
|
Ace
Posts: 498
Time Online: 13 days 4 hours 21 minutes
|
If you want to keep the edges of the windshield nice as the middle par, just peal the edge back as far as you need to rivet it, then once it is assembled put masking tape over the exposed areas of the window. You could cover the rivets and everything. That will keep the exposure down to a minimum and you'll have maximum protection!
Pete |
|
|
|
|
|
| George Sychrovsky |
| September 8, 2008, 5:44pm |
|
Guest User |
This thread has become so big it is affecting functionality of the board, every time somebody adds to it the “Recent posts” page gets screwed up , the recent posts don’t show and bunch of old posts appear instead.
George |
|
| Logged |
|
|
|
|
| Ricardo |
| September 8, 2008, 11:28pm |
|
Videos in UTube: ral1951 AcePosts: 2,772
Time Online: 75 days 23 hours
|
George:
I think this happens because you have the Page option open for all pages. If you select just the last page to be open then the entire thread will be hidden.
I haven't had that problem, but another way to speed up the thread having all pages open would be:
To let the threads be up to 3 or 4 pages. Name it i.e. "Iter's Project - Section 1"
Once those pages are completed, a new thread is open and named "Iter's project section 2" with a link to section 1 on the very first post, so if you want to read the prior post just hit the link. Same thing can be done for jumping forwards. And so on..
Iter's project would be on Section 4 or 5 by now.
That way the entire project gets united by name and link connection.
|
|
|
|
|
|
| iter |
| September 9, 2008, 7:28am |
|
Ace
Posts: 512
Time Online: 309 days 1 hours 7 minutes
|
Hours today: 2.5
Running total: 326
Varnished inside fuselage nose.
I lost my epoxy varnish virginity today, so to speak. Man, this stuff stinks! What do you guys use for respirators? I was using one of those paper masks and clearly I'll need to buy something better.
George: How about this--I'll finish up my fuse and I'll start another thread, build log part II so we won't have so very long threads.
Ari. |
|
|
|
|
|
| Hailin |
| September 9, 2008, 3:19pm |
|
Fledgling Member Posts: 0
|
Ari,
In the picture dsc01109_9877.jpg, what is seen in the inside corners under the nylon barbs on each side running the length of the fuselage? I can't tell whether that is an epoxy fillet or a tube?
Thanks! |
|
|
|
|
|
| iter |
| September 9, 2008, 4:37pm |
|
Ace
Posts: 512
Time Online: 309 days 1 hours 7 minutes
|
Bill, it's just the inside side of fuselage longerons. It just looks funny in that light.
Ari. |
|
|
|
|
|
| skyblazer |
| September 9, 2008, 6:51pm |
|
Ace
Posts: 213
Time Online: 29 days 11 hours 48 minutes
|
This thread currently has 16,346 views and (one complaint). No trouble here...
And on the 2 degree on spar carry through Ari you got me to thinking, I don't think I put that in mine, i'll check next chance I get, but I haven't had any trouble, not even when attaching wings. |
|
|
|
|
|
| Bob Hoskins |
| September 9, 2008, 7:16pm |
|
Fly Safe AcePosts: 1,208
Time Online: 38 days 16 hours 39 minutes
|
Hey iter;
I agree with skyblazer. This is the only time a MiniMax has been done this way. The entire buid is on the Buzzards. What a great thing for new people coming on board. They will have a complete record to look at. Thanks to you. You have done a wonderful job here iter. I would not change a thing. All a person has to do is click on the current page and there is no problem. If it was a problen Alan would have done something by now. I vote to keep it just the way it is. How about the rest of you? Just look at how many views there are. If people were not interested, why that number, LOL.
Enjoy your work iter. I hope you can get it done in time so you can enjoy the other half, flying.
Keep on truckin bud.
Bob |
| Fly safe and have fun. |
|
|
|
|
|
| djohn |
| September 9, 2008, 7:29pm |
|
Ace
Posts: 648
Time Online: 24 days 19 hours 31 minutes
|
+1 I have to agree with skyblazer and Bob. If this thread can stay intact it may be of benefit to a new builder. About the issue with the "unread posts" button, I also had it start from day one and inundated me with about 15000 posts to read. It took me about a month and a half to cover all of the posts it was throwing at me. I thought I was posting too often and it was Alan's way of slowing me down a bit,  but I learned a heck of a lot about these planes and personalities on this board, to say the least it has been somewhat of a growth period. It still throws a post I have already read at me once in a while but I don't care. Without a doubt this is the finest forum I have been a part of-KEEP UP THE GOOD WORK ALAN AND THANKS!!! Dennis (I have also been working out the details of my differential disc brake setup in the mean, time and almost have all of the bugs worked out and will share pics of it when I complete my taxi testing, on another thread) |
|
|
|
|
|
| George Sychrovsky |
| September 9, 2008, 8:16pm |
|
Guest User |
I wasn’t complaining the thread is too long, I agree having it all in one is good thing , I was simply pointing out the fact there is a bug in the forum script, fixing the bug would be the way to go but may be impossible. If you use Recent posts page to see new posts at least be aware you are missing o bunch of posts that don’t show up because of this
George |
|
| Logged |
|
|
|
|
| Cy V |
| September 9, 2008, 9:00pm |
|
Ace
Posts: 640
Time Online: 14 days 16 hours 39 minutes
|
This would be a good thread to make into a "sticky."
|
| Bad spellers of the world untie! |
|
|
|
|
|
| iter |
| September 10, 2008, 6:56am |
|
Ace
Posts: 512
Time Online: 309 days 1 hours 7 minutes
|
No useful work today (we had our EAA chpater meeting tonight and that ate my airplane budget for the day), but I wanted to post a photo of the varnished headrest--the varnish cured as advertized, and it looks good. I wonder if I should sand it before I put second coat on, and if so, what sandpaper to use? The photo is mostly for completeness--this page has the headrest progerssing from a CAD drawing to a finished thing. Varnish on the inside of the fuselage worked out as well but it looks too boring to photograph.
Ari.
|
|
|
|
|
|
| iter |
| September 11, 2008, 7:03am |
|
Ace
Posts: 512
Time Online: 309 days 1 hours 7 minutes
|
Hours today: 1
Running total: 324.5
Spot the difference.
Ari
|
|
|
|
|
|
| iter |
| September 12, 2008, 7:03am |
|
Ace
Posts: 512
Time Online: 309 days 1 hours 7 minutes
|
Hours today: .5
Running total: 325
Drilled and tapped brackets for rubber cable guides.
Ari.
|
|
|
|
|
|
| flybob13 |
| September 13, 2008, 1:28am |
|
Ace
Posts: 222
Time Online: 5 days 20 hours 43 minutes
|
Ari, a 3-M 6000 series half mask respirator should do the trick, you will have to ask the people at 3-M which filter you will need. They have a # for technical support, sorry I don't have if available, it's in my stuff at work, but if you give them some info off the can of stuff you'er using, they can suggest the correct filter.
Oh, and I also like the thread, and George, I like your site also.
Flybob |
|
|
|
|
|
| iter |
| September 13, 2008, 1:42am |
|
Ace
Posts: 512
Time Online: 309 days 1 hours 7 minutes
|
You mean this isn't something I can pick up at a hardware store?
Ari. |
|
|
|
|
|
| BlueMax |
| September 13, 2008, 5:40am |
|
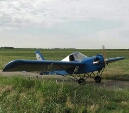 1550 Vmax w/ Eros canopy mod AcePosts: 1,244
Time Online: 35 days 15 hours 47 minutes
|
Iter, just go to lowes or home depot, they will more than likely have the respirator that you need.
Chris |
| Remember, in aviation death sentences are administered by the laws of physics, not the FAA. |
|
|
|
|
|
| iter |
| September 16, 2008, 7:11am |
|
Ace
Posts: 512
Time Online: 309 days 1 hours 7 minutes
|
Hours today: 2.5
Running total: 327.5
Made front fuselage cover and landing gear support pads.
The front has a centerline marking on the inside to make it easier to fit to fuse. It laso has a 3 1/2" round hole for access to engine bolts (should fit standard inspection hole cover)
LG pads have hole in them from hold-down screws. One looks bigger than the other because one was cut upside down and is countersunk on the other side.
This forum tells me I've been online for over 700 hours. This means I spent 2 hours figuring things out here for every hour I spent in the workshop. Even if I spent half of that time talking about unrelated stuff, it still doubles the amount of time I've invested in this project. And I was wondering why I can't seem to get the hours/day ratio up!
Ari.
|
|
|
|
|
|
| iter |
| September 17, 2008, 7:11am |
|
Ace
Posts: 512
Time Online: 309 days 1 hours 7 minutes
|
Hours today: 2.5 Running total: 330 Plugged holes in fuselage, varnished second coat inside fuselage. When I drilled fuselage for landing gear piano hinges, some of my holes went right into fuselage crossmembers (see http://www.lonesomebuzzards.com/cgi-bin/forum/Blah.pl?m-1185574047/s-360/#num374 for photo). I decided to plug theese holes and re-drill them 1/4" forward. So I cut a bunch of 3/16" dowel pieces and epoxied them in. Dowels are visible in lower longeron. Also visible is difference in color between coated and uncoated wood. I also put in a second coat of varnish on inside front fuselage. I had a bunch of varnish left over last time, so I mixed a smaller batch tonight, and ended up short. I'll need to go back and finish this second coat before I'll close up the fuselage. Ari.
|
|
|
|
|
|
| Jacob Lolk |
| September 17, 2008, 4:24pm |
|
Fledgling Member Posts: 18
Time Online: 9 days 15 hours 2 minutes
|
Ari,
On page 5 of your build log thread, on October 5th 2007, you posted a picture (dsc00495_5064.jpg) related to the control stick assembly. I started my Himax back in 1988 when I ordered the plans set from TEAM, probably making my project the longest ongoing since I am just about done with the woodwork. Anyway In that photo I see in the underlaying blueprint that there has been issued an "Angle Bracket Modification" on the angle that connects the torque tube with the aileron yoke. In my drawings the angle only has one bolt in each one of those parts, instead of the two your drawings indicate.
Would somebody please be kind enough to let me know what it says under that "Angle Bracket Modification" header which is all I can read in the photo.
Jacob |
|
|
|
|
|
| iter |
| September 17, 2008, 5:15pm |
|
Ace
Posts: 512
Time Online: 309 days 1 hours 7 minutes
|
Hi Jacob, welcome to the forum! I know people who've been building an airplane longer than you have, so don't lose heart! We've had an influx of international members lately, which is very encouraging. We literally have members all over the world!
The modified angle bracket is a result of experience with the original design that showed that more toque could be applied to the system than a single bolt and narrow angle bracket could sustain with friction. As a result, the yoke would slip and develop too much play. The modified angle bracket uses two bolts where the old design one used one.
I'm sure that if you contacted JDT, and gave them your plans number, they'd be happy to mail you a paper copy of this addendum sheet. Alternatively, if you post your email here or PM it to me, I'll be happy to send you a scan of mine.
Ari. |
|
|
|
|
|
| Jacob Lolk |
| September 17, 2008, 8:34pm |
|
Fledgling Member Posts: 18
Time Online: 9 days 15 hours 2 minutes
|
Hi Ari,
Thank you so much for your welcome notice. I realize that I have never introduced myself even though I have been a active reader of this forum several years now. Whenever I had a doubt I could pretty much look the answer up here, much the same way one would be able to find other facts in an encyclopedia. Your build log is extremely interesting reading and full of really good photos.
I am actually from Denmark but have lived the past 9 years here in Madrid. One day I will post some photos of my project which has followed me ever since I was 18.
With respect to the angle bracket modification on the control stick assembly, I kindly ask you to send a scan. At some point I will make a list of the bulletins and modifications I have and ask JTD to check whether I am missing some.
Jacob |
|
|
|
|
|
| iter |
| September 17, 2008, 8:58pm |
|
Ace
Posts: 512
Time Online: 309 days 1 hours 7 minutes
|
Jacob,
Thank you for your kind words about my photos. I got your email and I'll scan the addendum and email it to you when I get home tonight. There are a couple of sheets like that in my set of plans. I'll see about making you a list. My plans are 14 months old, and I don't think there were any new addenda published since then.
I would be wonderful to you see some of your photos.
Ari. |
|
|
|
|
|
| BlueMax |
|
1550 Vmax w/ Eros canopy mod AcePosts: 1,244
Time Online: 35 days 15 hours 47 minutes
|
Any progress on the max as of late?
Chris |
| Remember, in aviation death sentences are administered by the laws of physics, not the FAA. |
|
|
|
|
|
| Jack10739 |
|
Fledgling Member Posts: 13
Time Online: 5 days 39 minutes
|
Hi
The wood in the photos appear to be pine ,is this true? I thought spars and longerons should be spruce. Can someone clarify that before I start to buy wood for my 1300Z. I chose the 1300 because I have a 1/2 vw engine,37hp that needs a home.
Jack |
|
|
|
|
|
| Pawnee |
|
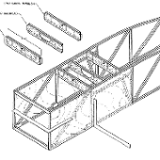 Fledgling Member Posts: 15
Time Online: 7 hours 43 minutes
|
Spruce is what i used on my 1600 ribs and spars . Aircraft spruce has some great pine spruce for ribs look to be cut out very nice.
Brian long |
|
|
|
|
|
| Gene |
|
Ace
Posts: 283
Time Online: 9 days 1 hours 4 minutes
|
Brian, I'm not sure what you mean by "pine spruce" that you say AS&S has available. Pine is pine and spruce is spruce. Two different critters.
Gene |
|
|
|
|
|
| theecoop |
|
 Flying AcePosts: 1,330
Time Online: 19 days 5 hours 17 minutes
|
Nice work ,love the walk through of your project |
| Perfect Practice makes perfect! |
|
|
|
|
|
| Knut A |
| February 19, 2009, 1:55pm |
|
LN-YJE AcePosts: 779
Time Online: 21 days 16 hours 8 minutes
|
"I have very good reason to try to finish the apirplane by February. If I don't, it is likely I will have to take a much longer break from building it." Hi Ari I can see you are logging in at times you usually should be at sleep.... I suppose the reason is either.. 1- working hard on your MiniMax project even at night.....or 2- working hard on a possible awake MiniAri project? Will you please update us on your project(s). With pics please. I suppose I have the board with me in a greeting to Irene...we miss her smile when stiring T-88... Knut A |
|
|
|
|
|
| Ed Gil |
| February 19, 2009, 11:36pm |
|
Flight Leader Posts: 173
Time Online: 18 days 3 hours 58 minutes
|
Ari, I have also missed hearing from you on this board, so I second Knut's inquire......keep us posted please! |
| Ed Gil.... Max owner -Hays, KS |
|
|
|
|
|
| sky dragon |
| February 24, 2009, 9:06pm |
|
Guest User |
great idea the clothes pegs,i'm just starting on my second 1600r.now were did she leave the washing? |
|
| Logged |
|
|
|
|
| iter |
| September 7, 2009, 2:33am |
|
Ace
Posts: 512
Time Online: 309 days 1 hours 7 minutes
|
I am trying to restart my miniMAX project again after not touching it for a year. This time I'm getting help. I'm recruiting one of my former Young Eagles who is now working on his private to help me build the plane. (He is learning on a scholarship from my local EAA chapter). The deal is that he keeps me on track and helps where he can, and gets a share of the finished airplane in return.
This is my first post in a year. I am now the father of a 4.5-month-old girl, Leah Deborah. I am learning more than I ever believed possible about unconditional love. This last year is quite a trip. I am also learning about being there for Irina and Leah. I am learning about making choices and finding a balance I am happy with.
I review this thread and plot the number of posts in it and the number of hours I put into the airplane every month.I recall my original plan to finish it in 300 hours and 3 months. I chuckle. I wonder if I can finish the project before Leah is old enough to help me with it.
Ari.
|
|
|
|
|
|
| himaxflyer |
| September 7, 2009, 2:53am |
|
Ace
Posts: 487
Time Online: 19 days 10 hours 38 minutes
|
Good to hear from you again Ari. Just try to do something on the plane every day, and you will get it done! Take care, Jim Chuk
PS you have a cute little girl |
|
|
|
|
|
| Randy lewis |
| September 7, 2009, 3:18am |
|
Ace
Posts: 965
Time Online: 21 days 18 hours 20 minutes
|
Great to have you back Ari. I've seen you lurking and hoped you would get restarted. Beautiful little girl, you'll have your hands full. Brilliant idea to get young eagle support, now you have an excuse to work on your plane and complete it.
Randy |
|
|
|
|
|
| iter |
| September 7, 2009, 7:28am |
|
Ace
Posts: 512
Time Online: 309 days 1 hours 7 minutes
|
Hours today: 2.5
Running total: 332.5
I have DXF drawings of main wing spars.
I want to finish a couple of small things on the fuselage and move to the wings. I have a complete set of ribs and plan to make spars next. The manual recommends that I glue the spar frames first and glue on the webs later. I wonder if it may be easier to lay the webs on the bench and glue the spar caps and verticals directly to them, all in one operation.
Chuck, Randy, GOW--thank you for your encouragement. I love the comradery on this board. Randy--this is my plan exactly behind getting a YE on board. Now I have a commitment to him.
Ari.
|
|
|
|
|
|
| Knut A |
| September 7, 2009, 9:17am |
|
LN-YJE AcePosts: 779
Time Online: 21 days 16 hours 8 minutes
|
Good to see you back, Iter. And it seems that you made a good job besides the MiniMax-project too.... Congrat to you both for that! Knut A |
|
|
|
|
|
| Ed Gil |
| September 7, 2009, 11:34am |
|
Flight Leader Posts: 173
Time Online: 18 days 3 hours 58 minutes
|
Ari,
Congratulations to you and Irena, your daughter is beautiful!
So glad to hear back from you! |
| Ed Gil.... Max owner -Hays, KS |
|
|
|
|
|
| iter |
| September 8, 2009, 2:17am |
|
Ace
Posts: 512
Time Online: 309 days 1 hours 7 minutes
|
Knut, Ed, thank you for your support. I show your responses to Irina and she says, wow, these guys remember you and welcome you back! Thanks guys.
I am studying the spar drawing, and I notice that I am not clear on the relationship between the front and the rear spar as far as the diagonal RS-11 pieces go. I notice that in my drawings, it is farther outboard on the rear spar than the front. I superimpose the rear (red) on the front (green) and the displacement is apparent. I wonder if this is an error in my drawing, or an artifact of the design and the angles between the wing and the wing struts.
Ari.
|
|
|
|
|
|
| djohn |
| September 8, 2009, 2:44am |
|
Ace
Posts: 648
Time Online: 24 days 19 hours 31 minutes
|
|
|
|
|
|
| Randy lewis |
| September 8, 2009, 3:17am |
|
Ace
Posts: 965
Time Online: 21 days 18 hours 20 minutes
|
Ari, it's been a long time but I remember that when I was rewady to install the aluminum brackets they wern't centered on one of the diaganols. I couldn't figure out what was off, everything was to print. What you show looks like what i saw. I ended up adding some thickness to one side of the diagonal so that the holes were drilled more or less in the center. I think you should use the 64" dim to the strut attach hole and work back to the centerline of the diagonal. I may be wrong but I think one might need to shift slightly. |
|
|
|
|
|
| iter |
| September 8, 2009, 6:19am |
|
Ace
Posts: 512
Time Online: 309 days 1 hours 7 minutes
|
Hours today: 3
Running total: 335.5
Drawing and jigging wing spars.
Thank you Dennis for your encouragement. Randy, I notice that the 46" hole is 1/4" lower on the rear spar than the front. I wonder how it all works out in the end with wing incidence etc. I am not clear on what is horizontal when the wing is on the plane. If the bottom of the wing is parallel to the reference line, the bottoms of the front and rear spars are level. Starting from the 64" point, the rear spar is spot on; the front is .033" off center--that's just over 1/32".
I feel a lot of excitement as I'm starting to work on the spars. This feels like a milestone. For a year and half, I'm saying that the next thing I plan to work on are the spars, and now I am building them. I notice that I attach a special significance to spars as a critical load-bearing piece of the airplane. I like the feeling of handling RS wood again.
One of the lessons from my CAD experience is that I am not making pubilcation-quality drawings. I want just enough DXF to build one set of parts. I forgo full-size printout this time. I print 3 legal-size pages on my inkjet--the ends and the middle with diagonals on it. I draw the other verticals directly on the bench. I notice that small pieces of paper are easier to maneuver on the bench than 15-foot long rolls. I nail a piece of 1/2" plywood to the side of the bench at every vertical. Tomorrow I clamp the spar cap to them and start cutting verticals.
Ari.
|
|
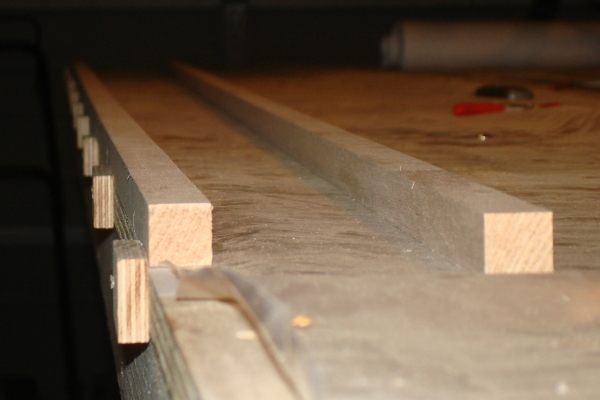 |
|
|
|
|
|
|
| Pilotpeat |
| September 8, 2009, 7:27pm |
|
Ace
Posts: 498
Time Online: 13 days 4 hours 21 minutes
|
lol thats funny, I have a tape measure exactly like that one!
Pete |
|
|
|
|
|
| iter |
| September 9, 2009, 6:25am |
|
Ace
Posts: 512
Time Online: 309 days 1 hours 7 minutes
|
Hours today: 0.5
Running total: 336
I cut some verticals for spars.
I love the smell of sawdust in the morning!
Ari. |
|
|
|
|
|
| Harless Greear |
| September 9, 2009, 10:30am |
|
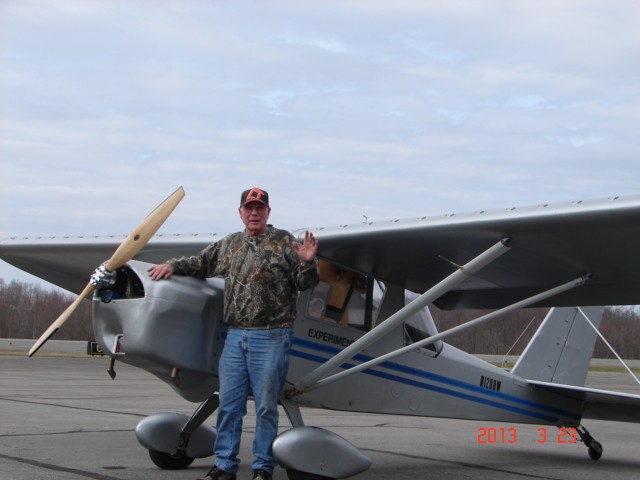 Ace AcePosts: 884
Time Online: 35 days 14 hours 19 minutes
|
Ari, The only critical measurement for drilling the spar wing brackets is the distance vertical from the bottom of the wing.. Make sure you have at least what the print calls for and 1/8" more would be OK.. Be sure to put the hole in the center of the bracket..
The incidence is set by the root mounts and the last thing you do to configure the wing is to drill the front and rear struts where the telescope together to set the dihedreal and zero washout.. |
| HARLESS in Va. |
|
|
|
|
|
| Charlie Harris |
| September 9, 2009, 9:42pm |
|
Ace
Posts: 922
Time Online: 23 days 31 minutes
|
ARI: Since You are just starting Your spars, there is one think I want to bring to your attention!! Be very carefull and make a set for a right wing and a set for the left wing. Don't laugh, it's easy, and has happened many times. I did not do it. but it has happened. also be very carefull when cutting the top of the cap angle. Charlie |
|
|
|
|
|
| iter |
| September 10, 2009, 1:24am |
|
Ace
Posts: 512
Time Online: 309 days 1 hours 7 minutes
|
Thank you for your warning Charlie. I wonder if there is anything in particular you feel deserves special attention about the cap angle.
Ari. |
|
|
|
|
|
| Charlie Harris |
| September 10, 2009, 2:43am |
|
Ace
Posts: 922
Time Online: 23 days 31 minutes
|
No, but note that they both angle down toward the sheeting. the webbing is on the front of the front spar and the rear of the rear spar. I am sort of unorthodox, so I cut mine on a band saw. Scared of a table saw but am getting better. Charlie |
|
|
|
|
|
| iter |
| September 10, 2009, 3:18am |
|
Ace
Posts: 512
Time Online: 309 days 1 hours 7 minutes
|
Thank you Charlie. I wonder how the bandsaw worked for you in this application. I am friendly with table saws, but the ones I have access to don't have enough clearance around them to cut 12-foot spars. The owner is not willing to rotate them for my spars, but is happy to move one of the four bandsaws.
Ari.
|
|
|
|
|
|
| iter |
| September 10, 2009, 6:29am |
|
Ace
Posts: 512
Time Online: 309 days 1 hours 7 minutes
|
Hours today: 1
Running total: 337
I cut all the sticks I need to make two front spars. Plan to glue one up tomorrow.
Ari. |
|
|
|
|
|
| Pilotpeat |
| September 10, 2009, 8:05am |
|
Ace
Posts: 498
Time Online: 13 days 4 hours 21 minutes
|
I used a box plane, only took about 30 minutes on my first spar, 20 minutes on the others and worked great. |
|
|
|
|
|
| Phil |
| September 10, 2009, 9:09am |
|
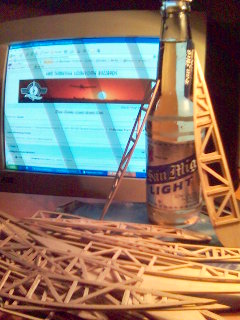 Ace AcePosts: 1,071
Time Online: 15 days 4 hours 10 minutes
|
Hi Ari,
Your spar cap photos shows the quarter sawn annual rings oriented almost perpendicular to the intended lift load..It would be safer I supposed if grains be set parallel with the force.
I have 60+ hours of fun building my second miniMAX since last 6th of Aug. Taking a break! 9 ribs assembled up to this moment...have fun!
Phil
|
|
|
|
|
|
| Bob Daly |
| September 10, 2009, 1:09pm |
|
Ace
Posts: 888
Time Online: 45 days 22 hours 25 minutes
|
Ari, you building your plane in a hospital? |
|
| Logged |
|
|
|
|
| iter |
| September 10, 2009, 3:09pm |
|
Ace
Posts: 512
Time Online: 309 days 1 hours 7 minutes
|
Pete--I wonder how uniform the surface is on your spars. I am afraid of taking too much or too little off with a plane. Phil--Thank you for sharing your concern. Perhaps you can elaborate on the course of action you recommend. Bob--The photo in my last post is a promotional photo for http://www.sawdustshop.com. I am building the plane in my garage. I go to Sawdust Shop when I need tools I don't have in my garage. It's a real neat place, but I must say I've never seen it quite as clean as in these photos. Ari. |
|
|
|
|
|
| Charlie Harris |
| September 10, 2009, 3:37pm |
|
Ace
Posts: 922
Time Online: 23 days 31 minutes
|
I just knew it was a setup!!! |
|
|
|
|
|
| Randy lewis |
| September 10, 2009, 3:58pm |
|
Ace
Posts: 965
Time Online: 21 days 18 hours 20 minutes
|
Ari, do you have access to a jointer in that shop? You can also cut the angle with a hand plane. |
|
|
|
|
|
| iter |
| September 10, 2009, 4:35pm |
|
Ace
Posts: 512
Time Online: 309 days 1 hours 7 minutes
|
There is a jointer at the shop. It sits behind the second table saw, in the same orientation and the same insufficient space between it and the wall. Maybe if I bring in 4 complete spars, I can sufficiently impress the owner to convince him to rotate one of the saws.
Ari. |
|
|
|
|
|
| Pilotpeat |
| September 11, 2009, 12:23am |
|
Ace
Posts: 498
Time Online: 13 days 4 hours 21 minutes
|
I just made a line on the side of the spar where it needed to be trimmed down to, the whole length of the spar. Then planed to the line, and test fit a rib over it. It needed a little more in a couple of areas for the rib to slip on, but when they were all done, it looked like a machine had done it. And all it cost was a 12.00 hand plane! It helps a lot to have the spar clamped to the bench so it doesn't move around when you are trying to plane on it.
Pete |
|
|
|
|
|
| Phil |
| September 11, 2009, 4:15am |
|
Ace
Posts: 1,071
Time Online: 15 days 4 hours 10 minutes
|
Phil--Thank you for sharing your concern. Perhaps you can elaborate on the course of action you recommend.
Ari.
Before glueing spar members. See to it, looking in the spar caps end, wood grain should be set in vertical position (front and rear C-channel spars standing upright) this will maximized wood bearing strenght. Phil |
|
|
|
|
|
| iter |
| September 11, 2009, 4:52am |
|
Ace
Posts: 512
Time Online: 309 days 1 hours 7 minutes
|
Hours today: 1
Running total: 338
Front right wing spar drying on my table.
I find it strange that it took me so long to simply glue up the sticks that I cut the night before. I worry about the integrity of my spars and check everything several times. Butt joins suck in glue, and I end up putting glue two or three times on the ends of verticals before I clamp them into place.
I notice that the spar cap stock in the kit is slightly oversize. I notice that the verticals aren't. I wonder if this can be a problem when I come to attach the plywood. The webbing goes on one side only so I can line up the verticals to have that side flush with the caps. I worry about plywood reinforcements for metal fittings on the root and strut attachment point.
Pete--Thank you for sharing your experience. I am happy to know I have a fallback if I can't use a big saw.
Phil--Thank you for your recommendation. My RS-9SC seem to have the grain at almost 45 degrees. For the ones that aren't, I see the value of lining them up as you suggest.
Ari.
|
|
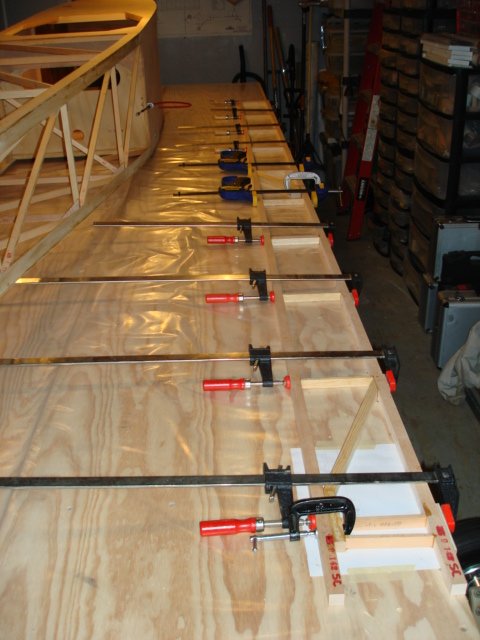 |
|
|
|
|
|
|
| Charlie Harris |
| September 11, 2009, 3:35pm |
|
Ace
Posts: 922
Time Online: 23 days 31 minutes
|
Ari: Will the front vert. RS-1 on the ribs nail up correct if You do that??? I don't have a set of plans with me right now so Just think everything through. Charlie |
|
|
|
|
|
| iter |
| September 11, 2009, 4:43pm |
|
Ace
Posts: 512
Time Online: 309 days 1 hours 7 minutes
|
Thank you for pointing this out Charlie. They won't.
I can run the spar through a belt sander (that one has clearance around it) to remove oversize thickness. I wonder if the spar as it is now, without any plywood, is strong enough to go through a sander without breaking.
Ari. |
|
|
|
|
|
| Mike Howe |
| September 11, 2009, 11:25pm |
|
MiniMax, Hawk, GA (Tipacer), another Max to finish AcePosts: 375
Time Online: 7 days 7 hours 30 minutes
|
Tell your wife "of course they remember me. I'm one of the guys!" Anyway, I would not worry too much about all the dimensions. Just build square and straight. When you get to the point of mounting the wings to the fuse, you level the fuse to the top longerons, attach the wing at the front carry through, pivot the wing down to get the right "angle of attack" and pin the rear carry through. Then with the wing held in the correct attitude (attack, dihedral, no washout) you pin the struts. The struts will telescope some to allow for a lot of measurement error. Great to see you back at it. Mike Howe |
|
Mike Howe
howetyr@yahoo.com
|
|
|
|
|
|
| Phil |
| September 12, 2009, 1:56am |
|
Ace
Posts: 1,071
Time Online: 15 days 4 hours 10 minutes
|
Ari,
Sanded surfaces to be glued on aircraft wood works not advisable. It should be block plane when reducing thickness on this kind of job.
Phil |
|
|
|
|
|
| iter |
| September 12, 2009, 3:34am |
|
Ace
Posts: 512
Time Online: 309 days 1 hours 7 minutes
|
Mike, thank you for your encouragement.
Phil, thank you for sharing this rule of thumb. I wonder if you can elaborate on the dangers of sanding aircraft wood.
Ari. |
|
|
|
|
|
| iter |
| September 12, 2009, 5:36am |
|
Ace
Posts: 512
Time Online: 309 days 1 hours 7 minutes
|
Hours today: 0.5
Running total: 338.5
Left front spar is drying on the table. No picture tonight--it looks exactly like last night's.
Ari. |
|
|
|
|
|
| Charlie Harris |
| September 13, 2009, 10:53pm |
|
Ace
Posts: 922
Time Online: 23 days 31 minutes
|
"Exactly" just jokeing, But it better not be!!! |
|
|
|
|
|
| Bob Daly |
| September 14, 2009, 1:12pm |
|
Ace
Posts: 888
Time Online: 45 days 22 hours 25 minutes
|
Should be "exactly". You'll determine which will be the left spar and which will be the right when you glue on the ply web. |
|
| Logged |
|
|
|
|
| Phil |
| September 18, 2009, 2:12am |
|
Ace
Posts: 1,071
Time Online: 15 days 4 hours 10 minutes
|
Mike, thank you for your encouragement.
Phil, thank you for sharing this rule of thumb. I wonder if you can elaborate on the dangers of sanding aircraft wood.
Ari.
Sanded wood fibers can be crushed, burned and accummolate dust enable glue penetration. |
|
|
|
|
|
| Bob Daly |
| September 18, 2009, 1:34pm |
|
Ace
Posts: 888
Time Online: 45 days 22 hours 25 minutes
|
Regarding Phil's comments about planing vs. sanding and glue joints: He is absolutely correct. But I suggest this is one of those cases where one can deviate from a best practice without compromising the stucture. The glue area is huge in this case. The web would tear long before separation from the spar caps even with poor glue joints. To mitigate the issue in question I'd simply use a filler to thicken the glue joint between the verticals and the web/rib. It looks like the we're talking about less than 1/16". The beauty of the built-up spar is minor discrepancies in technique do not prevent us from building a perfectly serviceable spar. |
|
| Logged |
|
|
|
|
| iter |
| September 19, 2009, 7:35pm |
|
Ace
Posts: 512
Time Online: 309 days 1 hours 7 minutes
|
Bob--re: identical spars, this is my interpretation of the plans. All th ewhile they have no plywood on them, the right and left spars are identical.
Phil--thank you for your explanation. I understand your concern better now.
The shop has a thickness planer. I have the same concern about feeding my spar though it as I have about the jointer--I worry that the glue may not hold under the stress.
Ari. |
|
|
|
|
|
| jody miller |
| September 19, 2009, 10:18pm |
|
 Ace AcePosts: 435
Time Online: 28 days 19 hours 32 minutes
|
ari,if the wood shop has a wide belt drum sander use it.use a 80grit belt and shop vac the wood after.feed the spars at a slight angle (use all of the feeding belt area)It will not put stress on the glue joint like a planer will.If all u have is a planer apply the ply to one side then run it through the planer.that way the all the glue joints will be supported and locked in place.also build up a few test pcs and try them first,it is better to have kill a test first than have the planer set to low on the first pass of your spars! |
|
|
|
|
|
| Phil |
| September 19, 2009, 11:32pm |
|
Ace
Posts: 1,071
Time Online: 15 days 4 hours 10 minutes
|
Ari,
Bare plywood surfaces from factory should be scrap to remove possible wax substance applied during manufacturing process this is to insure positive glue bonding within plywoods into other components.
Phil
|
|
|
|
|
|
| iter |
| November 13, 2009, 8:25am |
|
Ace
Posts: 512
Time Online: 309 days 1 hours 7 minutes
|
Hours on Sunday: 3
Running total: 341.5
Josh, on of my Young Eagles, is helping me with the project. Last Sunday he and I put finishing touches on the fuselage so we can put the complete article away and use the table to build wings. When I put the landing gear on the fuse the first time, the holes I drill go through some cross members. I plug the original holes with dowels and epoxy. On Sunday, Josh helps me drill new holes 1/4" forward of the old ones. We have to flip the fuselage up and down a number of times as we dry-fit the landing gear. I am grateful to have Josh's help--it's all but impossible to flip the fuse alone. While we have the fuselage on gear, Josh gets to try it on for size. We also add the 1/4" plywood pads that hold LG legs from sliding in.
Ari.
|
|
|
|
|
|
| carrycorrie |
| September 1, 2010, 4:57am |
|
Guest User |
"Josh, on of my Young Eagles, is helping me with the project. Last Sunday he and I put finishing touches on the fuselage so we can put the complete article away and use the table to build wings." Wow, great team, working together to make the works more beautiful. Good work. -------------- free beat maker downloads software |
|
| Logged |
|
|
|
|
| erkki67 |
|
 Ace AcePosts: 311
Time Online: 55 days 20 hours 55 minutes
|
And what did happend to the building here?
Erkki |
|
|
|
|
|
| iter |
|
Ace
Posts: 512
Time Online: 309 days 1 hours 7 minutes
|
Well funny you should ask Erkki.
After 3 years of not building, and after a marital separation, I am back in business--today! I am moving the fuselage (it's complete) out of my garage so I can have room to build wings. I have the coolest place to store the fuse--tomorrow I am hanging it from the ceiling in my office.
Ari.
|
|
|
|
|
|
| thunder669 |
|
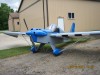 Ace AcePosts: 700
Time Online: 20 days 22 hours 9 minutes
|
sorry to hear about the seperation and project on hold for so long but glad to hear you are going to get back at it, i actually read you entire thread before starting mine and it really helped motivate me and make me decide this was the project for me |
| Once you have tasted flight, you will forever walk the earth with your eyes turned skyward, for there you have been, and there you will always long to return |
|
|
|
|
|
| iter |
|
Ace
Posts: 512
Time Online: 309 days 1 hours 7 minutes
|
Thank you for your support Thunder.
Well, the airplane is up, with a little help from my friends. I notice with pleasure that I have many more friends now who are willing to help with the airplane than previously.
It's kind of scary, actually, looking at it from below.
Ari.
|
|
|
|
|
|
| iter |
|
Ace
Posts: 512
Time Online: 309 days 1 hours 7 minutes
|
|
|
|
|
|
| PUFF |
|
 Ace AcePosts: 1,518
Time Online: 34 days 6 hours 18 minutes
|
my fuse is hanging in my den..... |
|
|
|
|
|
| iter |
|
Ace
Posts: 512
Time Online: 309 days 1 hours 7 minutes
|
Hours today: 2
Running total: 343.5
Now that I have the house back and have access to my garage again I am resuming the build.
My friend Nato volunteers to help with the project. He comes up with the hoisting mechanism last week. Tonight he comes over and helps with physical cutting. More importantly, I notice tremendous support that comes from a genuine interest in the project. Nato is a student pilot and holds a degree in aeronautical engineering. Our commitment is to make Thursday nights airplane-building nights.
Tonight we cut and fit verticals and diagonals for the two rear spars.
Ari.
|
|
|
|
|
|
| iter |
|
Ace
Posts: 512
Time Online: 309 days 1 hours 7 minutes
|
Hours today: 1.5
Running total: 345
The rear right spar frame is curing.
It's hard for me to believe it takes an hour and a half just to glue the spar together after all the prep work on Thursday--but that's what the clock says.
Although the right and left spars are identical at this stage (before webs and beveling) I decide to mark the sides now. The RS pieces are slightly different dimensions, and I try to align them so that they are all flush on the side where the webbing goes. On the right, it means pushing the verticals up until they are flush with the top of the spar caps; on the let it means pushing them down until they touch the table.
The second photo shows my method of clamping the diagonal--this is the most useful way I can come up with for holding it without using nails.
Ari.
|
|
|
|
|
|
| iter |
|
Ace
Posts: 512
Time Online: 309 days 1 hours 7 minutes
|
Hours today: 1
Running total: 346
The second spar goes faster. No picture today--looks exactly like the right one. Except that I now use plastic bags under the bricks. The one in the last photo sticks to the squeeze-out epoxy from the RS-8 doubler on the top spar cap. Takes a bit to get it off.
Ari. |
|
|
|
|
|
| iter |
|
Ace
Posts: 512
Time Online: 309 days 1 hours 7 minutes
|
Hours today: 3 Running total: 349 Nato and I sand the spars to remove squeezeout epoxy so that they can accept plywood webs. The two rear spars now have webs on them. The picture of the four spars reminds me of The Four KingsThis is where the distinction between the right and the left spar becomes final. I mark the side where the plywood goes with an arrow on the butt of my spar caps, and also the direction of the bevel I need to cut into them. I want to avoid ending up with two left spars. Ari.
|
|
|
|
|
|
| iter |
|
Ace
Posts: 512
Time Online: 309 days 1 hours 7 minutes
|
Hours today: 2
Running total: 351
All 4 spars now have webs on them. A third friend shows up tonight and we set up a virtual assembly line with mixing epoxy, spreading it on wood and tacking on the plywood. These airplane nights are turning into real social events! I like it so much better than building alone.
Ari. |
|
|
|
|
|
| Bob Hoskins |
|
Fly Safe AcePosts: 1,208
Time Online: 38 days 16 hours 39 minutes
|
Hi Ari;
Skyblazer and I built our planes together in my shop. He a 1300Z and me a 1400Z. We worked nights and week ends. When ever family and schedule would permit. We had a ball. Time passes quick and 2 heads are better than one when either had a problem. Besides, it should be fun to start with. Wait till you fly your little bird. You will see right away your time spent was worth it.
ENJOY.
Bob |
| Fly safe and have fun. |
|
|
|
|
|
| iter |
|
Ace
Posts: 512
Time Online: 309 days 1 hours 7 minutes
|
Hours today: 2
Running total: 353
We cut the bevels into all 4 spars and cut the excess off the ends.
I notice that on one of the rear spars the webbing delaminates. I am not sure how bad this is. On the one hand, this is in the area with a doubler and a diagonal, there is a lot of surface area, and the delamination is not deep (the plywood separates only from the very top of the spar cap, but holds tight to the doubler and the diagonal). On the other hand, this is a high-stress area where the wing strut attaches.
If I decide to fix this joint, I am not sure I can remove the plywood without taking the whole spar completely apart.
Ari.
|
|
|
|
|
|
| Bob Daly |
|
Ace
Posts: 888
Time Online: 45 days 22 hours 25 minutes
|
That's not a problem. Squirt some epoxy in there to ease your mind and move on. As you pointed out the spar cap doubler greatly increases the web glue joint area. The high stress point is in bending inboard of the strut attachment (hence the doubler), not outboard where you're pointing. This is the rear spar, right? The web is simply too narrow there to worry about buckling. |
|
| Logged |
|
|
|
|
| Tom Mathes |
|
Guest User |
As Bob pointed out just put some epoxy on the top and work it in with your finger till it is full then clamp lightly. |
|
| Logged |
|
|
|
|
| iter |
|
Ace
Posts: 512
Time Online: 309 days 1 hours 7 minutes
|
Thank you for your reassurances guys. This is indeed the rear spar.
Ari. |
|
|
|
|
|
| Charlie Harris |
|
Ace
Posts: 922
Time Online: 23 days 31 minutes
|
Also spread the epoxy then heat with heat gun it will run right in. |
|
|
|
|
|
| iter |
|
Ace
Posts: 512
Time Online: 309 days 1 hours 7 minutes
|
Ah! That makes so much sense. Thank you Charlie.
Ari. |
|
|
|
|
|
| iter |
|
Ace
Posts: 512
Time Online: 309 days 1 hours 7 minutes
|
Hours recently: 4
Running total: 357
The spars have plywood doublers on one side, and doublers for the other side are ready to go when the epoxy cures and I can turn the spars over (wing root doublers for rear spar are waiting for rib installation). I have half the aluminum wing root and strut fittings. I cut one RS-100 aluminum bar into pieces that are 1/2" too short--embarrassing. So I only have half the fittings, and John form JDT is mailing me new RS-100. He says it's cheaper to mail them if he cuts them to length (no oversize shipping charges). I wonder if he's trying to save me from repeating the embarrassment.
Ari.
|
|
|
|
|
|
| iter |
|
Ace
Posts: 512
Time Online: 309 days 1 hours 7 minutes
|
Hours recently: 3
Running total: 360
Plywood doublers are in place on both sides of the spars. All 16 aluminum wing-mounting fixtures are complete.
It continues to amaze me how long these little things take, even after I think that there is nothing to do. It takes me an hour to install the 6 doublers--that after thinking on Thursday that they are complete. They need sanding, measuring and cutting to size before I can glue them on. While I'm fiddling with plywood, Nato drills and files the metal fittings. The more I work with him on the max, the more I like it. Thank you Nato!
Also, thank you Charlie for your heat gun suggestion. The epoxy runs very very thin with the heat gun and seeps right into the seam.
It looks like I'm ready to install ribs next. It's going to look like a real wing soon!
Ari.
|
|
|
|
|
|
| iter |
|
Ace
Posts: 512
Time Online: 309 days 1 hours 7 minutes
|
I am confused about the two inboard ribs and how they connect to spars. The plywood reinforcements are 3/16" thick and the aluminum fittings are 1/8" thick. Together this is more than the 1/4" thickness of the front vertical on the rib. If I cut away the area as the drawing says, the front of the rib is going to completely open. I might as well remove the entire front vertical. It gets even stranger on the back spar where I have to remove two verticals to get the plywood and the aluminum to fit.
I wonder if anyone has pictures of their installation.
Ari.
|
|
|
|
|
|
| Bob Daly |
|
Ace
Posts: 888
Time Online: 45 days 22 hours 25 minutes
|
Yes, you need to remove the vertical material but remember, the end rib has 1/8" ply skin on the outside and the two ribs are wrapped top and bottom with 1/16" ply. The 'boxed' end ribs are then plenty strong. |
|
| Logged |
|
|
|
|
| Ricardo |
|
Videos in UTube: ral1951 AcePosts: 2,772
Time Online: 75 days 23 hours
|
Iter: Here´s a couple of pictures that might help. The wing was upsidedown on the table when I took the picture, I rotated for an easier look (I hope)
|
|
|
|
|
|
| iter |
|
Ace
Posts: 512
Time Online: 309 days 1 hours 7 minutes
|
Thank you for the photos Ricardo. I wonder if the vertical has any meaning after you cut a piece out of it, and if removing it entirely would make sense.
I also wonder how you keep the top of the rib from straightening out when you cut the vertical.
Ari. |
|
|
|
|
|
| Ricardo |
|
Videos in UTube: ral1951 AcePosts: 2,772
Time Online: 75 days 23 hours
|
Thank you for the photos Ricardo. I wonder if the vertical has any meaning after you cut a piece out of it, and if removing it entirely would make sense.
I also wonder how you keep the top of the rib from straightening out when you cut the vertical.
Ari.
Although I didn't cut the entire vertical, the top of the rib is glued to the spar and the diagonal also exerts some movement restriction through the plywood. Is not going to move. |
|
|
|
|
|
| iter |
|
Ace
Posts: 512
Time Online: 309 days 1 hours 7 minutes
|
Thank you for sharing your process Ricardo.
Ari. |
|
|
|
|
|
| iter |
|
Ace
Posts: 512
Time Online: 309 days 1 hours 7 minutes
|
Hours on Thursday: 4
Running total: 364
Nato and I make a jig for drilling out spar fittings and drill the roots of all 4 spars. We than try to figure out how ribs clear these fittings (thanks Ricardo!) and decide that we need to ask here.
These ribs are 4 years old now. Even though we can't quite start gluing them in place yet (still need to drill spars for strut attachments), we decide to do a "preview." OMG this is starting to look like a wing!
Ari.
|
|
|
|
|
|
| thunder669 |
|
Ace
Posts: 700
Time Online: 20 days 22 hours 9 minutes
|
i remember that exact feeling, it really makes it seem more real that you are actually building something that will fly. congrats and enjoy!!!!!!!!! |
| Once you have tasted flight, you will forever walk the earth with your eyes turned skyward, for there you have been, and there you will always long to return |
|
|
|
|
|
| natosaichek |
|
Guest User |
Hours on Wednesday: 3 (but 2 people... so is that 6 person-hours? how do we calculate this?) Running total: 367 ish. Not sure how everyone else attaches so many images - my first attempt went over the max data limit (256 k? isn't that a relic of DOS or something?) Anyway, I didn't want to be constrained by data limits, so here's an imgur gallery with what we did: Gallery here: http://imgur.com/a/L96HDIn short, we built a jig to properly position the aluminum fittings so we could drill holes in the spars for them. We also got tacks set in the ribs so that on our next meeting we can glue them in place and immediately secure them. A productive meeting! |
|
| Logged |
|
|
|
|
| Charlie Harris |
|
Ace
Posts: 922
Time Online: 23 days 31 minutes
|
Iri sure glad to have You back. Been so long now but I think I put a rs1 doubler behind that front vertical an cut a slot. I have moved twice and can't find a picture right now but if I find one I will send. only about 20 more inchs of rs1. Charlie |
|
|
|
|
|
| Charlie Harris |
|
Ace
Posts: 922
Time Online: 23 days 31 minutes
|
Nice pictures. I wish I could do that I have all my pics' on the computer and have had guys want to see them, just don't know how to get it together. Useing Picasa now I may can work it out. see ya. Charlie |
|
|
|
|
|
| Charlie Harris |
|
Ace
Posts: 922
Time Online: 23 days 31 minutes
|
found pic. can't send ID 10T operator error. Charlie |
|
|
|
|
|
| Larry |
|
Ace
Posts: 1,139
Time Online: 6 days 18 hours 49 minutes
|
We added two extra vertical RS-1s to the root and second rib that way when you cut out for the plywood and root fittings you still have some vertical wood left both front and rear spar locations
Larry |
| a mile of road will take you a mile, a mile of runway can take you anywhere. |
|
|
|
|
|
| iter |
|
Ace
Posts: 512
Time Online: 309 days 1 hours 7 minutes
|
I am posting Nato's photos here--I like to keep all of these together.
Nato's original cations are:
"Ari built a jig to properly position the aluminum bits so we could drill the holes for the mid-wing struts. Here you can see Ari showing off his masterpiece."
"The jig is clamped to the end of the spar."
"With the jig clamped to the spar, the aluminum fittings are properly positioned for drilling."
|
|
|
|
|
|
| iter |
|
Ace
Posts: 512
Time Online: 309 days 1 hours 7 minutes
|
Nato's captions, cont:
"Rather than using a tack hammer, Nato just used a scrap of aluminum as a thimble to get the tacks set in the wood prior to gluing."
"once the tack has been started, it's pretty easy to just clamp down and squeeze it into place where a tack hammer wouldn't fit."
Thank you Nato for the help and the photos!
Ari.
|
|
|
|
|
|
| Bob Hoskins |
|
Fly Safe AcePosts: 1,208
Time Online: 38 days 16 hours 39 minutes
|
Hi Ari;
Looking good, keep her going. When the wings start to go together, it looks and feels more like an airplane. Great work.
Bob |
| Fly safe and have fun. |
|
|
|
|
|
| iter |
|
Ace
Posts: 512
Time Online: 309 days 1 hours 7 minutes
|
Hours on Thursday: 1
Running total: 368
We glue ribs to the rear spar on the left wing.
Thank you for your encouragement Charlie, Larry and Bob. It motivates me to keep posting these photos.
We nail two little blocks of wood to the bench to hold the spar in place while we maneuver the ribs on it. We decide to glue the rear spar first, thinking it's easier to deal with the simpler butt join on the front when the back is in place.
It is looking wingier and wingier.
Ari.
|
|
|
|
|
|
| Charlie Harris |
|
Ace
Posts: 922
Time Online: 23 days 31 minutes
|
winger and winger Yea I like that Smells good too does'nt it. Charlie |
|
|
|
|
|
| Bob Hoskins |
|
Fly Safe AcePosts: 1,208
Time Online: 38 days 16 hours 39 minutes
|
Hey Ari;
Brings back fond memories.
Bob |
| Fly safe and have fun. |
|
|
|
|
|
| Phil |
| September 10, 2011, 9:56pm |
|
Ace
Posts: 1,071
Time Online: 15 days 4 hours 10 minutes
|
Hi Ari, I liked the way you build. It's pure without contamination. Keep it up! Phil |
|
|
|
|
|
| thunder669 |
| September 11, 2011, 3:55am |
|
Ace
Posts: 700
Time Online: 20 days 22 hours 9 minutes
|
i think his building is to neat and perfect, makes the rest of us look bad, lol. just kidding man, you should be very proud of the high quality of your work |
| Once you have tasted flight, you will forever walk the earth with your eyes turned skyward, for there you have been, and there you will always long to return |
|
|
|
|
|
| iter |
| September 13, 2011, 3:35am |
|
Ace
Posts: 512
Time Online: 309 days 1 hours 7 minutes
|
Thank you for your encouragement guys. You do realize I shove all the garbage out of the way just enough that it's not visible on camera, and then reposition it again if I take a shot from a different angle.
Ari. |
|
|
|
|
|
| Bob Hoskins |
| September 13, 2011, 2:26pm |
|
Fly Safe AcePosts: 1,208
Time Online: 38 days 16 hours 39 minutes
|
Hi Ari;
Hey, don't think you are the only one, LOL.
Bob |
| Fly safe and have fun. |
|
|
|
|
|
| skydragon, |
| September 13, 2011, 6:54pm |
|
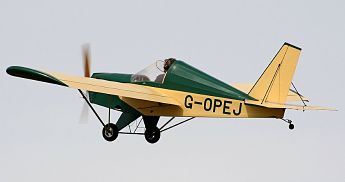 Fledgling Member Posts: 22
Time Online: 1 days 16 hours 26 minutes
|
hi ari
have you fitted the diagonal members?these are ment to be fitted in the wing when glue is wet
sky dragon |
|
|
|
|
|
| iter |
| September 14, 2011, 7:41am |
|
Ace
Posts: 512
Time Online: 309 days 1 hours 7 minutes
|
Time today: 0.5
Running total: 368.5
Whoops. I just glued in the front spar, and now, after reading sky dragon's post, I see that the plans do say "fit all drag braces before gluing, see construction manual." Sadly, the manual says nothing about gluing in braces before gluing ribs to spars. I was going by the manual, didn't look at the plans today.
OK. Wait till the morning to figure out how to go from here.
Ari. |
|
|
|
|
|
| skyblazer |
| September 14, 2011, 8:37am |
|
Ace
Posts: 213
Time Online: 29 days 11 hours 48 minutes
|
Ari, I did same thing on one of my wing panels, you can get them in it's just a little more difficult. Just don't get too rough with it. It was one of those OH CRAP moments.. |
|
|
|
|
|
| Tom Mathes |
| September 14, 2011, 12:11pm |
|
Guest User |
Ari, I put mine in the Airbike wings this way. Take a 1" hole saw and put a hole immediately beside where the front diagonal goes and then you can have an access point to slide the piece into the wing, then carefully measure and fit the diagonal to the rear spar point, remembering to leave a bit of an angle difference because when the diagonal goes in the front will be slightly to the left of the hole. If you choose to use a hole just above the location of the diagonal no angle difference is required. With the diagonal fit at the rear spar and the front of it sticking out the hole cut it almost parallel( remembering the angle will change slightly because of the offset hole) to the front of the front spar. Carefully trim the length of the front of the diagonal and keep fitting it till it will go inside the hole and fit the front spar. The wing will move slightly if you apply a little force to the spars and this will help getting the diagonal inside. #1 diagonal is easy but #2 and 3 are the ones that will take a bit of time to get right. I then made a round piece of 1/16 and glued it to fill the hole and put a 2 1/2" gusset to go over the hole area. It sounds harder than it really is. You could cut the 1" hole in the spar above where the diagonal goes, fit it then fill the hole and put your gusset to cover. Some others on here may have a better way. I could not get the diagonals any where close with out using the hole method because of the spar caps in the way. Sorry I didnt take any pics of this method. I did mine this way just to see if I could figure out a way to put the diagonals in place, experimental you see, actually I think the directly above method for the hole would be the overall best technique. |
|
| Logged |
|
|
|
|
| iter |
| September 14, 2011, 3:46pm |
|
Ace
Posts: 512
Time Online: 309 days 1 hours 7 minutes
|
Thank you for sharing your process Tom. To clarify, the 1" hole you mention is in the front spar web, right? I remember seeing photos (Larry's maybe) of "light" spars with 3" or so holes in the webs. I wonder if the gussets you are describing are necessary for rigidity.
Ari. |
|
|
|
|
|
| Tom Mathes |
| September 14, 2011, 4:28pm |
|
Guest User |
Ari, I dont believe the gussets are necessary for strength, it was just my A&P background kicking in. If it dont move paint it, if it has a hole cover it up.The spars of the Legal Eagle are built with these lightning holes you describe. I used the front spar as I thought the vertical members of the ribs aft of the rear spar might interfere with inserting the diagonal properly, might not tho. I just used a 1" hole so I would have some "wiggle room" to move the diagonals around some before I trimmed the front to fit. You could, if you cut the initial hole right on the front vertical of the rib, use a coping saw and take out the ply straight from the upper and lower part of the hole to the rib and have plenty of room to get an exact fit of the diagonal and remove very little ply in the process. |
|
| Logged |
|
|
|
|
| iter |
| September 15, 2011, 3:48am |
|
Ace
Posts: 512
Time Online: 309 days 1 hours 7 minutes
|
Thank you for your advice Tom.
Ari. |
|
|
|
|
|
| iter |
| September 21, 2011, 5:41am |
|
Ace
Posts: 512
Time Online: 309 days 1 hours 7 minutes
|
Time today: 2
Running total: 370.5
We put in the diagonals, cutting holes like Tom describes. The holes look ugly.
Ari. |
|
|
|
|
|
| iter |
| September 24, 2011, 10:39pm |
|
Ace
Posts: 512
Time Online: 309 days 1 hours 7 minutes
|
Well, we goofed up again. The 4 diagonals we put in, we put them in backwards. We have 4 anti-drag braces instead of anti-drag braces. Argh!
Some components go together easily. Others, seemingly arbitrarily, feel like pulling teeth.
Ari. |
|
|
|
|
|
| iter |
|
Ace
Posts: 512
Time Online: 309 days 1 hours 7 minutes
|
Time on Wednesday: 2x1.5
Running total: 373.5
We cut out the diagonals and put new ones in the way the plans show them. Second time around seems to go a lot smoother. The wing looks shameful with all the holes in spar webs and the remnants of old diagonals and their retaining blocks.
Ari. |
|
|
|
|
|
| Bob Hoskins |
|
Fly Safe AcePosts: 1,208
Time Online: 38 days 16 hours 39 minutes
|
Hi Ari;
Not to worry, when you get the fabric on, who's going to know, LOL. You know it is built right and and your quality of work is top notch. We all learn from our errors and go on. I don't think there is one person on this board that can say he never made an error, LOL. Keep her going. I know there are times that get you down some, but be assured that when you fly this little bird, it will all have been worth the effort. Just take a look at what you have done so far. You will gain the experience to enable you to build another plane if you ever want. We all have learned skills we didn't have before. Chin up bud, your doing great.
Bob |
| Fly safe and have fun. |
|
|
|
|
|
| iter |
|
Ace
Posts: 512
Time Online: 309 days 1 hours 7 minutes
|
Thank you for your encouragement Bob.
Ari. |
|
|
|
|
|
| iter |
|
Ace
Posts: 512
Time Online: 309 days 1 hours 7 minutes
|
Time on Wednesday: 2x1
Running total: 375.5
We install compression rib members.
Ari. |
|
|
|
|
|
| iter |
| November 6, 2011, 12:27pm |
|
Ace
Posts: 512
Time Online: 309 days 1 hours 7 minutes
|
Hours on Tuesday: 2x1
Running total: 377.5
We turn the wing around and glue in the trailing edge. |
|
|
|
|
|
| Dave Pendzick |
| December 25, 2012, 8:24pm |
|
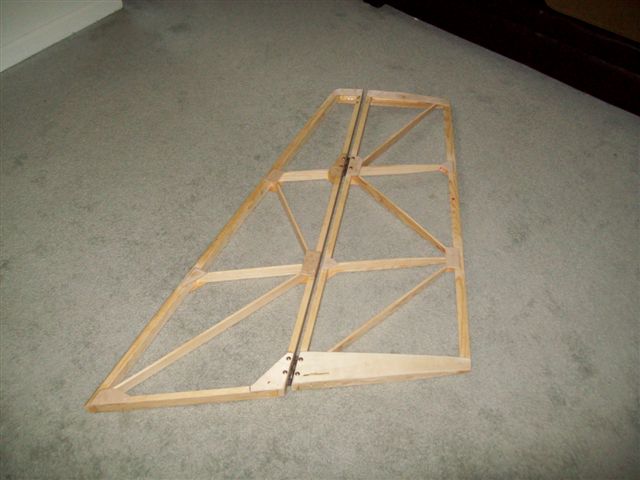 Have FUN! AcePosts: 248
Time Online: 5 days 15 hours 4 minutes
|
What ever happened to this thread? |
|
|
|
|
|
| Bob Hoskins |
| December 26, 2012, 1:16am |
|
Fly Safe AcePosts: 1,208
Time Online: 38 days 16 hours 39 minutes
|
Dave;
I don't know, he was doing such a great job. By logging his time and his pictures on the board, he was doing many people a great service. It would be the only complete log on any board, I think. The value to people would be great. Not to mention he would have completed a great flying little plane.
I hope he is OK and not sick or something bad. I have tried a few times to get in touch, but no return.
Iter, you are part of us here, come and say hello.
Bob |
| Fly safe and have fun. |
|
|
|
|
|
| Dave Pendzick |
| December 26, 2012, 2:28pm |
|
Have FUN! AcePosts: 248
Time Online: 5 days 15 hours 4 minutes
|
I hear ya, this thread has really helped me in my build. I reference it frequently. |
|
|
|
|
|
| nschmoker |
|
Ace
Posts: 260
Time Online: 5 days 18 hours 48 minutes
|
I have been in contact with Ari. If anybody is interested in his project he can be contacted at ari@lib.aero. I believe that he may entertain offers. |
|
|
|
|
|
| iter |
|
Ace
Posts: 512
Time Online: 309 days 1 hours 7 minutes
|
Sadly, the day has come when I must admit that I'm never finishing this airplane. With a divorce and co-parenting a 4-year-old child, and now running a business, the airplane fits about as well as a round peg in my square life. In a few years Leah might be old enough to take an interest in the project. But this is a single-seater, and it would be another 11 years before she can solo in it. As it stands, I prefer to spend what free time I have with her on things we can enjoy together, right now.   So on to the airplane. I am willing to entertain any serious offer. The alternative is a charitable tax write-off. I need to move the fuselage out of its storage space this month. The people who are generously letting me store it in their warehouse need the space. The fuselage is on gear; tail is complete; control linkages are in place for elevator and ailerons; all spars and all ribs complete. Left wing is complete through trailing edge installation. I have all remaining wood and hardware, fabric and covering materials. I also have a factory wheel brake kit. Entire build process is visible in this thread, but if you have any questions, I'm happy to answer them. The airplane is in Sunnyvale, Calif. Again, I am willing to entertain any serious offers. As is, where is. Must go this month. Ari.
|
|
 |
|
|
|
|
|
|
| Arthur Withy |
|
Happy 1500R owner - building a Jodel D18 AcePosts: 2,532
Time Online: 32 days 12 hours 14 minutes
|
Hi Ari, Well so sorry to read your last post. I too am divorced. I brought my daughter up myself as the Ex didnt want her at all, and of coarse I did. (no Comments respectfully). I have spent the last 8 years single raising a child and working and flying both my Minimax and Rans S6s...Life does go on....and so do the adventures...in the Sky..and other places Good luck with your choices. Shame you have to let your aircraft go.....my Jodel is still in the workshop regards Arthur |
|
|
|
|
|
| PUFF |
|
Ace
Posts: 1,518
Time Online: 34 days 6 hours 18 minutes
|
I hung my fuse in my Den for 2 years....
Stripped the gear and tail feathers off, stuck it thru a window and just hung it from center and tail spring......
Worked out well......
If you have room, it doesn't weigh a lot. |
|
|
|
|
|
| texasbuzzard |
|
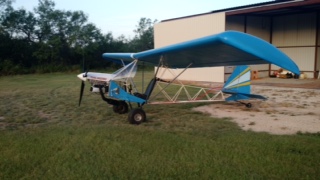 airbike Buzzard AcePosts: 1,238
Time Online: 8 days 23 hours 51 minutes
|
Ari, i am sure you will sell it but unless you really need the money it won't justify the time, love, and the desire to fly. you have done a great job building it so hang it up, go and enjoy raising your beautiful daughter. it will be waiting for you. if you still decide to sell it i will put the word out.
|
|
|
|
|
|
| iter |
|
Ace
Posts: 512
Time Online: 309 days 1 hours 7 minutes
|
I'm past trying to hang it from the ceiling :=( The fuse hung from an office ceiling for two and a half years, and it's sitting in friends' warehouse now. You know the stages of grief (denial, anger, bargaining, depression, acceptance)? I'm past bargaining ("just give me a place to store it for a year and I'll finish it!"). The project needs to go.
If you can put the word out, please do.
Ari. |
|
|
|
|
|
| tjspindler |
|
Ace
Posts: 411
Time Online: 14 days 1 hours 55 minutes
|
Don't give up Ari I have been through what you are now and one day down the road you will regret it. My wife left me after 26 years together and I went through all the stages and got rid of all the things that reminded me of that life. I regret it every day now those were the things that meant the most to me and one day you will want those thing back. I know I did because those thing meant a lot to my kids because we had memories about the good times working on them together. Trust me you will want to finish the plane one day. Sorry to preach but I understand. Maybe you have a friend that can help you store it until your ready?
I wish you the best of luck
Tom |
|
|
|
|
|
| rray |
|
Wing Man Posts: 90
Time Online: 13 days 7 hours 25 minutes
|
Ari, I feel for you, and understand you're position. I went through much the same thing. My ex did'nt want me building an airplane. She also did'nt want me to see my friends or family, consequently, my plane hung in a barn for 14 years.We divorced years ago, but the bad taste is still there. I recently started working on mine a year ago, and now hope to fly early this Fall. I agree with TJ. If there' any way you can store it, do so. It won't spoil. You won't regret it. Randy ps; I now have an air conditioned hanger, some people call a living room. |
|
|
|
|
|
| iter |
|
Ace
Posts: 512
Time Online: 309 days 1 hours 7 minutes
|
Guys, I appreciate your encouragement, but it's not helpful. It's hard enough to let go of this project without people telling me that I'm wrong :=)
If you think it's a worthwhile build, PM me with an offer or your idea of what it may be worth.
Ari. |
|
|
|
|
|
| skyblazer |
|
Ace
Posts: 213
Time Online: 29 days 11 hours 48 minutes
|
I have to say this post has made me a bit sad, it's like reading a book with a bad ending, but I know family is TOP priority too.
Dwight |
|
|
|
|
|
| Bob Daly |
|
Ace
Posts: 888
Time Online: 45 days 22 hours 25 minutes
|
Ari, you've likely learned enough to bang a Max together in half the time the next time around. And you've got the plans (ED: now free from the TEAM website). |
|
| Logged |
|
|
|
|
| iter |
|
Ace
Posts: 512
Time Online: 309 days 1 hours 7 minutes
|
Plans are part of the package I'm offering for sale.
I don't see this as a bad ending, on the contrary! This thread starts with a man who's incomplete, working solo on a single-seat project which he starts to distract himself from his joblessness. It ends with a man who is a father, taking responsibility for himself and his child; running his own business; helping his customers and supporting his contractors. The protagonist has matured into a fuller, more complete man. The projects he is building may be less glamorous, but he is building them with associates. He has integrated himself more tightly with a community. In a sense, he has created much of this community in the first place. He is a little prince who has grown into a king and succeeded to a kingdom :=)
Ari. |
|
|
|
|
|
| tjspindler |
|
Ace
Posts: 411
Time Online: 14 days 1 hours 55 minutes
|
Well said! Your good man and a great father and I wish you the best of luck.
Fyi Kids love going to Airventure at Oshkosh I know mine did. Great way to share your love of flight with her!
Tom |
|
|
|
|
|
| AC1600R |
|
Ace
Posts: 420
Time Online: 21 days 8 hours 2 minutes
|
Ari, I have been following this thread since I joined not but a month or so ago. I must admit that I felt really sad every time I opened it, until today. I found your most recent post to be one of the most inspirational things I have read in quite some time. You may not have known this was going to happen when you posted that, but you touched a life today.
-Sean |
| Sean Winship
Middle Tennessee |
|
|
|
|
|
| Ricardo |
|
Videos in UTube: ral1951 AcePosts: 2,772
Time Online: 75 days 23 hours
|
"A man has to do what he has to do" a very simple statement heard off a Clint Eastwood movie, I think every man should follow.
Wish you the best Ari, I'm sure you're on the right track.
Ricardo |
|
|
|
|
|
| iter |
| November 10, 2013, 5:08am |
|
Ace
Posts: 512
Time Online: 309 days 1 hours 7 minutes
|
As of this past Wednesday, another builder is taking over the project. I understand that he intends to continue this thread, in which he has my support. I am looking forward to following his progress.
Ari.
|
|
|
|
|
|
| Bob Hoskins |
| November 10, 2013, 10:19pm |
|
Fly Safe AcePosts: 1,208
Time Online: 38 days 16 hours 39 minutes
|
Hi Ari;
I have watched your progress since you started. I hate to hear that you will not be completing it. But life changes how we look at things sometimes. I wish you the best of luck for the future. And I know what ever project you take on will be done like a pro. You have done a great job on your max. And I hope the person that bought it will continue the thread. It is like a documentary on building a max. It will be a great tool for the beginner and I for one thank you for your effort.
How about stopping by with a post once in a while and letting us know how your doing ?
Take care Ari.
Bob |
| Fly safe and have fun. |
|
|
|
|
|
| iter |
| November 11, 2013, 1:57am |
|
Ace
Posts: 512
Time Online: 309 days 1 hours 7 minutes
|
Thank you Bob. Your friendship and others' I've met here on the forum is what I take away from this project. I've owned this house for 9 years. I've had the 1100 in it for 6 out of these 9 years--the house has had the airplane in it longer than it hasn't. I cleaned up over the weekend and took a photo kind of like the original one I posted way at the beginning of the thread. Bookends. Ari. 
|
|
|
|
|
|
| tjspindler |
| November 20, 2013, 9:43pm |
|
Ace
Posts: 411
Time Online: 14 days 1 hours 55 minutes
|
I'm happy to see you still have lots of RC planes. Of all the changes that I have gone through and all the moves I have made the one thing that will never change is my love for RC airplanes! I have some that are almost 40 years old and still fly!
Tom |
|
|
|
|
|
|


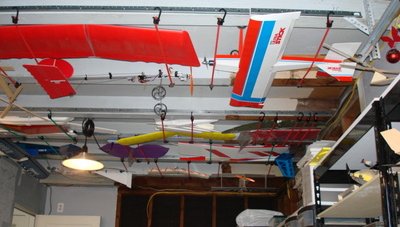
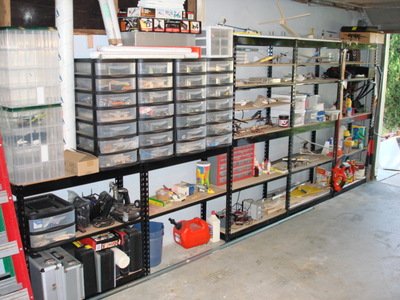
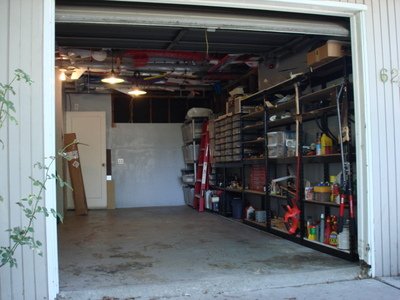


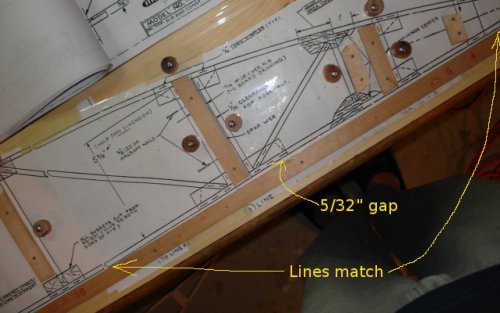
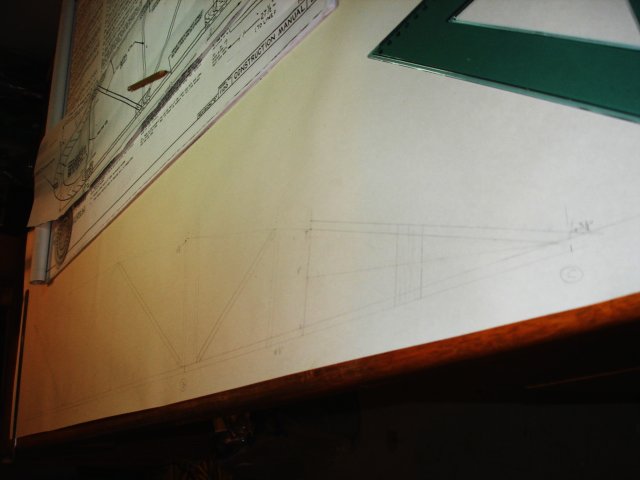
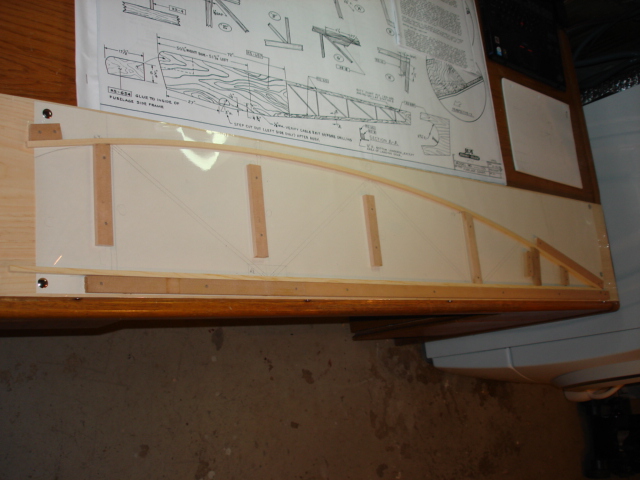
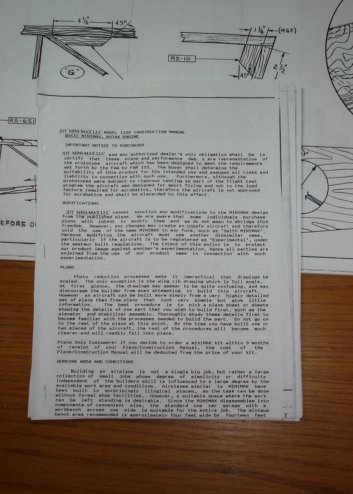
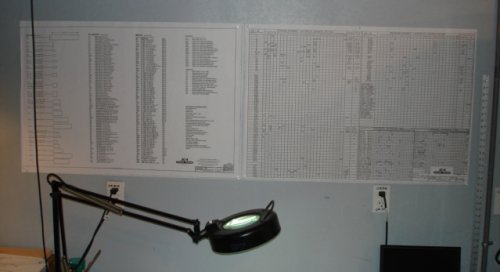
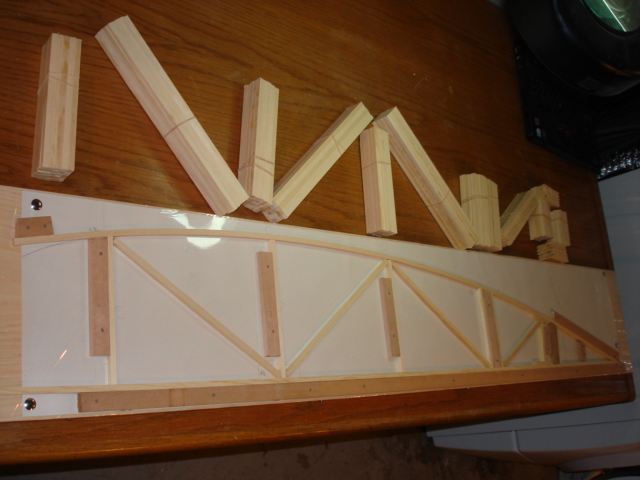
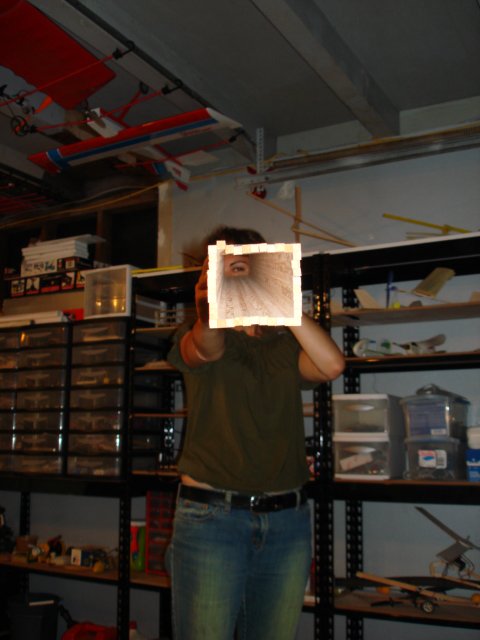
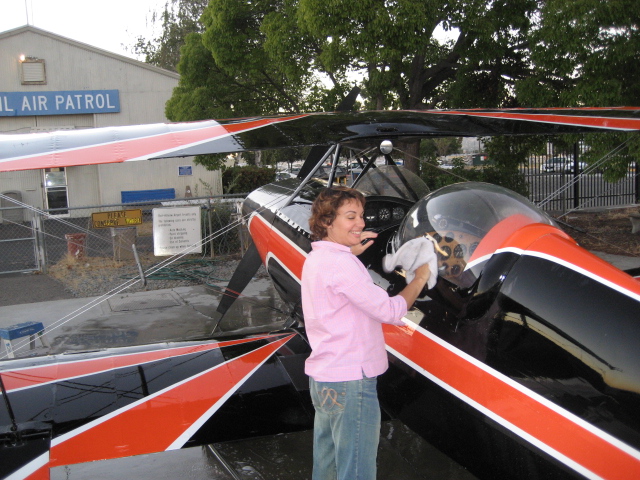
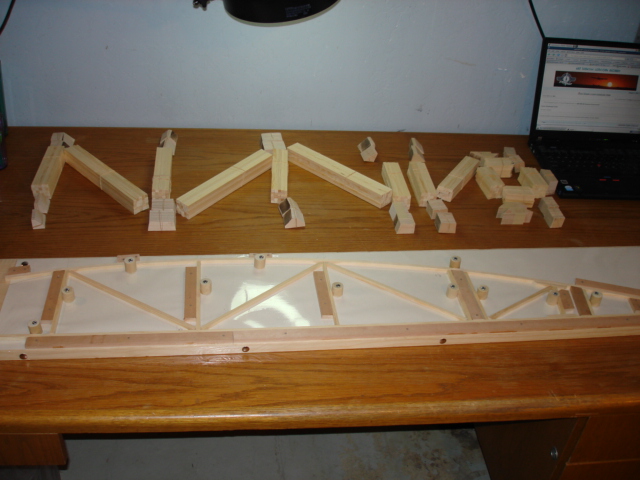

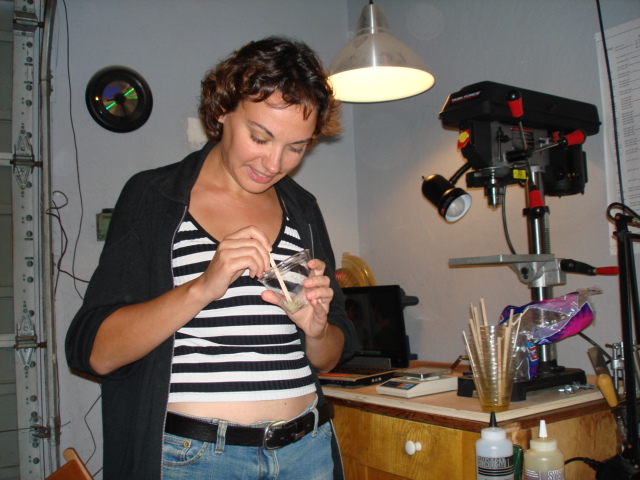
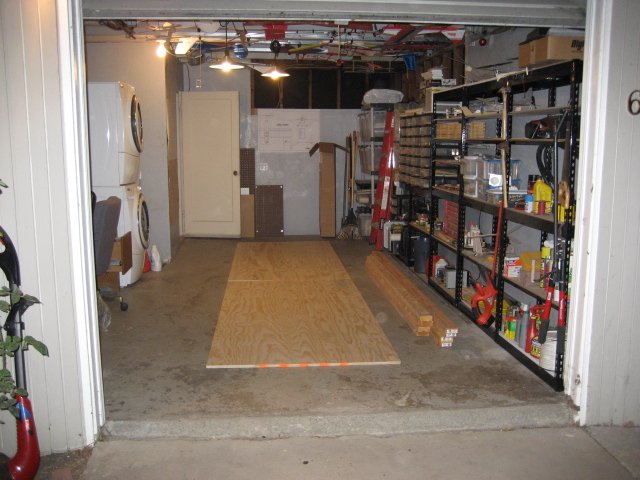
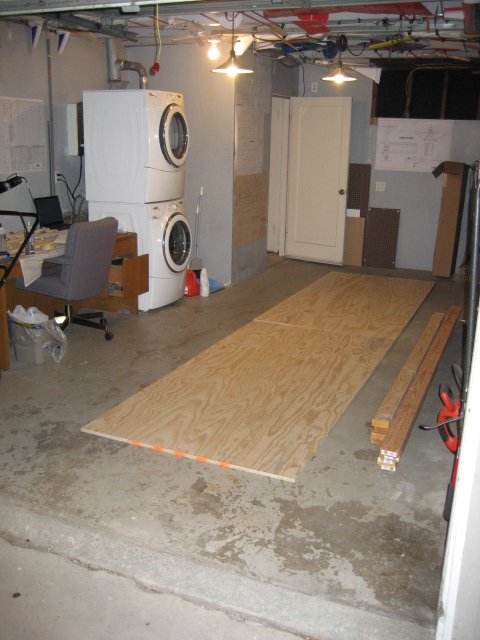

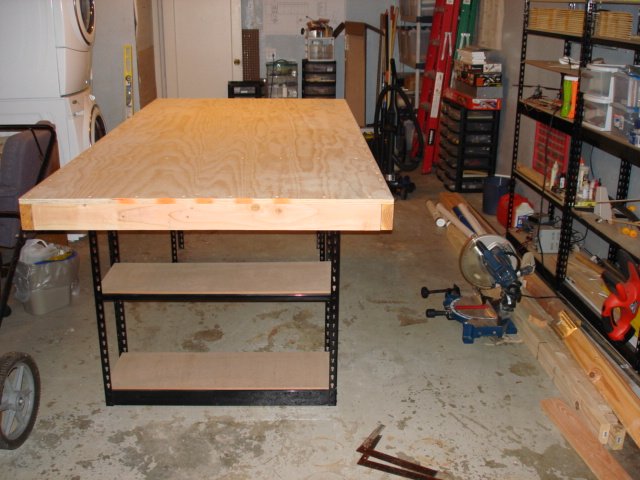
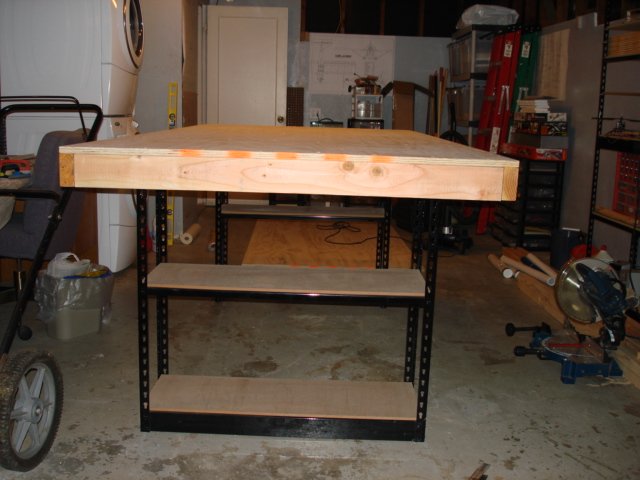
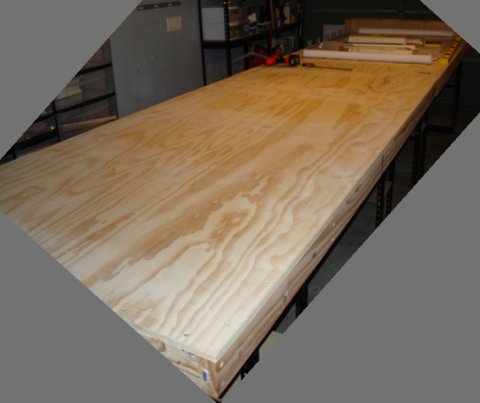
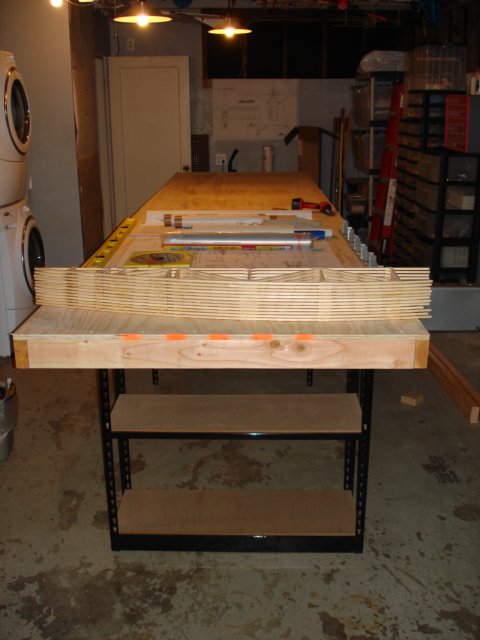
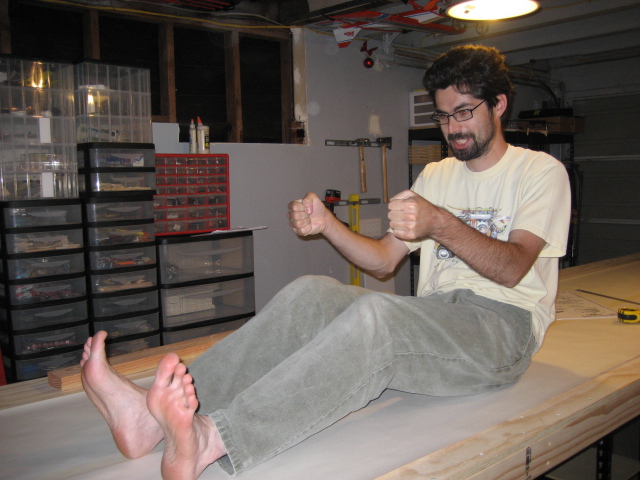
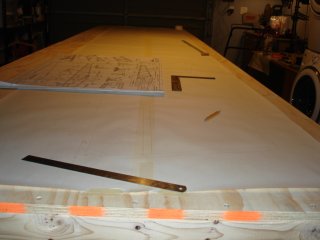
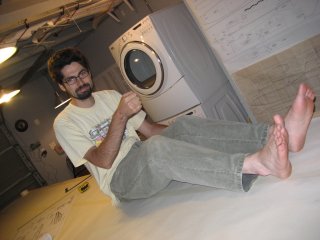
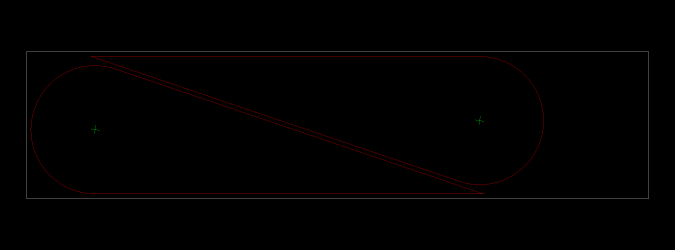
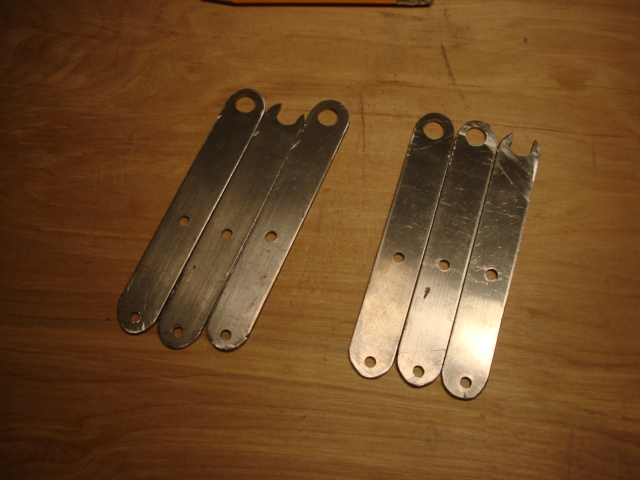
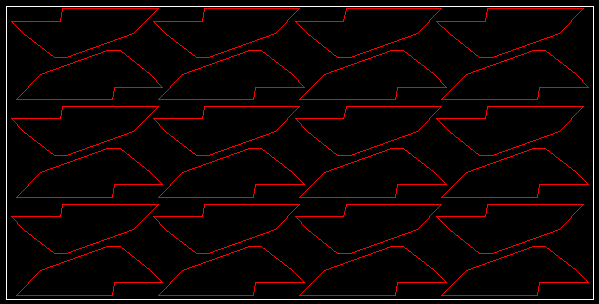
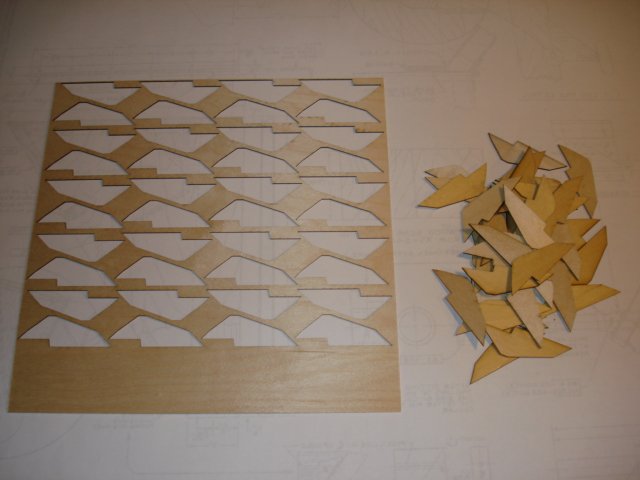
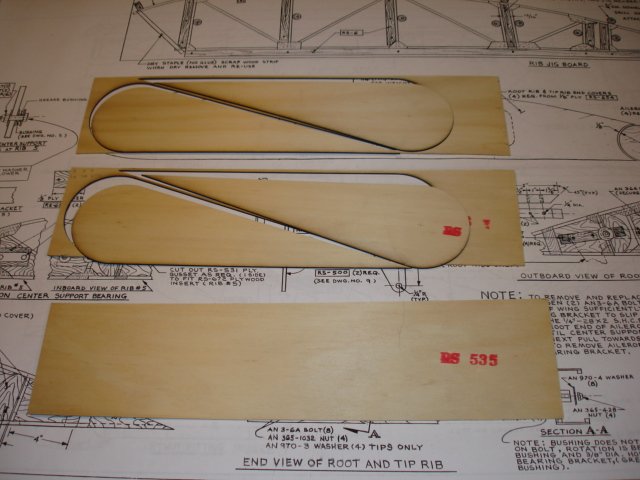
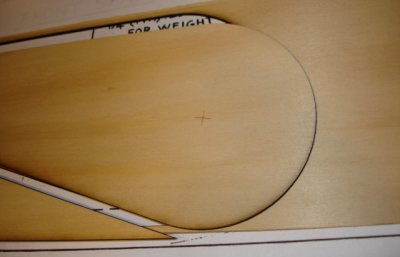
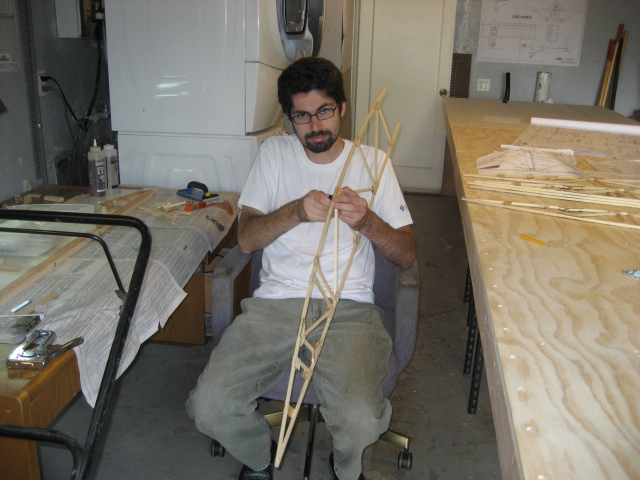
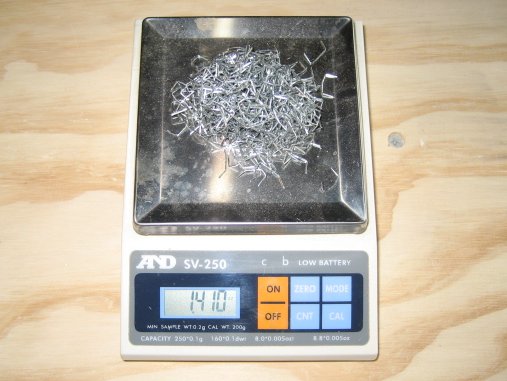
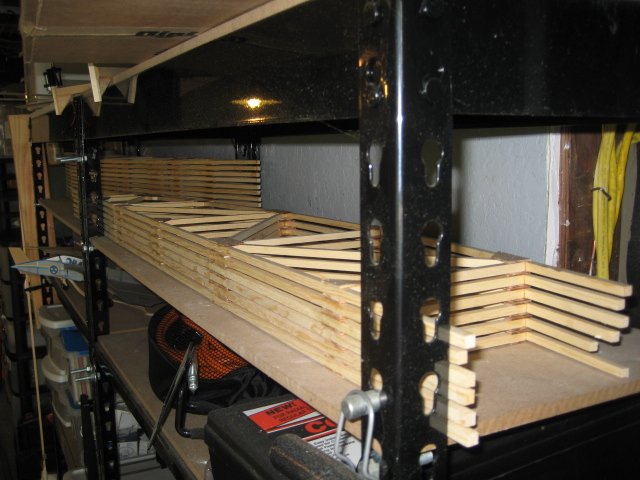
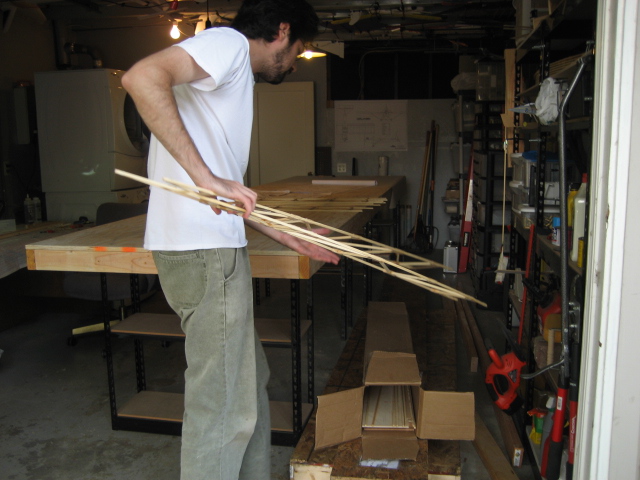
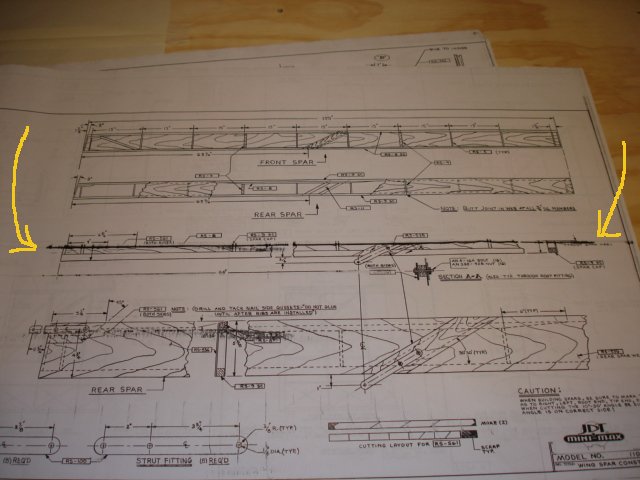

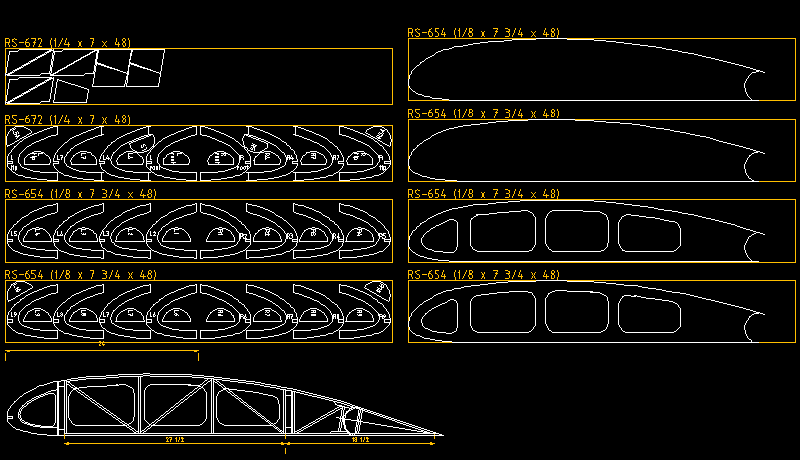
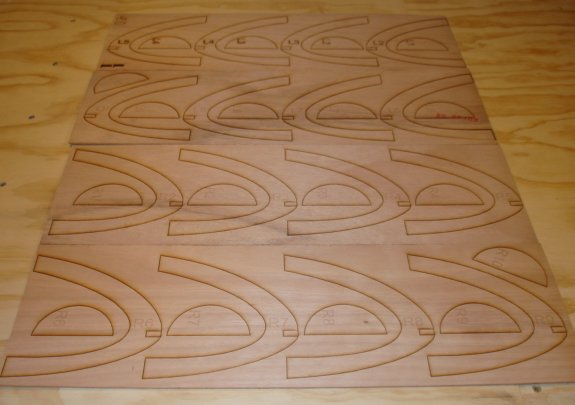
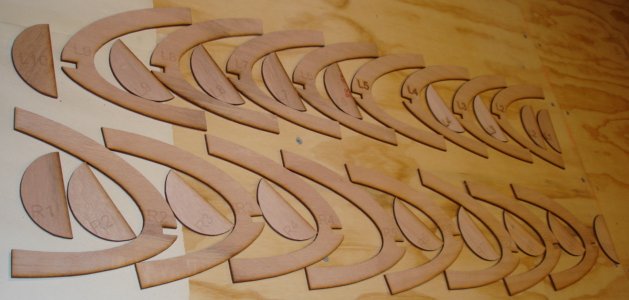
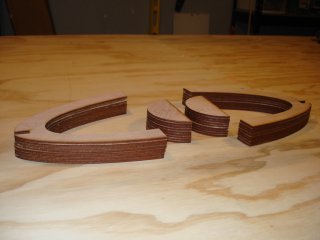
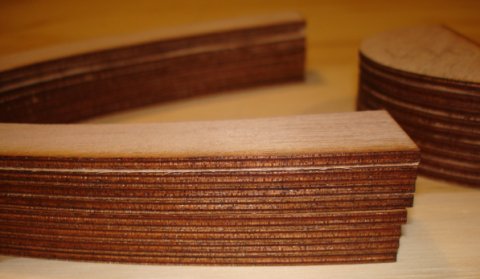
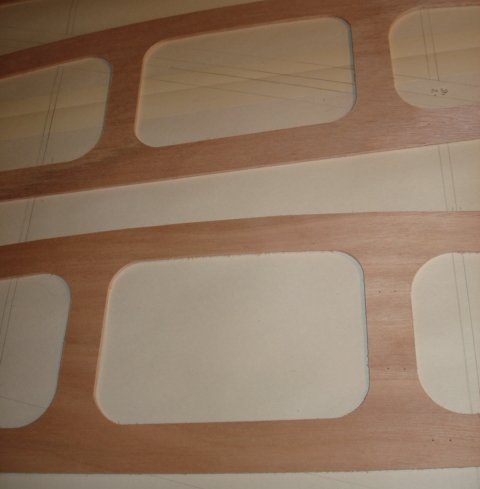
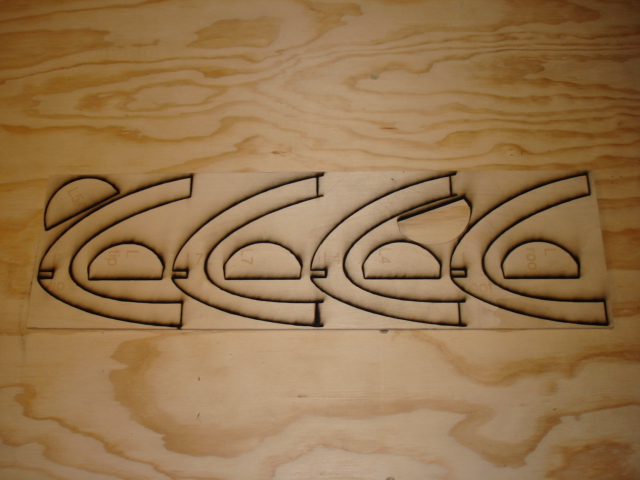
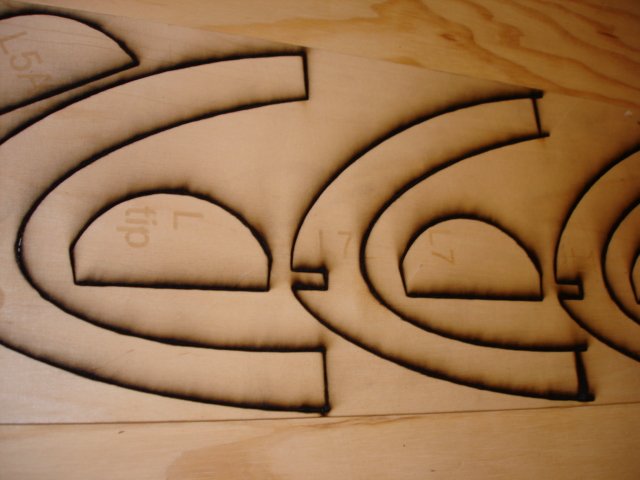
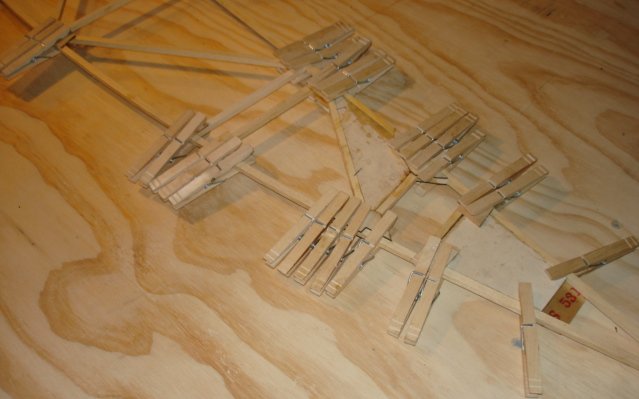
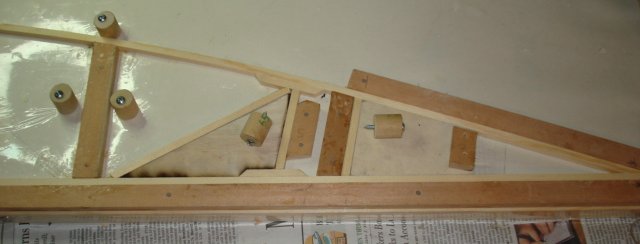
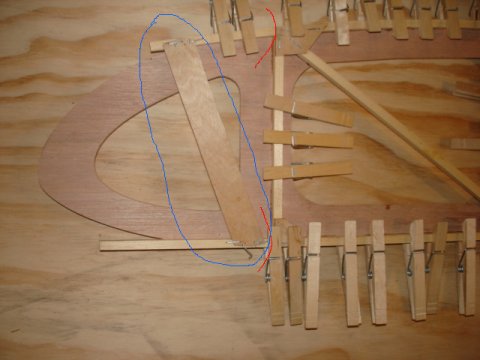
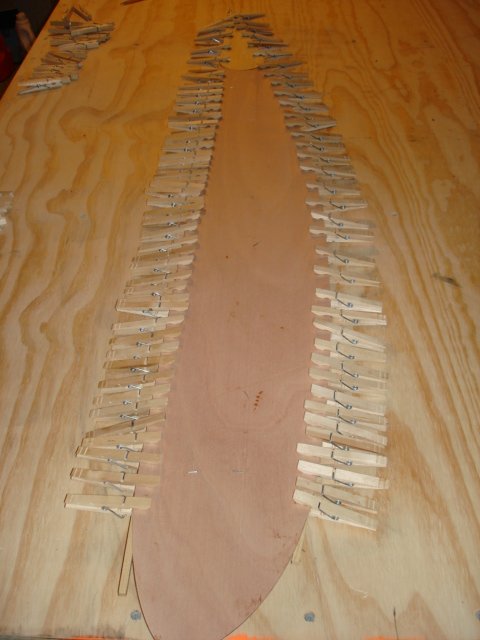
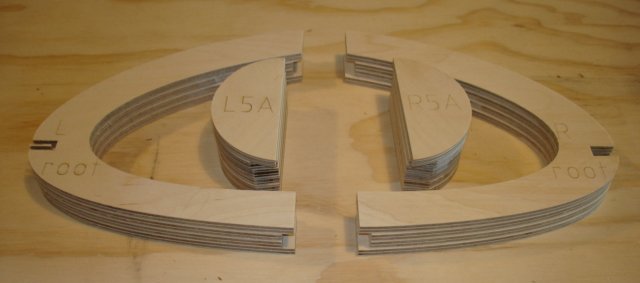
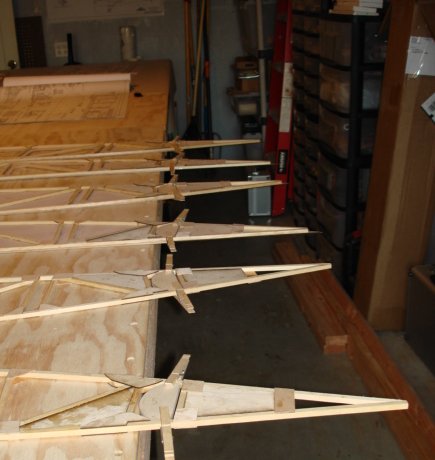

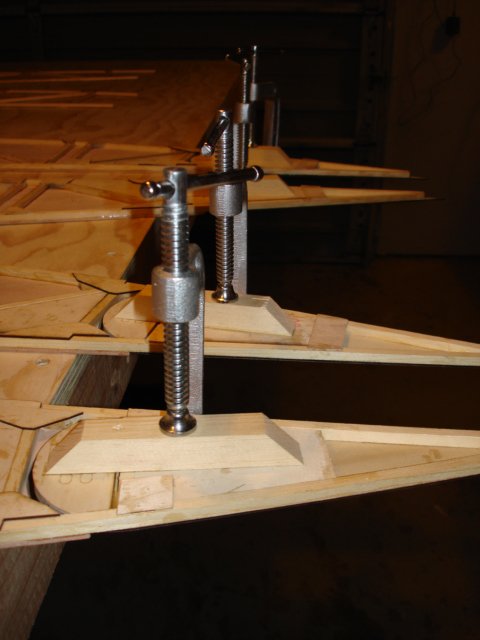
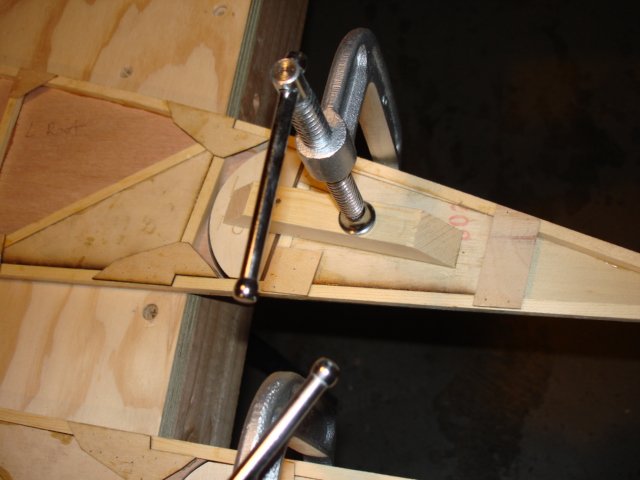
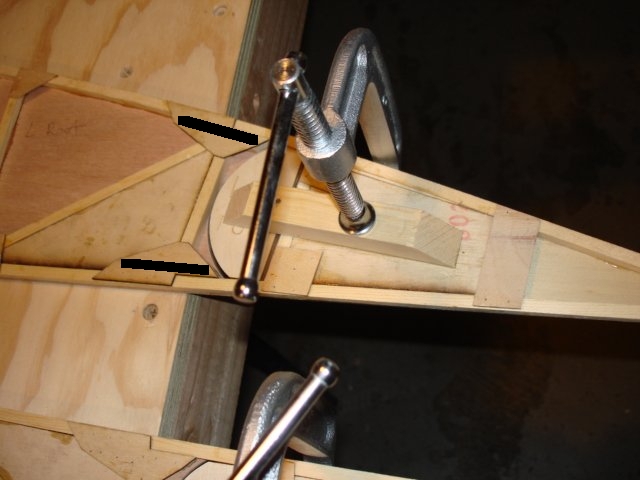
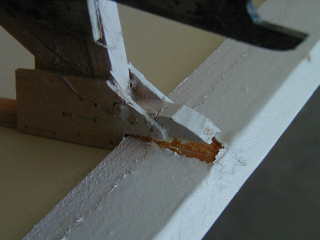

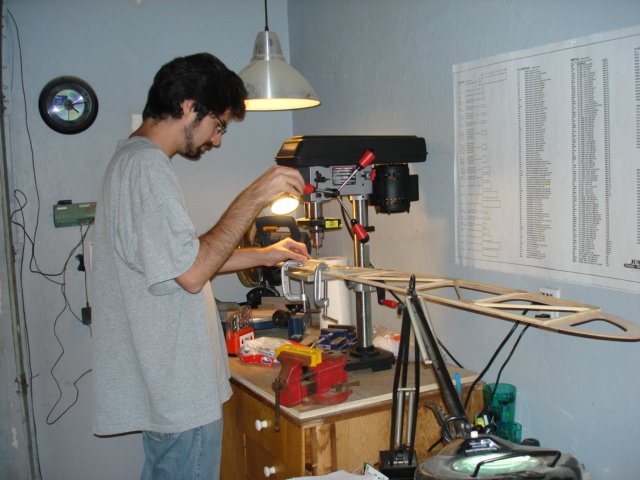

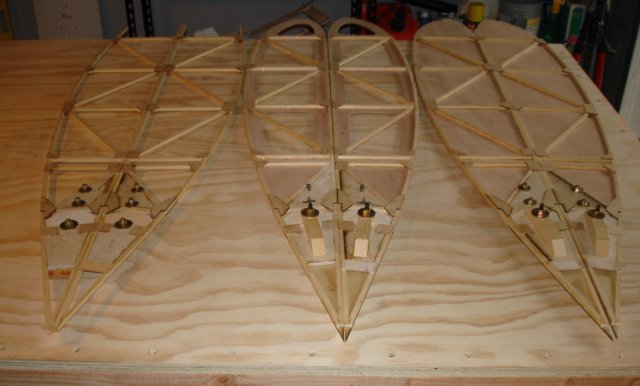
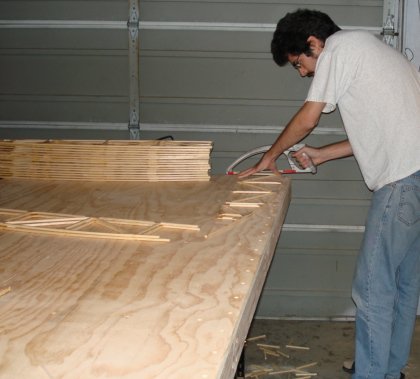
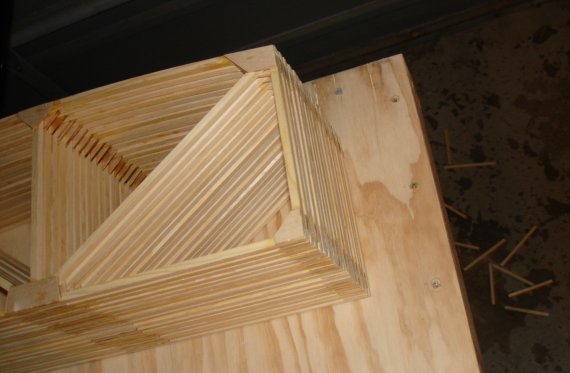
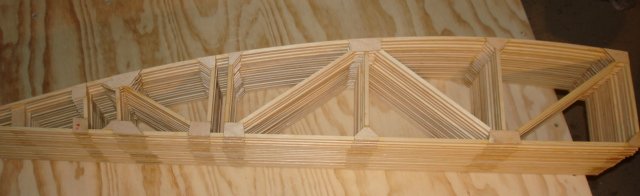
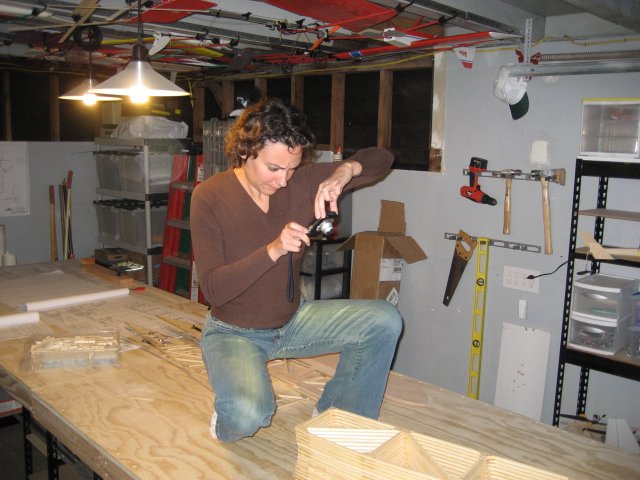
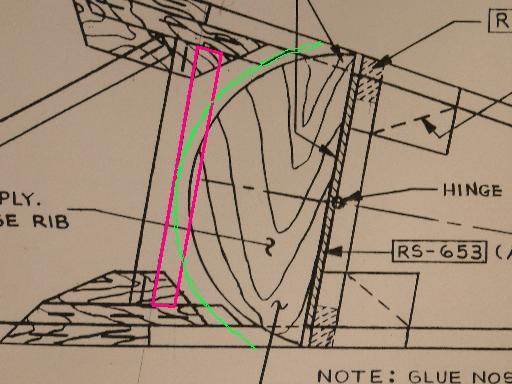
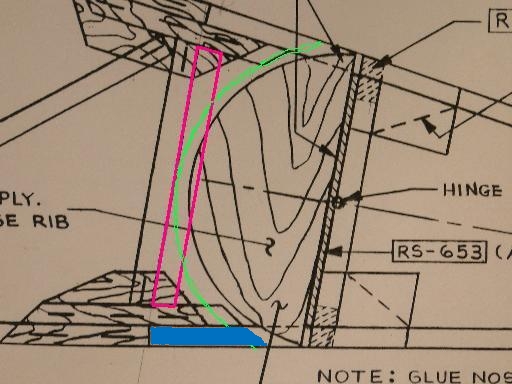
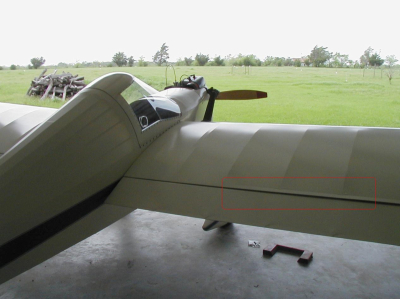
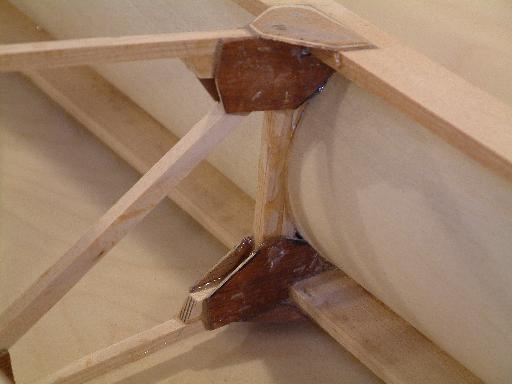

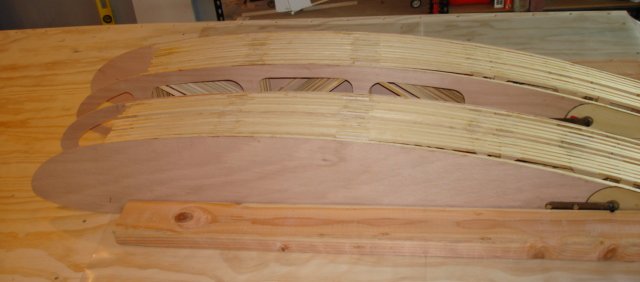
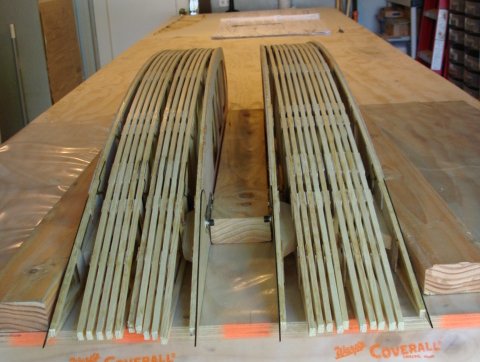
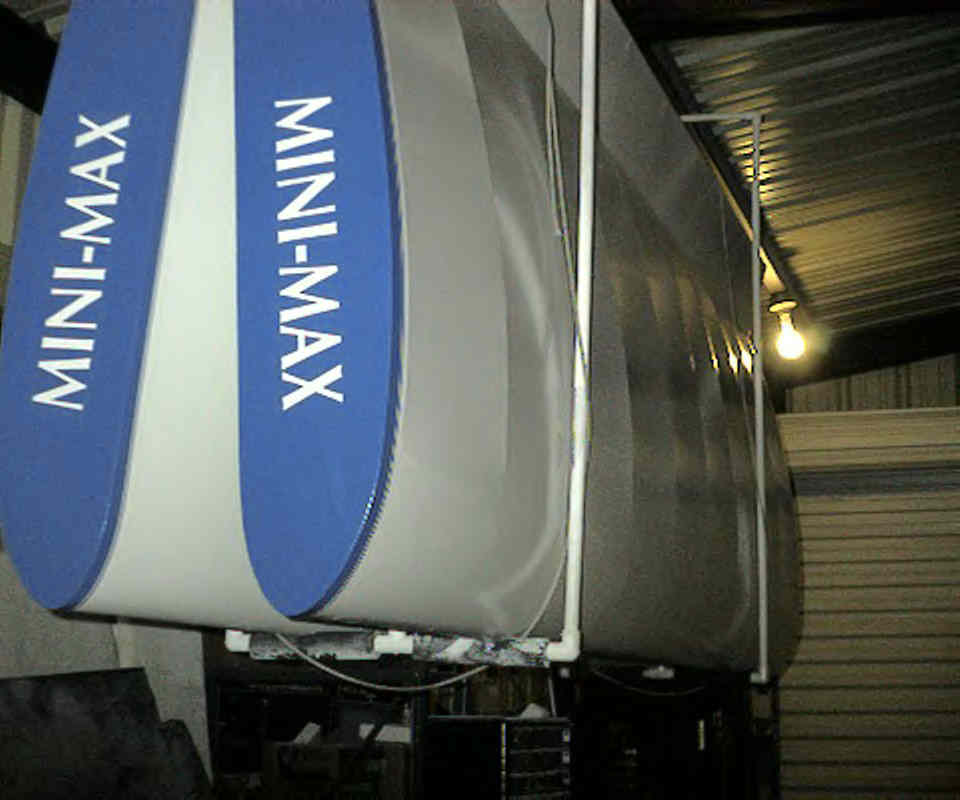
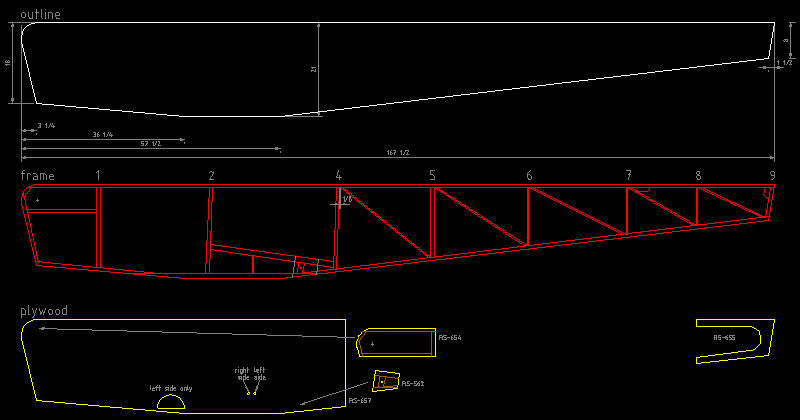
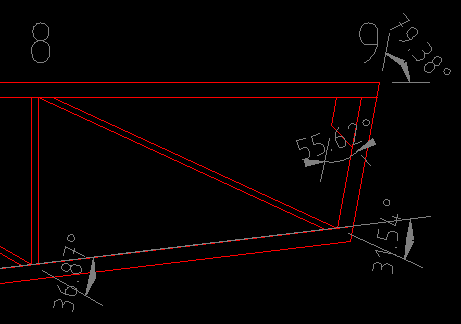
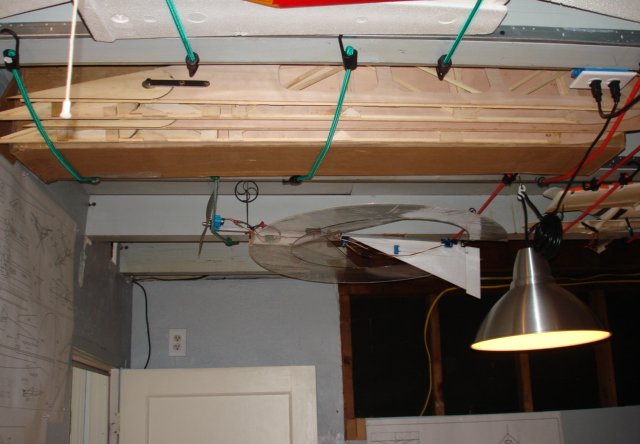
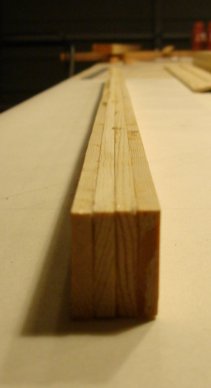
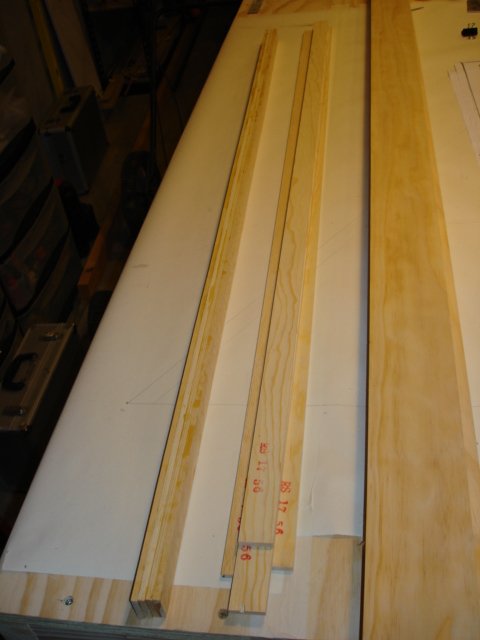
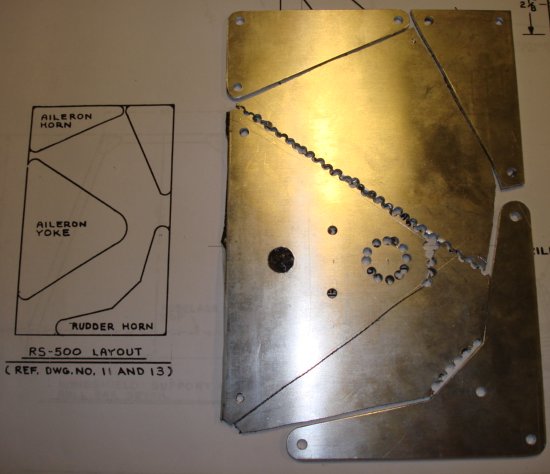

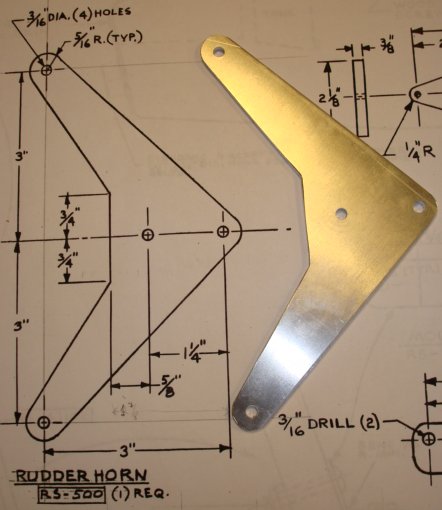
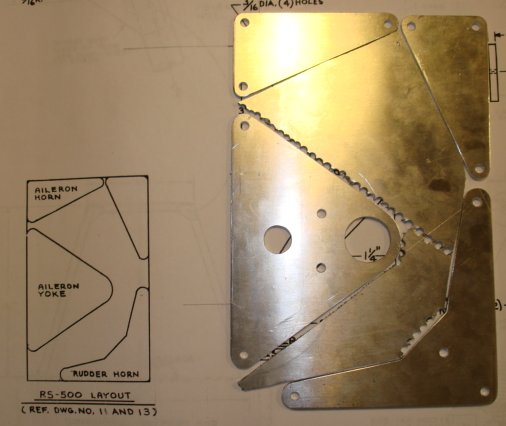
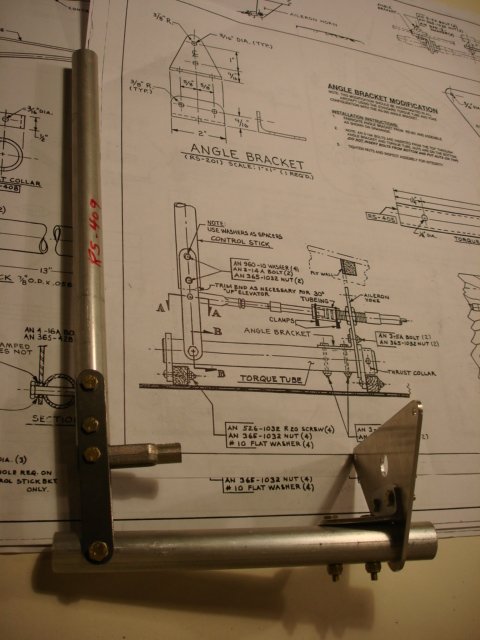
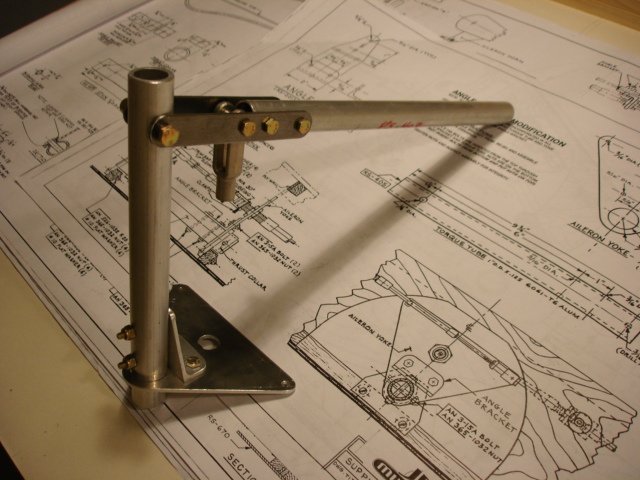
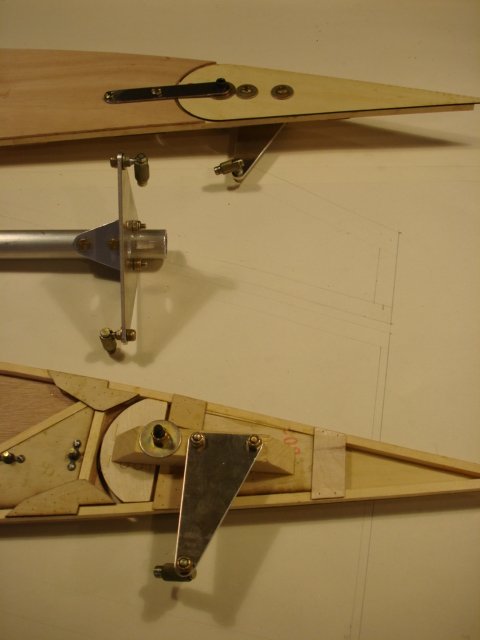
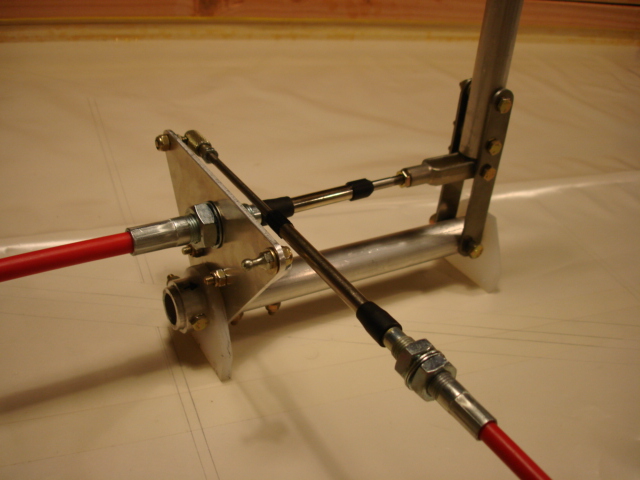
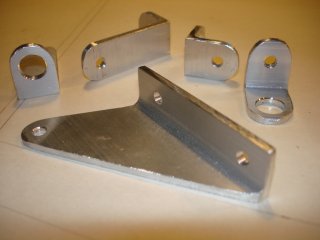
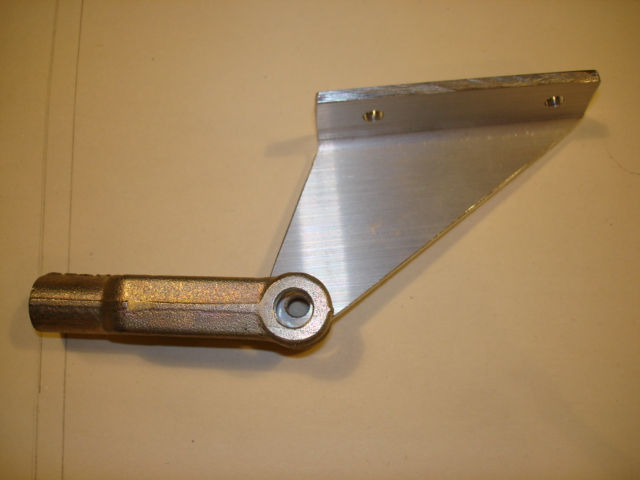
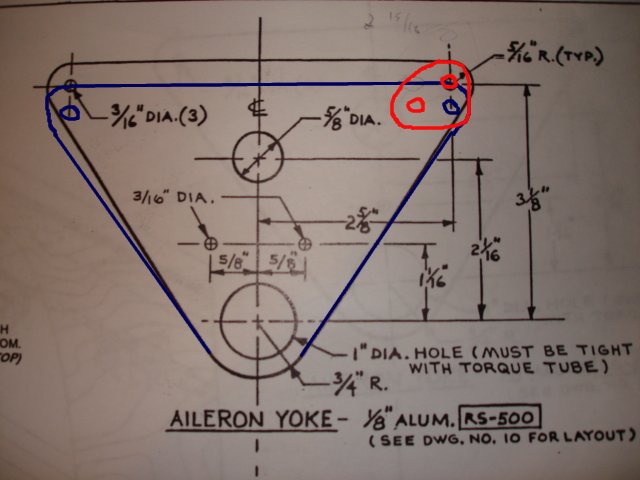
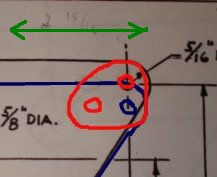
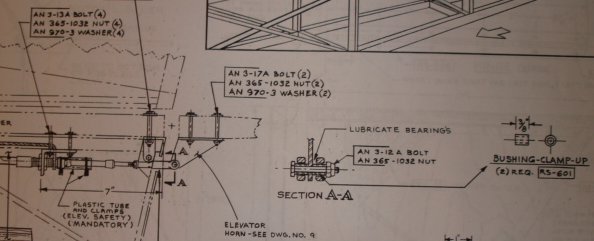
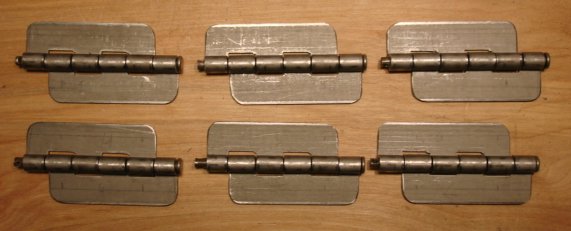
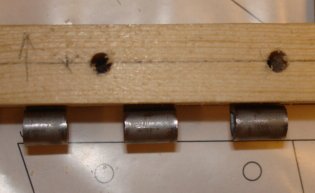
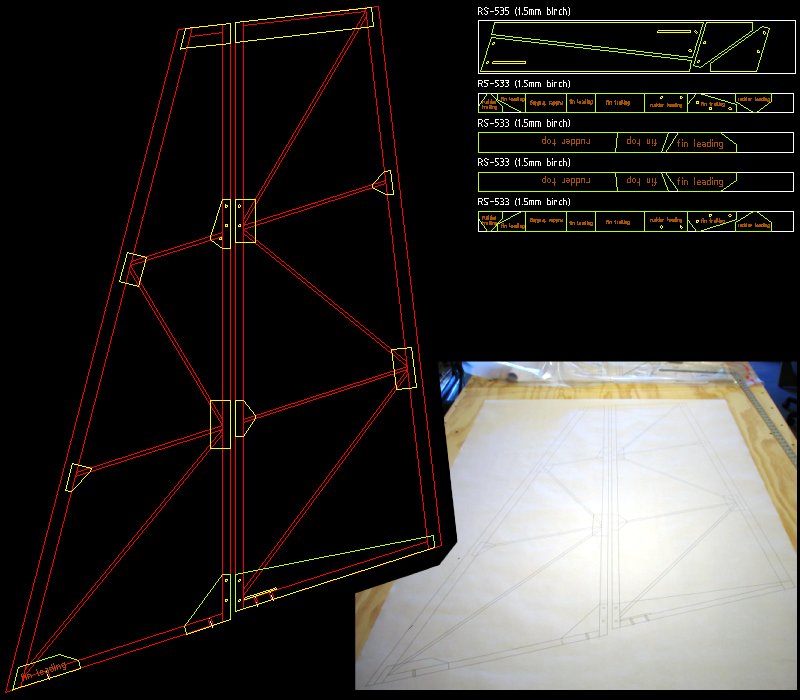
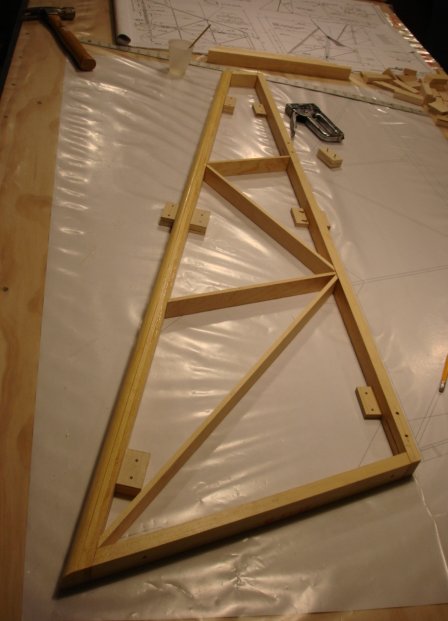
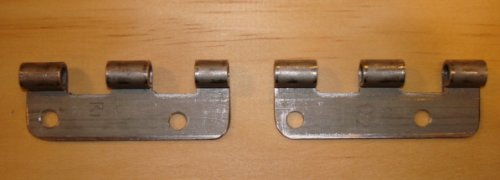
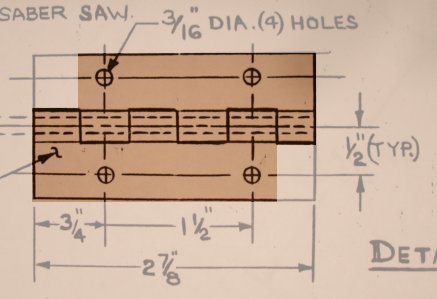
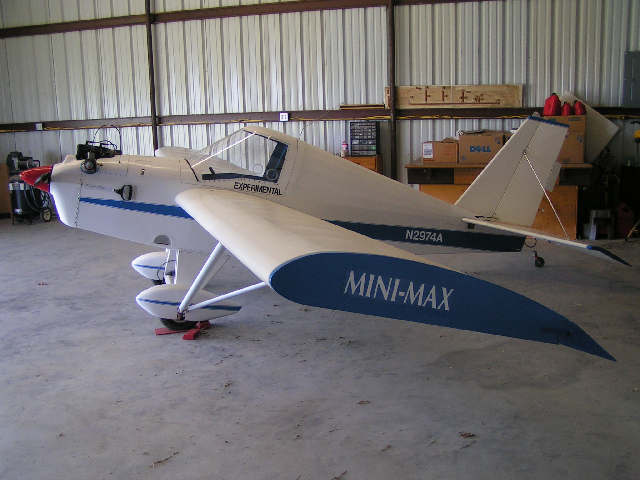
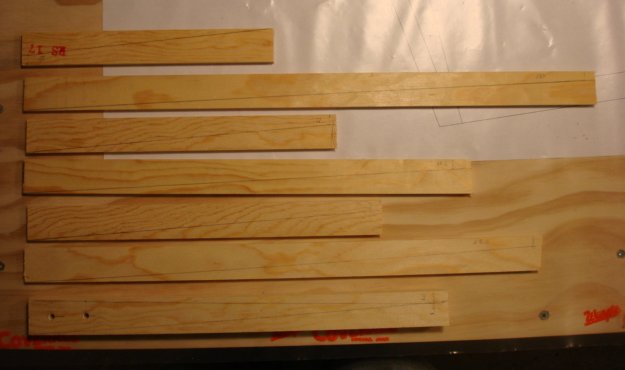
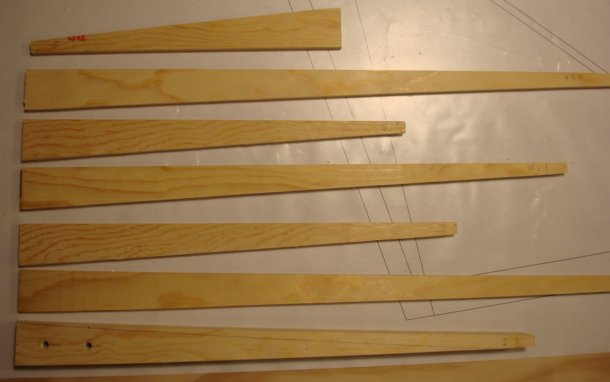
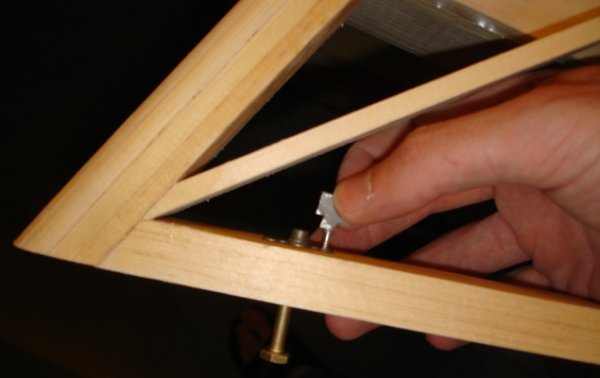
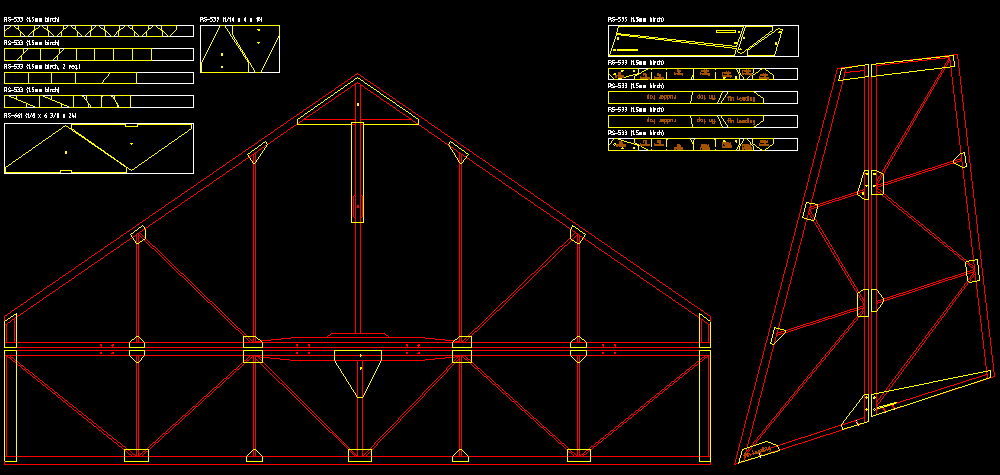
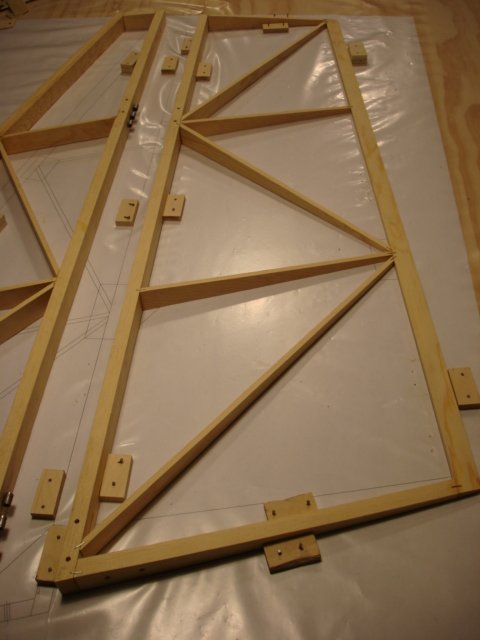
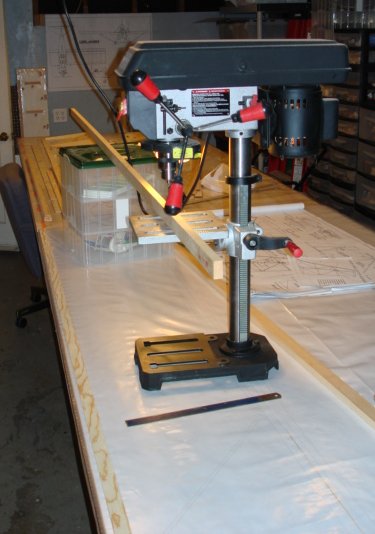
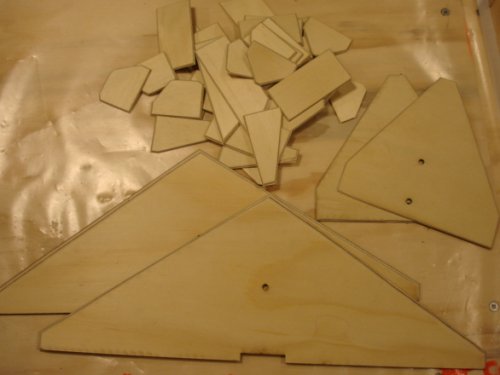
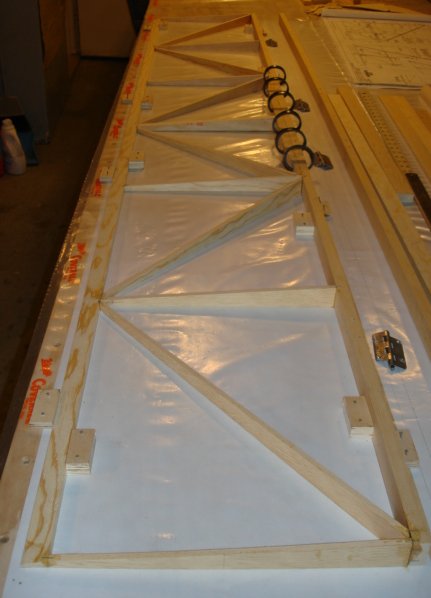
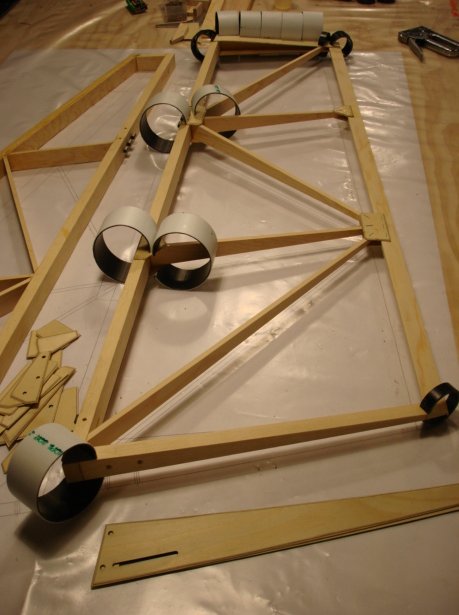
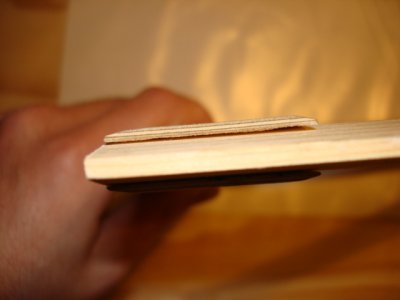
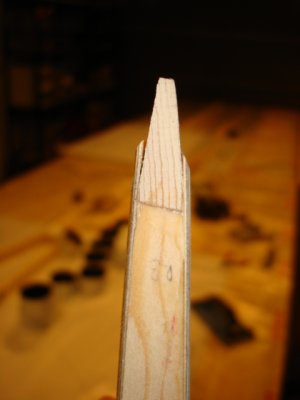
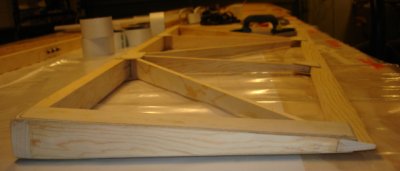
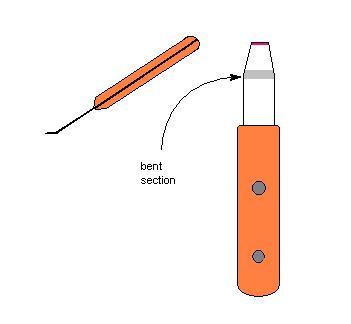
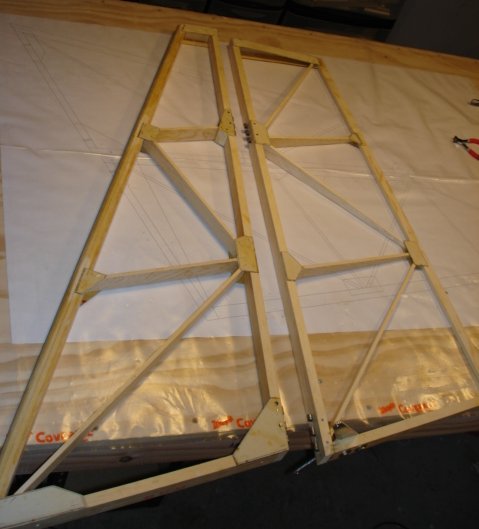
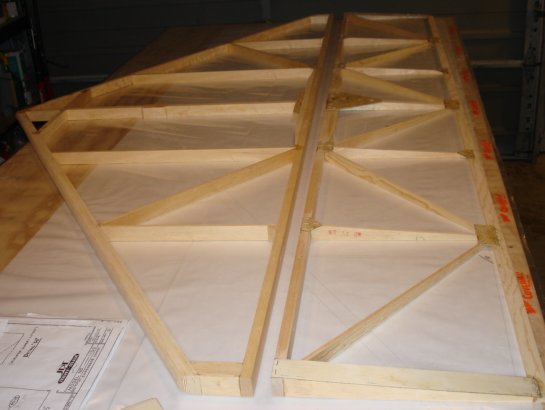
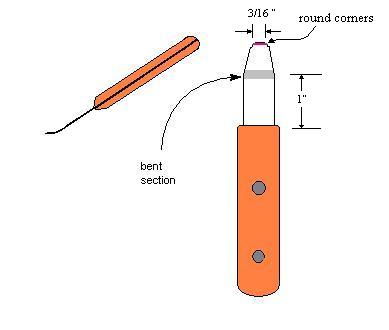

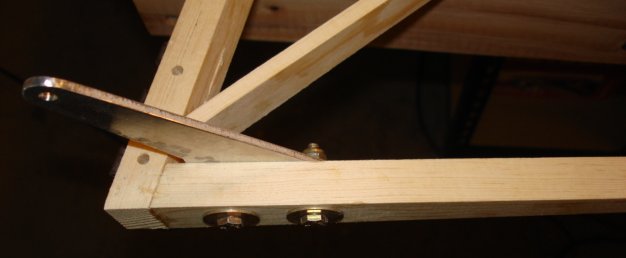
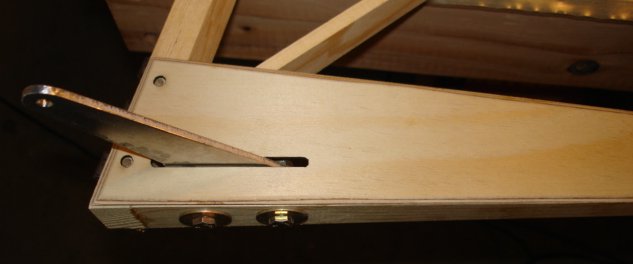
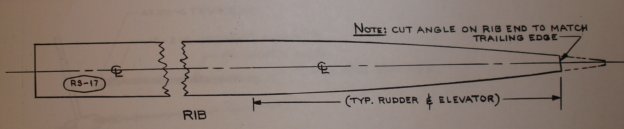
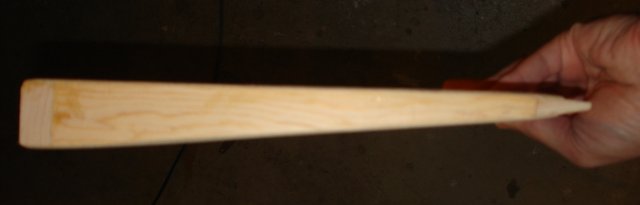

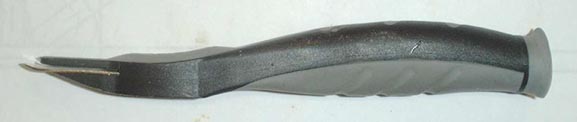

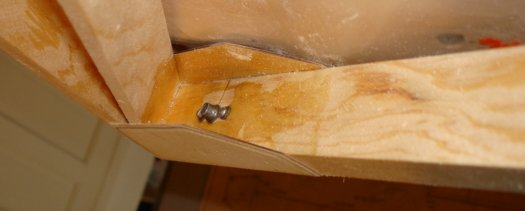
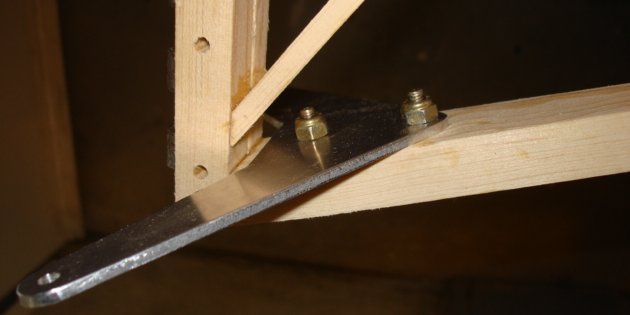
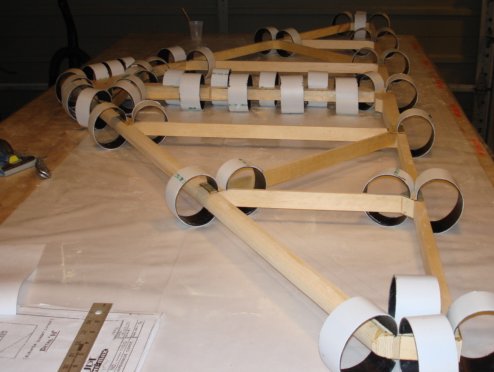
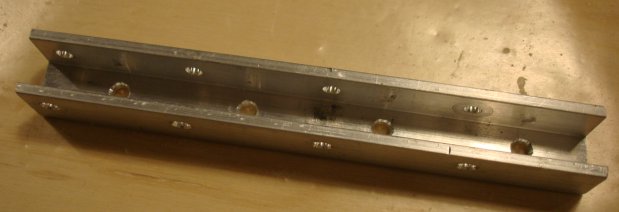
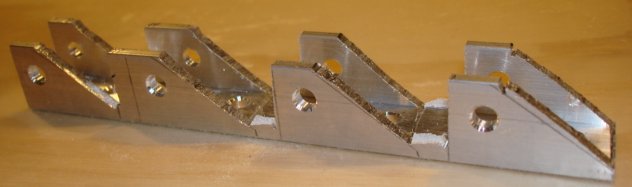
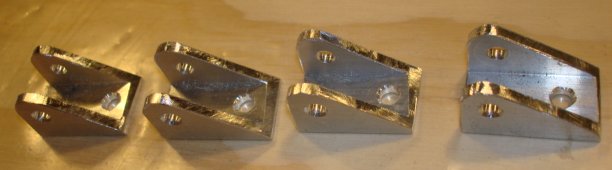
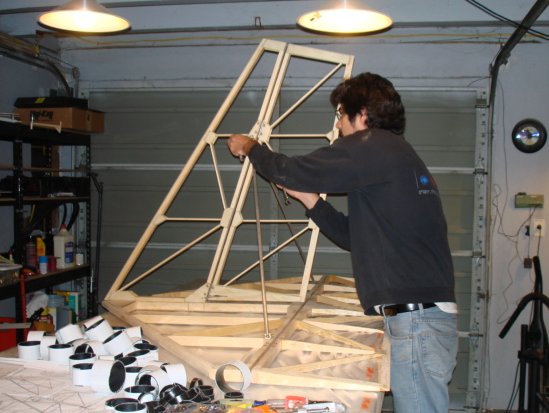
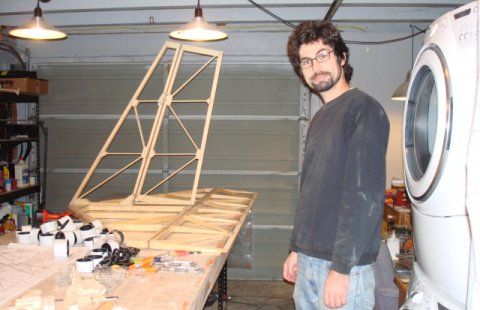
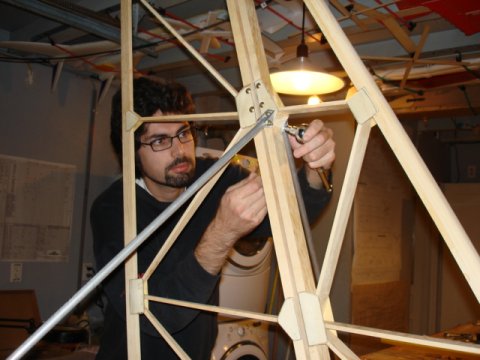
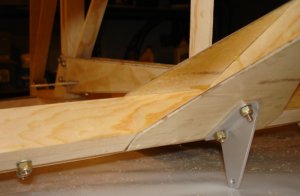
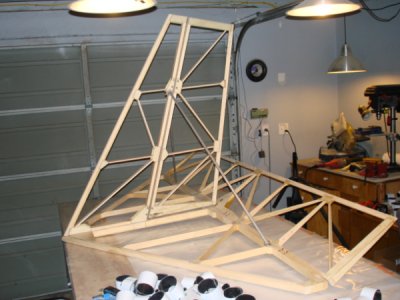

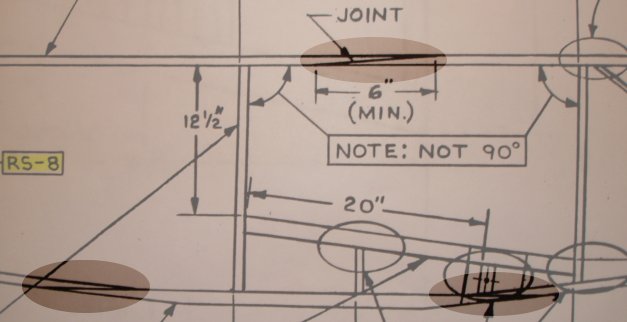
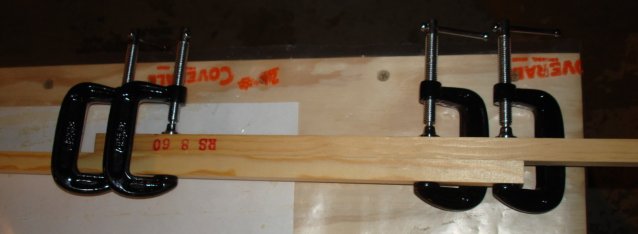
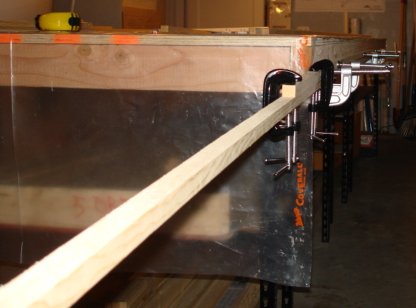
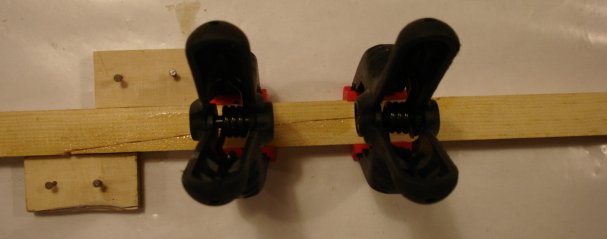

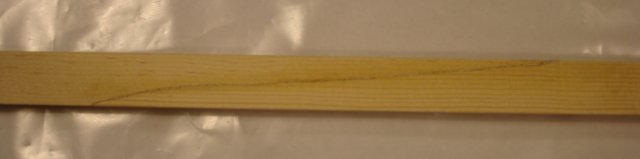

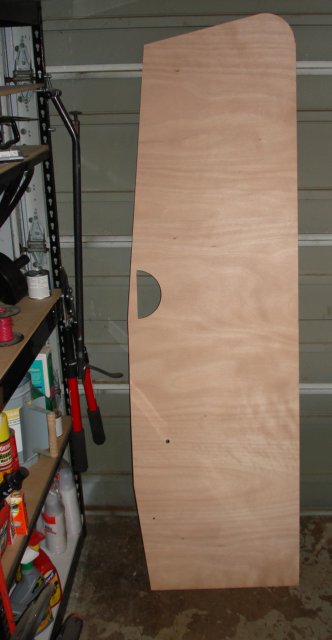
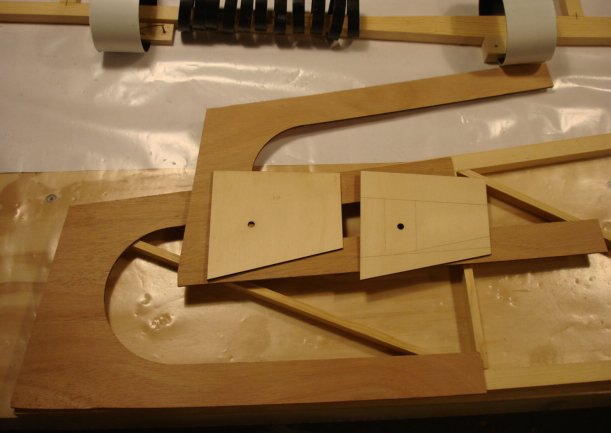
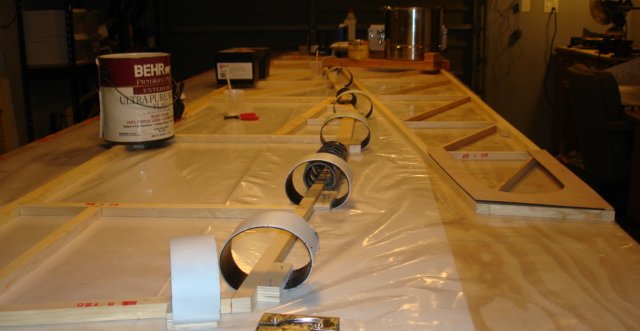
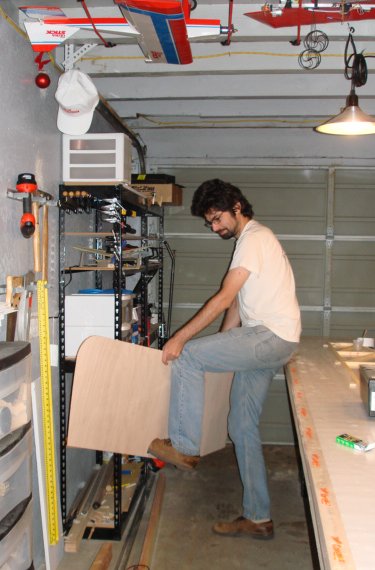
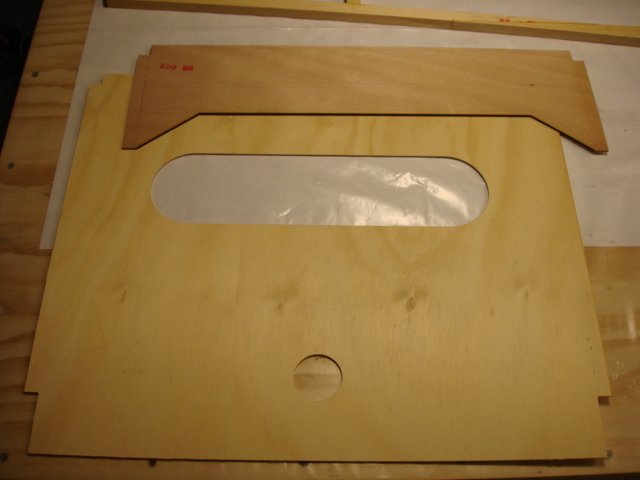
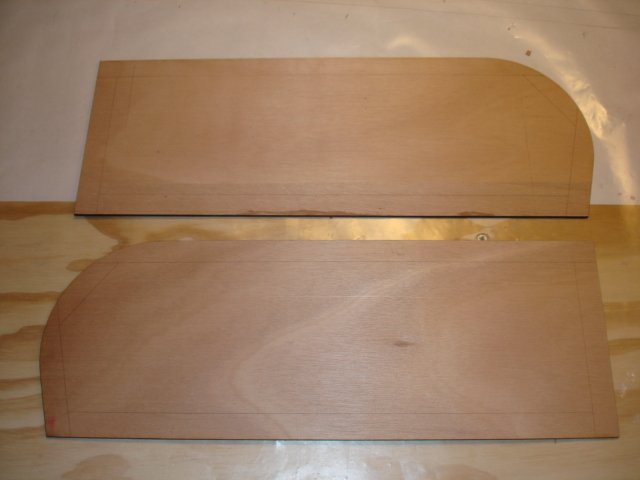

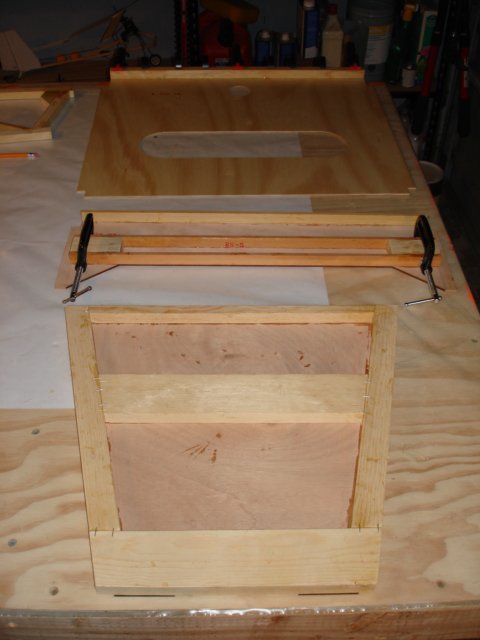
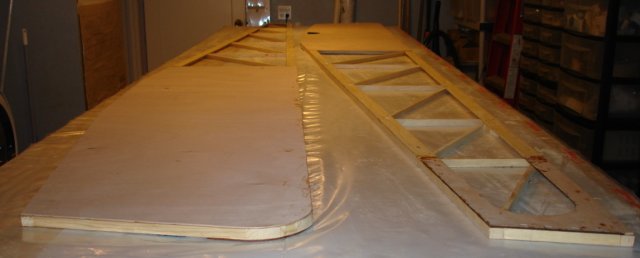
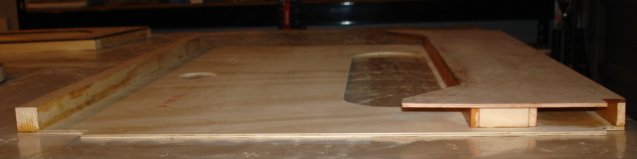
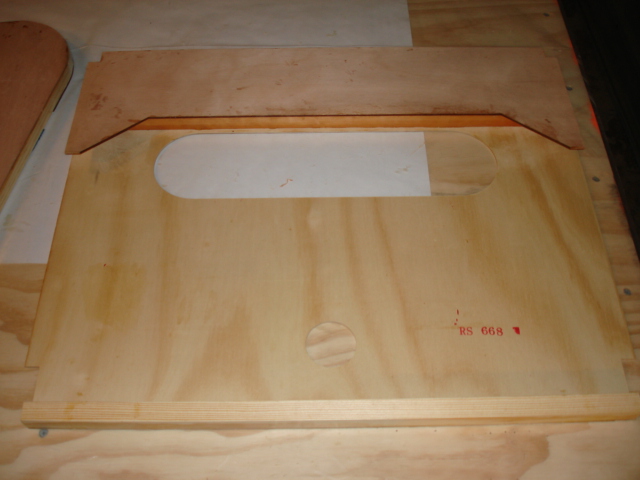
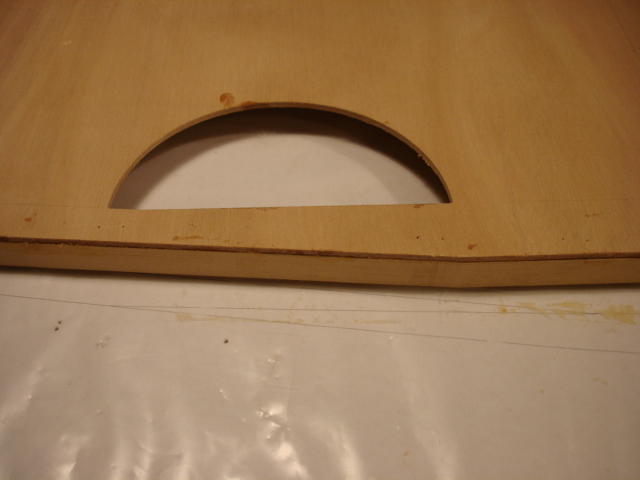
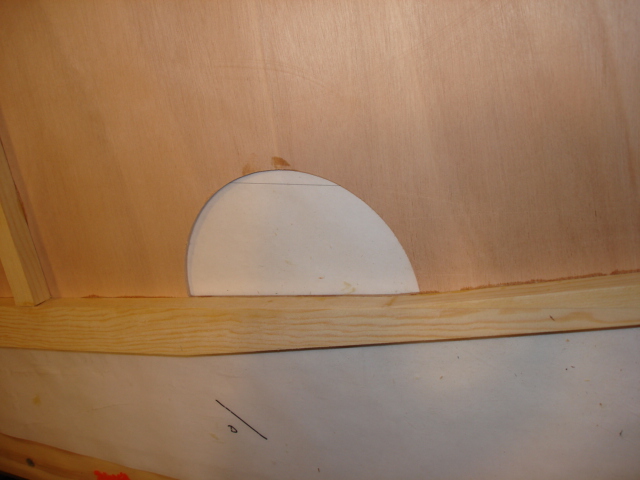

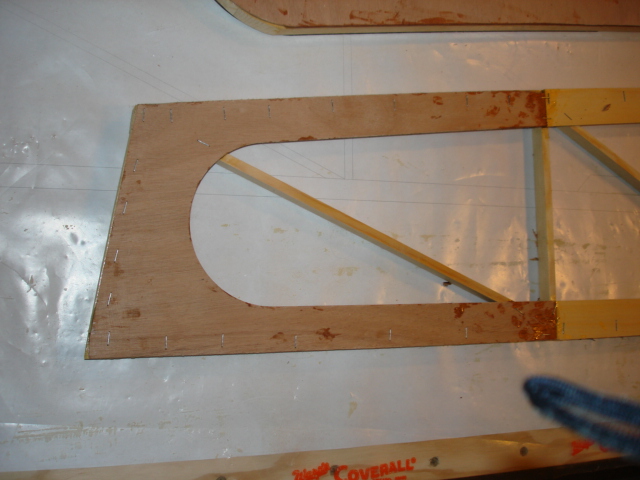
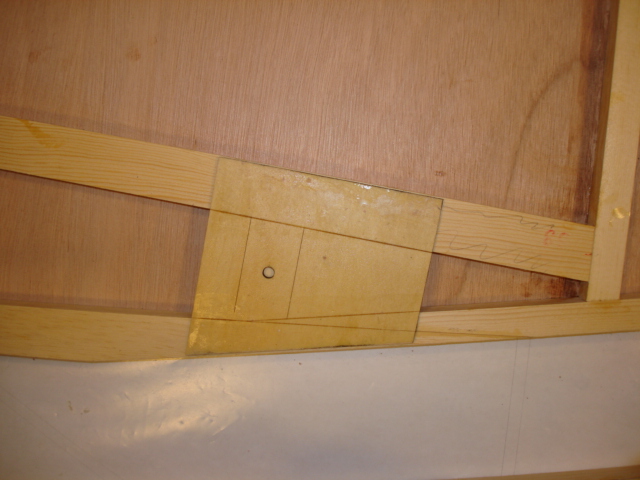
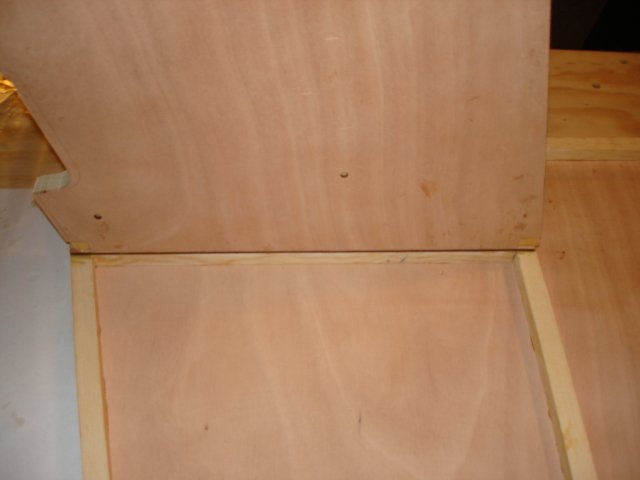
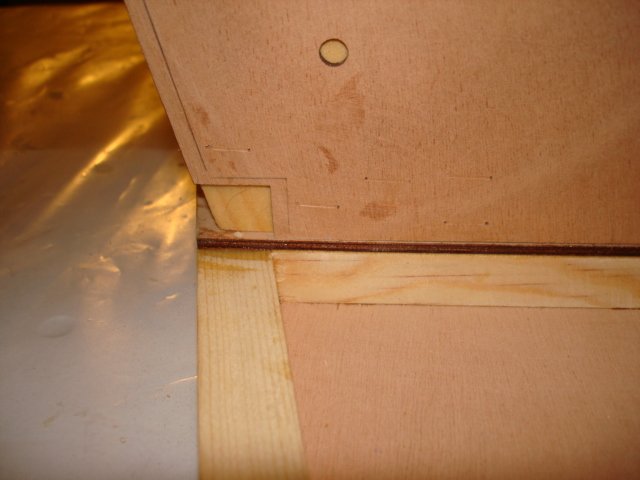
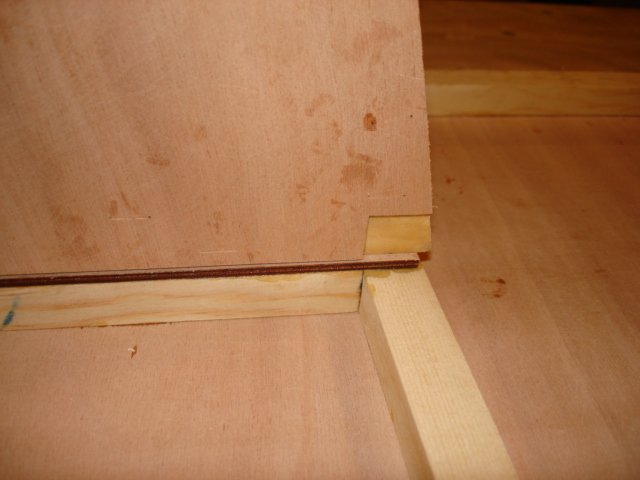
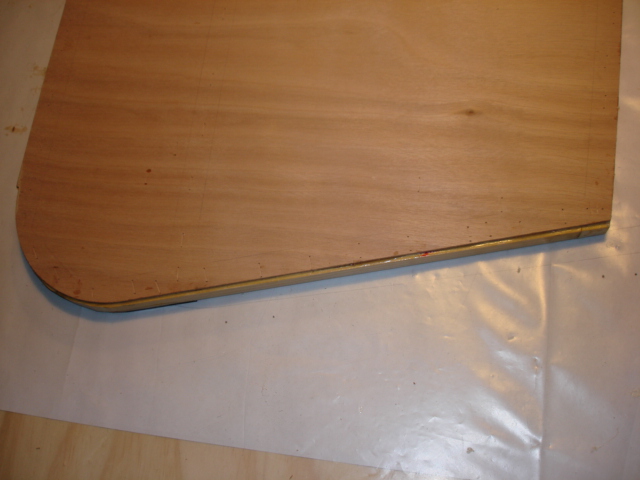
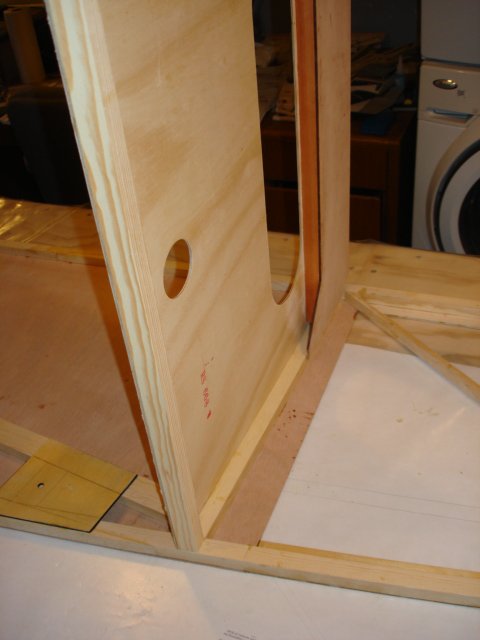
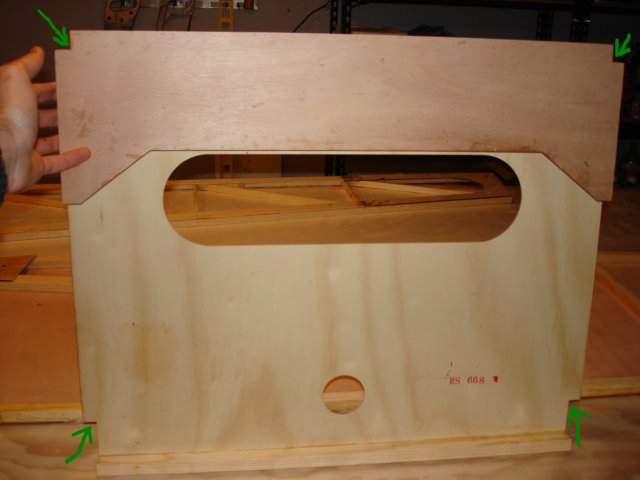
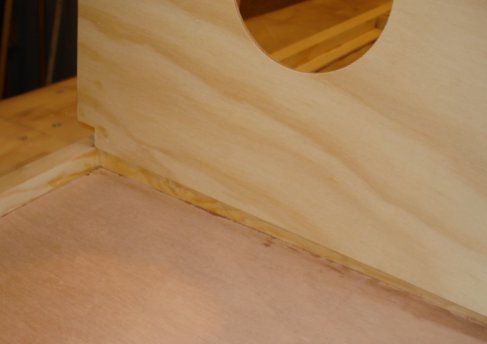
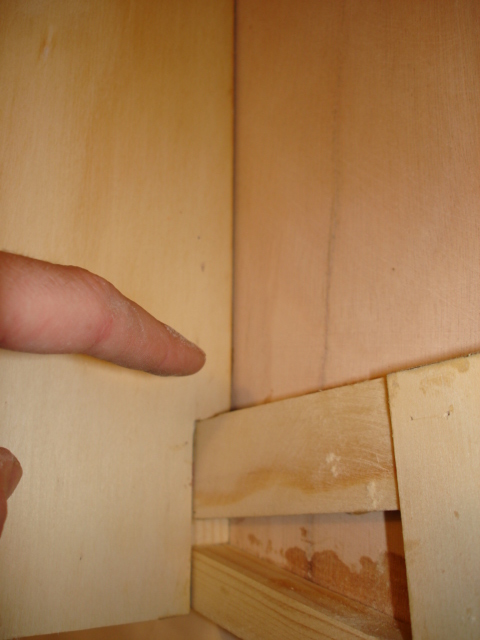
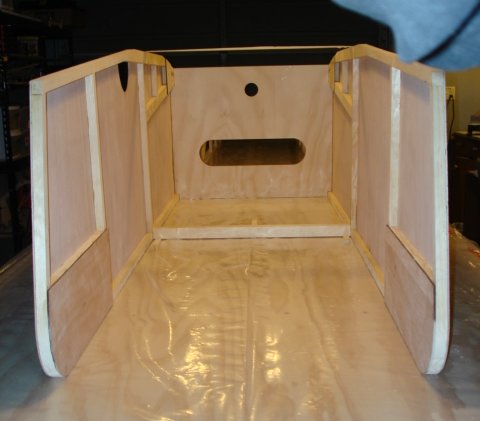
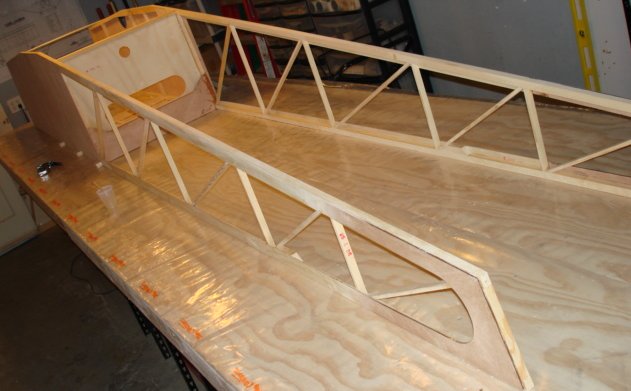

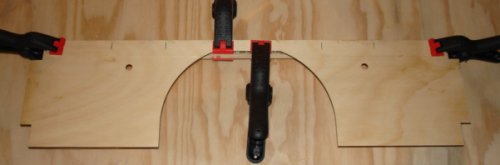
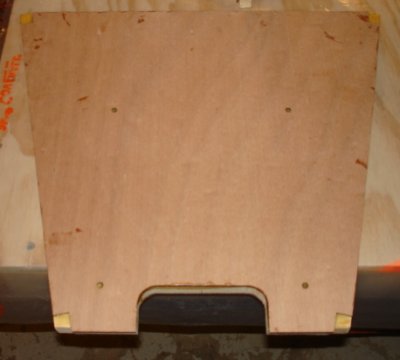
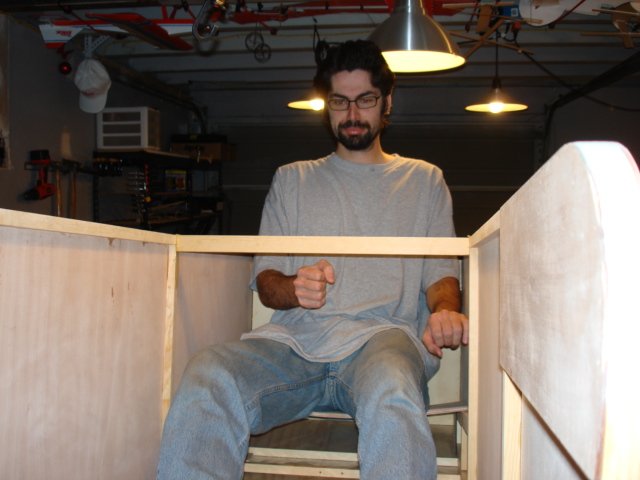
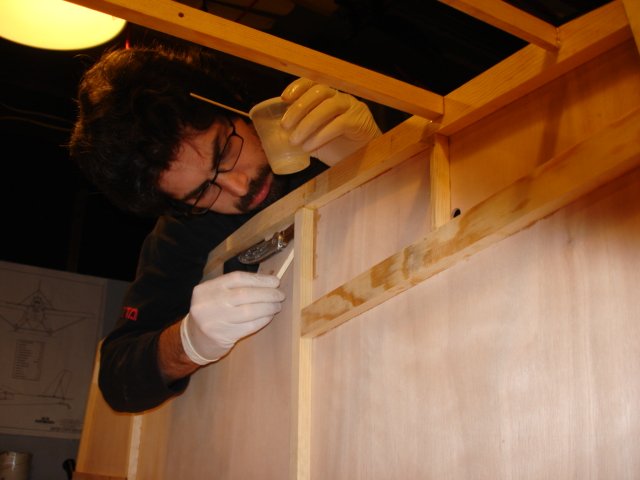
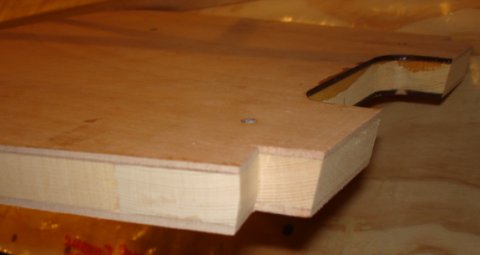
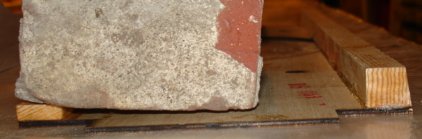
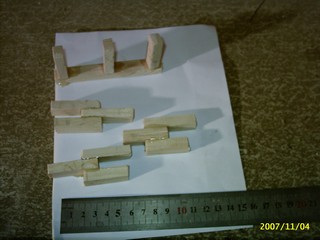
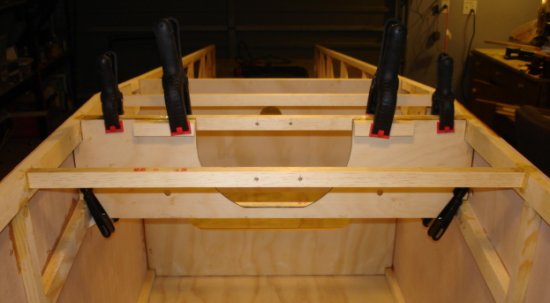
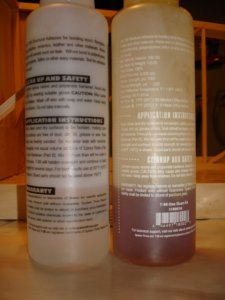
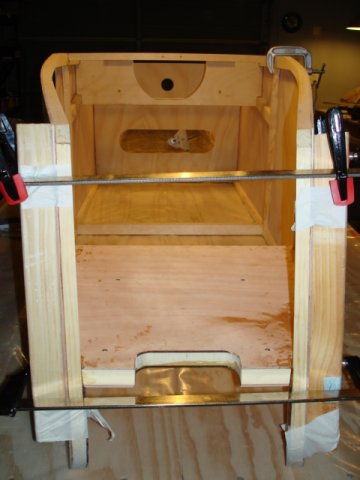
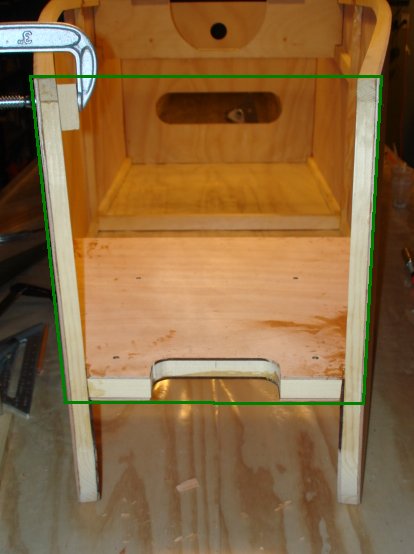

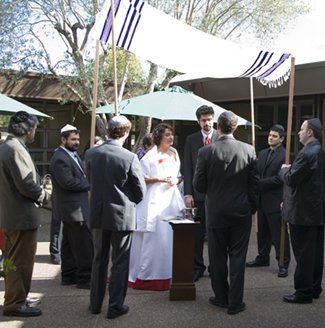

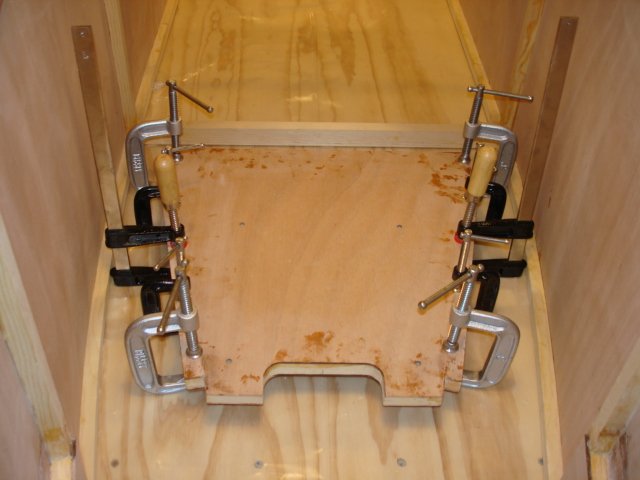
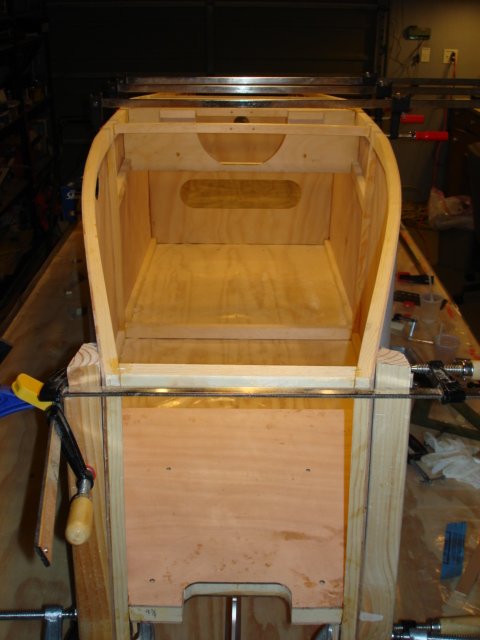
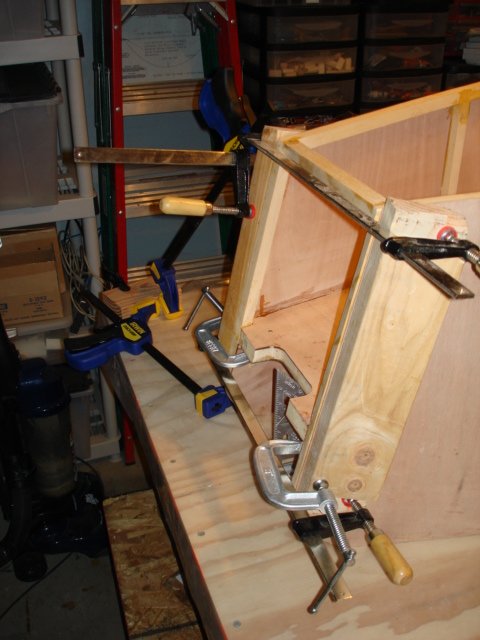
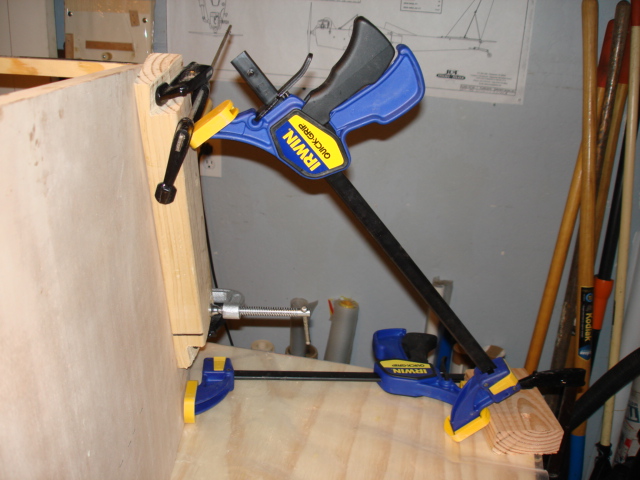
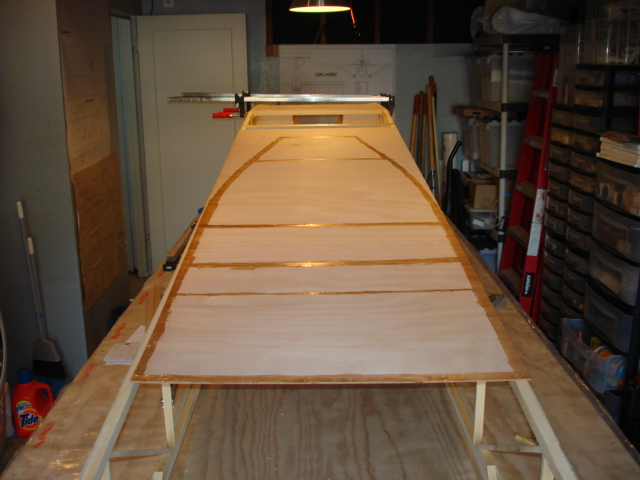
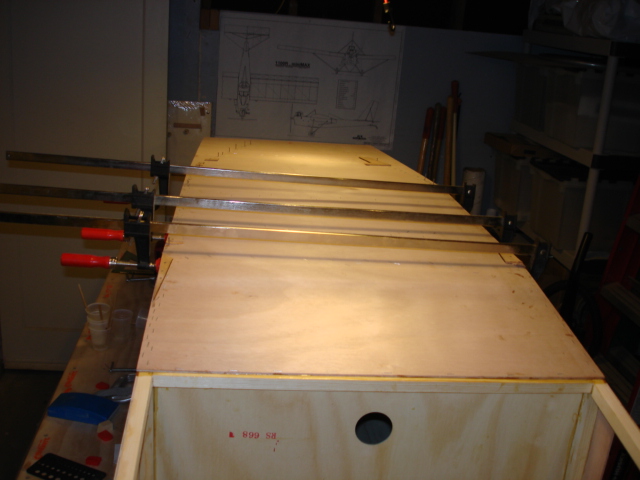
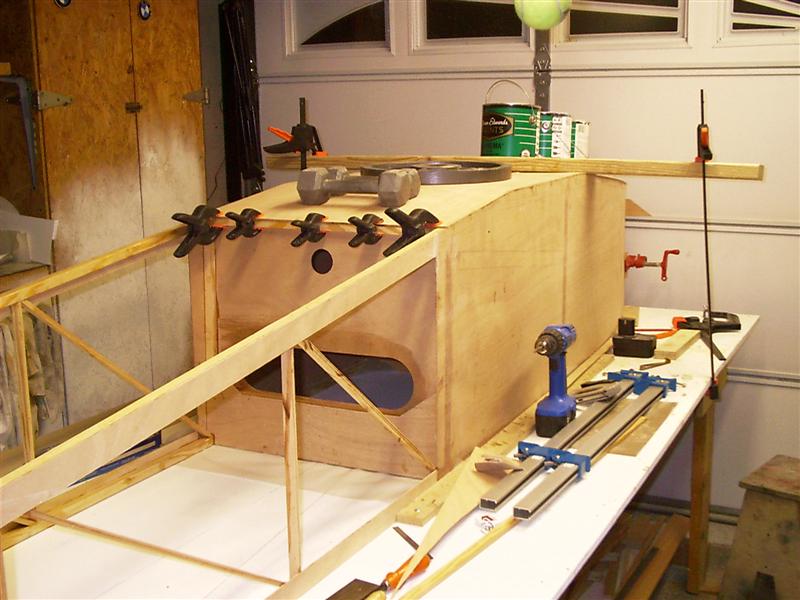
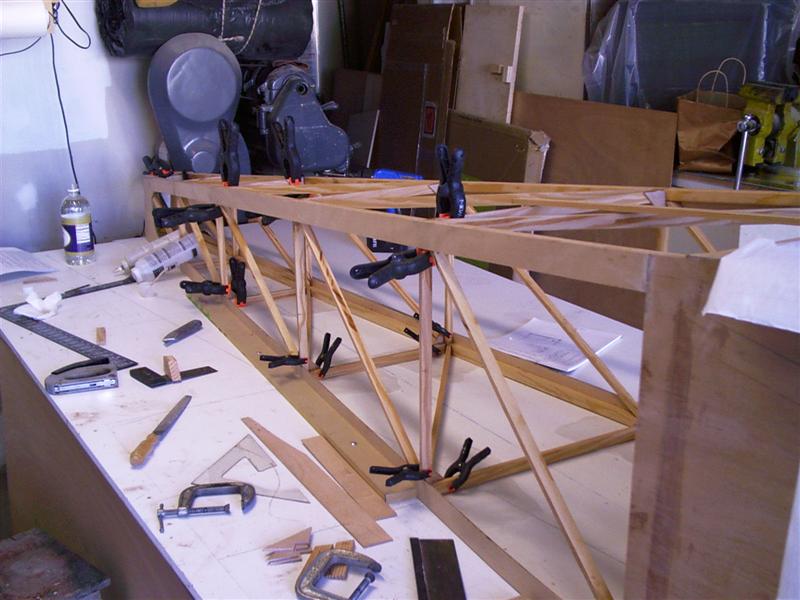
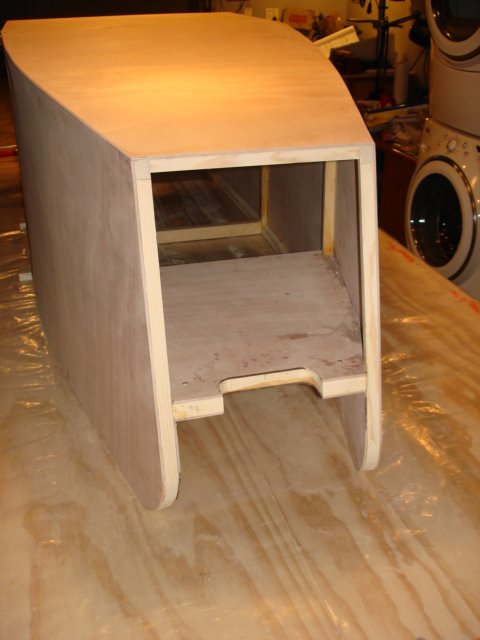
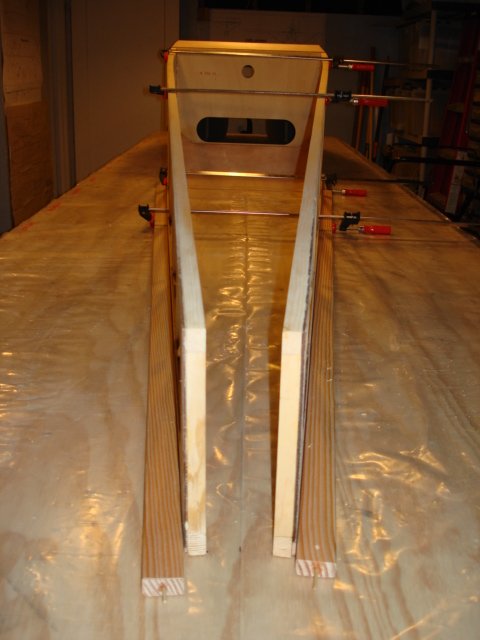
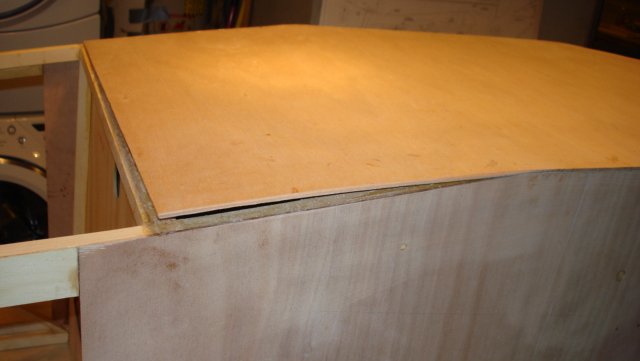
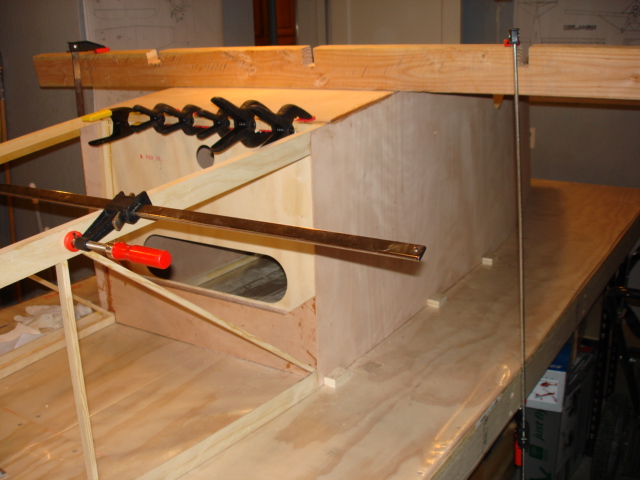
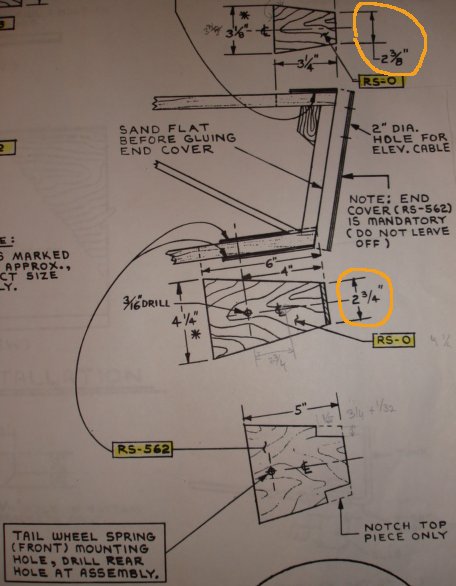
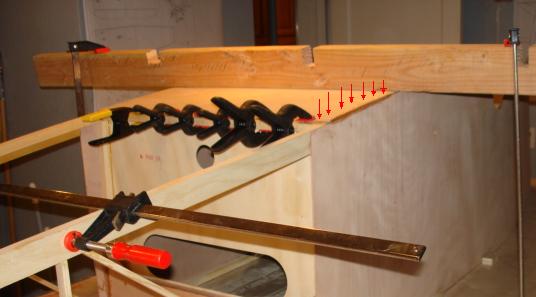
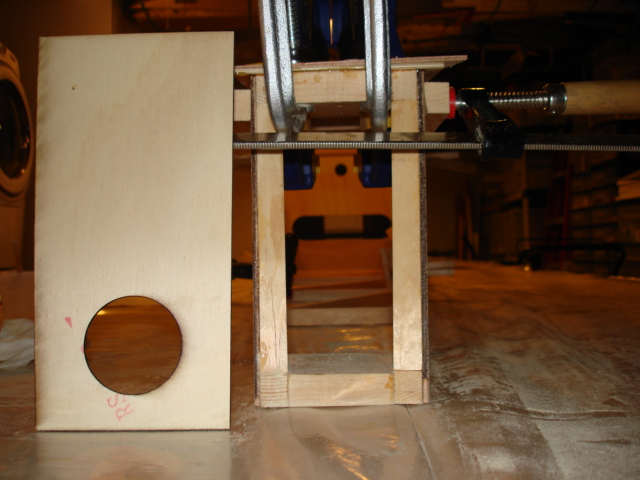
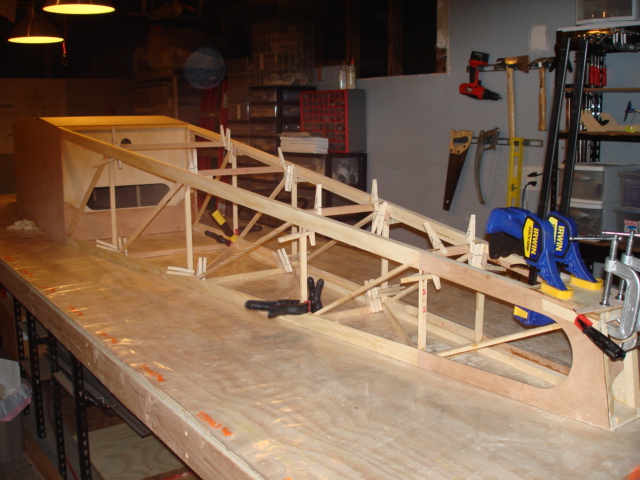
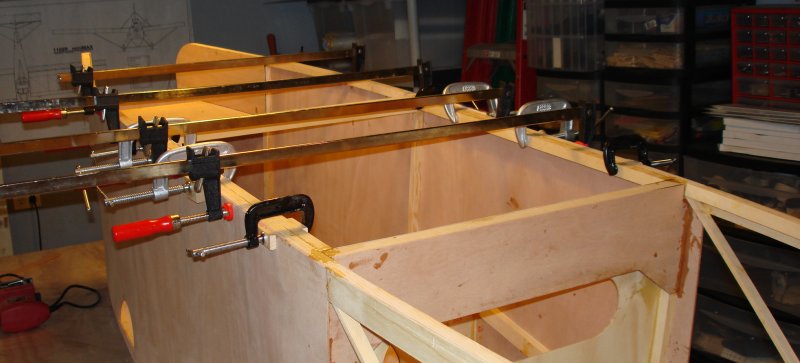
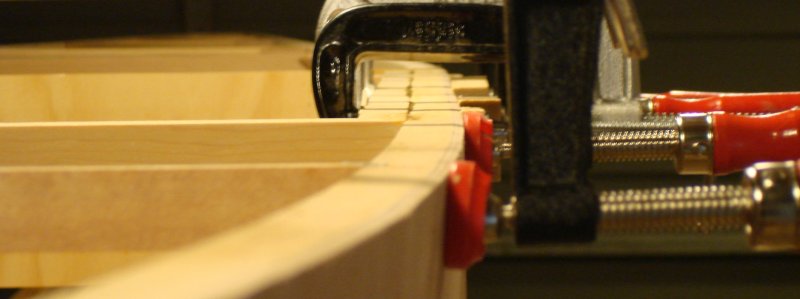
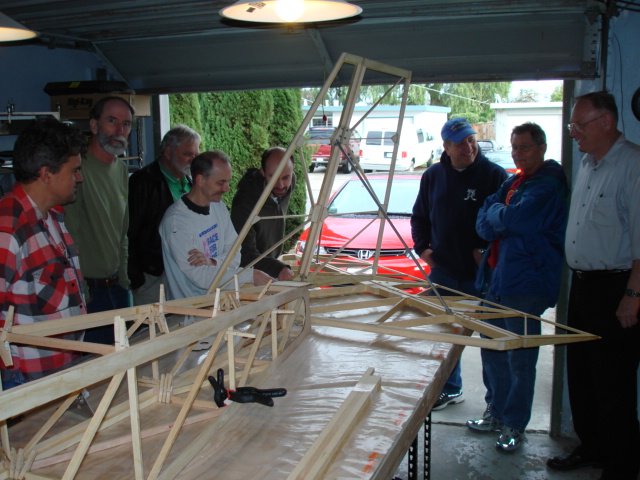
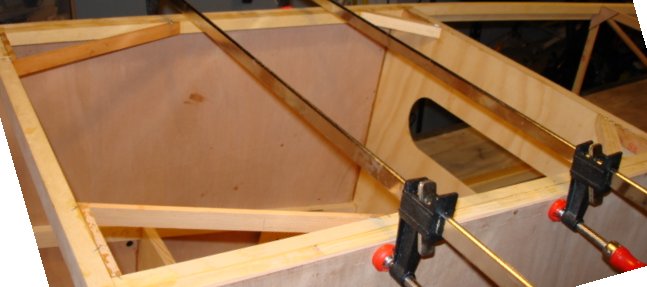
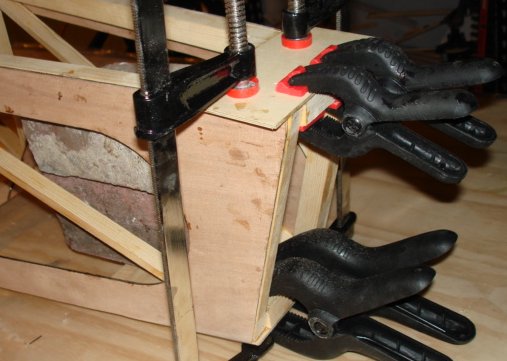
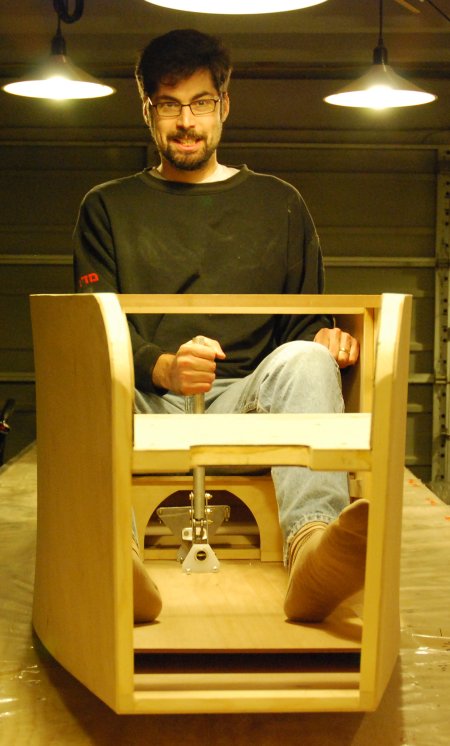
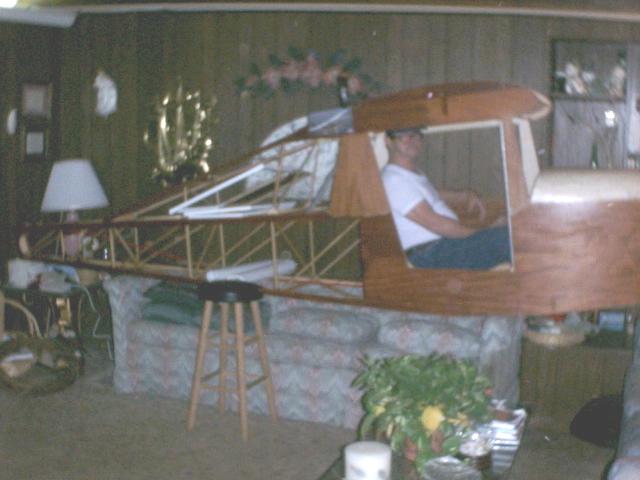

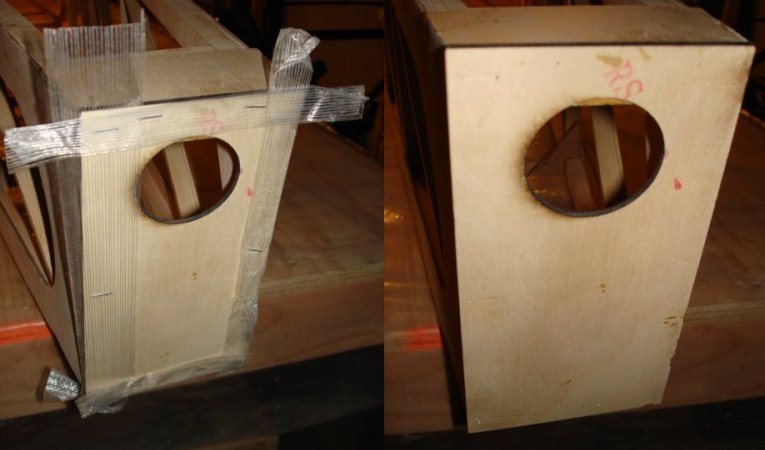
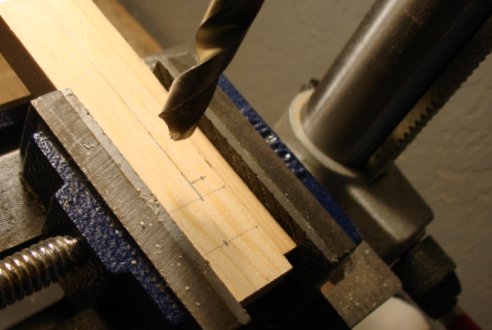
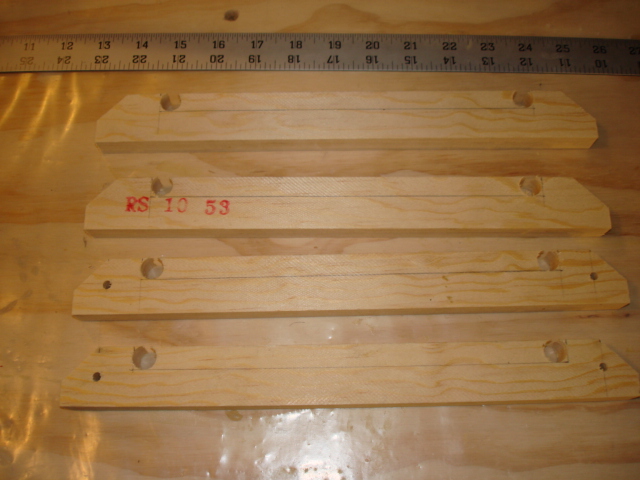
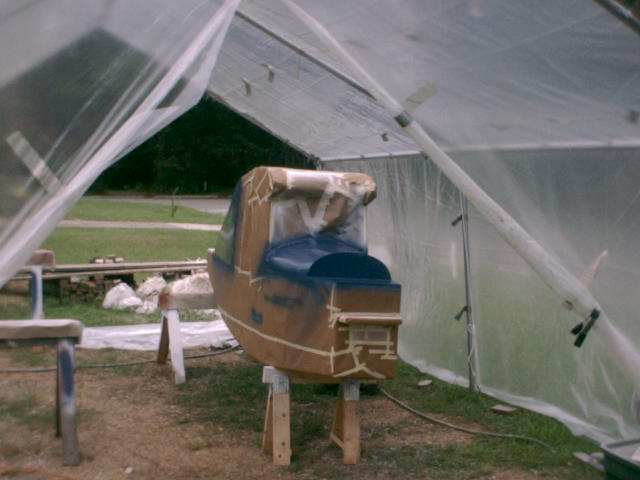
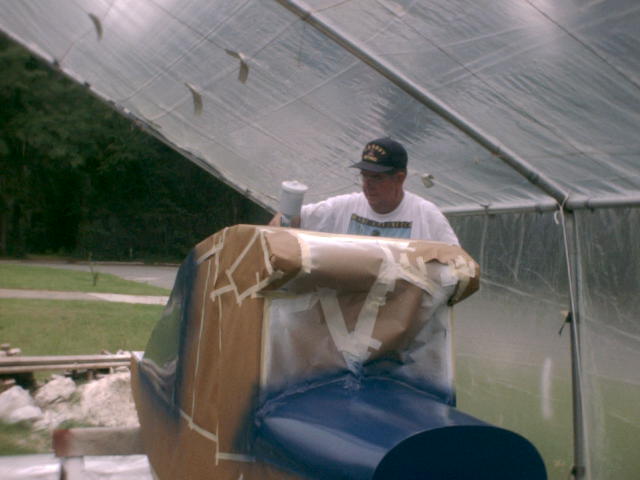
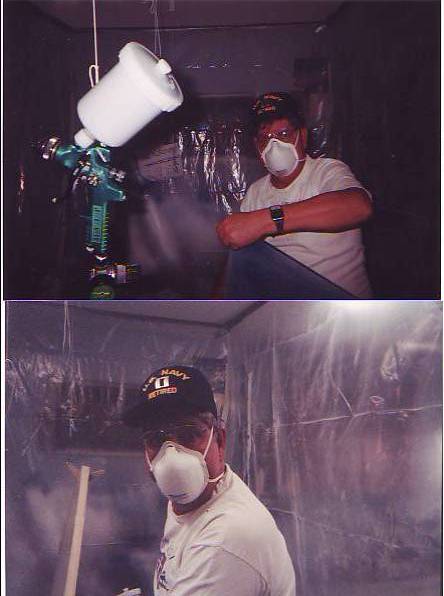
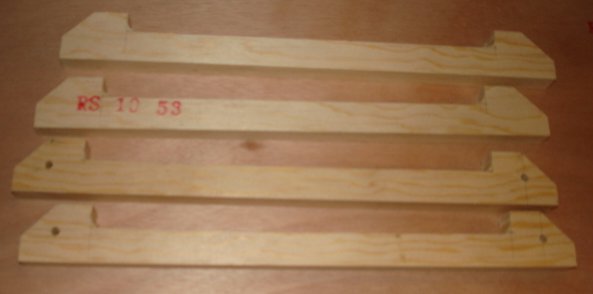
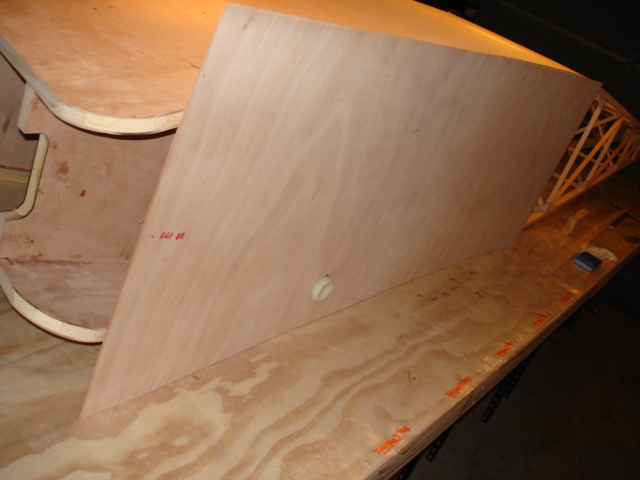
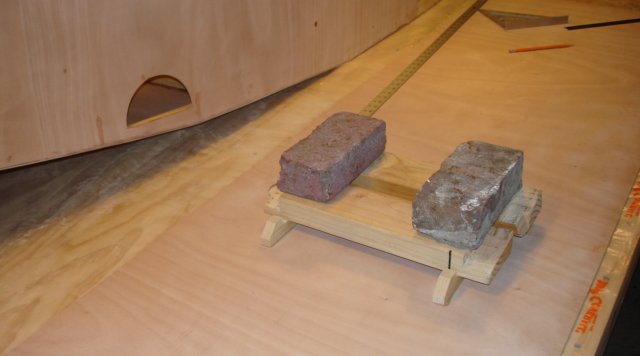
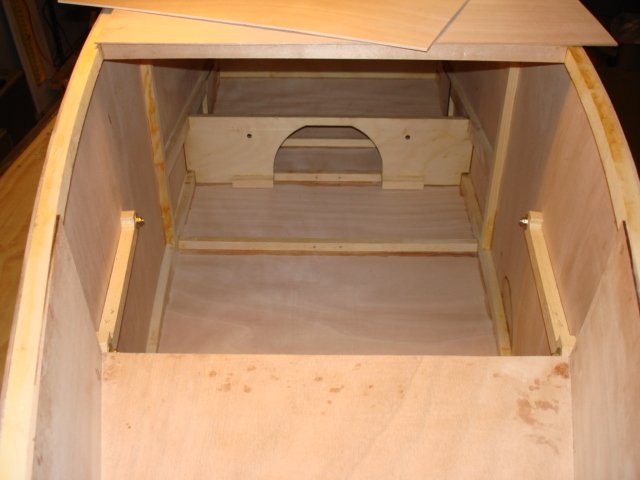
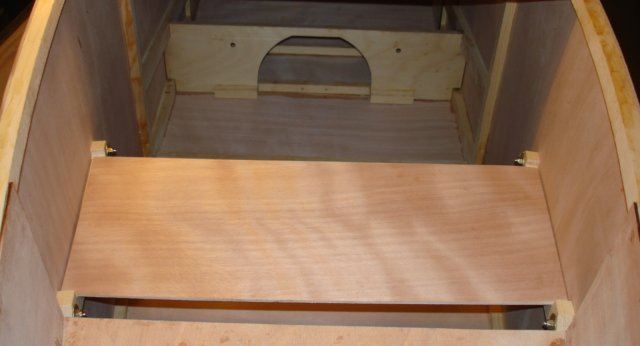
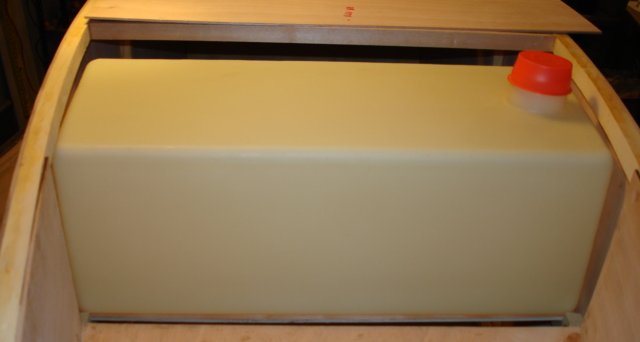

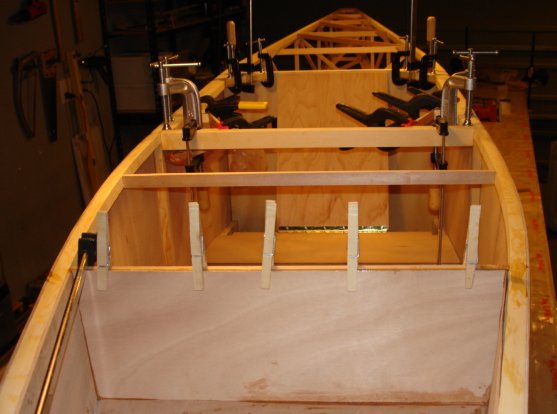
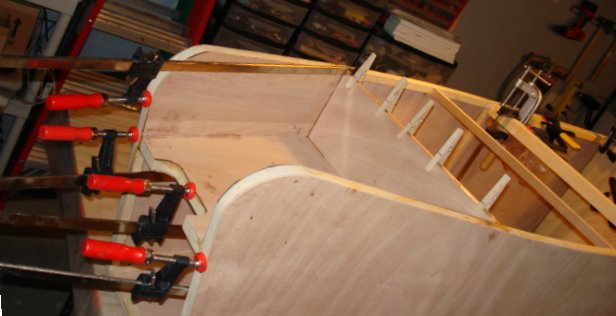
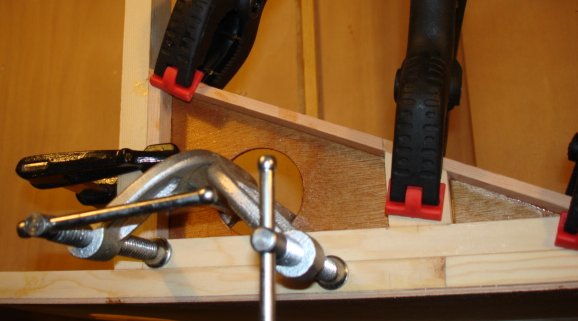
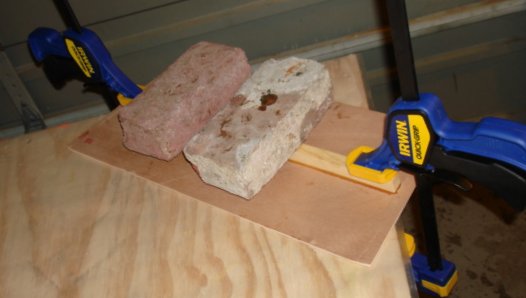
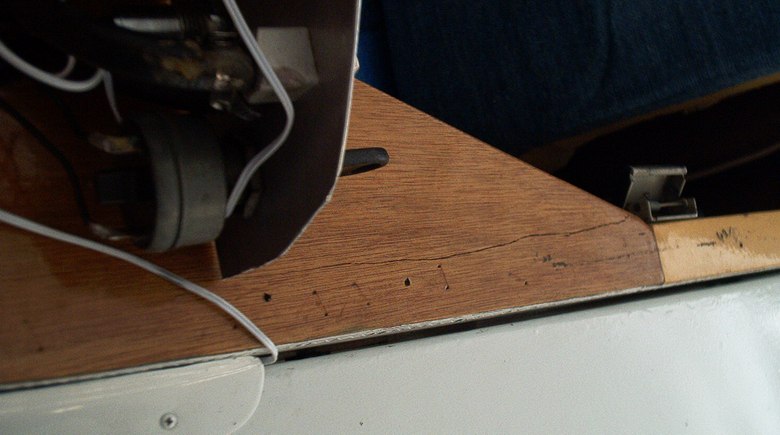
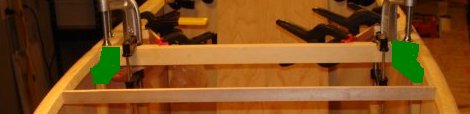
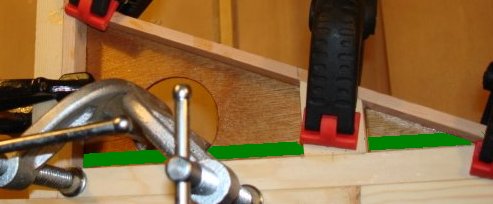
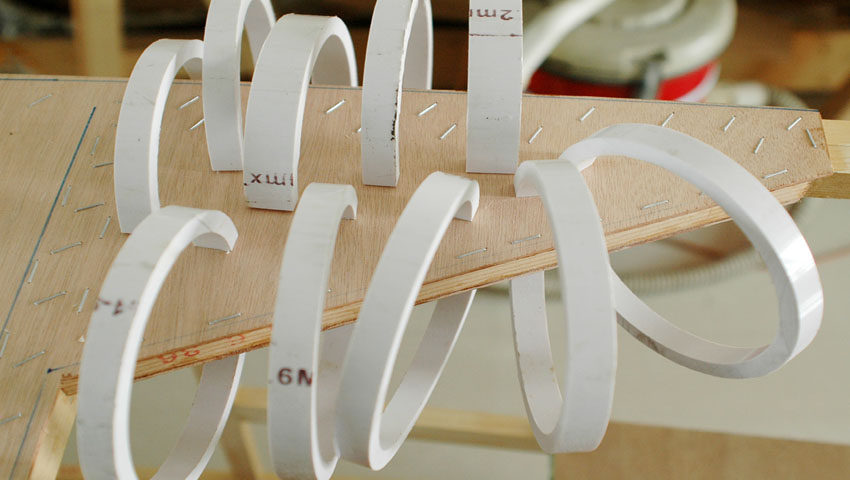
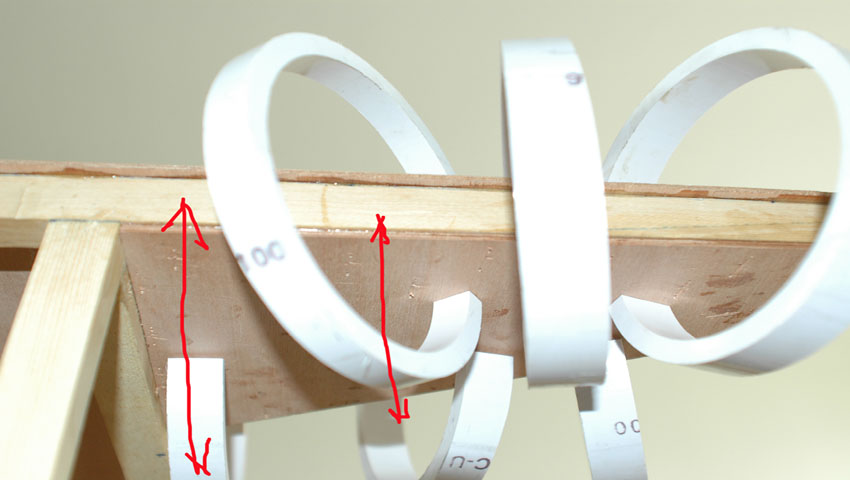
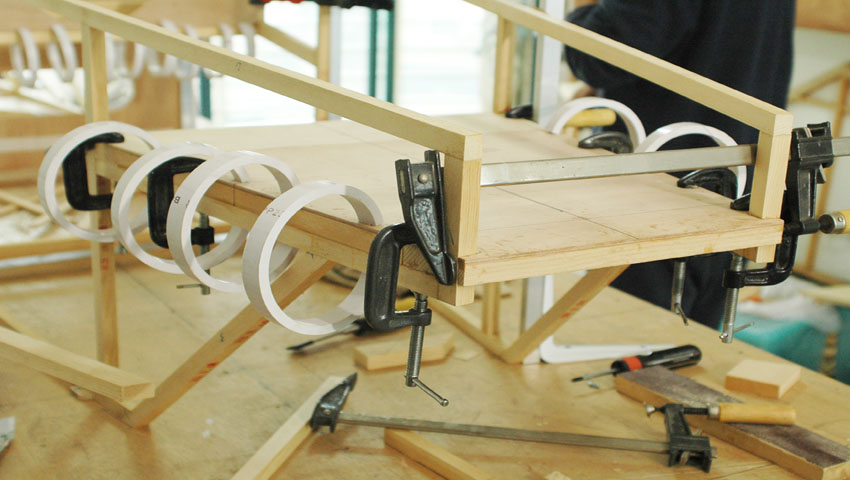
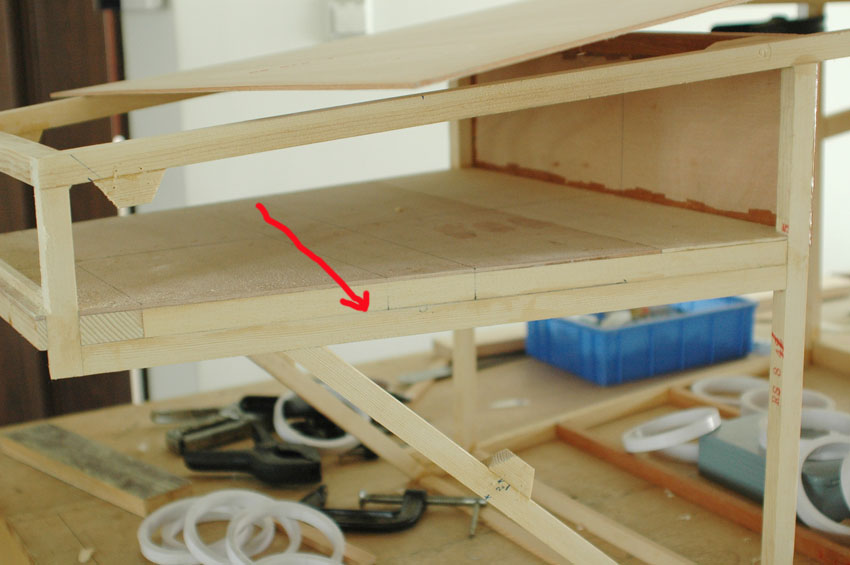
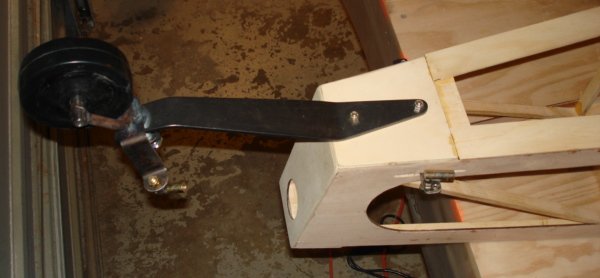
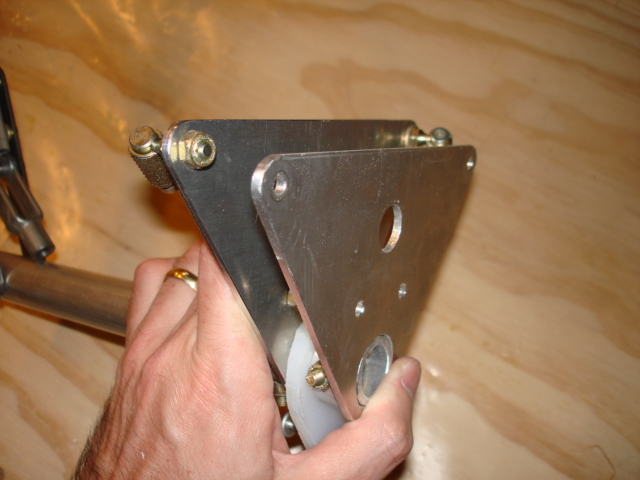
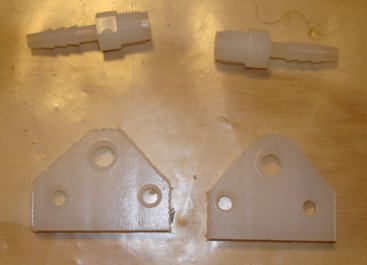

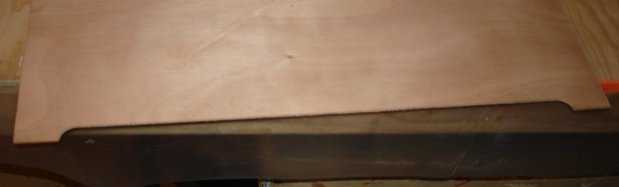
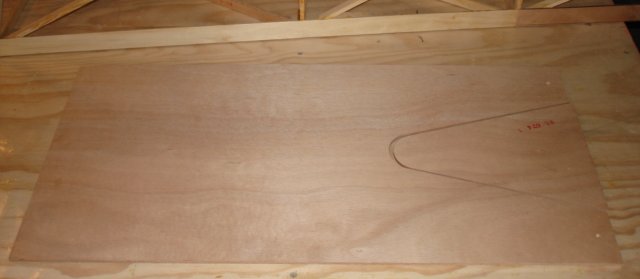
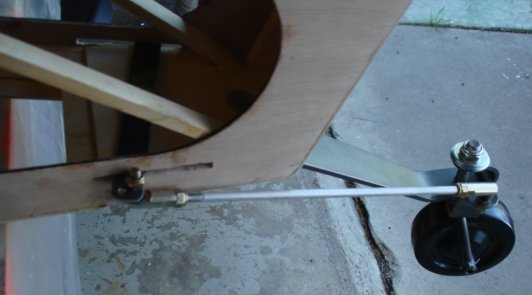

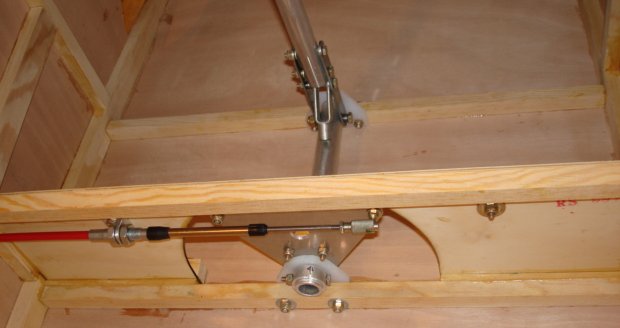
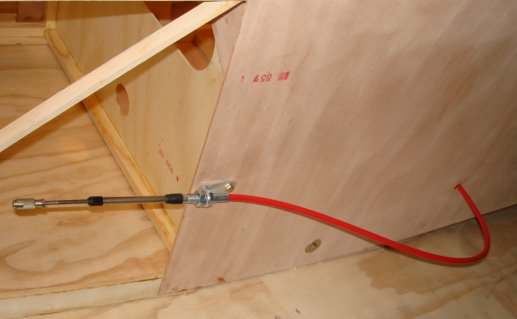
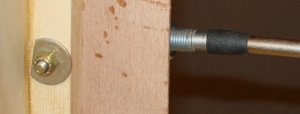
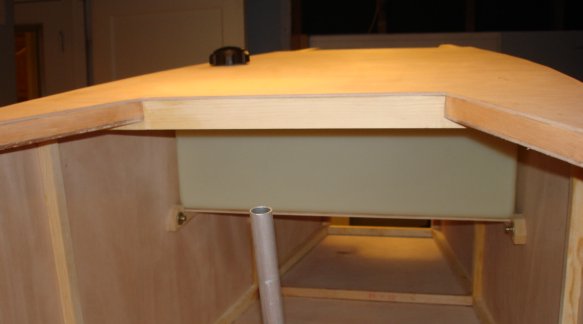
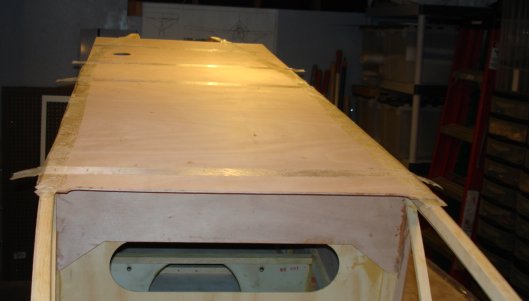
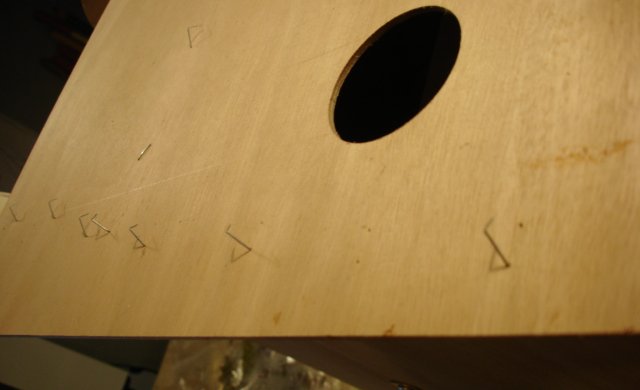
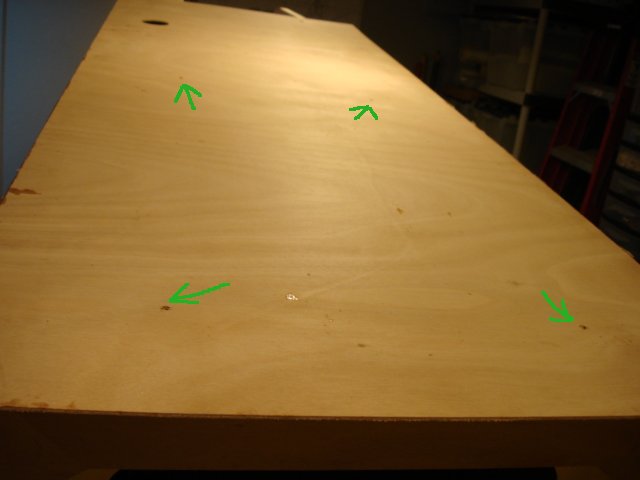
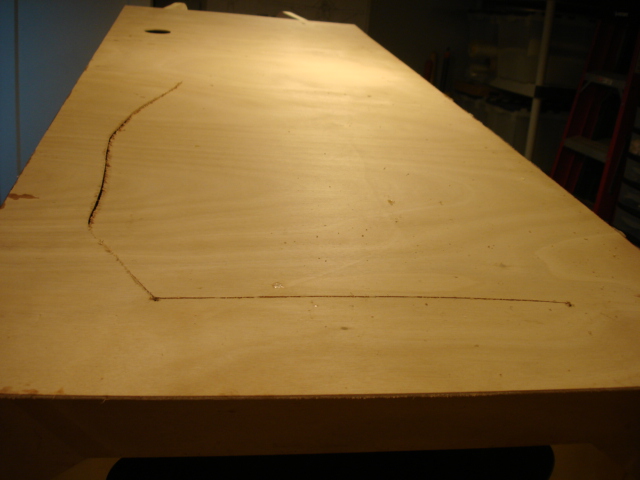
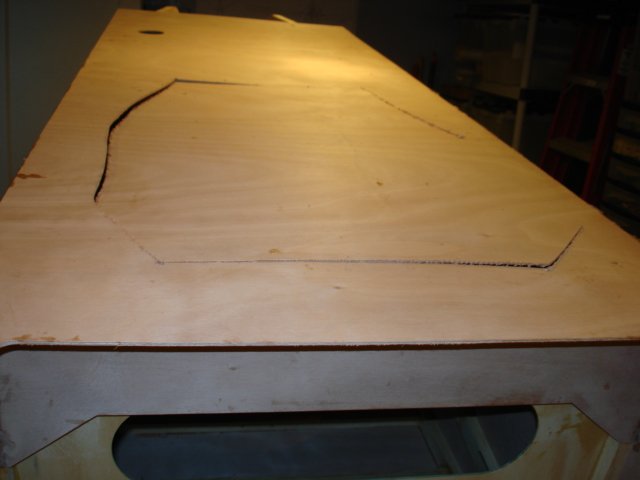
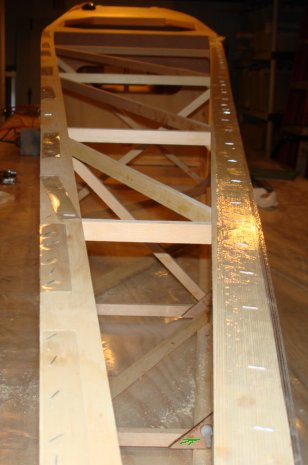
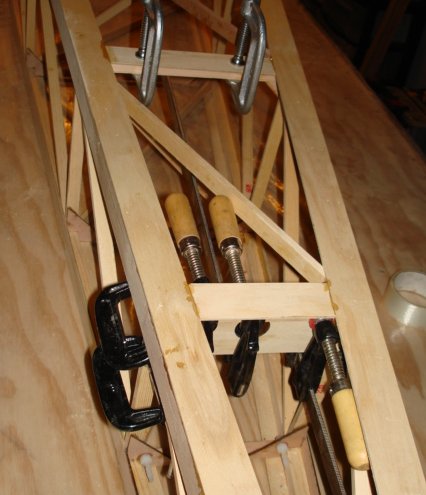
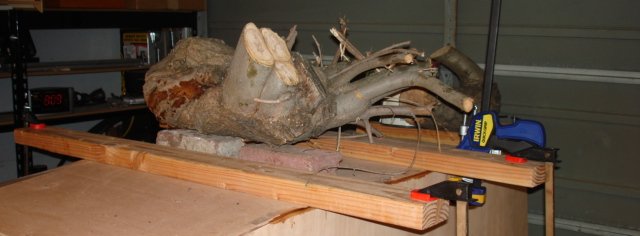
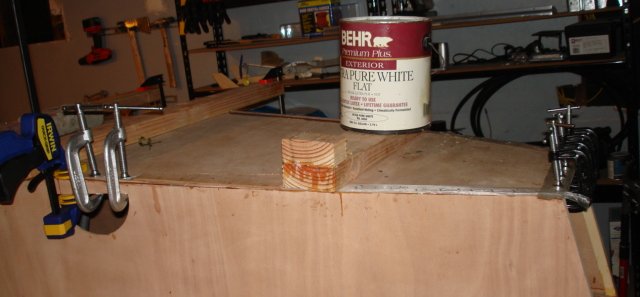
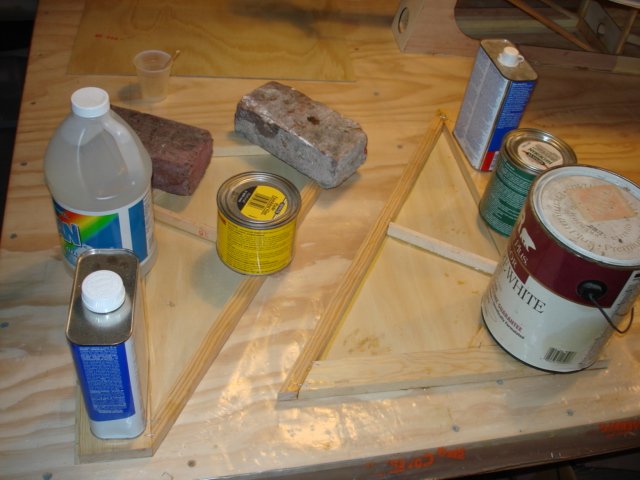
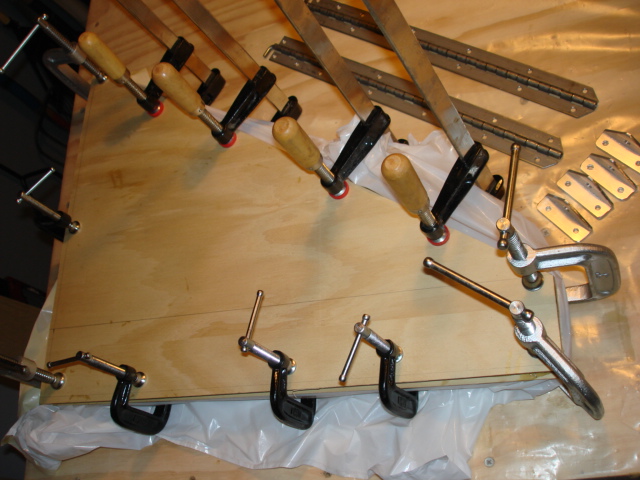
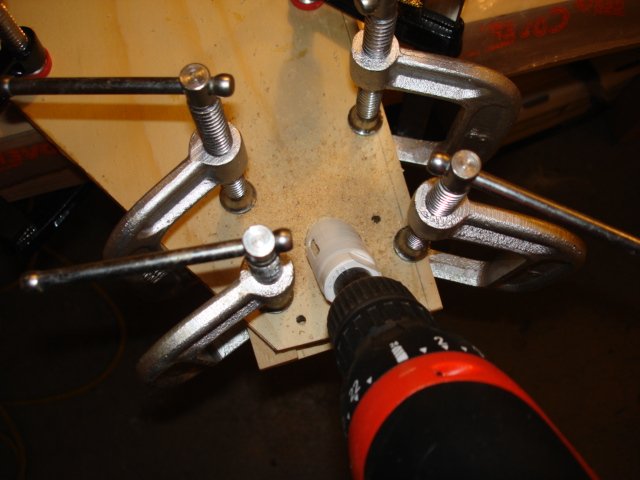
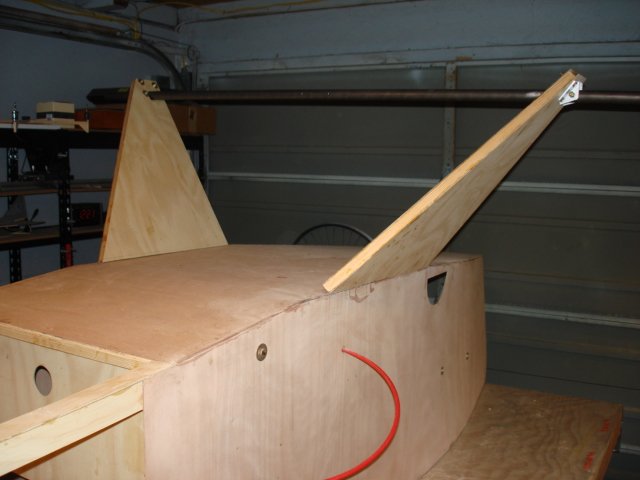
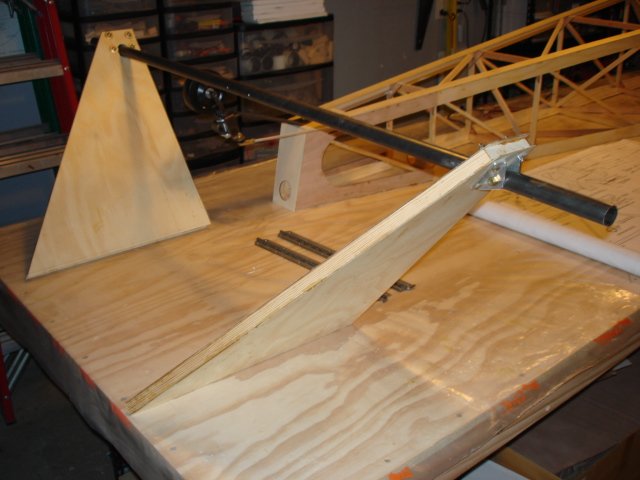
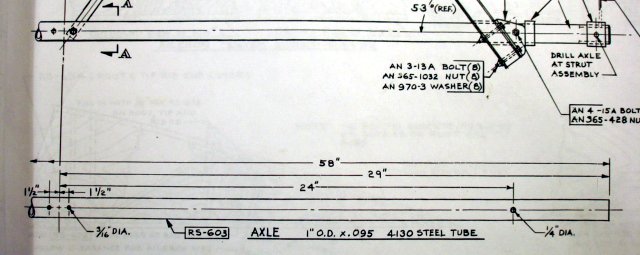
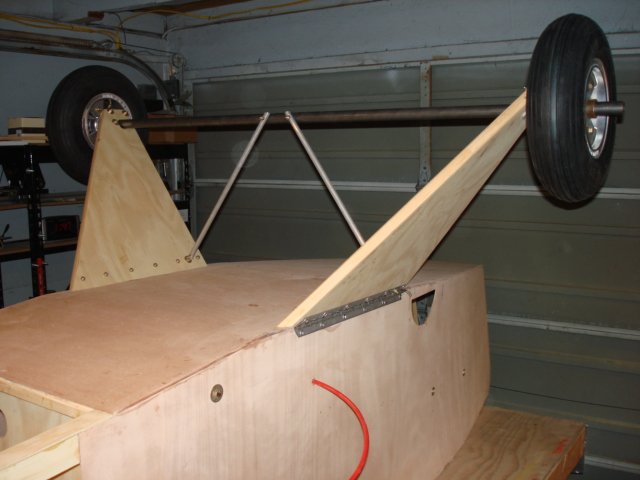
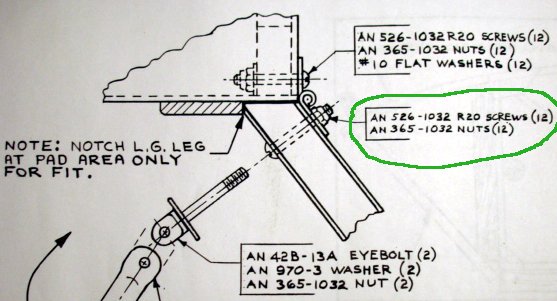
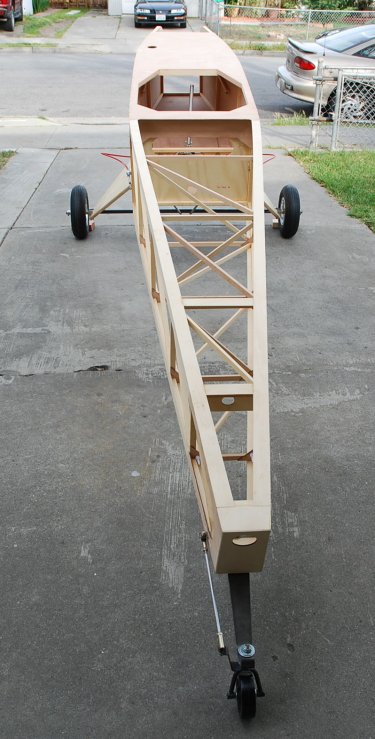

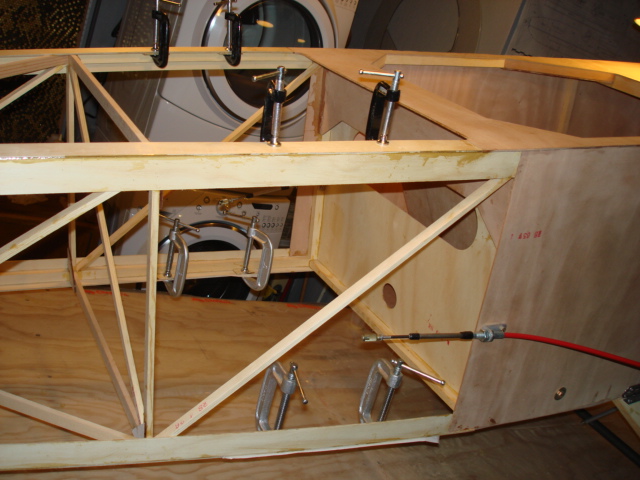
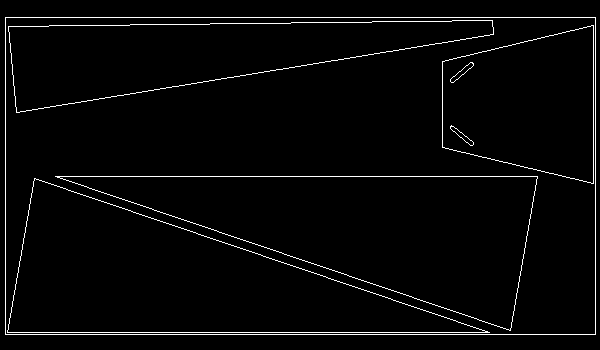
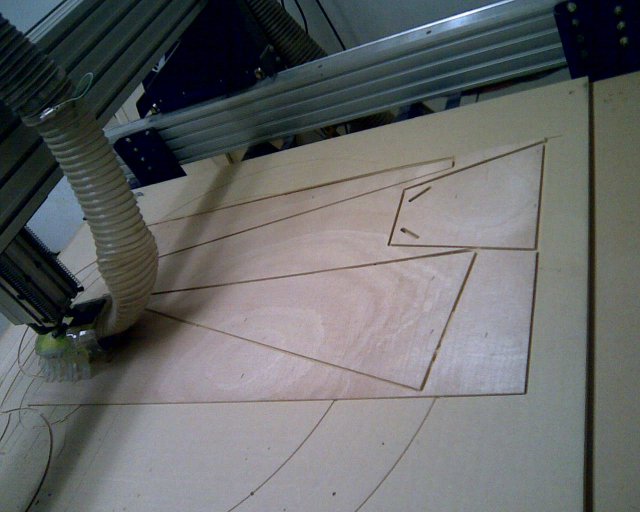
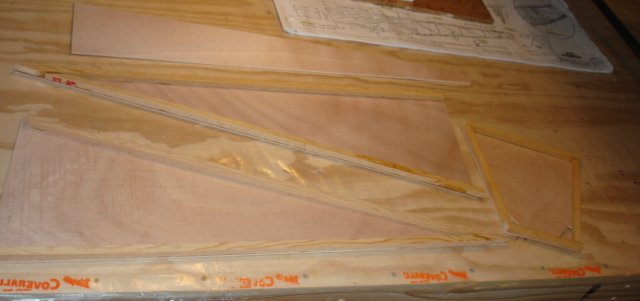
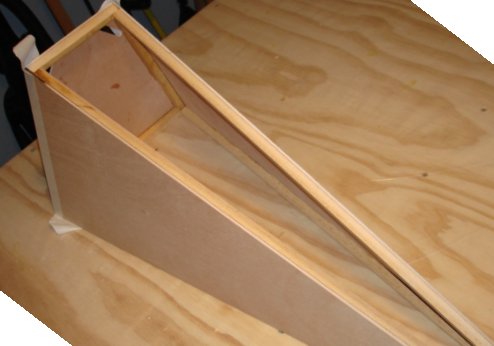
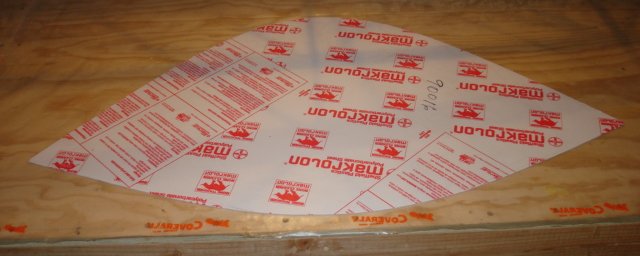
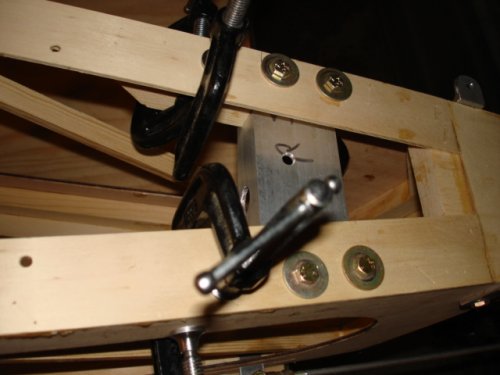
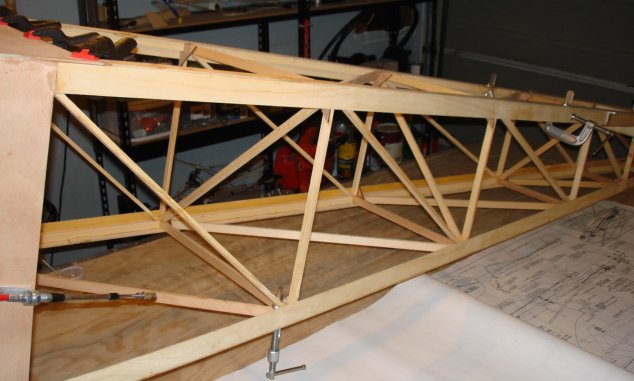
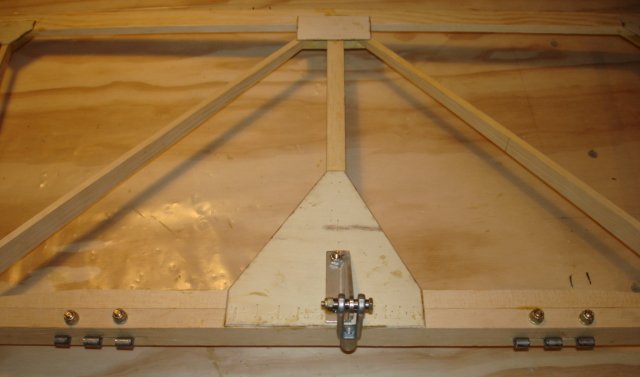
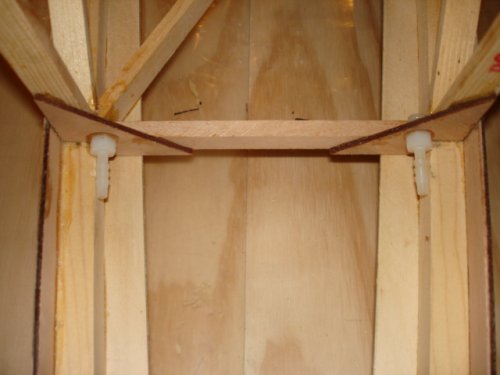
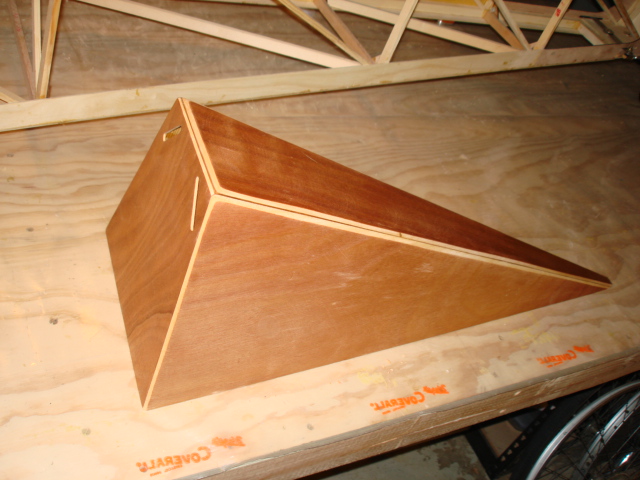
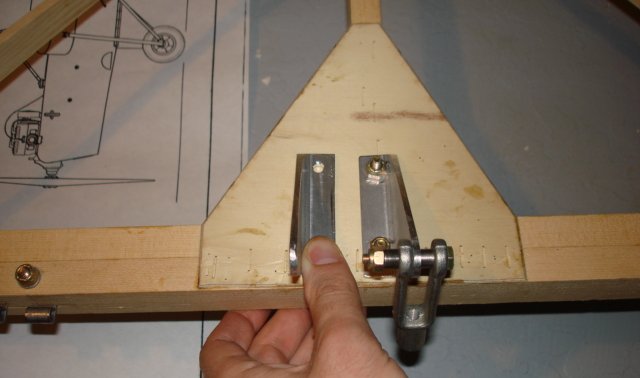

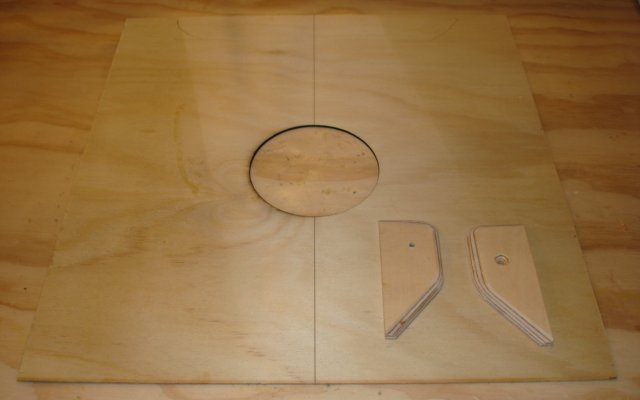
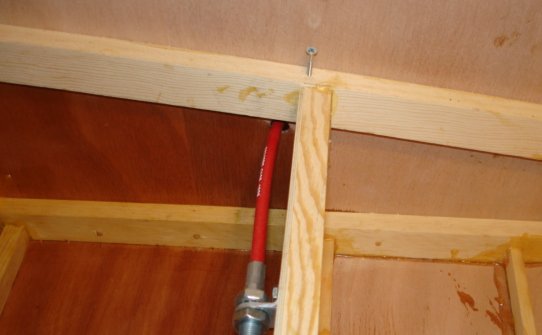

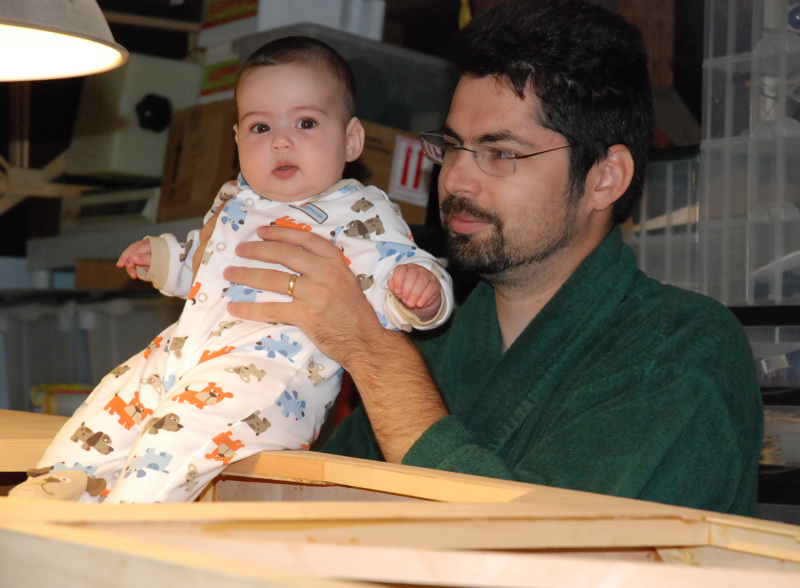

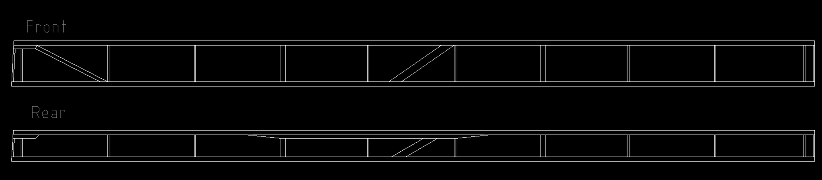
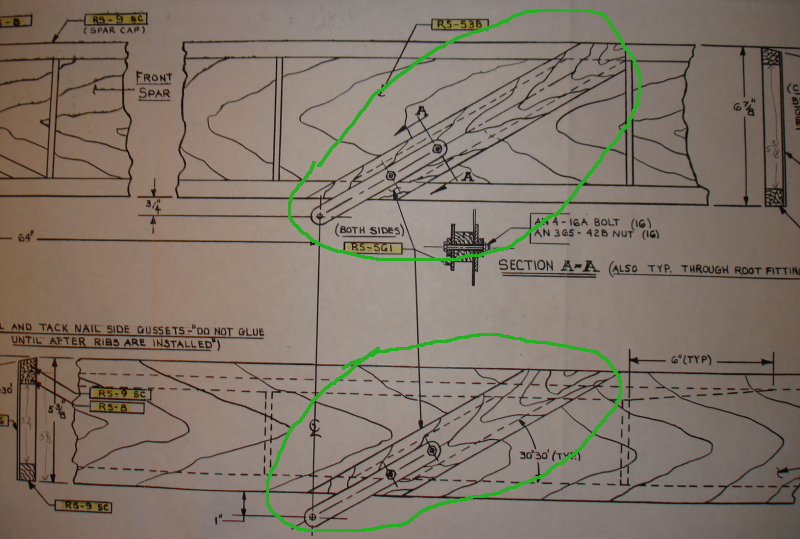
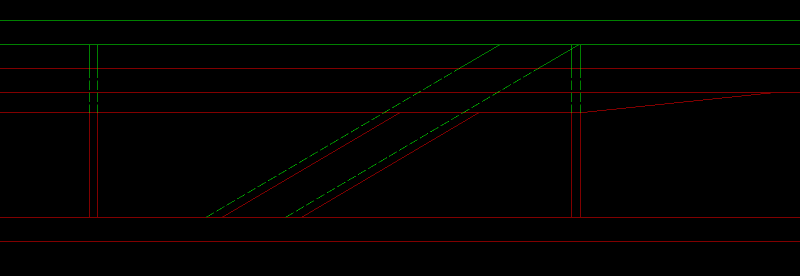
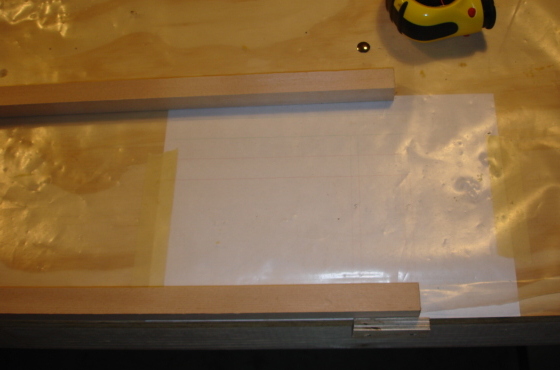
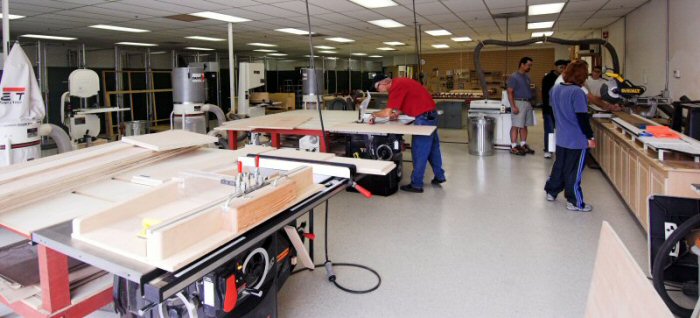
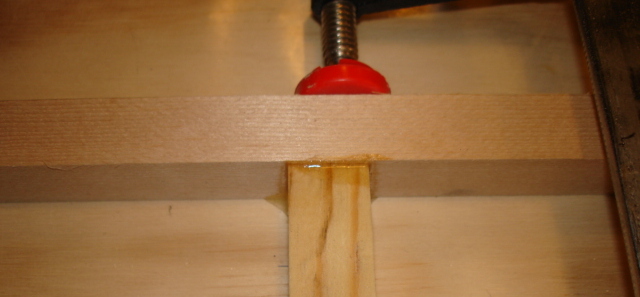
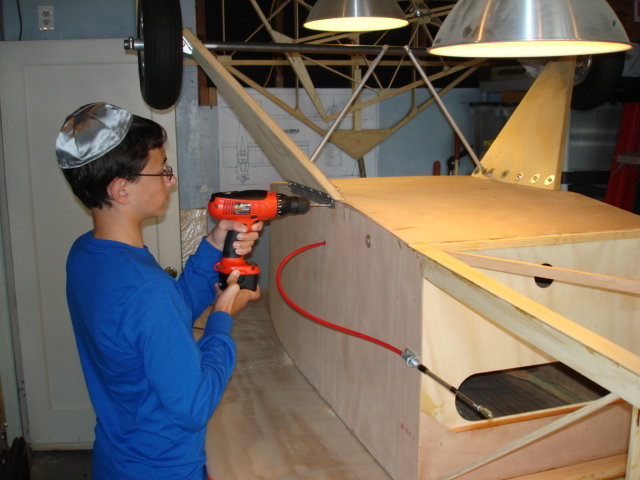
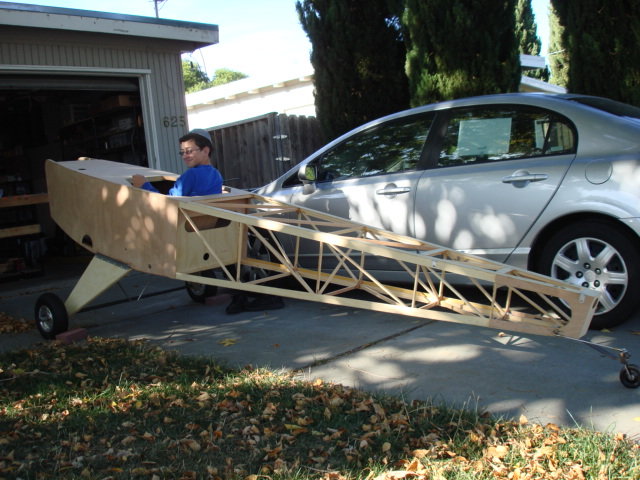
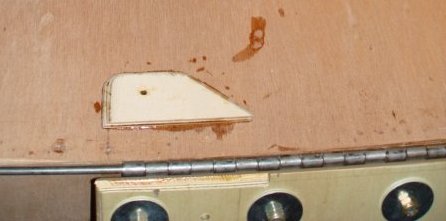


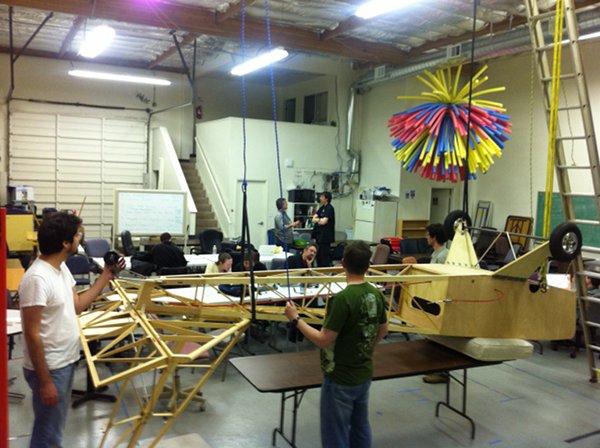

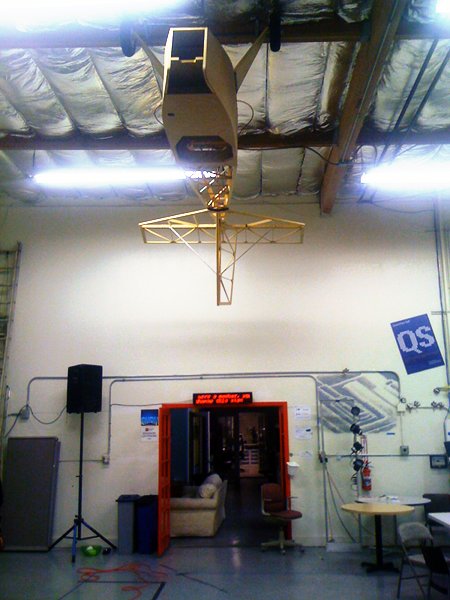
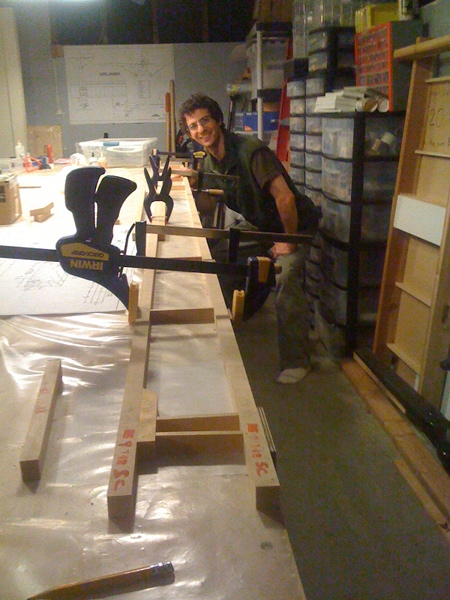
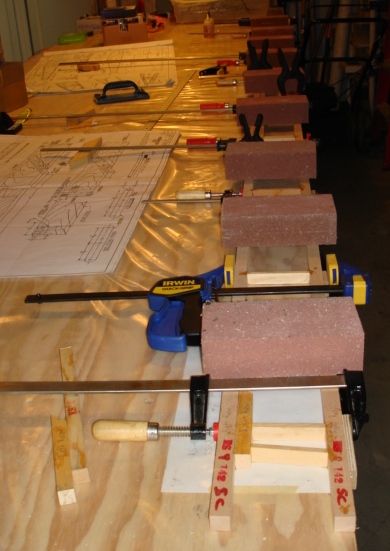
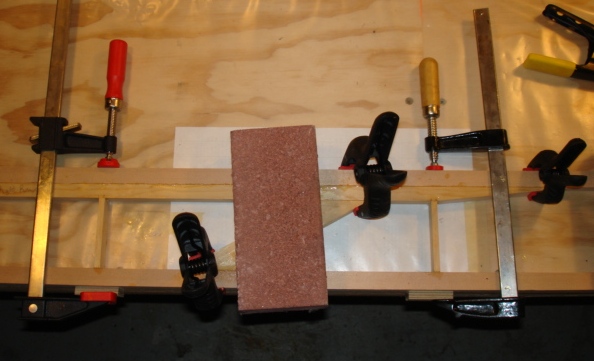
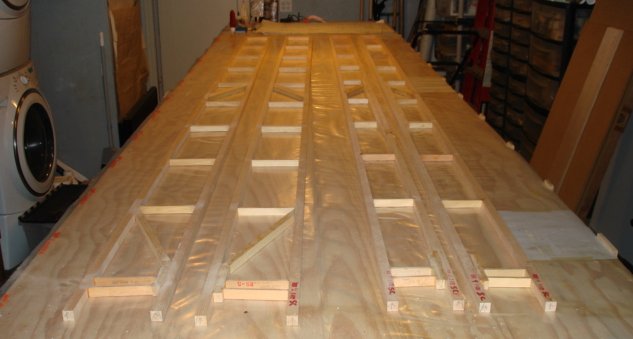

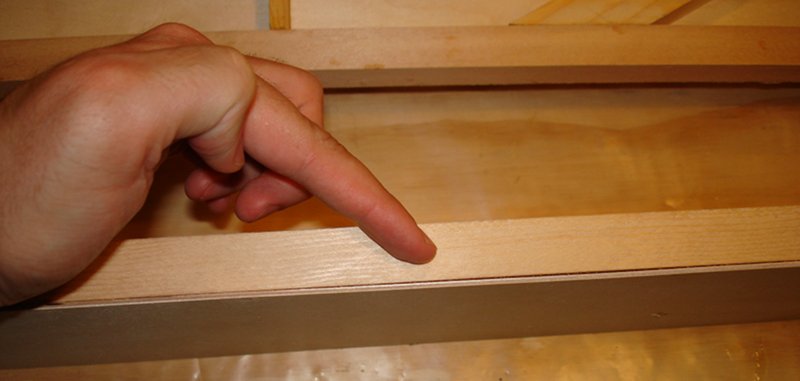
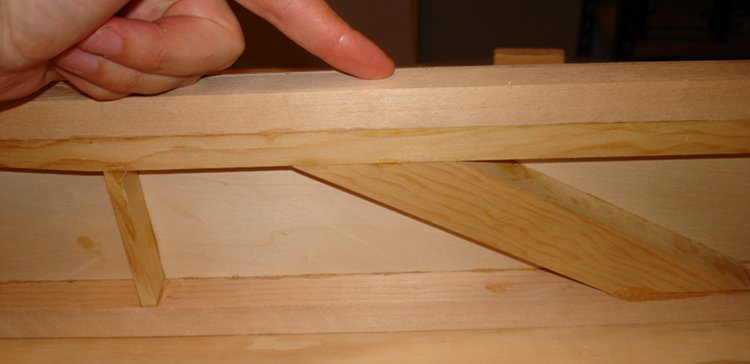

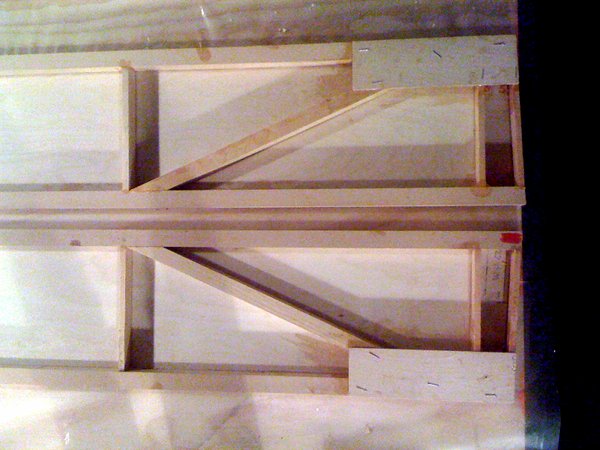
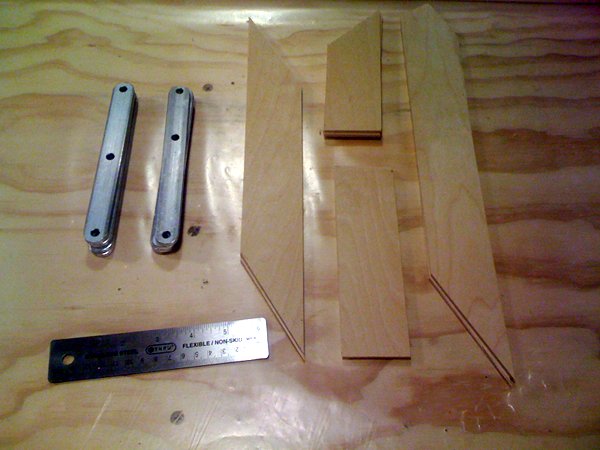
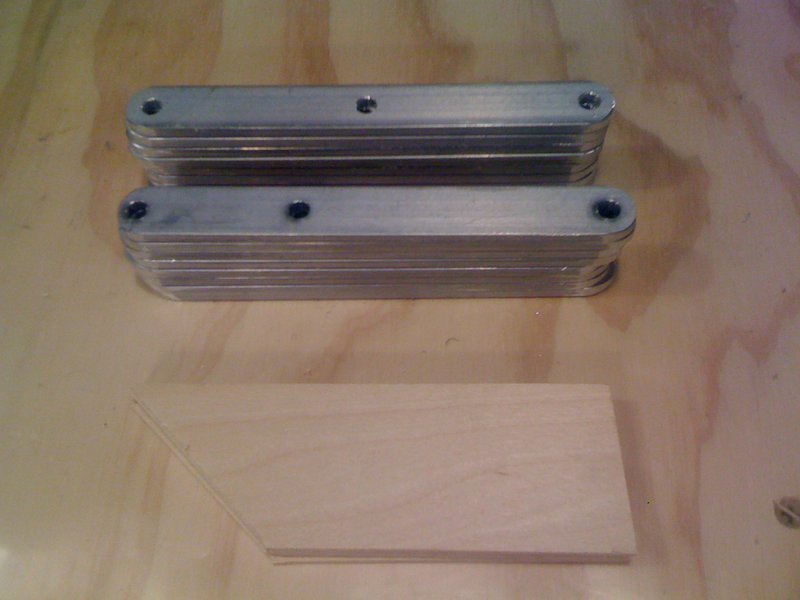
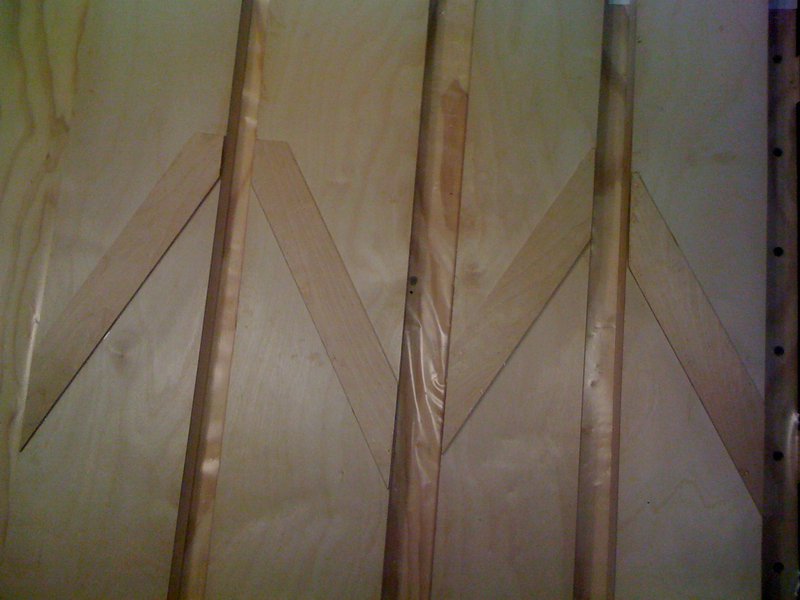
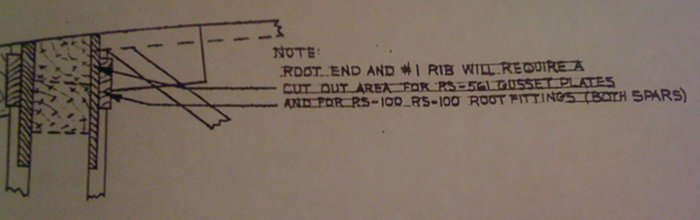
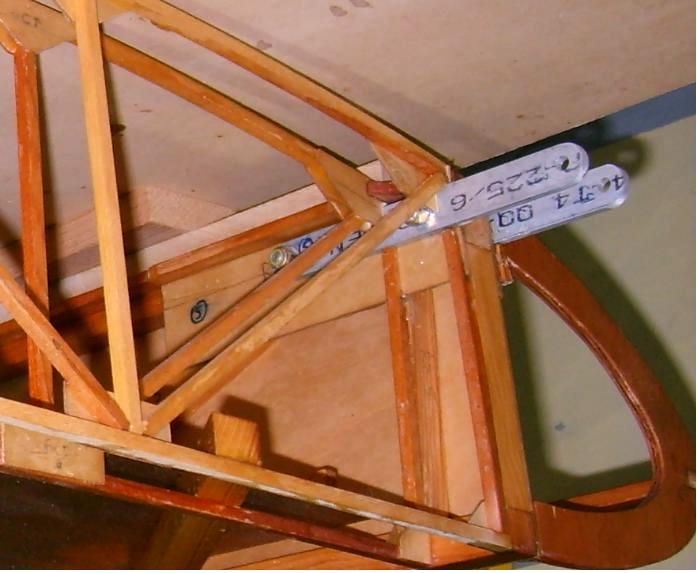
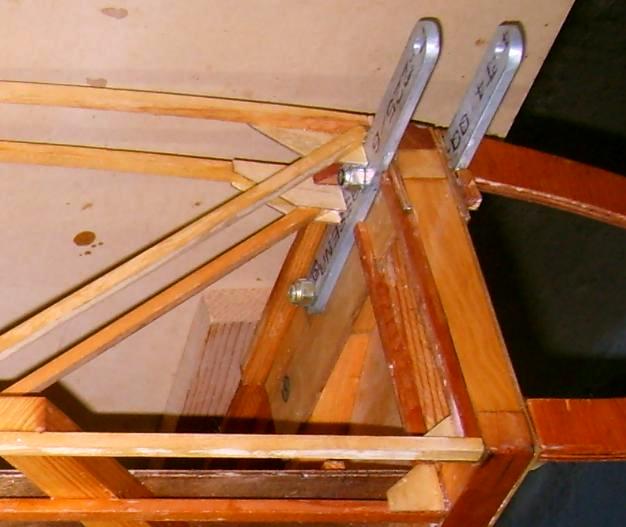
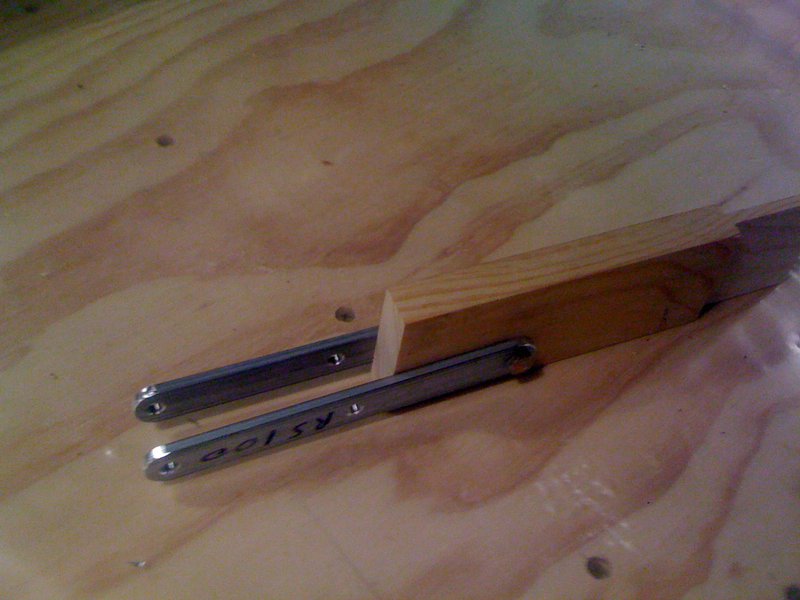
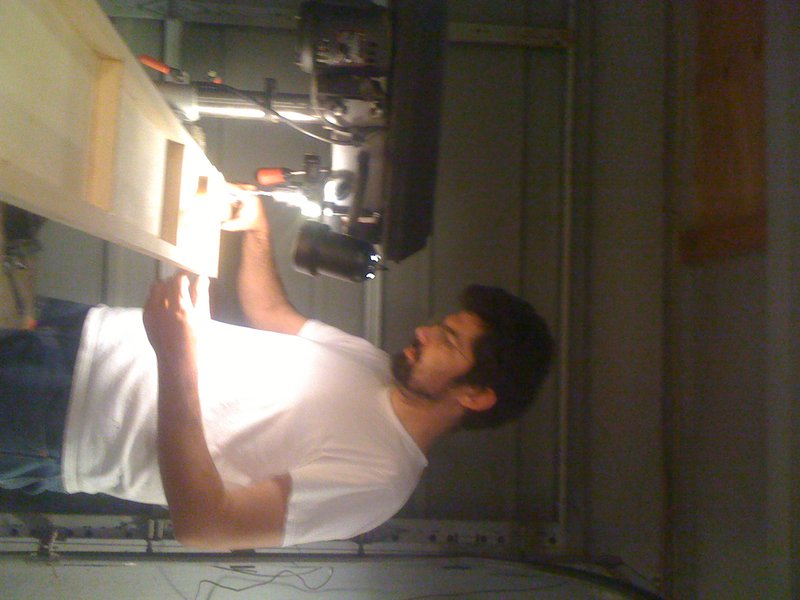
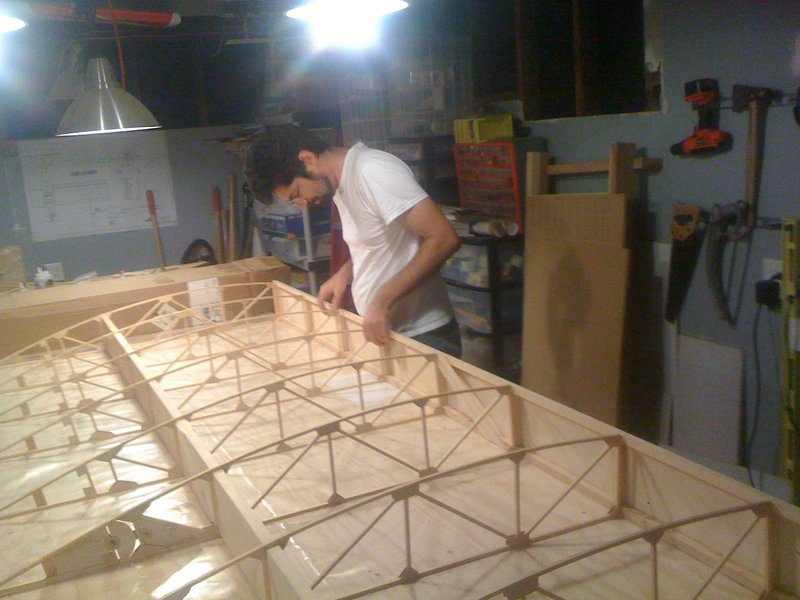
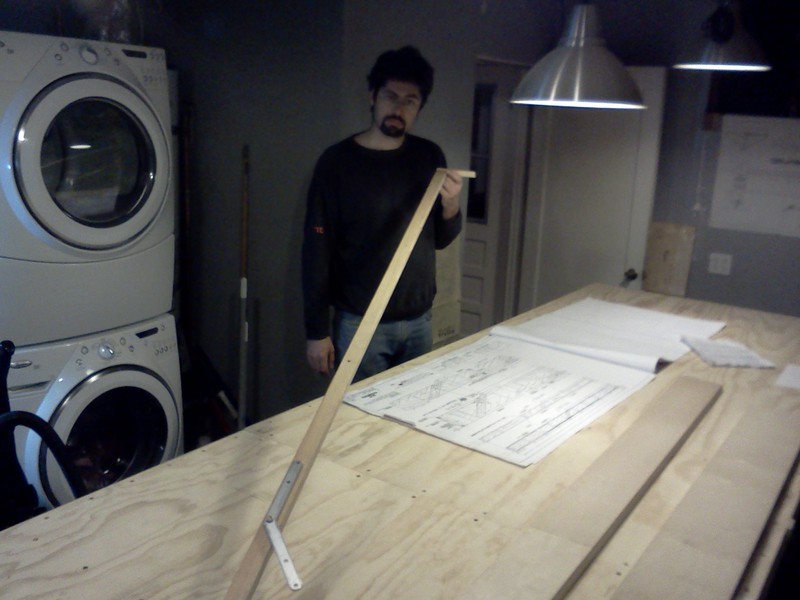
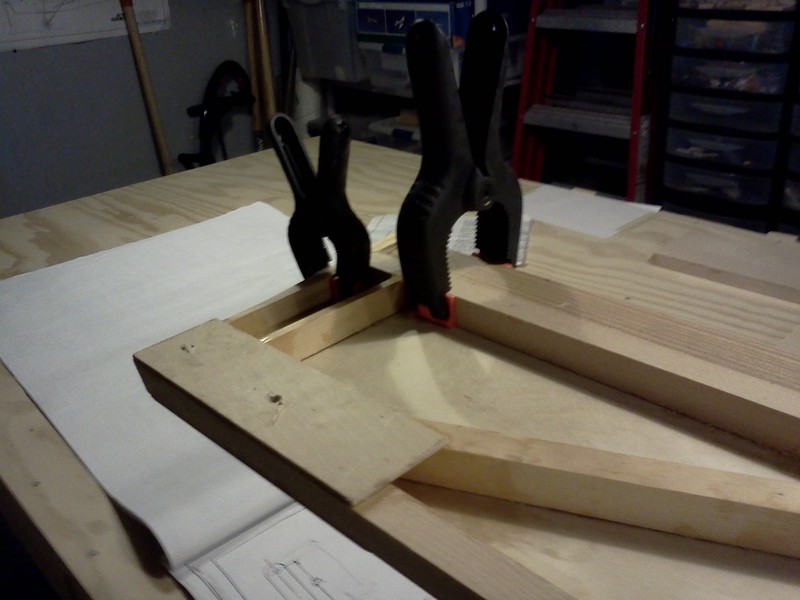
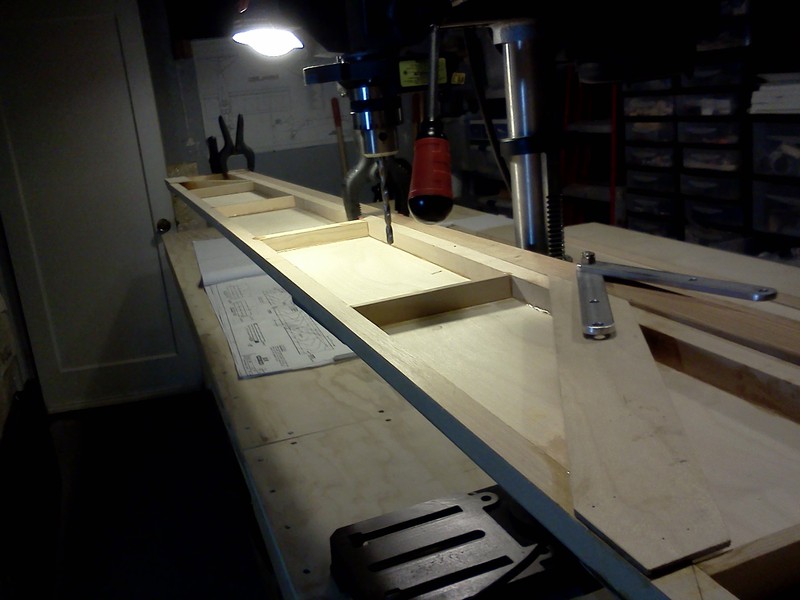
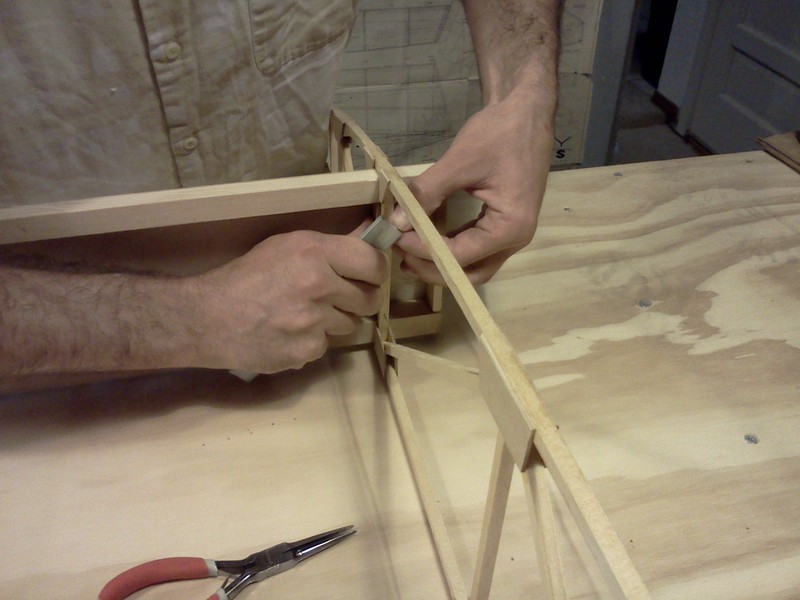
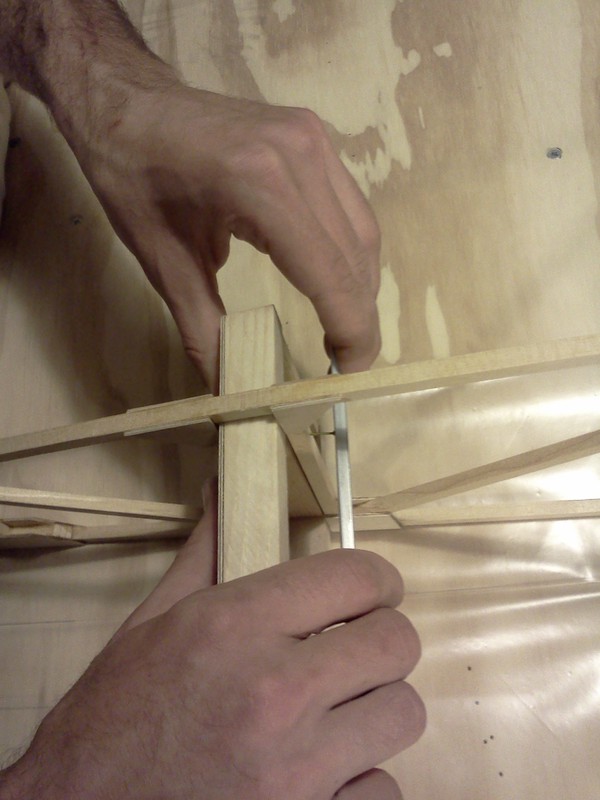
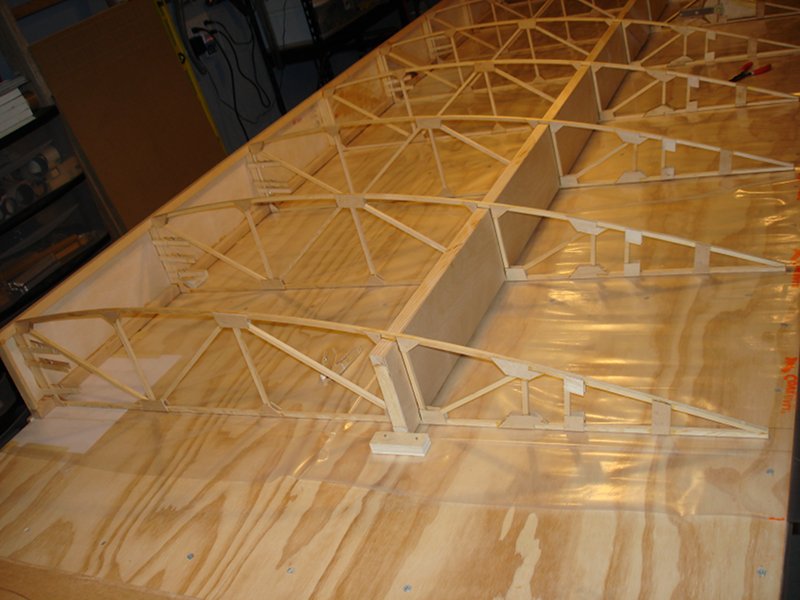


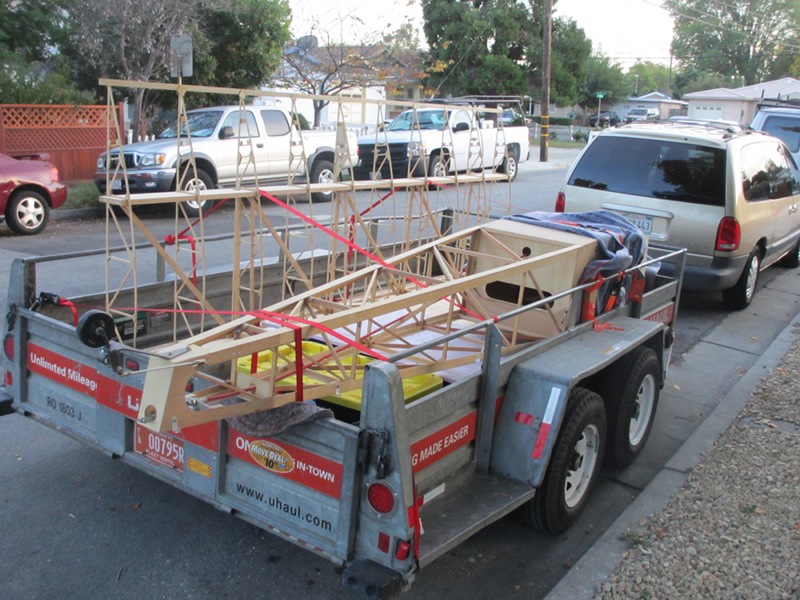
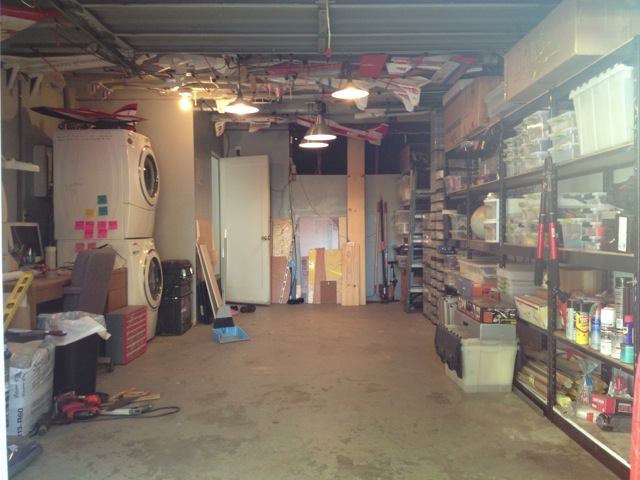

