Has anyone heard from Iter lately? I haven't seen any post, (well, maybe one) sense he got hitched. Just curious because he was going like a mad man for a while.
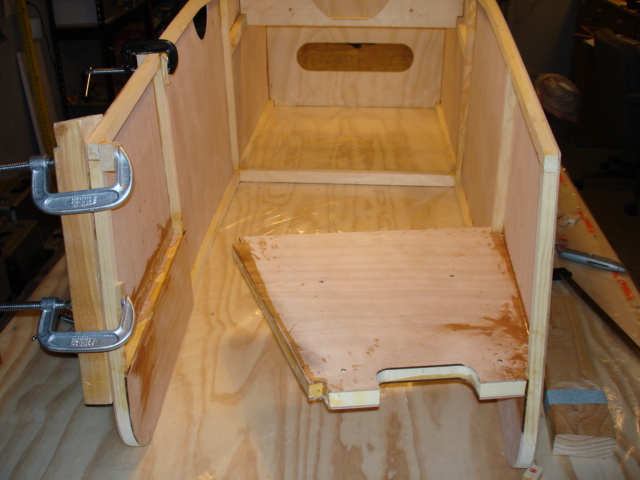
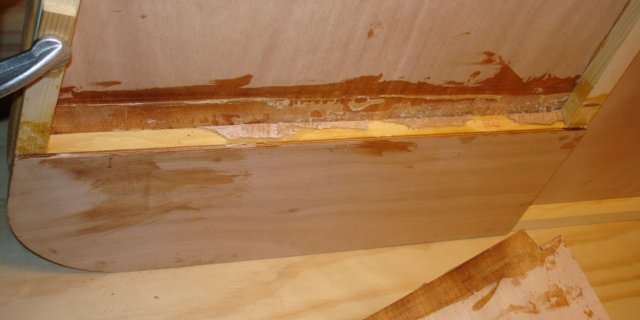
I'm not done, and in fact I haven't done much work on the project since early November, 2.5 months. I got so depressed about the skewed fuselage, I didn't know how to approach the thing. I tried bending the wood, tried heating the glue and realigning the joint, no luck so far. The most I managed to do was take apart the joint between left fuselage side and motor mount. While I was doing that, adjacent joints partially separated, and now I'm not sure if they are still sound.
I can't bring myself to throw the fuselage away and start over, and I can't bring myself to take it apart and put it together again.
I have the same dilema on my first prebuilt max. After discovernig several failed glue joints I made the decision to de-skin the entire plane and look at everything. I repaired many joints and then had a few pop back apart that I thought shouldn't have. I completely stalled out on that project and purchased another prebuilt, the new one seill has a couple of squawks before the DAR (but that's another story).
Long story short, I'm wondering if a glue joint repair thread might be of benefit so we could gain some well needed advice from some of the more seasoned T88 veterans. More specifically what is a proven proceedure for re-bonding a joint (if there is any). I know you probably should sand most if not all of the old glue from the faces of the wood to be bonded, but now the wood has lost all of its porosity at the joint area so there will be much less actual epoxy (surface area?) holding the joint. In other words you are no longer glueing two porous members together but now you are glueing epoxy to epoxy with epoxy with a little wood fiber in the mix.
Any thoughts are welcome.
I also know that every joint out of hundreds (maybe thousands) that make up a minimax cannot be perfect, that is to say probably not very many if any planes have 100% perfect glue joints so what percentage is acceptable? I know It's a fine line between over-thinking and just being prudent. It does give me peace of mind everytime I see or hear about another succesfull max build, if one man can do it so can another (to quote Antony Hopkins from the Edge about killing a bear with improvised weapons).
Dennis, I now have alot of CRS (it been sence 04) and I have not looked at the plans in a long time, but when I built my 1600 fuse, It look to me like following the plans on bringing the fuse together and removeing the clamps was going to cause problems for me, so I followed the plans left the clamps on, finished the top & bottom, then drilled in the right & left sides of the engine mount (plate) throught the 1/8 sides and put in 5- 1/4" dowels (each side) 1 1/2 " long, let that puppy setup 2 wks. before removing the clamps. Not a peep was heard. I know it was probley over kill, but I then added 1/4" qrt. round to all the 90% joints top & bottom of the mount and when covering, covered the entire engine area (well everything). Part of my pre-flight is to chech for cracked paint on the engine mount, none so far (100 hrs.). I think if I did it over again I would do like Charlie Harris said, and put the sides on after pulling the frt. together. Just my 1st time builder HO. Ronny
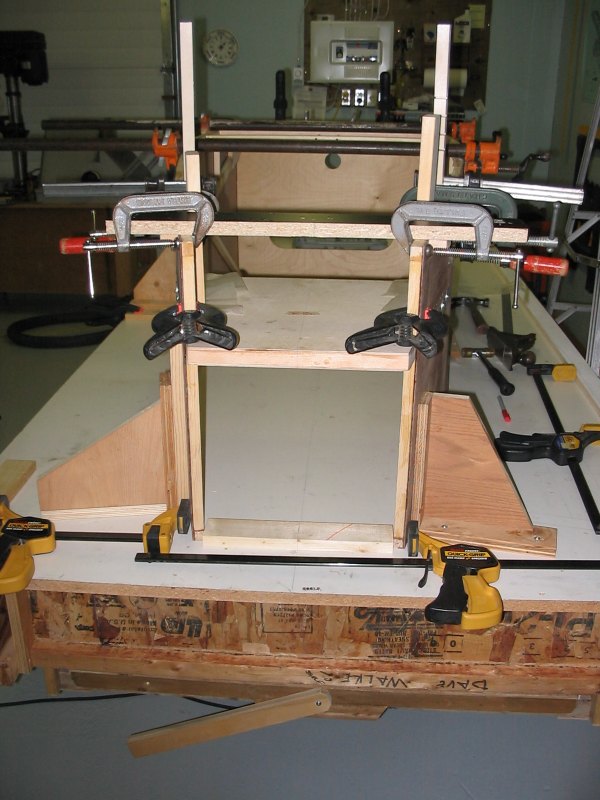
Ari, Just some quick thoughts. I don't see a centre line on you table. Start with this, line up your fuse and screw 2x4s along the outside edges of the straight sections. Clamp the top edges using bar clamps and spacers that will allow you to slide the bottom skin in place and still overhang the edges. I've attached a couple pictures as reference to show the braces I made to hold the front in place. When you clamp everything up, do it in a way that you can leave the clamps in place till the top and bottom skins are on. The bottom is easy, the top will require some angle blocks be made and 2 sided tape used to secure them in place. Then clamp the front top edge before removing it from the table. This is my first plane and it worked for me first try, maybe I just got lucky. As far as re-gluing joints goes, you aren't going to get any more glue to soak into the wood so the best you can do without starting over is coarse sand the old glue and re-glue.
Iter...don't quit just yet. Your posts with all those wonderful pictures have helped and inspired others, me included. There is a wealth of experience available on this site that you can use to get you on your way again.
Sanding old adhesive can also remove wood that you don't want to erode. Sandpaper also clogs up easy, and is a bit hard to control (personal experience). Not my first choice!
Removing the old glue and the wood fibres on the engine mount board can be done easily with a sharp wood working plane. If you don't have one, perhaps you can borrow one for this purpose. That's what friends are for!
The hard adhesive on the RS8 and along the fuselage ply can be removed with a furniture scraper. If you havn't seen one, it is a thin (maybe 15 thousands of an inch) thick piece of tool steel that is sharpened on the sides that are to be in contact with the wood. It won't be easy as slicing bread, and takes some time, but will work eventually. The scrapers come in various shapes and sizes. Again, check your friends before buying one, if purchase is an issue.
Also handy is a sharp wood chisel. Same advice as above.
Once all the "bad" joints are smooth, you are ready to assemble again.
If you have any doubts about "damage control" be sure to contact the experts. I think a call to JDT Minimax would be useful (574-773-2151).
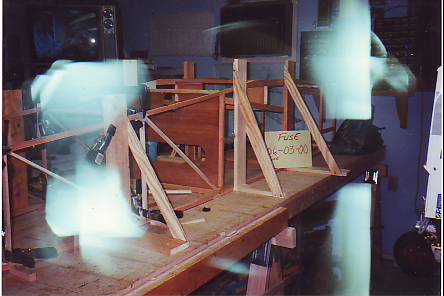
I learned from your posts and others that lots of bracing and temporary fixtures are needed to bring the structure into alignment during gluing.
You can be sure that no wood structure has been built without some "issue" having been dealt with. I include houses, furniture, and MinMaxes here.
I'll post my ideas about nose assembly, hopefully with some pictures (new experience for me!) in a few hours.
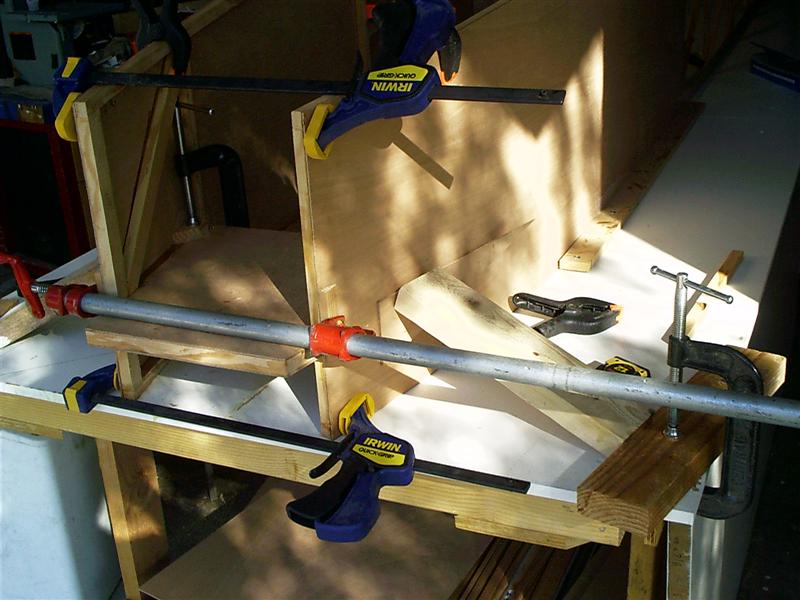
Thanks for the input guys. Randy: there is a pencil centerline on the table, you just can't see it very well in my photos because of the clear plastic I covered the table with to avoid gluing my plane to it. I like your 2x4s. I used much smaller blocks, 1x2 pieces of 3/4" plywood (as recommended in the manual) and they seem to hold. I came up with a slightly different way of clamping the sides together. I wanted to make sure I don't damage the wood surface with my clamps, so I used 2x4s and applied clamping pressure to them. I had to notch the 2x4s to make parallel edges for the clamp to hold on to.
It looks like you did it right, just dont take the clamps off till the top and bottom are in place.
By the way, good to have you back, and dont worry about the set backs, they happen. I closed the garage door on my wing once, caught it before it did much damage but I was pissed.
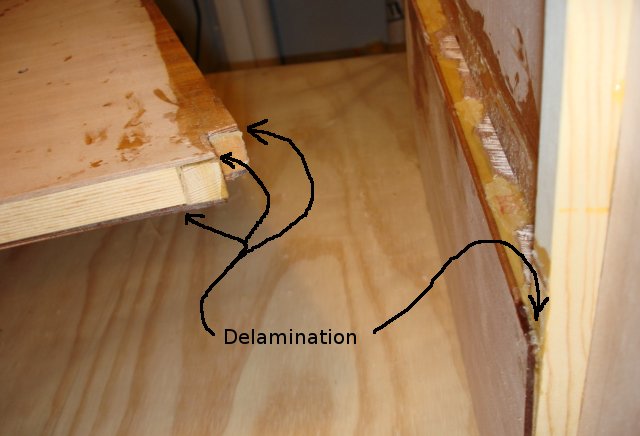
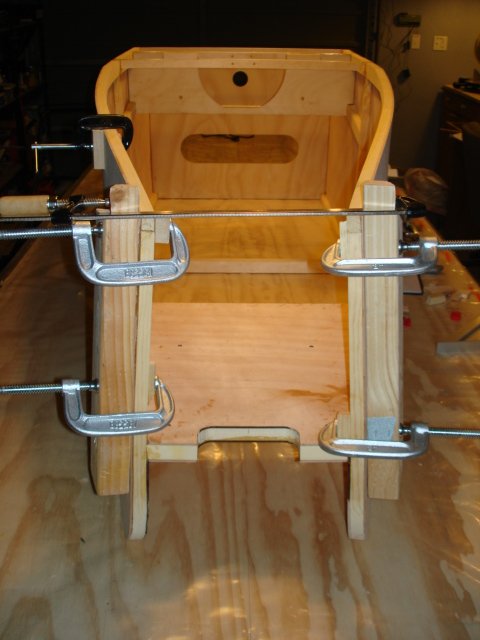
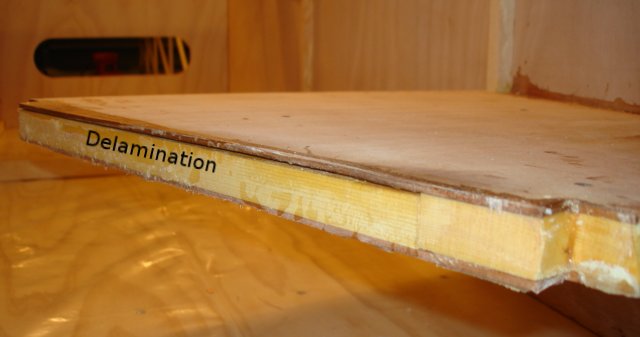
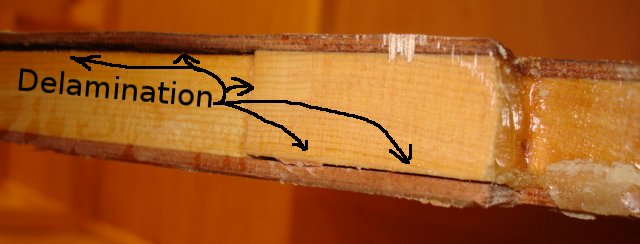
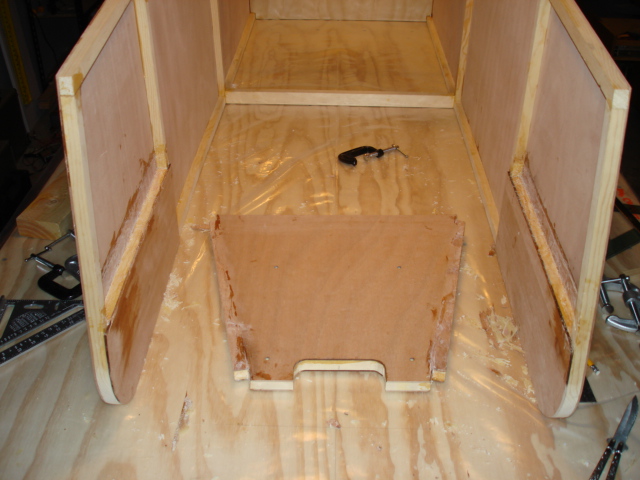
Ari, looks like you are on your way again! Great! Those delaminations could probably be forced open a bit with a putty knife or like tool, enough to force some adhesive in and reclamped to cure. In the Eros, the motor mount board is sandwiched between the RS8 built into the side structure, similar to what I see in your photo, and another RS8 that is placed on top later to prevent the motor mount from "escaping". If your plans don't show that, an additional RS8 like that might add some piece of mind.
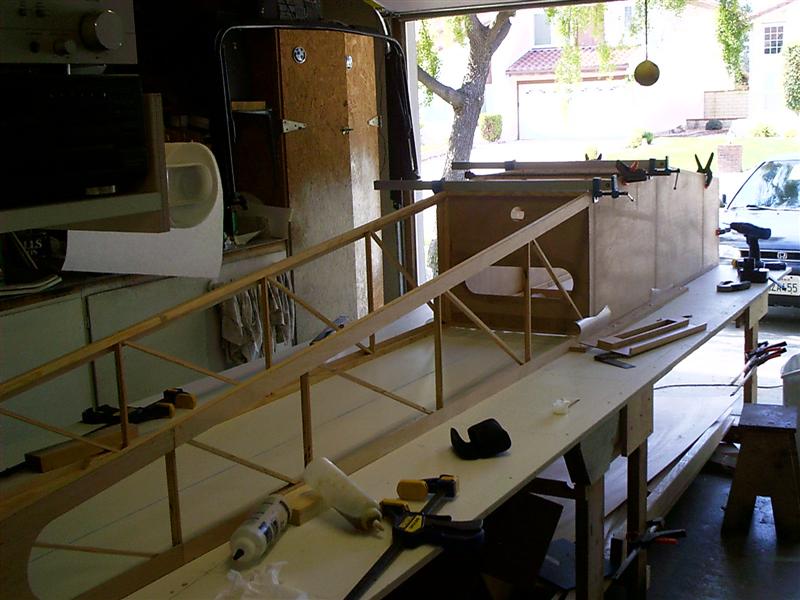
Here is my assembly (and my first attempt to post a picture).
What I did to control the position of the sides and to bring them together at the table surface was to nail a board the same width as the front opening to the bench, on the centre line. Two bar clamps set up for pushing (borrowed from a cabinet maker friend!) then pushed the sides to the reference board so that the sides were lightly touching it.
My plans call for wood screws to be used to clamp the motor base when gluing. So with the bottom in place, I put another bar clamp (one with rubber grippers on the clamp surfaces) at the highest point and pulled the sides into position, and tightened the screws just snug.
I then made a fixture out of about 2" wide material with wood blocks nailed underneath just the right size and shape to hold the sides in case the top clamp fell off. The 2 "C" clamps shown keep the fixture from squirting off the curvature of the nose.
Then I screwed the "book end" fixtures to the bench to insure that it was all square and secure for the cure.
This was a busy bit of construction, but I took time to check by measuring that the front was totally parallel top to bottom.
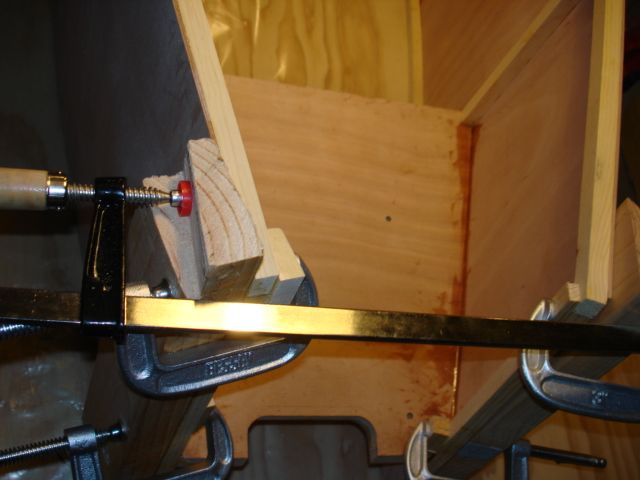
It was during this that other joints to the rear popped and my bottom longeron partially fractured, but that's another story!
What I did not check, but will be more careful with next time, is the intermediate measurements form the centre line to the longerons as they bend from station 4 (the rear spar carry-through bulkhead) to the rear of the engine mount plate.
I found (later, unfortunately) that my bottom longerons did not have the exact same curvature so that one side bulged a bit more than the other. I pushed the bulged longeron over and secured it to the table with a block before adding the "firewall", which will hopefully hold the longeron in close to the proper alignment. The difference was only about 1/4", but why leave it if something can be done.
I have one more picture for the next post, if this one works.
Ohhhh...that picture post seemed to work - please excuse the spelling in the first post (yes, unfortunately English is my first and only language)!
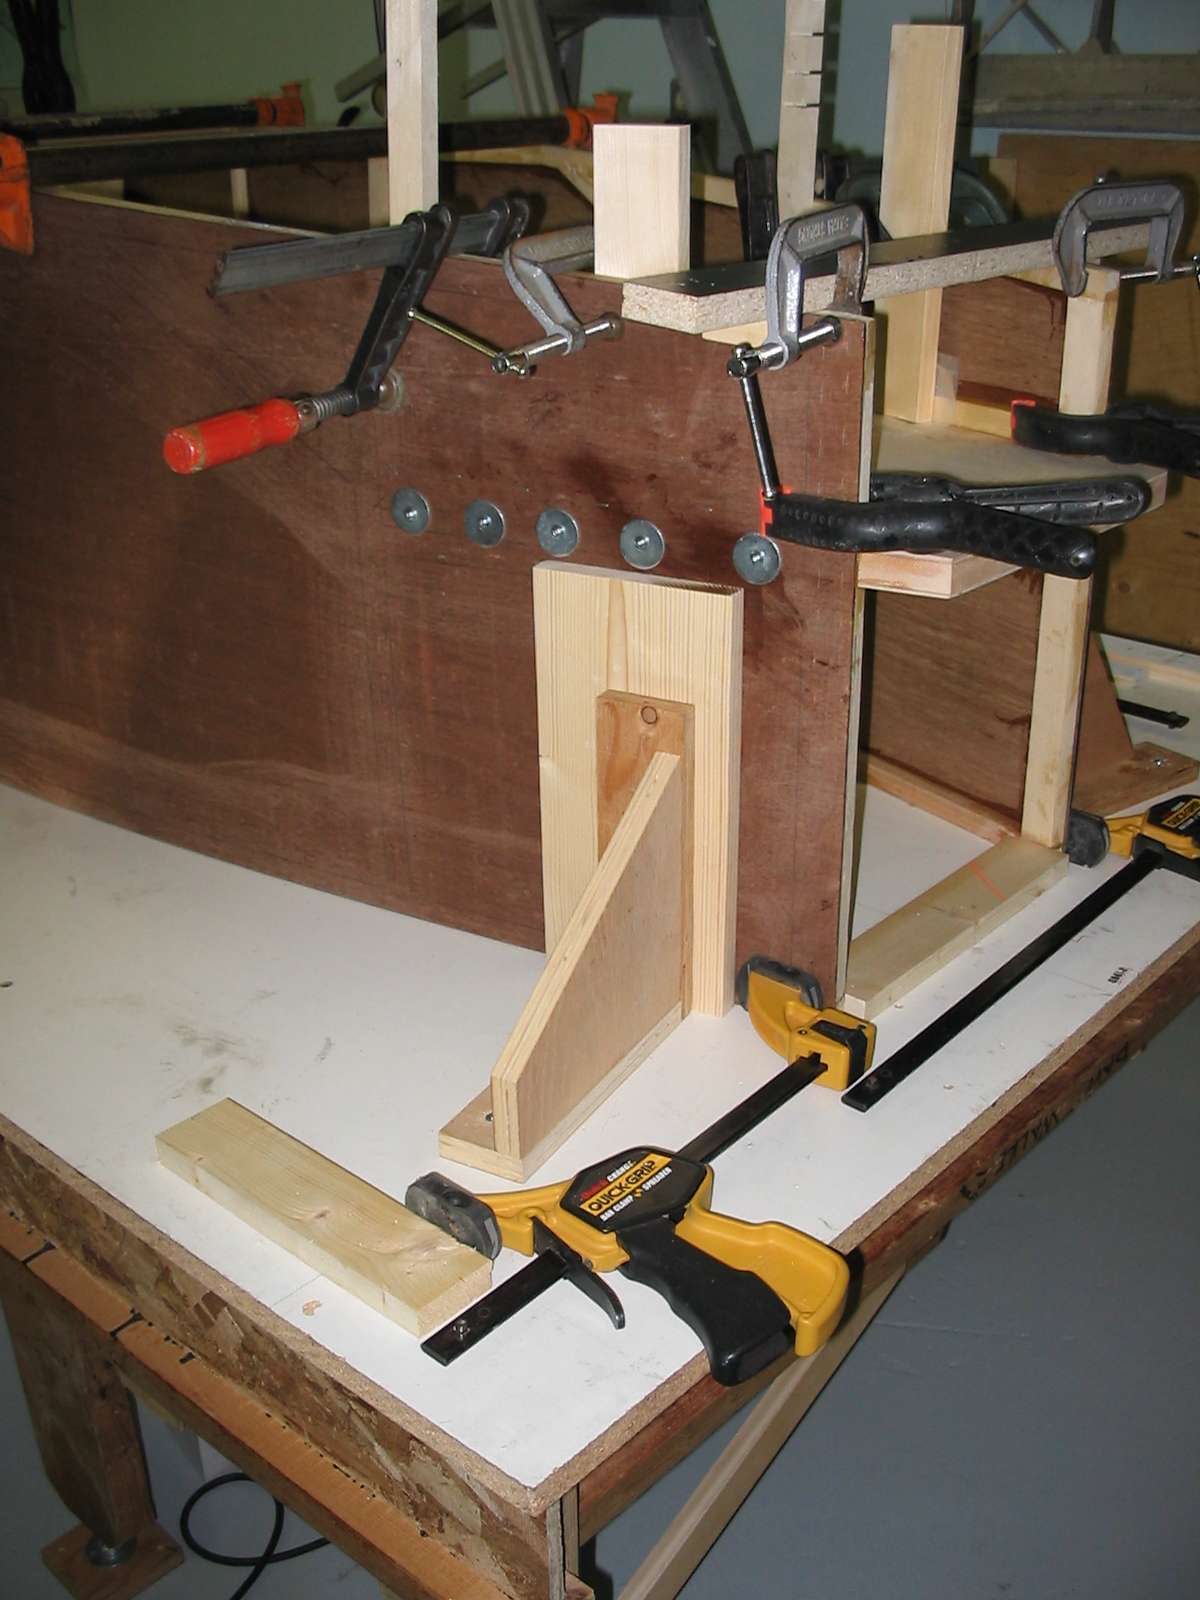
Here is a side view of my nose (Eros that is). The screws through the side ply into the motor mount are shown, as are the "bookends". There are a few extra clamps in the view since I was in the process of adding the sandwich RS8's around the motor mount base. The push clamps are easier to see here, too.
One tip worth mentioning for posterity, is that often during a trial fit the parts don't fit snugly and gape a bit since some adhesive from a previous glue-up has filled the joint area. I use my cabinet scraper to level the glue joint and then sand/plane the corners and mating surfaces to ensure "snugness'.
Oh, and yes....I keep a clamp on the high point just in case it wants to creep somehow. I'll more confident when the bottom is glued on!
Iter, Thought I'd put in my 2 cents in for what it's worth.
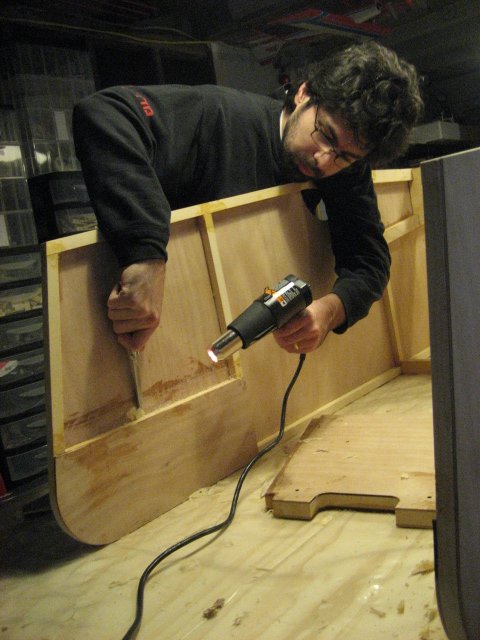
I'm in the middle of rebuilding a 1500 and had a bunch of broken glue joints to deal with. As Dave stated earlier sanding old glue joints will take the surrounding good wood with it and that's something you want to avoid. So what I done was to get a pack of #18 x-acto blades and with a blade chucked in the handle heated it up with a small propane torch. The hot blade cuts right through the epoxy and if your careful you wont take any wood with it. Getting the temp. just right so it takes the glue and doesn't become a wood burning tool takes just a little doing but its easily mastered after a short while. This will take off all the excess glue but of course will not remove the epoxy that penetrated the wood fibers,but it will get you down to a level surface that is easily sanded with a sanding block. You probably will have to do a little and then let the knife handle cool down somewhat---I know I did anyway, but with a little time the results can be very satisfactory.
In my opinion I would scrap the engine bed and build a new one as they are very easy to build and this would give you new wood to work with on 50% of this joint. In my experience so far what with removing the old glue and sanding as described earlier I've yet to have a "new" glue joint fail.
I would do as Ronny has and dowel the engine bed in also. Mine is done this way and I added 3/4 triangle stock around the bed as well, top and bottom (where Ronny used 1/4 round), and I do believe you could use this thing as a baseball bat if you wanted----very, very strong. And I might add my glue joints at the engine bed were broken when I began. I did notice when looking a the frontal shot you posted with it all clamped up that it appeared out of square to begin with, but perhaps its just the angle of the pic. I know I went through a couple of dry runs before putting any glue to it and once glued checked it a couple dozen times with a square before I left it alone to dry
Hope some of this helps and don't give up the fight! To echo Dave, you have helped and inspired many here me included. Rich
Wow Dave, I'm impressed with your jigging setup. And here I was, thinking I could get by with just a few clamps. Rich, you're right, the motor mount was not square to the sides to begin with, that's where my trouble came from. I've no removed it completely from both sides of the fuselage.
I used a heat gun to soften the epoxy and separate the joints. Heat gun also worked great to soften the leftover epoxy and I then scraped it easily with a knife.
Iter, as I mentioned before, your posts with pictures were what inspired me to do all that jigging. I saw what had happened during your assembly, and it was apparent that the same could happen to me. Thanks again for taking the time to share!
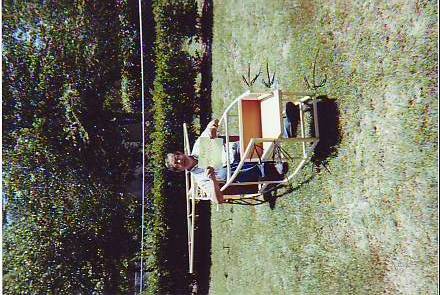
Iter: When I glued mine up I also used a bookend type brace to keep everything on the square until it dried. just use someway. Also on the picture of me and my fus. in the yard You can see the pencil marks to show the location where I drill 3/16th holes and put in birch dowel to keep it strong at these points. look close and you can see the extra rs-8 on top of the mount to sandwich it in.
Dave, what can I say. You don't know how happy I am that I my posts helped you in some way! I've learned so much from the folks here, I'm happy to make my contribution back to the forum, even if only in the form of a warning to others to avoid my mistakes :=)


 Logged

 "If in doubt, Chicken out."
  s it's cheaper if you rent it.