|
|
 flybob13 flybob13 |
| September 10, 2007, 8:32pm |
|
 Ace Ace Posts: 222
Time Online: 5 days 20 hours 43 minutes
|
Sweet, thanks for the visual!!! Bob |
|
|
|
|
|
| djohn |
| September 10, 2007, 8:48pm |
|
 Ace AcePosts: 648
Time Online: 24 days 19 hours 31 minutes
|
Quoted Text
I can work on the ribs in front of the TV, while wearing my pyjamas
I usually work on my ribs in the backyard, fully clothed, with a frosty beverage  Dennis |
|
|
|
|
|
| Tom |
| September 10, 2007, 8:52pm |
|
Ace
Posts: 744
Time Online: 16 days 10 hours 21 minutes
|
Water jet might be an option? The plywood would dry in a short time and no burned surface. In my area, western PA, laser cutting is harder to find than water jet. |
|
|
|
|
|
| iter |
| September 11, 2007, 3:41am |
|
 Ace AcePosts: 512
Time Online: 309 days 1 hours 7 minutes
|
Hours today: 7
Running total: 83
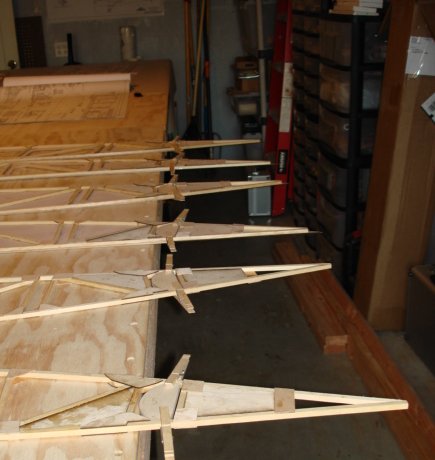
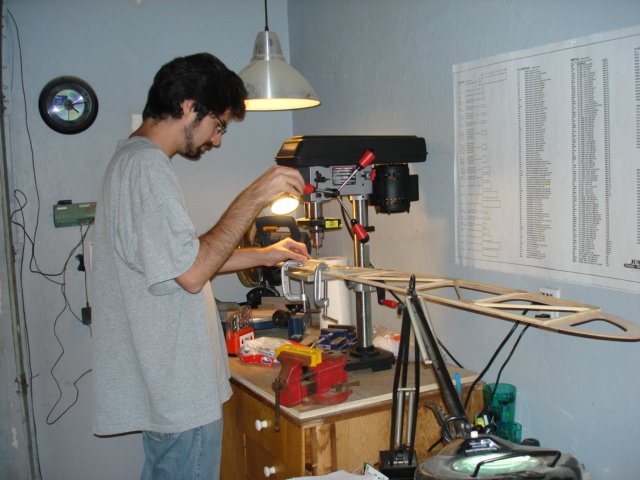
Cut all 1/8" nose ribs, including wing and aileron. Cut 1/8" root and tip rib doublers. Failed to cut 1/4" nose ribs. Sort of cut 1/4" reinforcements for aileron hinges. First the good:
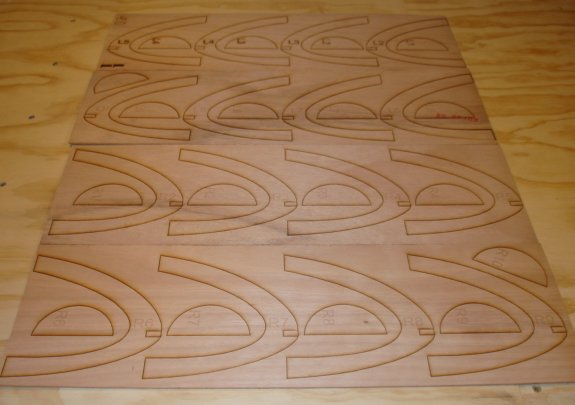
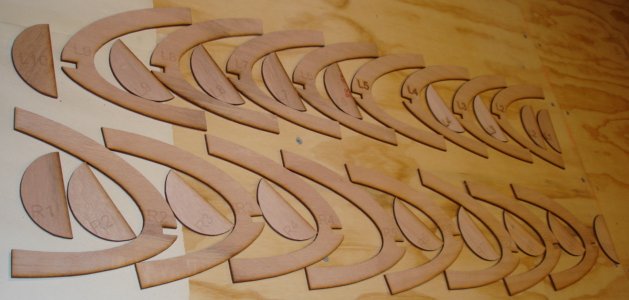
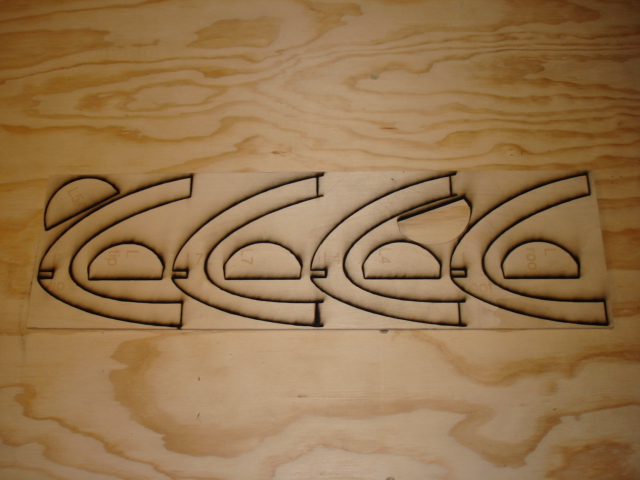
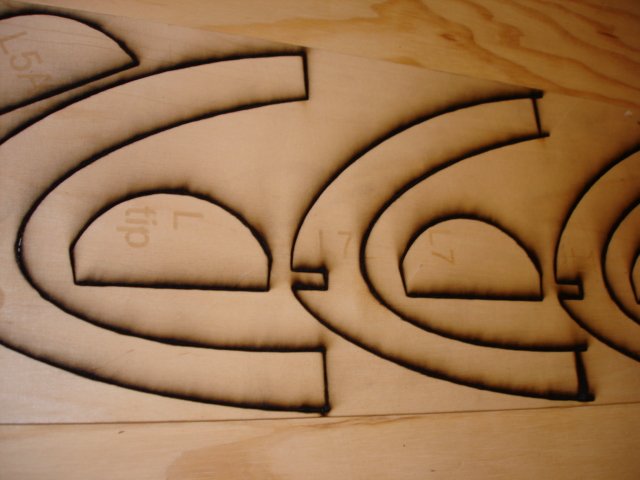
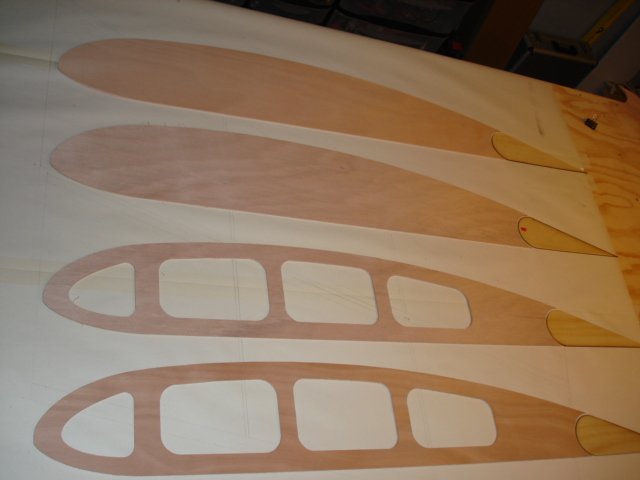
I cut out all 16 main nose ribs and 18 aileron nose ribs in less than an hour. The are all identical, but I marked them win "L" or "R" and station number because I keep getting confused which ribs have 1/8" noses and which have 1/4". Hopefully I got it right when I did the DXF. There are gaps in the sequence because some ribs have only 1/4" noses.
The laser has a working area of 24"x18", so I had to cut the plywood in half (and you wondered why I had a 24" marker in the file) The ribs came out looking very good and uniform. The burn doesn't seem to me to be a problem. You could sand it off, but to me that misses the whole point of using CNC :=) I have no experience with waterjets, but I hear they work pretty well.
|
|
|
|
|
|
| iter |
| September 11, 2007, 3:59am |
|
Ace
Posts: 512
Time Online: 309 days 1 hours 7 minutes
|
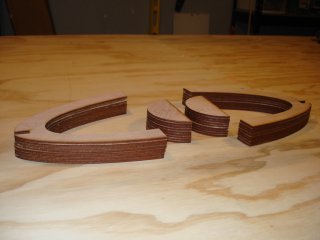
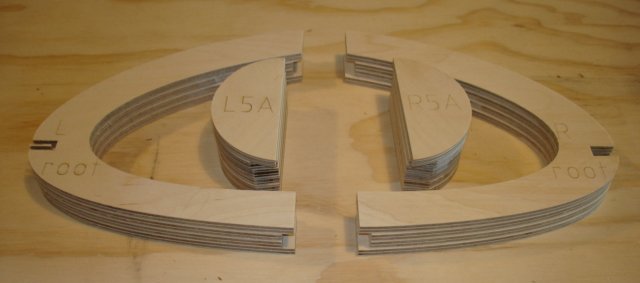
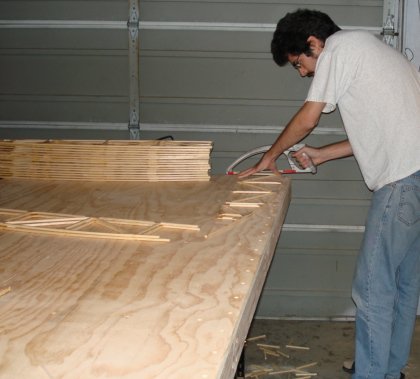
Also good--since the biggest piece that can fit in the laser is 24"x18", I used a CNC mill to cut 1/4" root and tip doublers. This machine has a completely different approach to control software and a steeper learning curve. I ruined a 48x7 piece of plywood the first time I tried to use it. But it is also very satisfying to watch the thing do all the hard work for you once you set it up correctly. From one day worth of experience working with it, it seems that the main problem with this type of machine is securing your parts to the worktable. On a laser, a part that you cut out stays on the table. On the mill, it becomes a free projectile if you hadn't nailed it to the table. 1/8" plywood was easy enough to secure--the stapler I use for making ribs works. The problem is knowing before hand where to staple so that both the part and the margin are secured to the table, and so that the router bit doesn't go through a staple. Securing 1/4 plywood is going to be more of a challenge.
The cut is very clean, and since the lasered and the milled parts came from the same DXF, they are identical. They also connect well with the aileron end ribs I cut earlier.
|
|
 |
|
|
|
|
|
|
| iter |
| September 11, 2007, 4:08am |
|
Ace
Posts: 512
Time Online: 309 days 1 hours 7 minutes
|
The bad--I wasted 3 hours trying to laser-cut 1/4" ply. The laser just won't go through it. I tried everything, high power, low power, multiple passes, but all I got was bad burn and flames. The wood actually was on fire inside the laser for a few seconds until I stopped it. I'll have to come back and mill these parts on the CNC router as soon as I figure out how to secure them. It will have to be next week though. Sawdust Shop only lets you use the laser and the CNC mill 2 hours a week each, and I went over quota on both today.
|
|
|
|
|
|
| iter |
| September 11, 2007, 4:15am |
|
Ace
Posts: 512
Time Online: 309 days 1 hours 7 minutes
|
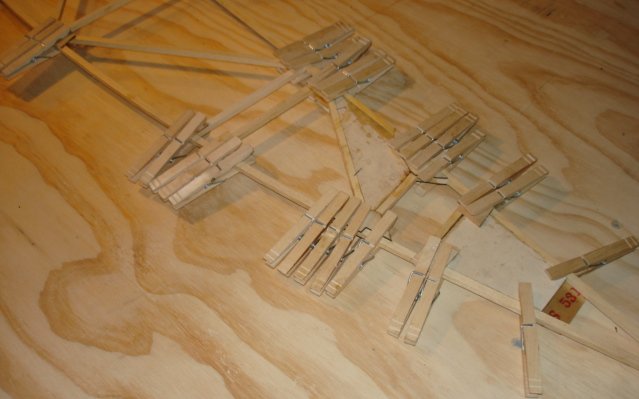
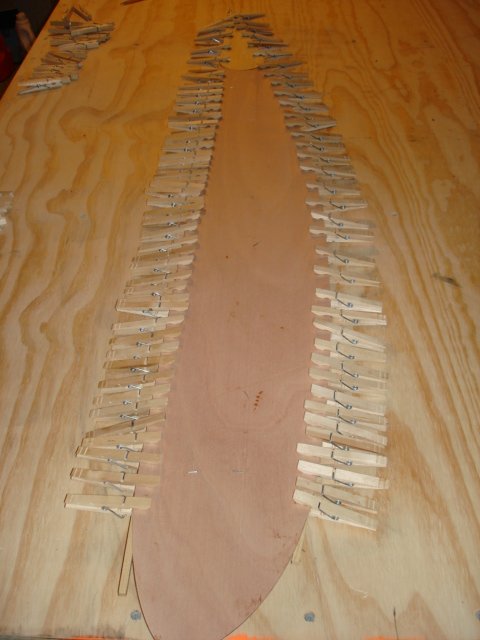
The ugly--I discovered clothespins today. Turns out I can use them instead of stapling gussets to the reverse of a rib. I still need to use them on the front or the rib will fall apart when I pull it out of the jig, but not on the reverse! No staples to drive and no staples to pull. This is a #5 rib which will have an aileron hinge in it and consequently has 1/4" reinforcements. I sort of managed to cut them on the laser today, but the parts came out really ugly, with a lot of burn and took much manual work to finish.
I've gone though almost all of the material in the rib kit. I might redo the metal parts, but otherwise the end of the ribs is in sight.
Ari.
|
|
|
|
|
|
| djohn |
| September 11, 2007, 7:04am |
|
Ace
Posts: 648
Time Online: 24 days 19 hours 31 minutes
|
Ari, I usually predrill "hold down" holes in parts that will be too small for the universal vacuum table to hold on the router I use. I also use tiny wood screws or finishing tacks on parts like the ribs you are trying to cut. Also make one pass around the part at .020 less that the thickness of the plywood. If the plywood is .250 make your first pass at Z-.230 1/8 2 flute end mill (router bit) @24000 rpm and 350 ipm and make last pass at Z-.248 and 250 ipm. The combination of a small screw or tack and leaving just a hair of material on the cut makes for a far better yield (read less flying rib parts) that is until you want them to fly. You will have to very lightly trim the parts to get the remnants of the .002 you left on the part. You may not have to tack thru the parts if your router runs accurate in Z.
HTH
Dennis |
|
|
|
|
|
| iter |
| September 12, 2007, 7:26am |
|
Ace
Posts: 512
Time Online: 309 days 1 hours 7 minutes
|
Hours today: 2
Running total: 85
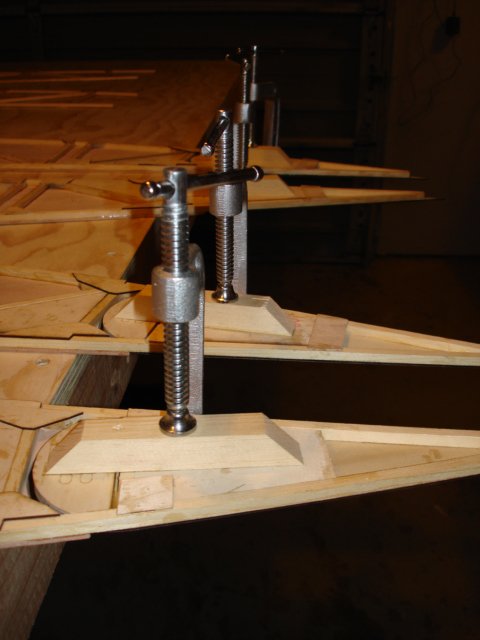
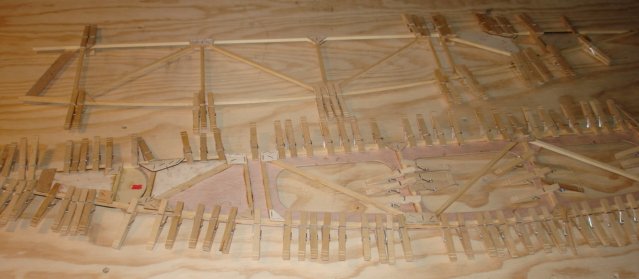
pulled staples out of last night's rib and built two more--another #5, and the left root rib. This one is covered with 1/8" plywood and took some planning. I figured it out eventually, though I'm still not sure what to do for the two ribs that have plywood on the left side. Instructions have you dry-staple gussets, remove the rib from the jig, staple gussets on the other side, then pull dry staple and glue and staple plywood on the left side. Does this actually work, or will my ribs fall apart by the time I'm done stapling?
I made a slight modification to the jig to allow gluing in 1/4" reinforcement blocks concurrent with making the rib. Plans have you build your rib first, then cut away the relevant gussets and glue in the plywood blocks. I wanted gussets on both sides of the blocks, and to be able to fit things exactly, I removed two cams and a block from the jig, and was able to lay and dry-fit everything without gussets.
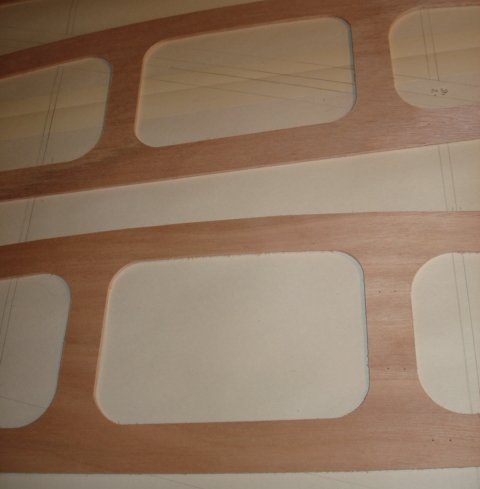
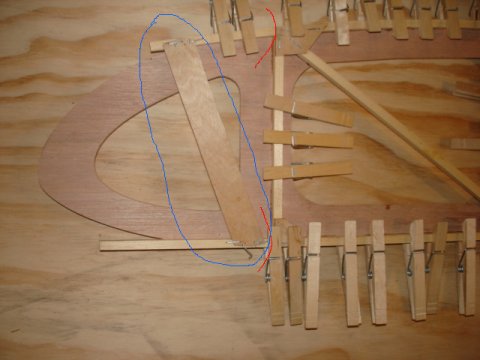
The way you build MiniMAX ribs is with cap strips too long and then cut them once the glue is dry. (at point shown in red). That's easy enough for normal ribs, but end ribs have plywood sides, so I'll have to cut the strips on the plywood. You can't cut them until the glue is dry because you need pull their ends together with temporary member outlined in blue.
I have 21 ribs at this point. 3 more to go!
Ari.
|
|
 |
|
|
|
|
|
|
| Pilotpeat |
| September 12, 2007, 7:24pm |
|
 Ace AcePosts: 498
Time Online: 13 days 4 hours 21 minutes
|
I did it like the plans call for and they turned out good. Dry stapled with just the ends of the capstrip glued, removed from jig, glued stapled second side, then removed dry stapled gussets. Worked perfectly.
I just finished the aileron fillers last weekend. Instead of cutting out the gussets to fit the fillers in I installed the fillers before the second set of gussets went on. This worked well. I just had to do a little sanding on the corners where the filler would have hit the glue that squezed out from the first set of gussets. I epoxied the second side of gussets when I epoxied in the fillers so I wouldn't have to deal with glue squeze out where the second side gussets went.
The end ribs you might epoxy the plywood on at the same time as epoxing the fillers in. I didn't and got carried away and started putting gussets where the plywood was supposed to be. Fortunalty I figured out my mistake before the epoxy cured and I was able to get them back off without too much trouble. |
|
|
|
|
|
| iter |
| September 14, 2007, 8:05am |
|
Ace
Posts: 512
Time Online: 309 days 1 hours 7 minutes
|
I don't know if you can see it in the photos, but I glued two blocks in when I was building the rib. The only part I didn't glue in was the 1/4" aileron nose rib because I don't have them yet (1/4" ply didn't cut on the laser), but these are not that important at this stage because no gussets cover them. I prefer to put the fillers in at the same time with everything else so I don't have to deal with dry glue that interferes with fit. I assemble both sides of a rib on the same batch of epoxy, including the big plywood on end ribs.
Speaking of which, I built the right tip rib. Running total hours: 86.5
Ari.
|
|
|
|
|
|
| iter |
| September 15, 2007, 8:06am |
|
Ace
Posts: 512
Time Online: 309 days 1 hours 7 minutes
|
Hours today: 1.5
Running total: 88
These last ribs are taking a lot of time to make! I built the left tip rib today. One more to go.
JDT kindly mailed me a good copy of the wing spar plan which was misprinted in my set (see post #72 above). Nice of them. Does anyone know if someone from JDT (John?) reads this forum?
Ari. |
|
|
|
|
|
| iter |
| September 16, 2007, 8:10am |
|
Ace
Posts: 512
Time Online: 309 days 1 hours 7 minutes
|
Hours today: 1.5
Running total: 89.5
Built the right root rib. This is the last rib I had to assemble. There is still much cleaning up to do and then the hinges.
Ari. |
|
|
|
|
|
| iter |
| September 21, 2007, 7:28am |
|
Ace
Posts: 512
Time Online: 309 days 1 hours 7 minutes
|
Hours today: 8
Running total: 97.5
CNC-cut 1/4" nose ribs, glued in aileron hinge supports into relevant ribs.
The ShopBot CNC router is a really sweet piece of equipment once you actually get it going, but fiddling with the software can take half the day. Anyway, I cut 1/4" the parts today, following loosely on Dennis' suggestion. The driver software lets you leave "tabs" around parts you cut, it's like having that little bit of material still holding the part like Dennis said, only it isn't all around your part but rather in 1"-long strips. Still, I had to sand a lot of wood after breaking my parts out. Nothing like the clean, ready-to-use finish the laser produces. Too bad it didn't have the teeth to cut 1/4" ply. I laser-etched inscriptions on my pieces after I was done cutting to go along with etching on my 1/8" pieces.
To put aileron hinges in, I need to have 1/4" aileron nose ribs in root, tip and #5 ribs, so I glued those in. I want to leave the other nose ribs off until I'm further along building the wing, in particular, until I have the aileron spar web installed so I can glue the nose ribs to it.
The 1/4" square RS-1 isn't always exactly 1/4", so I had to file verticals on all ribs that need this part to allow a 3/4" square hinge support to contact the plywood.
Root and tip ribs have the 3/4" supports, 4 ribs in all. I drilled pilot holes in them where ailerons will hinge. In hindsight, I should have cut holes in aileron end covers instead of just marking thir centers. Finding these centers took some effort and a flashlight through the pilot hole.
Ari.
|
|
 |
|
|
|
|
|
|
| Chase |
| September 21, 2007, 2:02pm |
|
Guest User |
Ari,
Thanks for the regular updates, photos and time log. It is really informative and clearly illustrates what is involved in building a minimax.
I'm a lurker but hope to build one some day (after getting my sport/private cert). I also have RC background - 9 years flying nitro, gliders and e-helis.
Mike |
|
 Logged Logged |
|
|
|
|
| 10 |
| September 22, 2007, 12:40am |
|
Guest User |
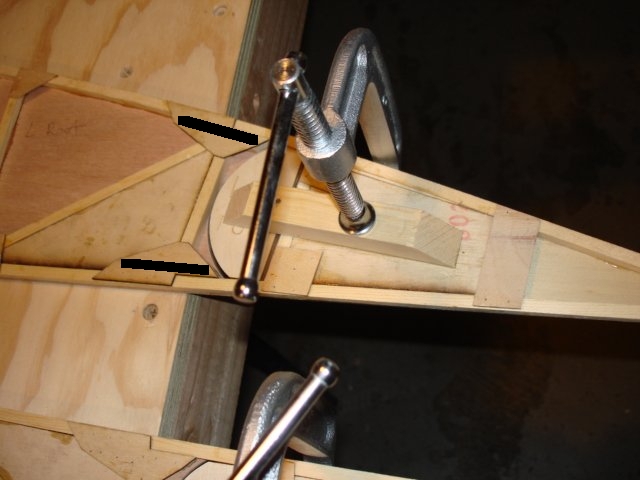
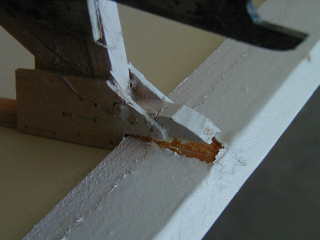
Ari, while you are at this stage of building, I might suggest you "beef" up your gussets on all your ribs where the trailing edge strip will be epoxied. I would epoxy spare1/4" pine strips along each side of the gussets where I marked your photo in black. That would eliminate the "dreaded edge curl" that has been posted in the past. You might want to research past posts on this subject. This is the only (and minor) design flaw in the Minimax line of planes that I know of. Below is what happened to my wing if you don't strengthen the gussets. Harold
|
|
| Logged |
|
|
|
|
| iter |
| September 23, 2007, 10:18pm |
|
Ace
Posts: 512
Time Online: 309 days 1 hours 7 minutes
|
Harold, thanks for your input and graphics. Am I correct thinking that fabric tension causes the curl as it pulls the trailing edge (RS-17?) up? If so, wouldn't it be better to glue in the reinforcements you mention after the trailing edge is in place? This way I'd be sure the will have good fit both to the rib and the trailing edge.
Ari. |
|
|
|
|
|
| 10 |
| September 23, 2007, 11:48pm |
|
Guest User |
Ari, The fabric got tighter for two different reasons. 1. When I applied paint and it dried. 2. When the plane was out in the sun. As for the reinforcements, I think you can do it either way, if you do it now, you'd have to have the 1/4" pieces perfectly flush with the gusset edges (simple clamp job) and then later epoxing the LE to the gussets (and the reinforcements) would be a one step process. If you do it later it would be easier to align the reinforcements onto the LE but you'd have a lot of little parts to watch while the epoxy dries because it may be harder to clamp. Since this problem happend to me "after the fact" I don't now when it would be the best time to beef up your trailing edges. Most importantly, I wanted to let you know of the problem. The pic below is what I had to go through to fix the problem a day before my plane's maiden flight. Harold
|
|
| Logged |
|
|
|
|
| iter |
| September 24, 2007, 2:04am |
|
Ace
Posts: 512
Time Online: 309 days 1 hours 7 minutes
|
Thanks for sharing your experience Harold. I think I will take more complex clamping and easier alignment and delay this job. I wonder how common this curl is?
Ari. |
|
|
|
|
|
| Mike Howe |
| September 24, 2007, 4:48am |
|
 MiniMax, Hawk, GA (Tipacer), another Max to finish AcePosts: 375
Time Online: 7 days 7 hours 30 minutes
|
The curl issue is real and could happen to any of us. Most of us have either guled a piece of wood in place like Harold has done, or made deep fillets of epoxy and filler material. Some use flox and epoxy, I used sawdust and epoxy. Either way, if you do this, make a stif mixture and wipe in a fillet on each side. Once it is all hardened up you can grind/sand it to form with a dremel tool. I did this after the trailing edge was on and also went back when fitting the aileron and sanded the wood and fillets for clearance and fit.
Mike |
|
Mike Howe
howetyr@yahoo.com
|
|
|
|
|
|
| iter |
| September 24, 2007, 7:07am |
|
Ace
Posts: 512
Time Online: 309 days 1 hours 7 minutes
|
Guys, thank you so much for bringing this up. I was completely unaware of this problem and would have built per plans if you hadn't generously shared this information with me. I love this forum!
BTW, is there any reason not to use microbaloons for epoxy filler?
Ari. |
|
|
|
|
|
| iter |
| September 24, 2007, 8:31am |
|
Ace
Posts: 512
Time Online: 309 days 1 hours 7 minutes
|
Hours last three days: 7
Running total: 104.5
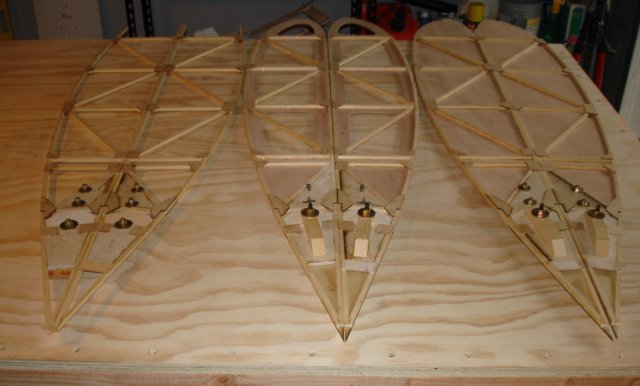
I drilled root, tip and #5 ribs, cut bushings from a steel tube and installed the hinges. Remembering the difficulties I had when drilling bearing brackets, and realizing how important it is to have hinges that are centered in the aileron, I used better clamping this time. It worked, and my holes were where I wanted them this time. I cut a few extra bushings just in case (4 more are needed)
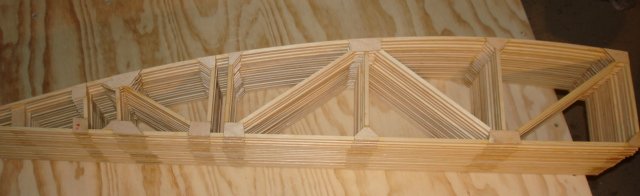
I finally cut ends off the ribs. I got so used seeing them with protruding cap strips, it felt weird to have them flat.
One thing I did that was maybe not 100% required was go over every rib and sand any gussets that protruded outside its profile. I figure this will make covering that much easier and tidy. In the process, I also found a number of gussets that didn't bond tight enough to the RS, so I went back and touched them up with epoxy.
Ari.
|
|
|
|
|
|
| iter |
| September 24, 2007, 8:38am |
|
Ace
Posts: 512
Time Online: 309 days 1 hours 7 minutes
|
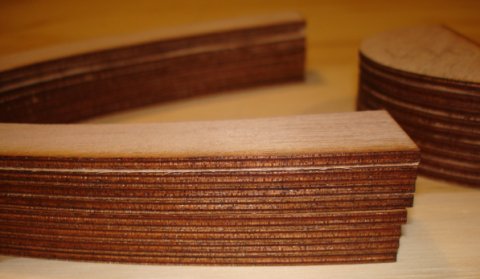
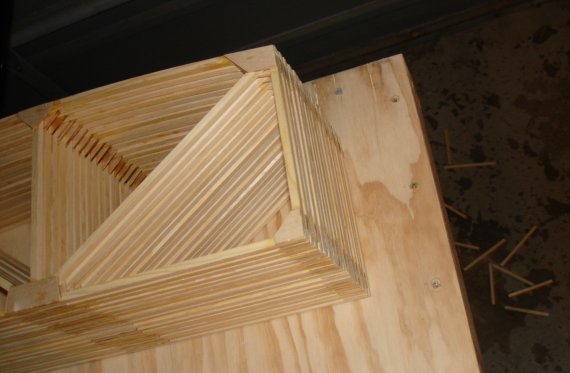
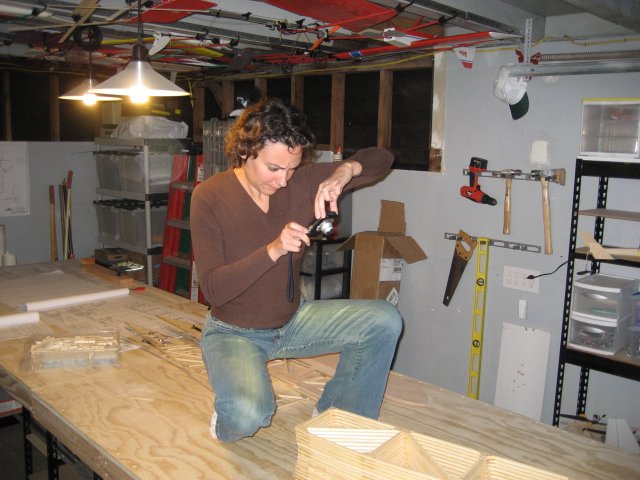
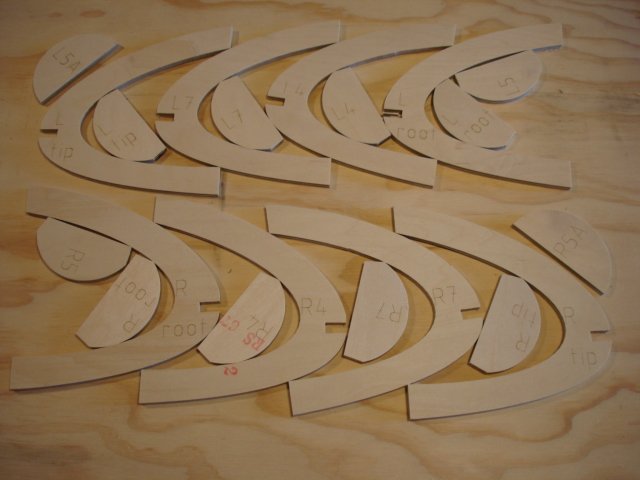
Stacks of ribs always make good photos. I though I was getting carried away taking pictures until Irene decided she could get a better perspective on them :=)
Ari.
|
|
|
|
|
|
| Gene |
| September 24, 2007, 1:20pm |
|
Ace
Posts: 283
Time Online: 9 days 1 hours 4 minutes
|
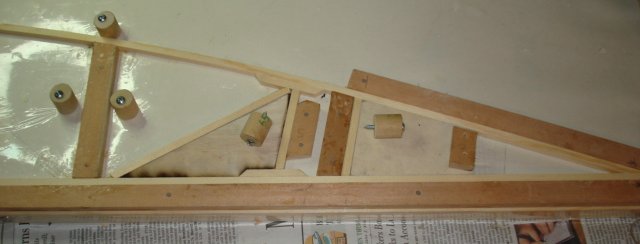
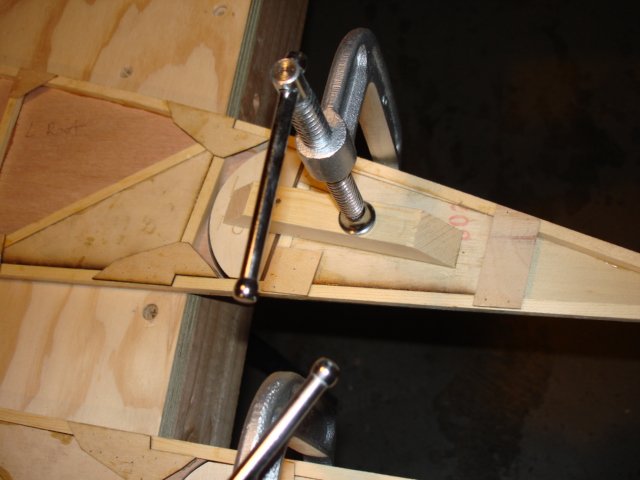
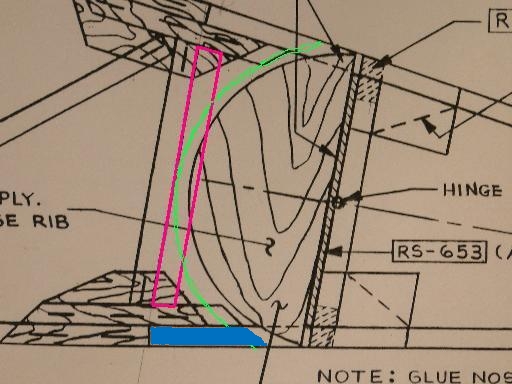
I would suggest that you modify the trailing edge of your wing and enclose it similar to what is shown in this picture. That avaoids several problems...!
Have a great day...!
Gene
|
|
|
|
|
|
| Gene |
| September 24, 2007, 1:26pm |
|
Ace
Posts: 283
Time Online: 9 days 1 hours 4 minutes
|
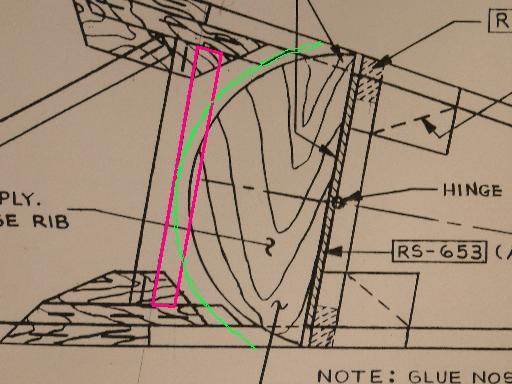
My suggestion wasn't very complete....! The "red" portion is a short length of 1/4" x 1/4" spruce that is glued in and then cut out along the line shown in green. This supports the 1/32nd piece of plywood that is glued in where the "green" line is. This totally encloses the back end of the wing and provides lots of strength, etc in this area. No more failures like shown in earlier pictures.
Let me know if you need more info.
gene |
|
|
|
|
|
| Omega |
| September 24, 2007, 6:54pm |
|
Guest User |
BTW, is there any reason not to use microbaloons for epoxy filler?
Microballoons is made to be used as an epoxy filler. The composite plane guys use it as a light weight sandable filler. It is in no way to be used for something structural.
Always use Flox (cotton fiber) in epoxy for fillets. Flox is used for structural joints.
|
|
| Logged |
|
|
|
|
| 10 |
| September 24, 2007, 8:38pm |
|
Guest User |
Gene, I don't understand how your mod will keep the trailing edges from ripping off like in my photo above. What you have shown in red doesn't seem to have any contact with the trailing edges. This has been a major problem for me and a lot of others. On my plane, three out of the four TEs had the center 5 gussets seperated. I took your photo and indicate one of the TE attachment positions in blue to illustrate what I'm saying. The 1/4" reinforcement strips are along each side of the gussets to provide more surface area that the TE can be expoxied to, thus handling the force from the tight fabric. Harold
|
|
| Logged |
|
|
|
|
| 10 |
| September 24, 2007, 8:54pm |
|
Guest User |
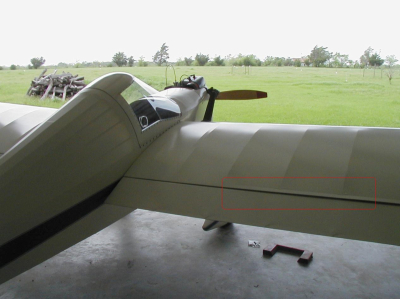
Here's what a seperated trailing edge looks like from the outside. I now check that on every pre-flight by looking down standing at the wingtip to see if the the space between the aileron and TE is an even 1/4" the whole length. What you see is about a 1" gap in the middle of the wing. Harold
|
|
| Logged |
|
|
|
|
| Gene |
| September 24, 2007, 8:58pm |
|
Ace
Posts: 283
Time Online: 9 days 1 hours 4 minutes
|
Harold,
You have totally misinterpreted the modification. The portion shown in red is only a short piece of 1/4" stock that is glued in parallel to the vertical in the rib which then provides shape and support for the 1/32" plywood that is shown in green.
The 1/32" plywood does glue to the trailing edge strips, connecting the two together and also closing in the backside of the wing. The trailing edge will never pull up as shown in your picture....! I'll try to find another picture that shows it all put together.
The biggest problem one might have with this concept is leaving enough space between the aileron and the wing as at least three layers of fabric and some paint have to go in that space and it takes a whole lot more than one might guess....!
Gene |
|
|
|
|
|
| 10 |
| September 24, 2007, 10:02pm |
|
Guest User |
Ok I understand now, I wasn't visualizing real well what you were doing. What you have in green is not just at the rib, but down the whole length of the TE. That would work great plus keep them mud daubers out! Harold |
|
| Logged |
|
|
|
|
|