|
|
 Knut A Knut A |
|
 LN-YJE Ace Posts: 779
Time Online: 21 days 16 hours 8 minutes
|
He, he...
...yes I see, but with all the food-money he now saves, he could afford a bigger engine.....
I'm quite sure that Irene will feed him properly....
Iter... when you are done with the plane, do you have a hangar facility? And where will you have the plane stationed?
Knut A
|
|
|
|
|
|
| iter |
|
 Ace AcePosts: 512
Time Online: 309 days 1 hours 7 minutes
|
Knut,
Thank you for your kind words. I gave the engine issue a lot of thought and decided to stick with the plans-recommended 447. I entertained all sorts of ideas, including some preliminary calculations for battery-powered electric motor. I also looked at half-VWs. In the end, I decided to go with a pedestrian 447 because I know I can install one relatively quickly and I won't need to modify the structure. My goal with this project was to build /a/ flyable plane that looked like an airplane. I decided on the MiniMAX because I bought into the advertised 250 hours build time :=) I am not looking for a lifetime achievement project, nor an ultimate travel machine, nor an aerobatic performer (I already own 1/2 of a SkyBolt). I want to fly this airplane sooner than later, and any creative engine choices are going to add unforeseeable amount of time to the build.
As far as hangar goes, the SkyBolt lives in a hangar at KRVH. If I can convince my partner to get rid of all the junk that is stored in the hangar, I could probably fit my Max there as well. I know people in general don't think much of removing Max wings for transport, but it sure would be nice if I could trailer it to the airport.
Thanks again for your comments and continued interest. I'll keep up the work if you guys keep up the feedback :=)
Ari.
P.S. Irene read this and she asks that I clarify that she feeds me well an in a timely fashion, which is true.
Ari. |
|
|
|
|
|
| iter |
|
Ace
Posts: 512
Time Online: 309 days 1 hours 7 minutes
|
Hours today: 4
Running total: 225
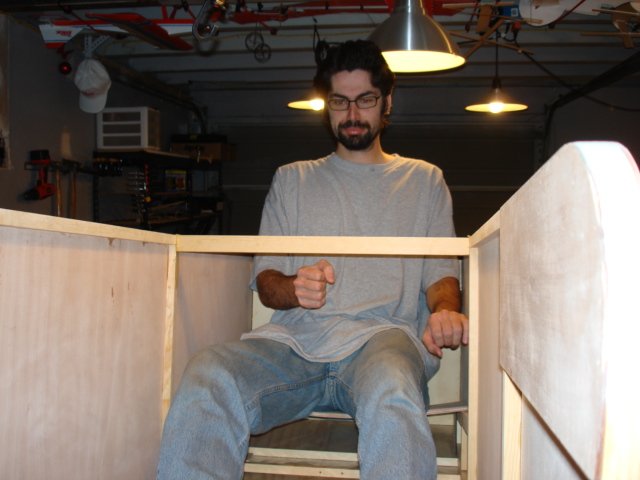
I like reading blueprints, but I don't like deciphering them. There was maybe 1.5 hours of actual work today, the rest wasted trying to figure out what goes where. The good news is that tomorrow I might know if I fit inside the fuselage.
Ari.
|
|
|
|
|
|
| iter |
|
Ace
Posts: 512
Time Online: 309 days 1 hours 7 minutes
|
Hours today: 2
Running total: 227
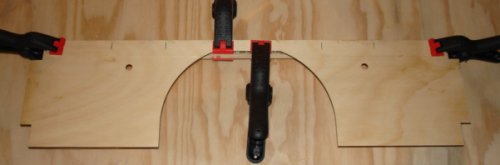
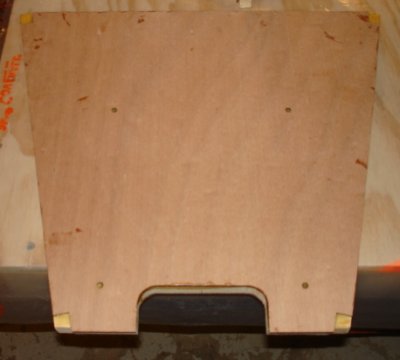
The good news is that I fit inside the fuselage with room to spare. The bad news that half the joints from last night didn't cure right and after I tried to pull the nose sides together, I noticed that some of the cross-members were loose. I glued them back in and will wait until they cure until I try anything else.
I also beveled the edges on motor mount base and floorboard support bulkhead which still needs RS-9 added to the front of it. The motor mount base is done and ready for installation into the fuselage nose.
Ari.
|
|
|
|
|
|
| Knut A |
| November 3, 2007, 10:26am |
|
LN-YJE AcePosts: 779
Time Online: 21 days 16 hours 8 minutes
|
Iter..... do I hear a human engine sound from pict 3985?
By the way,...do you make glue testsamples? |
|
|
|
|
|
| iter |
|
Ace
Posts: 512
Time Online: 309 days 1 hours 7 minutes
|
Of course engine sounds! Not the first, not the last :=)
As far as the samples, there's the leftover stuff that cures in mixing cups. Should I be keeping those?
Ari. |
|
|
|
|
|
| Knut A |
|
LN-YJE AcePosts: 779
Time Online: 21 days 16 hours 8 minutes
|
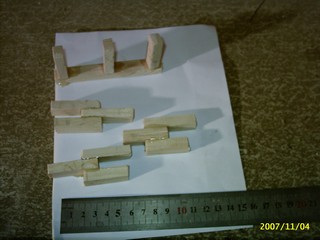
Use the leftover to glue some small pieces of the wood you use together. Make for instance three of them each time. The first for test if the inspector demands it. The next for test after for instance 3 and 10 years. Mark them and make a register which tells were the gluebatch were used on the plane. I don't think this is mandatory, but why not take this precaution for the sake of security. The gluetest pieces should lay permamently in the plane. In that case they will live in the same environment als the plane. I think the evt. next owner will also be pleased.
Knut A
|
|
|
|
|
|
| iter |
|
Ace
Posts: 512
Time Online: 309 days 1 hours 7 minutes
|
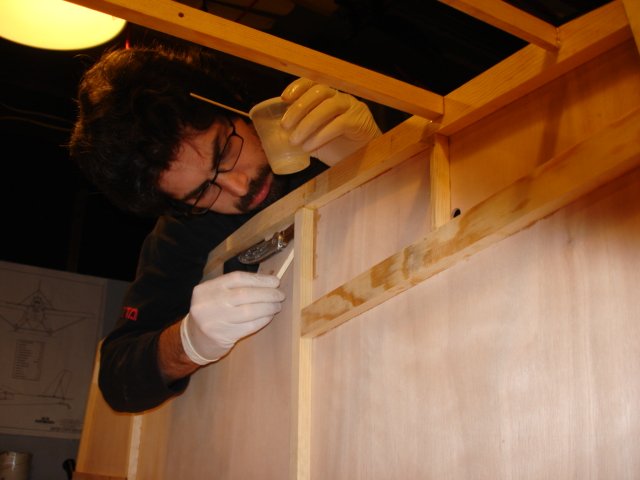
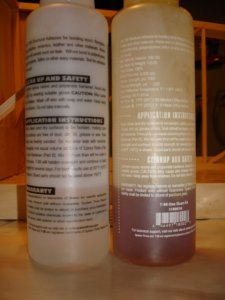
I like the idea of samples living with the plane. But I'm worried about exceeding my gross weight that way :=) I use T-88 epoxy which has a 30 minute pot life. I don't think I can count the batches I've already made, and I'm not close to half-done...
Ari. |
|
|
|
|
|
| iter |
|
Ace
Posts: 512
Time Online: 309 days 1 hours 7 minutes
|
Hours yesterday & today: 1
Running total: 228
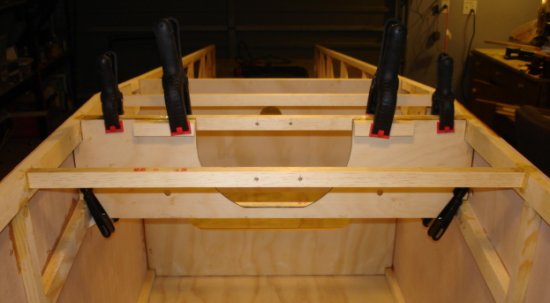
I decided to glue in the floor/seat support bulkhead. This will give me more cross-members to distribute the load when I bend fuselage sides.
Is pulling them together /supposed/ to take that much force?
Ari.
|
|
|
|
|
|
| Charlie Harris |
| November 4, 2007, 10:25pm |
|
 Ace AcePosts: 922
Time Online: 23 days 31 minutes
|
Yes Iter: It take a lot. I had heard about it before and pulled mine in and glued before adding the fus plywood sheeting It was much better. But then its too late, and I should have said something. I have mentioned this before and have caught a couple on time sorry. Charlie |
|
|
|
|
|
| Bill Metcalf |
| November 4, 2007, 10:55pm |
|
 Ace AcePosts: 2,041
Time Online: 22 days 7 hours 24 minutes
|
My airframe is now 18 years old, and just about to be finished. Over the years my bird has been stored indoors and out, trailered around, been twisted, lifted, turned and sat in (much of this with the airframe only partially completed). It's gone through several permutations and mods, and even spent one summer hung from a museum ceiling as an exhibit. It's so old that several parts had to be re-built due to wood shrinkage and/or cracking. I started construction using the now-defunct Excel epoxy, and then changed to T-88. I mixed all my epoxy by eye in plastic Dixie cups. First a squirt of the thicker catalyst, which would form a puddle in half of the tilted cup bottom, followed by a dollop of the other part. It was pretty easy for me to tell if the two puddles(which eventually flatten and snuggle up next to each other) were of relatively equal proportions in the bottom of the cup. In all this time, the only pieces of the structure which have broken free are pieces I have bumped or bashed, and when they did come loose it was always the wood fibers that tore out, not the glue that failed. My glue-mixing technique would certainly not qualify as science, but I think that maybe lots of builders become too concerned about getting absolute perfection when, in reality, the glue holds pretty well even if the mix is not exactly 50/50. Then again I have not yet added flight stresses to the airframe. |
|
 Logged Logged |
|
|
|
|
| iter |
| November 4, 2007, 11:44pm |
|
Ace
Posts: 512
Time Online: 309 days 1 hours 7 minutes
|
I kept thinking, what if I'd not glued the plywood on before I started pulling them together :=) I thought maybe there was some reason it was a bad idea. I wonder if what makes the bending so tough is that the fuselage is 2" wider now than it was in the original design. I imagine that Wane kept the motor mount's dimensions when he widened the fuse, and the angles involved now are sharper.
I use a .1gram scale to mix my epoxy at the 1/.83 ratio that's specified on the bottle. I've used up an equal amount of resin and hardener so far, so it must be working.
Ari,
|
|
|
|
|
|
| Randy lewis |
|
 Ace AcePosts: 965
Time Online: 21 days 18 hours 20 minutes
|
Iter
One problem that you may be seeing with the full size drawings is expansion of the paper. The changes in humidity can easily add an 1/8 inch to the length of a 12 foot plot. Are you using a heavy bond paper? I think a mylar is more stable or even a vellum media but both are much more expensive. Have you put a tape measure to the full size plot to see what it is? |
|
|
|
|
|
| iter |
| November 5, 2007, 10:56pm |
|
Ace
Posts: 512
Time Online: 309 days 1 hours 7 minutes
|
Rnady, that sounds like a definite possibility. I haven't measured the plans, but you're probably right. It all worked out though, because I'll need to bevel the front uprights to make them parallel, and if the plywood had extended all the way, I'd have had to sand it away anyway.
Hours today: 2
Running total: 230
Ari.
|
|
|
|
|
|
| iter |
|
Ace
Posts: 512
Time Online: 309 days 1 hours 7 minutes
|
Hours today: 2
Running total: 232
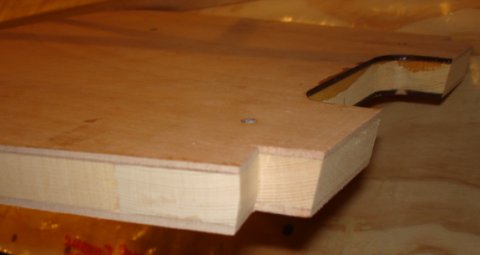
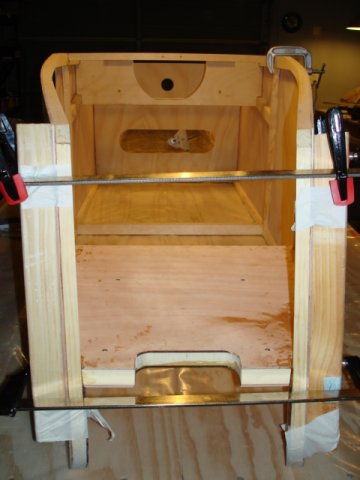
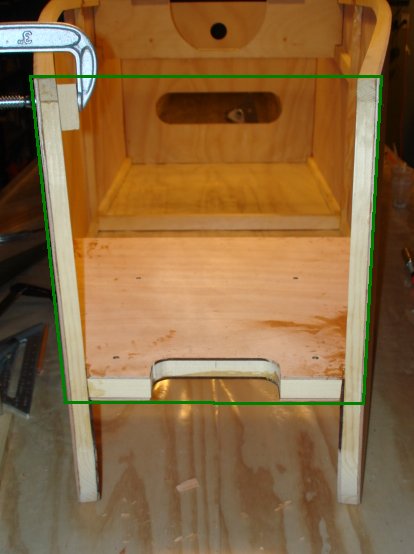
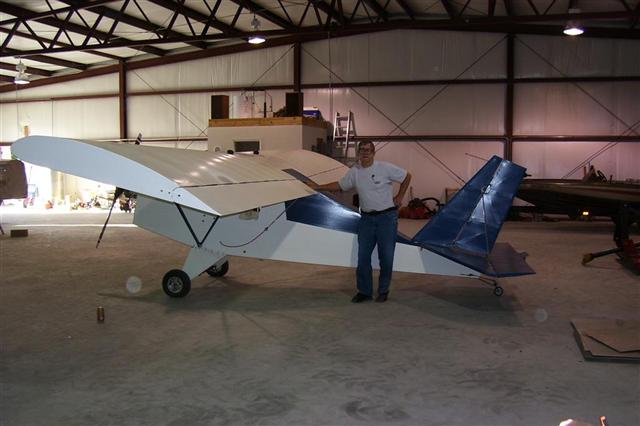
The motor mount is glued in, but the fuselage sides aren't parallel. What you see in the photo is only in small part the result of parallax. The lower port side (top left in the photo) is slanted significantly outboard. I expect this would have little effect on airframe integrity, but it's a visual disaster. I'm not sure what I can do about it short of pulling the fuselage completely apart. The amount of heat that will be required to soften 1.3oz of epoxy that went into this joint will soften adjacent joints, which in turn will require pulling off the plywood sides, which in turn... I'll have to go back to before post 178.
Ari.
|
|
|
|
|
|
| Bob Hoskins |
|
 Fly Safe AcePosts: 1,208
Time Online: 38 days 16 hours 39 minutes
|
Hi Iter;
I see what you mean. It is almost impossible to get 2 different pieces of wood to dry bend the same way and amount. I believe the T88 glue is water proof. How about wetting the problem longeron and using a heat gun to warm up the wood and make it easier to bend. Don't heat it hot enough to loosen the joints. I believe with a little patience and "fiddling" here you can get the bends correct. Do a little at a time to see how and if it will work. Be careful you don't go to far also. Just an old mans thoughts.
Fly safe, Bob |
| Fly safe and have fun. |
|
|
|
|
|
| Ricardo |
|
 Videos in UTube: ral1951 AcePosts: 2,772
Time Online: 75 days 23 hours 15 minutes
|
Ari:
Don't worry too much about it. You still need to place RS 670 plywood on top.
Right now your longerons are bending the way they feel according to their own particular wood fiber.
Once you place that plywood cover both longerons will be symmetrical.
Ricardo |
|
|
|
|
|
| Charlie Harris |
|
Ace
Posts: 922
Time Online: 23 days 31 minutes
|
Why have You left out the cross pcs. on the fus. bottom front. This would have helped to hold it straight. Charlie |
|
|
|
|
|
| George Sychrovsky |
|
Guest User |
A little late for this advice now but you should have made a spacer the right length to get the sides parallel and clamp it between the lower part of the fuselage sides when you were gluing the motor mount in.
George |
|
| Logged |
|
|
|
|
| iter |
|
Ace
Posts: 512
Time Online: 309 days 1 hours 7 minutes
|
Why have You left out the cross pcs. on the fus. bottom front. This would have helped to hold it straight. Charlie
I was going to glue it in next, but then I panicked because of the misalignment. I wanted to do it one step at a time because I thought it would be easier to control fewer parts at any given moment. Ari. |
|
|
|
|
|
| iter |
|
Ace
Posts: 512
Time Online: 309 days 1 hours 7 minutes
|
Ari:
Don't worry too much about it. You still need to place RS 670 plywood on top.
Right now your longerons are bending the way they feel according to their own particular wood fiber.
Once you place that plywood cover both longerons will be symmetrical.
Ricardo
I was thinking about that, but I'm worried that the plywood and the cross-members will just pull the longerons together, so the left will move closer to its correct position, but the right will get skewed closer to centerline than it needs to be. Ari. |
|
|
|
|
|
| iter |
|
Ace
Posts: 512
Time Online: 309 days 1 hours 7 minutes
|
Hi Iter;
I see what you mean. It is almost impossible to get 2 different pieces of wood to dry bend the same way and amount. I believe the T88 glue is water proof. How about wetting the problem longeron and using a heat gun to warm up the wood and make it easier to bend. Don't heat it hot enough to loosen the joints. I believe with a little patience and "fiddling" here you can get the bends correct. Do a little at a time to see how and if it will work. Be careful you don't go to far also. Just an old mans thoughts.
Fly safe, Bob
I will try this today! Thanks for this advice. It gives me hope that I can fix this non-destructively. Ari. P.S. I see you just made "ace" on this board, congratulations! Ari. |
|
|
|
|
|
| iter |
|
Ace
Posts: 512
Time Online: 309 days 1 hours 7 minutes
|
Quoted from 71
A little late for this advice now but you should have made a spacer the right length to get the sides parallel and clamp it between the lower part of the fuselage sides when you were gluing the motor mount in.
George
Thank you. Am I to understand that your advice is to start the fuselage over and use a spacer next time? Ari. |
|
|
|
|
|
| George Sychrovsky |
| November 7, 2007, 10:57pm |
|
Guest User |
That’s not my advice, I would just pull it together as much as its willing to go without straining the parts too much and leave it at that
George |
|
| Logged |
|
|
|
|
| John Riggans |
| November 10, 2007, 1:11pm |
|
Fledgling Member  Posts: 37
Time Online: 28 days 4 hours 45 minutes
|
Ari, Did you glue station 5 to the rear spar carry thru before gluing it to the fuse sides ? John Riggans |
|
|
|
|
|
| iter |
| November 12, 2007, 8:49am |
|
Ace
Posts: 512
Time Online: 309 days 1 hours 7 minutes
|
Ari, Did you glue station 5 to the rear spar carry thru before gluing it to the fuse sides ? John Riggans
Not sure what you mean here. Station 5 is not glued in yet as such. Station 4 has 2 plywood pieces and 5 RSs sandwiched between them. I assembled the sandwich first, then glued the whole thing in place, if that's what you were asking about. You can see photos in posts 190 and 191. Some of you may have been wondering about my loss of productivity lately. My mind has been elsewhere :=) This is from earlier today. Ari.
|
|
|
|
|
|
| Knut A |
| November 12, 2007, 9:18am |
|
LN-YJE AcePosts: 779
Time Online: 21 days 16 hours 8 minutes
|
Congratulations Ari and Irene.... may your flight be successful. Be careful during landing... And we don't want or need written and fotographic reports from the next steps.... do we?
Knut A |
|
|
|
|
|
| djohn |
| November 12, 2007, 10:48am |
|
 Ace AcePosts: 648
Time Online: 24 days 19 hours 31 minutes
|
I'm bettin the next step happens where it doesn't smell like T-88 MEK and fresh cut wood.
Congratlations you two!
Dennis |
|
|
|
|
|
| 10 |
| November 12, 2007, 1:43pm |
|
Guest User |
I happy for the both of you! Wish you happiness for the rest of your lives!
I just want to tell the rest of the people on this BBS because you can't see why Ari is smiling. Irene is putting a AN960C washer on his finger!!! Ahhhh, such love!!! Harold |
|
| Logged |
|
|
|
|
| Knut A |
| November 12, 2007, 2:27pm |
|
LN-YJE AcePosts: 779
Time Online: 21 days 16 hours 8 minutes
|
But in the background...I can se a man carrying a spar...!! Ari...you don't bring with you your MiniMax-project to the church....do you..???
Knut A |
|
|
|
|
|
|