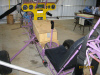
I am building a tandem airbike and am working on the ribs right now. I have made two so far but I am having a little trouble getting the quality up to where I think it needs to be. Does anyone have any suggestions? What tricks do you use to make the perfect rib?
My main problem is that even though I know for sure that my jig is straight across the bottom the bottom capstrip is coming out not quite "flat". I think maybe it is the tension in the curve of the top capstrip pulling. Do I need to steam the top capstrips? I havn't heard mention of this....
The tension of the top rib cap is curving the lower one, this is not a problem in itself because its more important the ribs are all the same rather then perfect shape but the curve on the bottom will come to haunt you when you start assembling the wing on the flat table and the ends of the ribs are lifting off of the table when trying to glue in the front spars and trailing edges. You will need to temporarily shim the opposite ends of the ribs to bring the ends you are working on down to the table. One way to deal with this is not the make the bottom of the jig straight but curve it to account for the spring back of the rib when its removed from the jig.
Seems like this subject might be opening another "can of worms" as evryone has their favorite (and best) way of making the perfect rib. For me it's a little different than what has been described.
First off I always soak the top ribs where the maximum curvature occurs for a few hours and then clamp the ribs bent around a simple form until they are dry. The exact curvature is not important, but taking the induced stress out is.
Then I assemble the rib in my jig avoiding putting alignment blocks near the gusset area so the blocks don't get glued into the rib assembly. This includes putting in the plywood nose piece. Then glue and staple each gusset in place. I always leave the rib in the jig overnight and then take it out and add the gussets to the opposite side, again stapling them in place. This way you can make a rib a day and shortly will have them all done.
You can remove the staples if you wish and depending upon what type you use you probably should. I personally use a small monel staple that is used in the carpet installation industry and leave them in place as they will never rust and their added weight is negligable. I buy them by the box of 5000 and they weigh a few ounzes at the most. They are 3/16" across the flat and 3/8" long. I set them flush and if they don't end up that way I set the rib on a suitable surface and tap the staple lightly with a hammer to set them flush.
The final thing is to run the ribs lightly across a disc sander to smooth the gussets down even with the rib profile.
When I take ribs out of my jigs they are absolutely flat on the bottom and conform perfectly to the rib outline. There are no stresses within the rib due to pre-bending the top rib. I have been using this method for years on end, but unfortuately can't take credit for it as it is a method that the EAA has been pushing since day one. I have made a few modifications like using the special staples that I do, but other than this it's the same old standard method. No sense in trying to re-invent the wheel...!
In my humble opinion, for whatever that is worth. Have a great day...!
Gene, how long do you let the rib top dry after you have formed it? Also what kind of stickum do you use? I talked to JDT and they said they were experimenting with gorilla glue, which seems to like damp conditions to start with. I was wondering if the epoxy bond is effected by the moisture.
The length of time it takes to dry the top ribs depends highly upon what the humidity conditions are where you are drying them, but generally when they "feel" dry to the touch they are dry enough...! I find that a day in a warm environment is suitable. Make sure that you put a little space between each rib while you are drying them so the air can circulate, like maybe 1/8" or so. I should have pointed out that there will be some "spring-back" so it is a good idea to overbend them in the form..!
Glue: I am a strong believer in T-88 and have little experience with "Gorilla Glue". I used it once for a non-aircraft project and was extremely disappointed with it and would never recommend it for use for an airplane. I feel like one doesn't have enough control over the final outcome where T-88 is repeatable everytime.....!
Gorilla Glue expands and "foams" while drying (at least ways it did for me) and I just flat out don't like it....! Also the cleanup of the expanded foam is miserable...!
Hope this helps. T-88 is good insurance at a fair price....! I can easily go along with guys wanting to save money on painting, like using latex, etc, but never on glue (or rib-stitching..!) or anything else that might bite you in the anal area while in flight....!
I'm with you on the Gorilla Glue. I have used it a couple of times with similar results as you. I thought water or moisture was pretty much an arch enemy of any epoxy in its non cured state, no facts to back that with just a hunch. Then I hear of people using ethelyne glycol to prevent wood rot and that epoxy likes that? Go figure.
I also am not into saving a couple of dollars unless quality is absolutely uncompromised.
I don't have a picture of my "forming jigs" as they are too simple to take a picture of and I just "pitch them" after using them. Basically all you're looking for is a rounded surface to wrap the top ribs around and a couple of clamps to hold the ends down.
Try and visualize a 3' length of 2"x8" with a short length of 4" diameter PVC plastic tube placed near one end. Lay your wetted top ribs on the PVC tube and then use a short length of wood to hold down the long (back) end. You can hold it down with clamps or a couple of deck screws.
Take another short length of wood and lay it on the short end (forward) where you want the bend to occur and using a pair of clamps just keep pulling the ribs down until you have "over bent" the ribs and then let them dry. When they are dry they should spring back ever so dlightly and should go into your rib jig without creating any undue stresses in the rib....!
Let me know if you have kept up with this. If not, I'll make a drawing using "Paint" program and forward it.
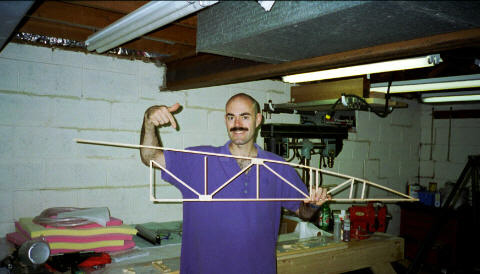
When I made my first Tandem rib I didn't epoxy the gussets on before I pulled the rib from the jig and Pop! there went a joint. (see photo) The fix was to make the fixture locating blocks not interfere with the gussets so I could epoxy all gussets onto one side of each rib before pulling the rib from the jig.
I still can't see how 1/4" rib cap strips can apply enough moment to pull a properly trussed rib's lower cap strip into an arch though. My ribs were all perfectly flat and I didn't do any preforming of the upper cap strips.
Regarding hydrated wood/epoxy joints. The water molecules will not affect cures in many types of epoxy joints and the wing skins of my Pulsar XP are bonded in the hydrated (steamed) condition to allow for tightening to prevent skin sag when the joints are cured. This actually does (can) pull the wing out of alignment until the opposing wing skin pulls it back as it dries.
As always I encourage users to think like scientists and do a simple test. Drop two pieces of ply into a bowl of water and let them soak. Towel dry them immediately prior to bonding. Use two identicle sized pieces of ply to epoxy in the dry state. Test each bonded part to destruction using gallon water jugs (or any other incremental weights)by hanging one end of the ply structure from a clamp and the water jugs from another clamp. ASTM has lots of info but one need not go crazy for home structural tests.
Don't know about you guys, but in Texas we make ribs like this:
Jack's Ribs
1 ½ cups wood chips or chunks (preferably hickory or apple) 3 tablespoons unsalted butter 1 cup apple cider 3 tablespoons bourbon, or 3 additional tablespoons apple cider 3 tablespoons soy sauce 2 tablespoons coarse salt (kosher or sea) 2 tablespoons brown sugar 2 tablespoons sweet paprika 1 tablespoon freshly ground black pepper 2 teaspoons dry mustard 2 teaspoons garlic powder ½ teaspoon celery seed 2 racks baby back pork ribs (4 to 5 pounds total)
Barbecue Sauce (Use your favorite or make your own)
Soak the wood chips for 1 hour in water, then drain.
Make the mop sauce: Melt the butter in a nonreactive saucepan over medium heat. Stir in the cider, bourbon and soy sauce. Keep warm until ready to use.
Make the rub: Place the salt, brown sugar, paprika, pepper, mustard, garlic powder and celery seed in a small bowl, and mix with your fingers, breaking up any lumps.
Prepare the ribs: Place a rack of ribs meat side down on a baking sheet. Remove the thin, papery membrane from the back of the rack by inserting a slender implement, such as a butter knife or the tip of a meat thermometer, under it. The best place to start is on one of the middle bones. Using a dishcloth, paper towel or pliers to gain a secure grip, peel off the membrane. Repeat with the remaining rack.
Set aside 2 tablespoons of rub for serving. Sprinkle the remaining rub over both sides of the ribs, rubbing it onto the meat. Cover the ribs with plastic wrap and refrigerate them while you set up the grill.
Set up the grill for indirect grilling and preheat to medium (325 to 350 F). Place a large drip pan in the center of the grill under the grate.
When ready to cook, brush and oil the grill grate. Place the ribs, bone side down, in the center of the grate, over the drip pan and away from the heat. (If your grill has limited space, stand the racks of ribs upright in a rib rack.) If cooking on a charcoal grill, toss half of the wood chips on each mound of coals. Cover the grill and cook the ribs for 45 minutes.
Using a barbecue mop, mop the ribs on both sides with the mop sauce. Re-cover the grill and continue cooking the ribs until well browned, cooked through, and tender enough to pull apart with your fingers, 45 minutes to 1 hour longer, 11/4 to 11/2 hours in all. When the ribs are cooked, the meat will have shrunk back from the ends of the bones by about 1/4 inch. Mop the ribs again every 15 minutes and, if using a charcoal grill, replenish the coals as needed.
Just before serving, brush the ribs on both sides with some of the Lemon Brown Sugar Barbecue Sauce and move them directly over the fire. Grill the ribs until the barbecue sauce is browned and bubbling, 1 to 3 minutes per side.
Transfer the ribs to a large platter or cutting board. Let the ribs rest for a few minutes, then cut the racks in half or into individual ribs. Sprinkle a little of the reserved rub over the ribs, and serve at once with the remaining barbecue sauce on the side. Makes 4 servings.
Don't ask a man if he's a pilot. If he is, he'll tell you. If he's not, you don't want to embarrass him.
Thanks for the input everyone. I think I will try to go ahead and steam the capstrips. What do you use to create the steam? Obviously water is involved, and heat, but is there some special tool that I would need or would I get enough steam if I made a rack over a long narrow vessel and poured boiling water into the vessel? What about actually dunking the capstrips in boiling water? or is that a no no?
I think I have a pretty good idea what you are talking about for a drying jig Gene. I like the sound of that design-nice and simple.
Some time ago, I got involved in repairing the wing tip of an airplane that had been ground looped. The tip was made from 10, 3/16X 1.00 in. strips of spruce. These were each about 6 ft long. Vertical grain. They were to be bent around a form and glued in a stack to form a bent laminated board 30/16X1.00 in. Steaming was not available so we soaked the pieces in a kids plastic wading pool for a whole day, occasionally working each piece to induce the proper bend. Next morning the parts were dried a little, Elmer's carpenter glue liberally applied, parts laid on the form and clamped. Drying process took about a week. Worked slick and is still flying last I knew.
Your comment about using "Elmer's Carpenter" Glue in an aircraft just causes a certain part of my body to pucker up so bad I can hardly take it....! I guess if one was to use Elmer's in an aircraft the wing tip bow would be the place to do it, but one shouldn't get the idea that this is a suitable glue for aircraft....!
I have constructed bows the identical way except I used T-88 for laminating the strips together and yes, it works perfectly....!
If you are talking about bending strips of wood for wingtip bows there is no need to either wet or steam the strips. They will bend easily right around your form. I usually am bending oak or ash strips (1" x 1/8") for larger aircraft and stack up six of them in a form. Sitka Spruce will bend with no effort..! If anyone is interested I can further describe the form, etc.
Somebody else brought up the wing tip bows. I am trying to find info about taking the stress out of the top capstrip for the ribs in a Airbike/Minimax wing.
Just wet the ends to be bent for a few hours in water and then wrap them around a simple form to dry. The form should "overbend" them and when dry they should spring back to a shape that will allow conversion into a rib without inducing stresses.
Hope this helps Pete. keep us posted on your success....!
The other night I made a simple jig just as you described with a 2x6 and a piece of 4" PVC. When I held a rib up alongside of it it looked like the PVC should be almost centered. Then I soaked the whole capstrip in water ( a long piece of PVC with a cap on one end worked well to soak them in) for 1 1/2 or 2 hours and put it in the jig to dry for 24 hours or so. I havn't built a rib yet but holding the bent capstrip up to the jig it looks like it will work very well. Amazing. Thanks for the advice. I'll try and post a pic or two of what I built.


 Logged


 Gotta be finger likin' good

