|
|
 iter iter |
|
 Ace Ace Posts: 512
Time Online: 309 days 1 hours 7 minutes
|
Hours today: 3
Running total: 51
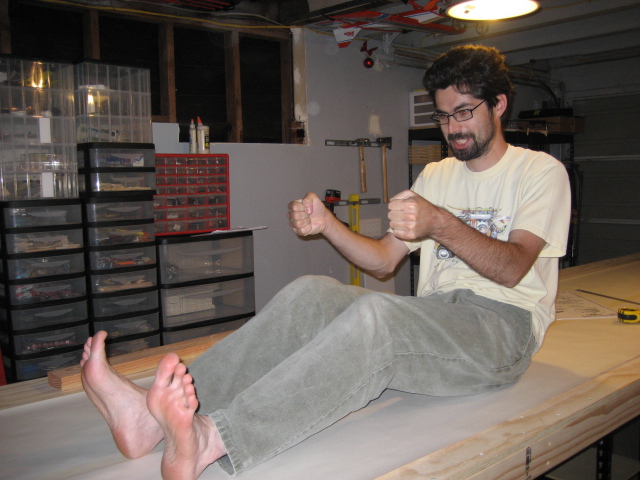
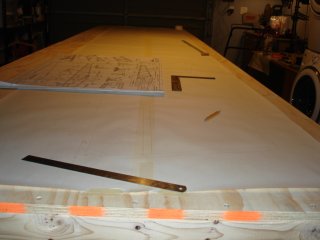
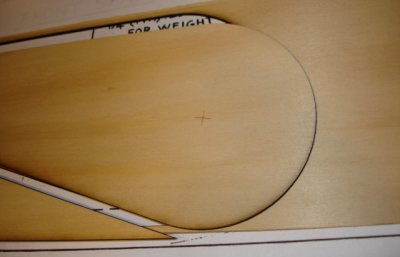
I drew up full-size plans for the fuselage today, now that I have a table big enough to hold them. Wow this thing is long. I know the fuse is not very long as man-carrying airplanes go, but nothing in my R/C experience prepared me for this :=)
You can't see the pencil lines too good in the photo :=( I more or less reproduced everything that's on drawing 1. I drew this on paper instead of on the bench as the instructions suggest. I think I'll do full-size drawings for fin/rudder and stab/elevator the same way, and then I can do the actual building in any order. I'm still waiting for my wood.
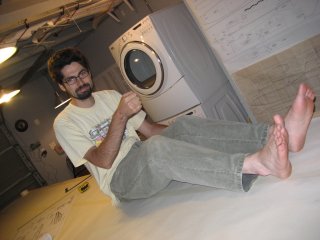
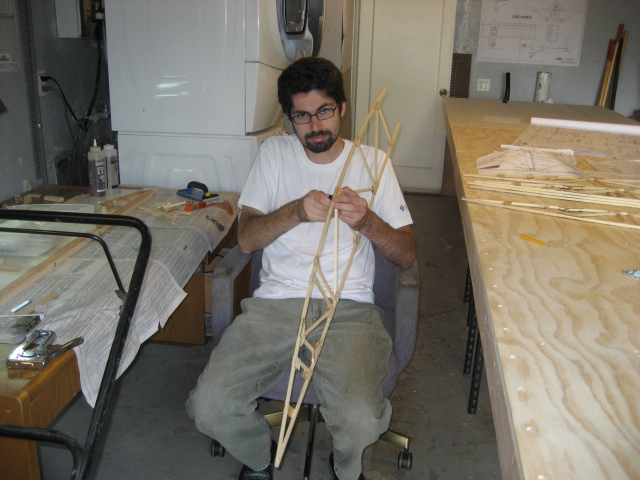
That, and an I'm-making-engine-noises photo, one of many to come, I'm sure.
Ari.
|
|
|
|
|
|
| djohn |
|
 Ace AcePosts: 648
Time Online: 24 days 19 hours 31 minutes
|
Engine noises are good, in fact mandatory but you must get the stick and throttle thing down. This ain't no "yoke" bird.  Dennis |
|
|
|
|
|
| iter |
|
Ace
Posts: 512
Time Online: 309 days 1 hours 7 minutes
|
Arthur made a similarly correct observation over here: http://www.lonesomebuzzards.com/cgi-bin/forum/Blah.pl?m-1187319013/
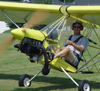
Great photograhpy Ari...gave me a laugh...I like the no shoes concept however there isnt a control yoke in a Minimax...Its a real aeroplane and comes with a stick.....maybe another photo required..!
The smile looks convincing
Irene caught me off-guard in this photo--that's why the smile looks so convincing. I immediately realized the yoke problem and posed for a number of "stick and throttle" pictures, but none of them had that convincing engine nose to them.
I particularly like the "dimensional adjustment instruments" (axes) on the wall.
UARTs is what we call them--Universal Alignment and Readjustment Tools. Cf. http://catb.org/jargon/html/L/LART.html (One of them is a hammer, BTW)
|
|
|
|
|
|
| djohn |
|
Ace
Posts: 648
Time Online: 24 days 19 hours 31 minutes
|
Not nearly as convincing. Irene, you must work on the "unaware" of it all.  Dennis |
|
|
|
|
|
| iter |
|
Ace
Posts: 512
Time Online: 309 days 1 hours 7 minutes
|
Hours today: 8
Running total: 59
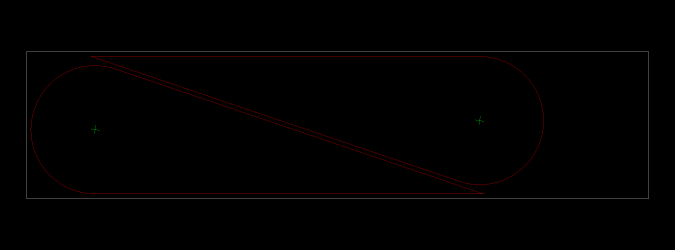
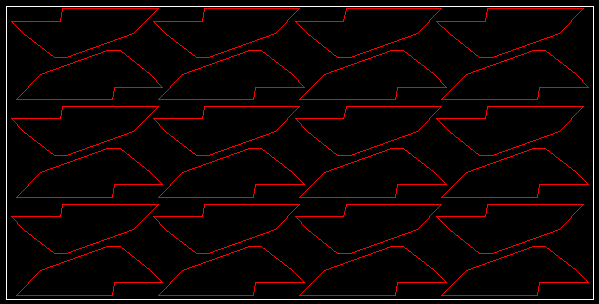
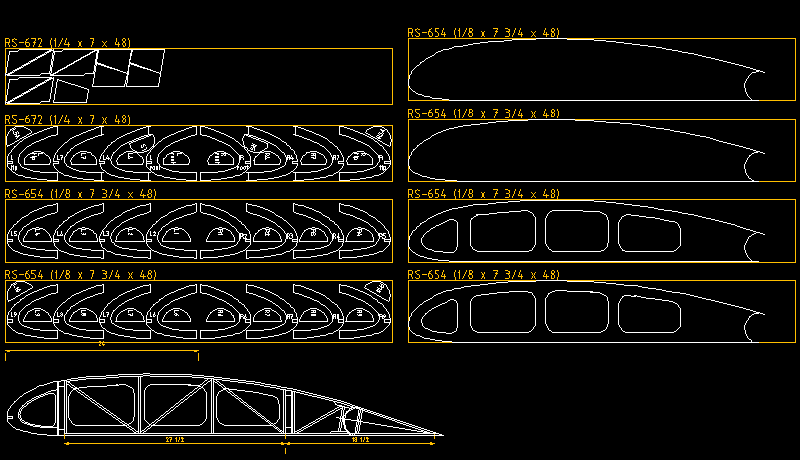
Drew full-size fin & rudder on paper. Started working on DXF files for laser cutting. I wish JDT would supply the files... or better yet... laser-cut parts... Here's an example--the aileron end rib. White outline is the size of RS-353 that the ribs are made of.
Ari.
|
|
|
|
|
|
| iter |
| September 2, 2007, 6:07am |
|
Ace
Posts: 512
Time Online: 309 days 1 hours 7 minutes
|
Hours today: 3
Running total: 62
Made the 6 "bearing brackets" for ailerons. I think I'm getting closer to finding the "good enuf" bliss. My holes are off-center and the rounded ends are not very round. Is there hope for me yet?
Ari.
|
|
|
|
|
|
| iter |
| September 2, 2007, 9:05am |
|
Ace
Posts: 512
Time Online: 309 days 1 hours 7 minutes
|
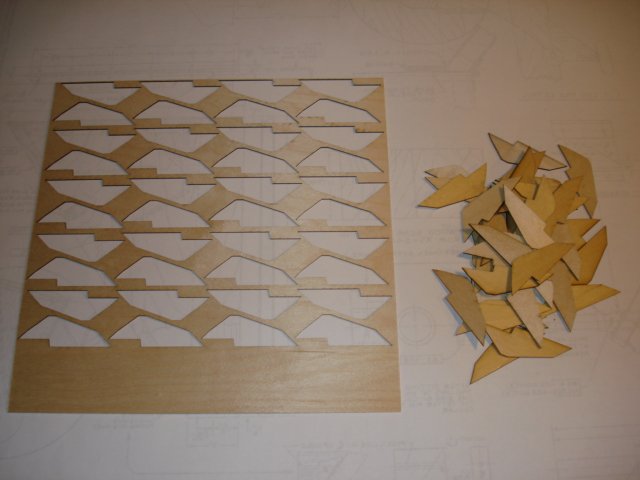
Hours tonight: 2.5 Running total: 65.5 I made enough gussets for 27 ribs, except for one particular shape. I found out I didn't have enough of the funkiest-looking piece, so I decided to laser-cut it instead of making it by hand. I have access to a laser cutter at http://www.sawdustshop.com --I'll get them cut Tuesday. Ari.
|
|
|
|
|
|
| iter |
| September 6, 2007, 8:30am |
|
Ace
Posts: 512
Time Online: 309 days 1 hours 7 minutes
|
Hours today: 4
Running total: 69.5
Built 6 ribs today, bringing the total to 18. I'm done with "plain" ribs. The 6 that I still need to build have hinges and relevant reinforcement blocks, and 4 of them have plywood skin on one side.
The laser parts are turning out well. I think I'll be laser-cutting a lot more. Oh, just thinking about all these parts I won't have to saw and sand... Nice thing about the laser is that it can also engrave without cutting--note the hinge center point on the aileron end rib.
Speaking of end ribs. There were 3 pieces labeled RS-535 in the rib kit. As far as I can tell, only 4 ribs are needed, and this type of plywood isn't used anywhere else in the ribs (some is used on the rudder, but that would be in a different kit I assume). Is this a spare piece they gave me, or did I miss parts that I need to make out of it?
Ari.
|
|
|
|
|
|
| djohn |
| September 6, 2007, 11:39am |
|
Ace
Posts: 648
Time Online: 24 days 19 hours 31 minutes
|
That laser really does a good job. What software did you use to lay the parts out in?
Dennis |
|
|
|
|
|
| iter |
| September 6, 2007, 4:09pm |
|
Ace
Posts: 512
Time Online: 309 days 1 hours 7 minutes
|
I used QCad (www.ribbonsoft.com)--this is the only CAD program I know of that runs on Linux. I used to write SVG by hand for laser jobs I outsourced in the past (until I found SawDustShop) and it worked well where the contractors could read it properly. I think I'll go back to writing SVG.
Ari. |
|
|
|
|
|
| iter |
| September 6, 2007, 8:41pm |
|
Ace
Posts: 512
Time Online: 309 days 1 hours 7 minutes
|
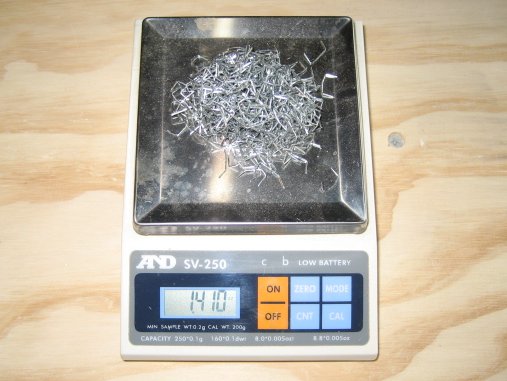
Hours today: 1
Running total: 70.5
Pulled staples out of the 6 ribs I made yesterday. 1.4 oz worth of staples were removed. Some got lost in the process, so I estimate a total penalty of 6 oz for the whole wing if you leave the staples in.
Ari.
|
|
|
|
|
|
| iter |
| September 6, 2007, 8:44pm |
|
Ace
Posts: 512
Time Online: 309 days 1 hours 7 minutes
|
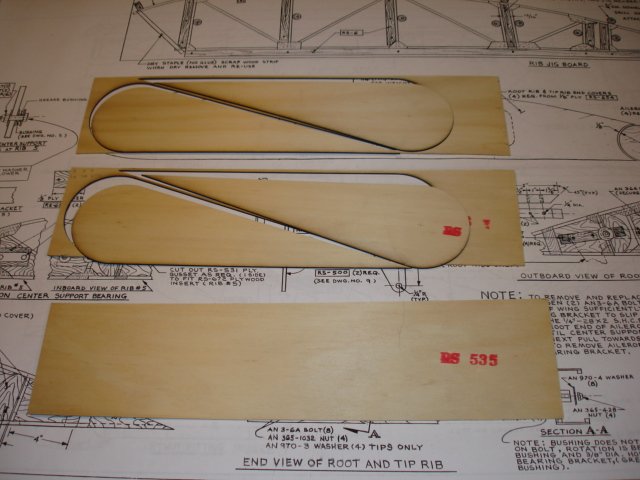
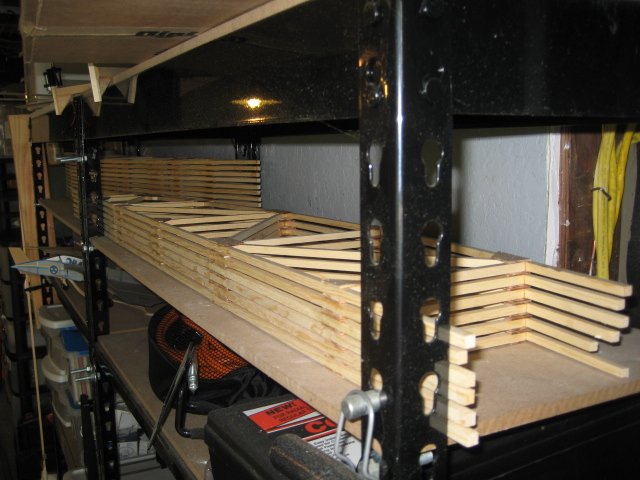
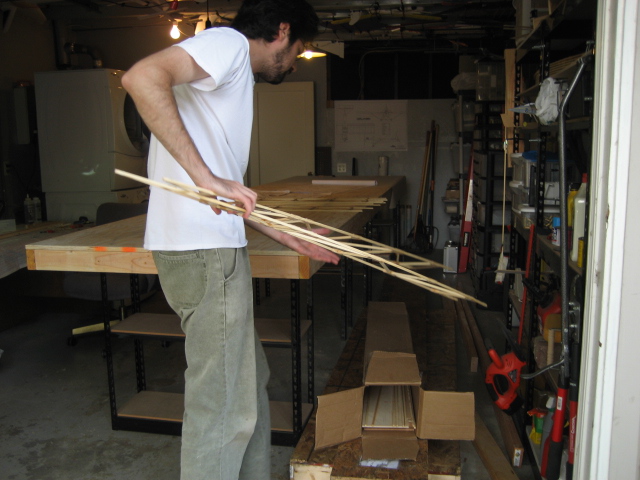
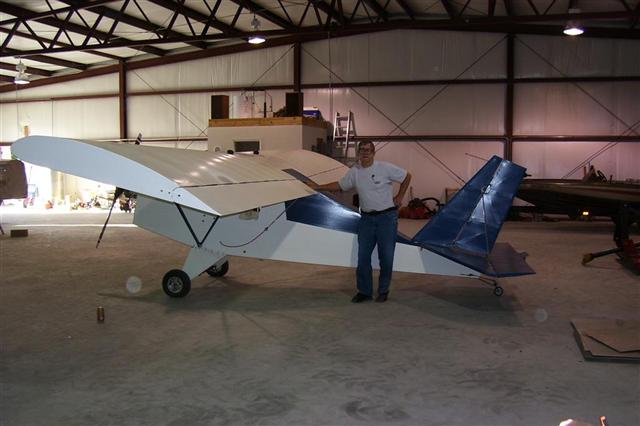
My progress so far--18 ribs.
Ari.
|
|
|
|
|
|
| Gene |
| September 6, 2007, 10:54pm |
|
Ace
Posts: 283
Time Online: 9 days 1 hours 4 minutes
|
A box of 5,000 of the Duo-Fast staples I use wouldn't weigh 6 ounces and you don't have to pull them....! Your wing ribs look great....!
Gene |
|
|
|
|
|
| iter |
| September 7, 2007, 1:58am |
|
Ace
Posts: 512
Time Online: 309 days 1 hours 7 minutes
|
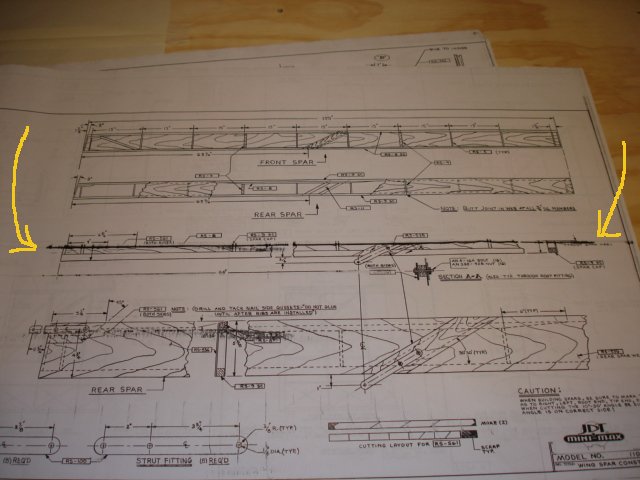
A drawing incorrectly printed?
It appears that part of drawing 14 in my set of plans hasn't printed correctly. It looks like a band is missing in the middle of the page (front spar, above "SECTION A-A" at the yellow arrows. Can anyone look at his drawing and tell me if it's different than mine?
Ari.
|
|
|
|
|
|
| djohn |
| September 7, 2007, 2:16am |
|
Ace
Posts: 648
Time Online: 24 days 19 hours 31 minutes
|
Hi Ari, You are correct. My plans are both Team, on the 1400Z it's drawing 16, on the 1600R it's drawing 17. Your copy was obviously a misprint. Mine show a elevation view just like the rear spar below but some of the dimensions and gussets are very different. I don't know what the difference between the 1100R and my two models are, I can take a picture tomorrow evening. My camera is at work.
Let me know
Dennis |
|
|
|
|
|
| Airbike1 Ron Franck |
| September 7, 2007, 4:57am |
|
 Flying an Airbike, building a house. Flight Leader  Posts: 107
Time Online: 2 days 13 hours 2 minutes
|
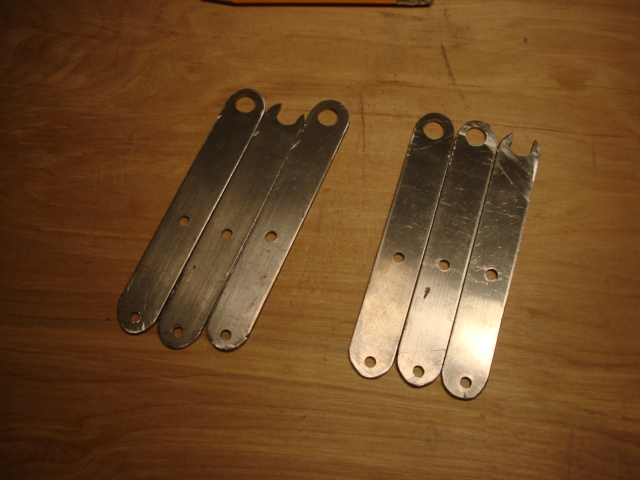
Man, I wish there was a woodshop like your's in my area. Nice parts. The metal working needs to be more precise. I don't know if its your layout or if you're not using the right fixturing to hold the parts from moving, but try to make them look as good as the wood stuff. I think you'll be happier once you do. Sorry, not picking on you, but the way they are made prevents them from being interchangable if one gets flipped over, etc. |
|
|
|
|
|
| iter |
| September 7, 2007, 5:43am |
|
Ace
Posts: 512
Time Online: 309 days 1 hours 7 minutes
|
Ron, thanks for the feedback. I love that shop, just found it, was looking for a place like that all my life! If only they did metalwork as well...
About the hinges--I agree that they could be better, and my sense of aesthetics hurts. But why would I want to flip them around? If I wanted to redo them, can I use steel bar from the hardware store, or do I need some sort of special material? (BTW, I think the reason they came out like that was that I had my drill press on too low RPM and the bit wandered).
Dennis, thanks for the heads up. I emailed John @ JDT, I assume he can mail me another copy of that drawing. I just wanted to make sure I'm not missing something, that the drawing is actually misprinted.
Ari. |
|
|
|
|
|
| Mike Howe |
| September 7, 2007, 11:30am |
|
 MiniMax, Hawk, GA (Tipacer), another Max to finish AcePosts: 375
Time Online: 7 days 7 hours 30 minutes
|
I have a customer here in Grand Rapids, MI that does both wood and metal on the laser cutter! Mark Maker Inc. 616-538-6980. Steve Stout is the VP Production. It's a nice small shop that makes patterns for steel ruled dies and such. They have a couple lasers. One does flat work only, the other does both flat work on the table and round drum work on a special station. http://www.mark-makerco.com/Mike Howe |
|
Mike Howe
howetyr@yahoo.com
|
|
|
|
|
|
| Pilotpeat |
| September 7, 2007, 7:38pm |
|
 Ace AcePosts: 498
Time Online: 13 days 4 hours 21 minutes
|
Don't know on the minimax but the material called out on my drawings for my airbike say 4130 for the aileron brackets. 4130 is a lot stronger and stiffer than anything you could get at the hardware store. You might be able to find it at a metal supply, or I am sure that A/C spruce would stock it.
I havn't quite got as far as you on making those brackets but I am planning on stack drilling them so they all come out the same.
Pete |
|
|
|
|
|
| djohn |
| September 7, 2007, 8:14pm |
|
Ace
Posts: 648
Time Online: 24 days 19 hours 31 minutes
|
Pete, Stack drilling may not help and may actually hurt. The key is to: 1. have a sharp drill bit that is either a factory grind or the grind is absolutely centered, and make sure the chuck spins it true. you can tap most chucks into running true with little effort 2. center punch the hole location and center drill if you choose, but if you center drill don't use a drill diameter larger than the final drill bit center web thickness, or "fixture" for the holes (clamp a piece of stock on the drill press table with a stop at the end you can change for the different hole locations 3. turn the drill the correct speed (for a 3/8 drill use 800 rpm, it gets you 78 SFM (surface feet per minute)) 700-900 is a good range to hit around 80 SFM (which is appropriate for 4130 at rockwell C hardness from 18-26) much faster you will burn things and may work harden the mtl, any slower you will have a chatter problem and may walk off location. Also try to use some kind of sulfur based cutting oil to make the bit live. This may sound like I'm picking nits, but if you follow the above directions you will happily cut many holes on location with a normal drill bit. Hope your weekend goes well, for me I'm covering and painting my ailerons Dennis |
|
|
|
|
|
| iter |
| September 7, 2007, 10:03pm |
|
Ace
Posts: 512
Time Online: 309 days 1 hours 7 minutes
|
I have a customer here in Grand Rapids, MI that does both wood and metal on the laser cutter! http://www.mark-makerco.com/
Interesting website! Maybe I'll outsource some of the metal work. The cool thing about Sawdust is that they let you use their machines. You don't outsource the work, you do it yourself, and that's so much more fun. Their laser won't cut metal though, I'm quite sure of that. I just started using them, so I don't know what their policies are for cutting metal on their CNC router. Ari. |
|
|
|
|
|
| iter |
| September 7, 2007, 10:06pm |
|
Ace
Posts: 512
Time Online: 309 days 1 hours 7 minutes
|
Don't know on the minimax but the material called out on my drawings for my airbike say 4130 for the aileron brackets. 4130 is a lot stronger and stiffer than anything you could get at the hardware store. You might be able to find it at a metal supply, or I am sure that A/C spruce would stock it.
I haven't quite got as far as you on making those brackets but I am planning on stack drilling them so they all come out the same.
I actually drilled them as a stack. Well, drilled one hole in each and then put a bolt through that one and drilled the rest as a stack. Didn't help me any :=) Ari. |
|
|
|
|
|
| iter |
| September 7, 2007, 10:16pm |
|
Ace
Posts: 512
Time Online: 309 days 1 hours 7 minutes
|
I haven't done any metal work since high school and it shows.
1. have a sharp drill bit that is either a factory grind or the grind is absolutely centered, and make sure the chuck spins it true. you can tap most chucks into running true with little effort
How do you check that the chuck spins true?
if you center drill don't use a drill diameter larger than the final drill bit center web thickness, or "fixture" for the holes
I don't follow. What is the "web" in this context?
3. turn the drill the correct speed (for a 3/8 drill use 800 rpm, it gets you 78 SFM (surface feet per minute)) 700-900 is a good range to hit around 80 SFM (which is appropriate for 4130 at rockwell C hardness from 18-26) much faster you will burn things and may work harden the mtl, any slower you will have a chatter problem and may walk off location.
I had it set up for 660rpm and it walked off like you said.
Also try to use some kind of sulfur based cutting oil to make the bit live.
Anything in particular you can recommend? Again, my metalworking foo is really rusty (pun intended). Good luck with your ailerons! Ari. |
|
|
|
|
|
| djohn |
| September 8, 2007, 1:30am |
|
Ace
Posts: 648
Time Online: 24 days 19 hours 31 minutes
|
Quoted Text
How do you check that the chuck spins true?
I generally use a dial indicator, if you don't have one handy move something stationary very close to the tip of the drill that is mounted in the chuck and rotate the chuck slowly by hand. If the tip of the drill wobbles, bend the drill by hand-gently. They usually have some give or tap the end of the chuck body with a soft faced hammer (brass aluminum lead or something that will not dent the body) until the drill doesn't wobble.
Quoted Text
I don't follow. What is the "web" in this context?
The web I refer to is the center of the drill that is not ground to form the flutes. If you drill a pilot hole slightly smaller than the web, as soon as you break the surface the hole will guide the drill. Ideally, the hole should be "the size of the web". If the hole is larger than the web it has some room to move before it hits the resistance of the side of the pilot hole so it just figures, if you have to err-err to the small side. Make sure you form a good cone shaped dent with the center punch. It isn't just a mark, It should mechanically guide the pilot drill. If you center punch off center the hole will be off center. A good center punch dent and the right sized pilot will accomodate for a lot of drill bit wobble, of course the pilot should also run true.
Quoted Text
I had it set up for 660rpm and it walked off like you ...
That figures out to about 65 SFM which isn't all that far below the window, use pretty good positive pressure on the handle while pulling it through the material and it should help. I hope this helps, Dennis |
|
|
|
|
|
| iter |
| September 9, 2007, 7:36pm |
|
Ace
Posts: 512
Time Online: 309 days 1 hours 7 minutes
|
Hours today: 1.5
Running total: 72
Drew wing and aileron nose ribs.
Dennis, thanks for the explanation, I get it now.
Ari.
|
|
|
|
|
|
| Charlie Harris |
| September 9, 2007, 7:57pm |
|
 Ace AcePosts: 922
Time Online: 23 days 31 minutes
|
ARI; One thing about it if You know how to cut them this way, they are all the same, and You sure don,t have much waste. Charlie |
|
|
|
|
|
| iter |
| September 10, 2007, 6:24am |
|
Ace
Posts: 512
Time Online: 309 days 1 hours 7 minutes
|
Hours tonight: 4
Running total: 76
So I spent most of today doing CAD. I figure I'd have spent much more time trying to cut all these parts out by hand. I expect it will take a couple of hours to cut all of this on TUesday when I go to the shop.
The funny thing is, this is the second time I re-drafted the rib (first time was on paper when I was making the jig because my copy of the rib drawing was all skewed). This time around, I found myself thinking how much better the CAD drawing was, and how I should really laser-cut a jig and ll the ribs will /really/ be the same and would actually match the 1/4" end rib covers... OK, never mind, I'll just go back to finishing my ribs :=)
Charlie, thank you for your kind words. I hope this actually works out and I haven't made some stupid mistake in the DXF... That would be a good way to produce much waste very quickly :=)
Ari.
|
|
|
|
|
|
| Stilson |
| September 10, 2007, 8:47am |
|
Flight Leader Posts: 136
Time Online: 1 days 5 hours 36 minutes
|
Ari, I have been following your build with great interest. Sort of a real-life 'builder's manual' for me I have just received my Eros rib & tail kits, and this laser cutting seems like just the solution for me. I have found a shop locally that will cut for me. Just a question, does the edge burn on the cut parts need to be sanded, or is it quite deep? Does it affect the glue or should I stop worriyng now and get started? Many thanks for sharing your experience. Colin. |
|
 Logged Logged |
|
|
|
|
| iter |
| September 10, 2007, 3:48pm |
|
Ace
Posts: 512
Time Online: 309 days 1 hours 7 minutes
|
Colin, I'm glad you find my posts useful. I've built a number of laser-cut R/C models and never had problems gluing to a cut line. With my MiniMAX, all glue joints have been on unburnt sides so far--the first time I'll put glue on a cut line will be when I glue nose ribs in. However I don't anticipate trouble there. I'm not sure what you mean by a deep burn. One thing to keep in mind is that in JDT kits a lot of the plywood comes cut into thin strips, e.g. you are supposed to cut rib gussets from a 7/8"x48" strip. These will be difficult to cut on a laser. When you order your next kits, if you decide to go the laser route, you may want to ask JDT to not cut these pieces into strips.
I'm looking forward to reading about your experience with your kit!
Ari. |
|
|
|
|
|
| Stilson |
| September 10, 2007, 4:23pm |
|
Flight Leader Posts: 136
Time Online: 1 days 5 hours 36 minutes
|
Ari, Thanks for your advice. You are correct, I have not unpacked the kit yet so the plywood may be in small strips. I will try check that tonight, I've been too busy studying the plans By deep burn I meant what would happen if you lightly sanded the edges? Or would you have to take off a lot of material before it's clean? I will most definitely start a new thread for my build once it gets going. First have to sort the garage, build a table, finish desks in my home office for junk in garage etc etc. But in the meantime that's the beauty of homebuilding, I can work on the ribs in front of the TV, while wearing my pyjamas  Regards, Colin. |
|
| Logged |
|
|
|
|
|