Iter: just be sure and extend the center line on the table all the way to the tail end and keep each side the same from the center. as far as vertical just look back at the posts on Jan. 17th for a way to do that. Charlie
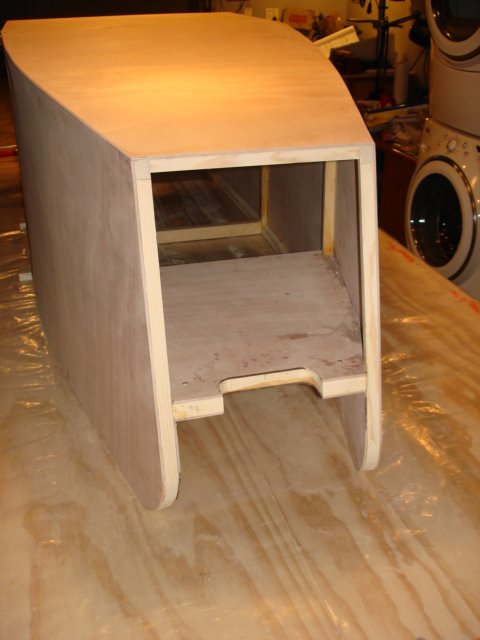
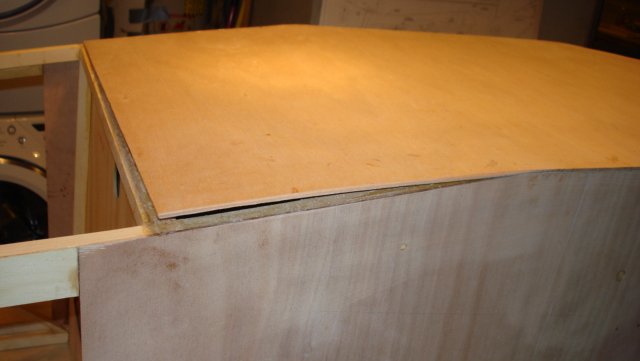
Cut & sanded bottom plywood to shape, repaired about 10" seam breakage, installed straightedges to control rear fuselage curvature, made CAD drawings for RS-0 blocks that hold rear fuselage together as well as related plywood pieces. And I the plane finally has a straight, square nose.
Thanks for your advice Randy and Charlie. Compared to front end, the rear was almost too easy. And with all these long clamps I have now, I didn't even need much help from Irene (not in the shop anyway.)
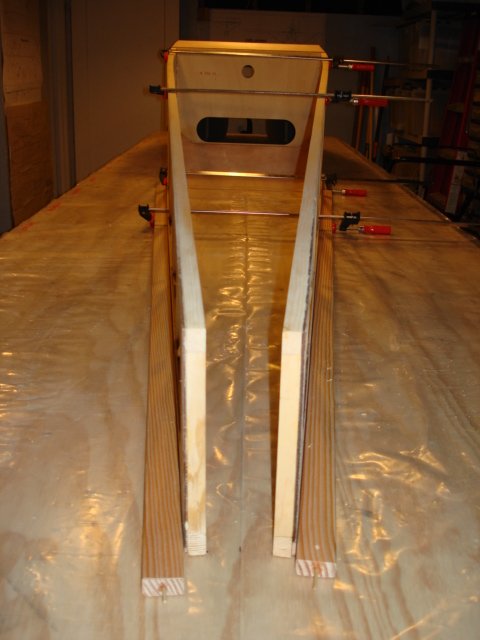
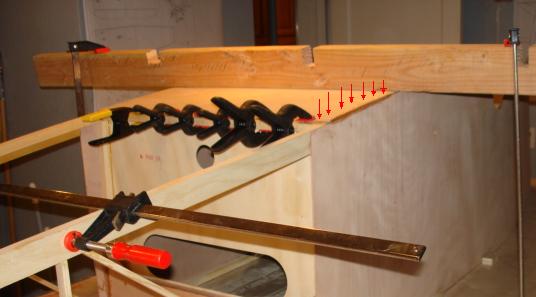
Ari, looks good! If you look at your second picture, you can sort of see what I was talking about. Be real carefull with the top clamps because the wood will not bend evenly and you may get a lopsided edge like I did. In other words the bottom (top) is held straight to the bench but the top (bottom) may not be exactly parallel. Look real close at your photo on the right top longeron and you can see a slight wave right where the clamp is ( actually this looks really good just want to make a point for others going through this part of the build). It may just be the photo but on mine I missed it and had to re do the cross braces.
Randy: I see what you mean. Thank you for bringing this to my attention, I'm glad I posted this picture before I put any glue in the joints. I'll take care of this before I do.
Rob: I agree wholeheartedly that you can't have too many clamps. Can I borrow some of yours?
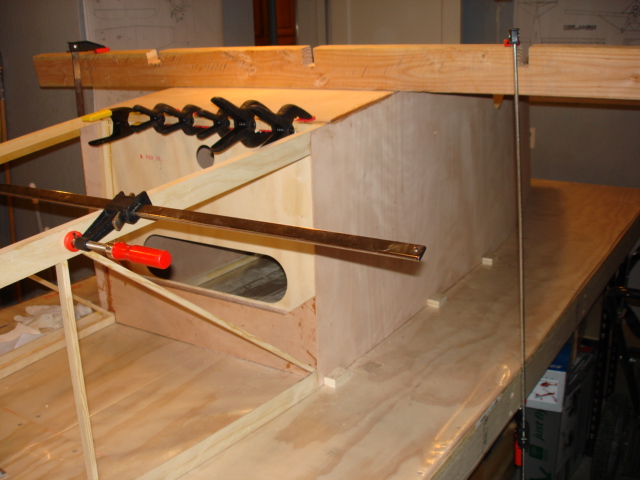
I started cutting blocks that hold the tail together and as I was adjusting the rear fuselage sides, I had the bottom ply separate over a significant area. I repaired the damage using Randy's technique for holding down the ply.
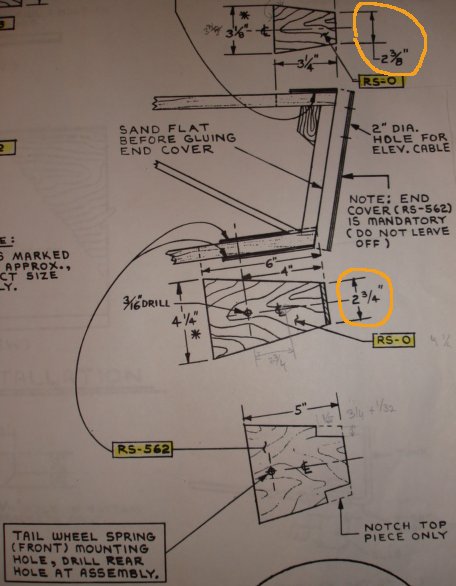
Also, I am perplexed at why the RS-0 blocks are different widths top and bottom. Is there a reason the rear should not be rectangular? The way I read the plans, bottom is 3/8" wider than top.
The reason for the difference in these two dimensions you remarked about is because the top longerons are coming closer to each other the further back you go and notice that the top is back further, therefore the longerons are closer. OK....?
I thought about that, but the top longeron is only 1.5" longer than the bottom but the top is a whole 3/8" wider. It makes no sense to me and actually makes the sides not square to the table if I put in the blocks as they appear on the plans.
I’m looking at your bottom ply and I have to say there is something seriously wrong with your gluing technique, if such a huge area just popped out by itself just sitting there how can you trust the rest of the glue joint, how much better you think is the rest of it holding and how long it will stay on, maybe only until you turn it right side up or until you start the engine ? Think about it. Incredible enough , no one else said a word about it.
Ari, I think George is right here. That much surface area shouldn't have poped free like that. Two thoughts, are you getting glue squeeze out everywhere and are the joints being held closed tight for at least 12 hrs (24 is better) before removing clamps? Secondly, any chance your T-88 has gone south? I don't know if there is an expiration date for it or if it could go bad over temperiture extremes. The ply is springy but with that big a glue surface even 1/2 that area bonded down shouldn't pop.
I sure am glad somebody has spoken about the glue on this project. I surely agree something is wrong with these joints. If when these joints pop and they are sticky between the parts, it has not cured. Also if you cannot pour the glue from the mixing container its not warm enough or it has strated to cure, and you need to mix a new batch. charlie
Look guys, I appreciate your input, and I welcome your critique, which is why I post problems I encounter in my build, not just successes. I also appreciate your concern for my safety, decision-making ability and sanity. I'm taking until tomorrow to respond to these messages. I'm used to George's communication style, but I came to expect better from the rest of this forum.
Ari, I don't think anyone is meaning to present any kind of attitude here, just a genuine concern for another member and a chance for all of us to learn. If something seems amiss, and is caught here it could save a life. I've had my work questioned and it has usualy been to my benifit. Randy
Ari, you joined this group around the same time I did and I have been very impressed with your work and work habits. I think you have been a great inspriation to a lot of people, me for sure. I look forward to your post each day and even though my project was partially built when I got it, I will be looking back at your stuff, as well as others,for advice and clairification. And like I said, these 61 yr. old eyes don't see as well as they used to, even with cheaters. Bob
Generally I only post here when it’s a matter safety or when answering the specific questions asked. I have said to people they did things wrong and I mean seriously dangerous in the past and sometimes people would get totally mad at me and wrote personal attack back to me without a single word addressing the substance of what I said. I could get really discouraged and say nothing anymore and stop trying to help anyone but I don’t, I don‘t take it personally either. Next time I see something dangerous and no one points it out I will speak up again. My objective is state the facts not to be gullible, I think we are all Men here talking about how to built our planes and not a bunch of ladies discussing their feelings like on Oprah show. Instead of bending out of shape about how somebody said something focus on what it is you did to end up with such poor glue joint, think if all the other things you glued are any better, how to test it how to fix them if they are as bad and how to do it right next time.
Group - concerning temperatures of the T-88 - I have successfully worked with this adhesive at air temperatures of 16-18 degrees C (about 61-65 F). My experience is that temperatures in that range produce acceptable bonds. My shop temperatures drop to about 14 degrees C during the night. I do pre-heat my adhesive to slightly higher temperatures to facilitate pouring and mixing, but the material temperatures where the bond takes place are surely at the room temperatures previously mentioned. I do wait at least 24 hours (usually 48 for springy assemblies) before unclamping to ensure that the cure has sufficient strenght to proceed.
Temperature might be an issue with the failed bonds, but perhaps longer curing times, and adequate glue amounts are more important. Mixture ratios are also a consideration, but the adhesive is apparently quite tolerant of minor deviations. Most of us take only reasonable precautions when determining mixing ratios, and there are many successful projects built with this adhesive.
As far as "pot life" goes, I find that if it spreads with a stick, and is thin enough to flow out some, then it will bond.
Looks like not enough curing time to me. Cool temps or inexact mixing will greatly increase full cure time. The good news is that epoxy will eventually fully cure though it may take as much as two weeks. If you're at all worried you can always wrap the outside seam with fiberglass tape in epoxy.
I had the same thought as Bob regarding the thickness of the bottom plywood. It looks like it's closer to 1/4" than 1/8". When gluing on mine, I don't recall having any problems - just used good amt. of epoxy and staples to hold it in place till the glue set. Pulled the staples and that was that. If that ply IS 1/4", that would explain SOME of the problems holding it down.
Ari: on those rear end pieces of RS-o just hold the rear vertical and parallel and sand to fit. its not critical. You just need about 2-3/8 inside at the back. Charlie
Thanks, Charlie for clarifying the size of the RS0 pieces at the tail. I, too was scratching my head wondering how this area was to be built. My plans show dimensions for the blocks as do Ari's, but there is also a note on the plans stating that the width dimensions are "approximate". My plans do not say whether the tail area (viewed from the rear) is supposed to be square.
The plans are quite good as far as they go, but the experience available from this group saves sooooo much trouble.
Ari, I don´t know if this will help, but: When I glue plywood using clamps I also use staples for the adyacent sides. I have noticed that many areas where clamps are not located don't have enough pressure to push the glue into the wood. On below picture where arrows are shown I would have placed several staples, but maybe you did . At very low room temperature glue will be very thick and will not penetrate into wood.
What a difference a day makes :=) I take this short break and there's all this engaged discussion happening in my thread! Now I know how to generate traffic :=)
I want to thank you all for your input and insight, especially George, Randy and Dave. It is not always easy to accept advice when you know you've made a mistake. I am learning to do that. I should explain that what ticked me off was mainly that some possible causes people posted where problems I'd anticipated and in fact photographed and posted some of the precautions I took. I wetted both sides with epoxy, I let it cure for 72 hours, etc., it's on the previous page of this thread. Also anyone who bothered to scroll up, even on this page, would see that the plywood is 1/8" mahogany, still stamped with its RS number from the kit.
Now the difficult part: I had a number of glue joint failures lately, and alarmingly, most have been in the glue line, not the wood. In particular, cross-members in the cockpit area kept popping out until I bought long clamps. George is right when he says that where one joint failed, others may, too. To clarify his question, the plywood didn't just pop on its own, the seam opened after I pulled the tail together which introduced a new stress. I had also turned the fuselage over to check how the plywood stuck to cross-members, so George is right again in that turning the fuse over precipitated the failure.
Now the good news: the problem seems to be in my glue, as Randy and Dave suggested. There is no expiration date on T-88 as such, but someone offline speculated that the hardener may have become contaminated with a small amount of resin which made it ineffective. I opened a fresh set of T-88 and mixed a batch. The components were much closer to liquid and easier to pour out of their bottles, the batch set faster, and the joints were strong. I will have to go back and check other joints I made recently to see if any need redoing. I may remove the bottom ply, clean it of old glue and reattach it again--but only after I'm done with top cross-members, cockpit reinforcement etc.--I want to make sure bottom cross-members don't start popping out again :=)
Ari: on those rear end pieces of RS-o just hold the rear vertical and parallel and sand to fit. its not critical. You just need about 2-3/8 inside at the back. Charlie
Thanks. I followed this advice and where's what I ended up with:
Code
Top block: 2 3/8"   narrow end, 3 1/16" wide end
Bottom:    2 11/16" narrow end, 4 1/16" wide end
With these numbers, the sides are almost parallel, though there is still some taper toward the bottom. Please forgive the parallax in the photo.
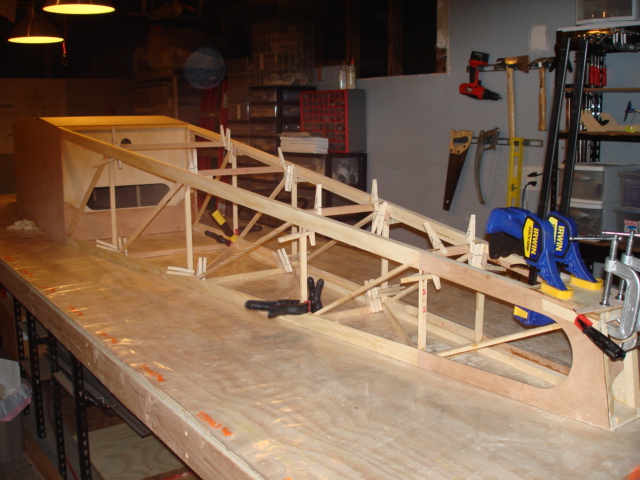
Glued the tail ends of the fuselage together, glued in most of the diagonals, laser-cut and glued in triangular gussets on cross-members, laser cut end-plate.
Cloth pins are holding the gussets. I glued in the sticks yesterday with the new epoxy, and it cured very well (I'm keeping a sample though)
Curiously, I ran out of RS-6. I called JDT, and apparently there was an error made in the packing list, and John told me the missing 4 sticks are on their way. Thanks John! He was as surprised as I was at the number of kits that have shipped with this error without any of the builders complaining. Note that I received everything the packing list specified, nothing was missing in that sense. The packing list was in error.
I will glue in the missing 3 bottom and 1 top diagonals when the wood arrives.
Ari: Looking good! Another thing to watch for in T-88 is the glue, or clear bottle will get crystals in it when it gets old. I have been told that you can heat it and it will remix or the crystals will melt, but I aways discarded it or used it as a filler if needed. PLEASE DO NOT EVER HEAT EPOXY IN A MICROWAVE OVEN!! I DID. OPENED BOTH BOTTLES AND HEATED AT THE SAME TIME. JUST ABOUT 2O SECONDS JUST ABOUT PASSED OUT WHEN I OPENED THE DOOR. THE GLUE WENT GUMMY IN ABOUT 8HRS. I GUESS FROM THE FUMES MIXING, AND I HAD TO DISCARD 3/4 OF 1/2 PINT BOTTLES. STUPID MOVE!!! Charlie
Ari: You asked one time about building times. I just checked my logs and when I was at about the same point as you are, close as I can tell I had about 4oo hrs. But at about 3 1/2 years. I compleately scratch built and milled all the wood from boards and full plywood sheets. and I finished at about 650rs. . this included a lot of pondering how,untill I found this group. But I have never had so much fun. Charlie


 Logged