|
|
 Reto S Reto S |
| November 29, 2013, 4:11pm |
|
Ace
Posts: 320
Time Online: 13 days 19 hours 26 minutes
|
Reto that is correct, attachment point for brace stays to the plans, but you move the hinge up to dimension shown on addendum. I got this with my plans several years back. Jim
Dear Jim Thank you for your reply. Got it from Team MM by e-mail. It's not reflected in the hard copies of my plans. Question: Did you guys incorporate some or all of the UK 91 modifications? - LAA-186-001 issue 2: Seat belt attachment - LAA-186-002 issue 2: Firewall - LAA-186-003 issue 2: Turtle deck/roll-over protection - LAA-186-004 issue 2: Locking pin retention - LAA-186-005 issue 2: Flying control system improvements - LAA-186-006: Fuel system improvements - LAA-186-007: Wing forward strut reinforcements (91 version) - LAA-186-008:Undercarriage reinforcement (only required if max gross weight 590 lb) - LAA-186-009 issue 2: Shoulder harness cables Kind regards Reto |
|
|
|
|
|
| Reto S |
|
Ace
Posts: 320
Time Online: 13 days 19 hours 26 minutes
|
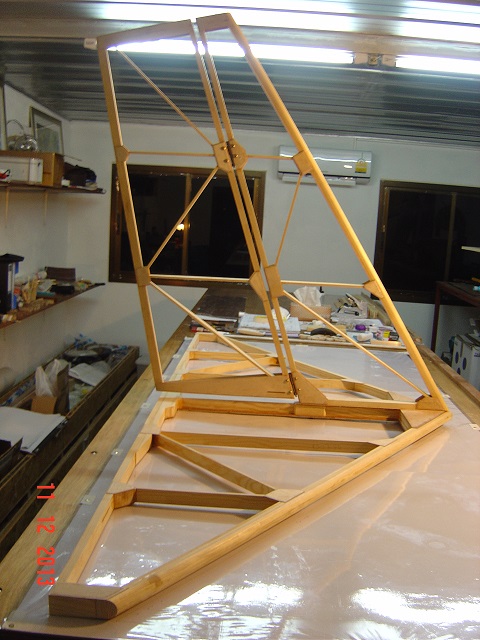
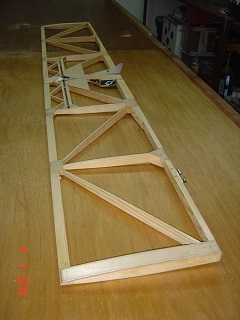
Back building, quite happy about that...
Quick question:
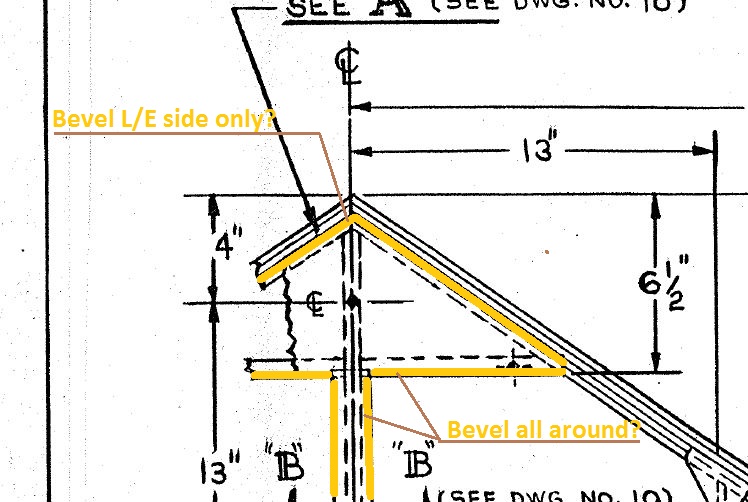
It is not very clear to me where to bevel (see picture below)...
Thank you for inputs
Reto
|
|
|
|
|
|
| Dick Rake |
|
 Home phone 602-999-3715/Mini-max with Hirth 2704 AcePosts: 755
Time Online: 40 days 13 hours 26 minutes
|
Back building, quite happy about that...
Quick question:
It is not very clear to me where to bevel (see picture below)...
Thank you for inputs
Reto
Reto, Bevel the plywood on the leading edge only. The other areas you show should be rounded off to smooth the transition from the plywood to the fabric. Dick |
|
|
|
|
|
| Reto S |
|
Ace
Posts: 320
Time Online: 13 days 19 hours 26 minutes
|
Reto,
Bevel the plywood on the leading edge only. The other areas you show should be rounded off to smooth the transition from the plywood to the fabric.
Dick
Thank you Dick, clear now..  |
|
|
|
|
|
| Reto S |
| December 11, 2013, 12:52pm |
|
Ace
Posts: 320
Time Online: 13 days 19 hours 26 minutes
|
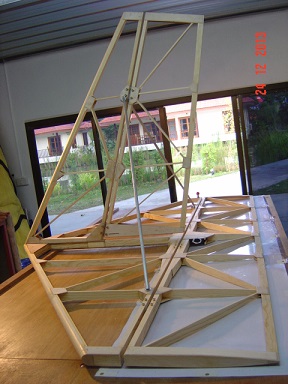
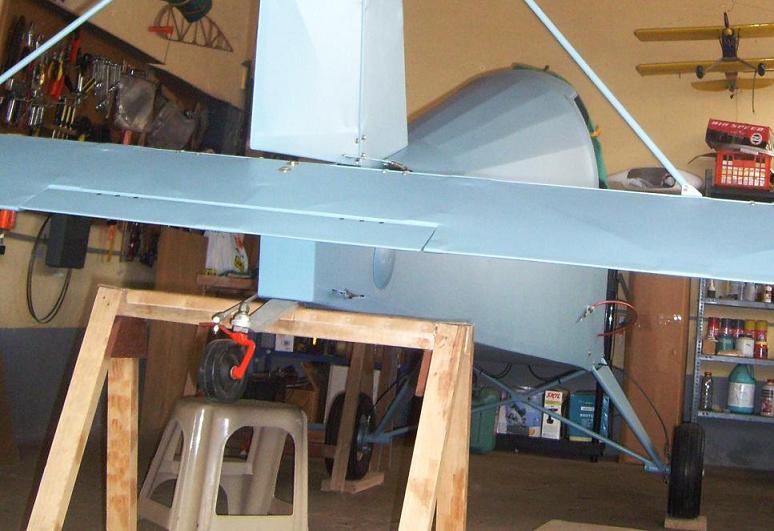
Enjoying building, making progress..
|
|
|
|
|
|
| theecoop |
| December 12, 2013, 2:46am |
|
 Flying AcePosts: 1,330
Time Online: 19 days 5 hours 17 minutes
|
Excellent Workmanship !! |
| Perfect Practice makes perfect! |
|
|
|
|
|
| AC1600R |
| December 12, 2013, 4:04am |
|
Ace
Posts: 420
Time Online: 21 days 8 hours 2 minutes
|
Looking great Reto! Thank you for keeping us posted on your work. I think I can speak for many of us in saying that we enjoy following your build, keep up the progress!
-Sean |
| Sean Winship
Middle Tennessee |
|
|
|
|
|
| Reto S |
| December 24, 2013, 4:35pm |
|
Ace
Posts: 320
Time Online: 13 days 19 hours 26 minutes
|
Merry Christmas to all of you!
Will build elevator trim system and start fuselage next week...
|
|
|
|
|
|
| Reto S |
|
Ace
Posts: 320
Time Online: 13 days 19 hours 26 minutes
|
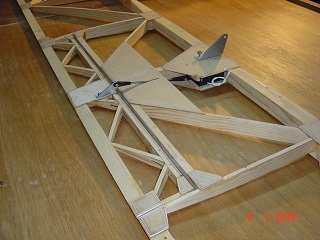
Finally, got the trim system done..
Question: Is 1 inch deflection up/down adequate?
Cleaning the workshop (what a mess) was kinda liberating.
Tomorrow start of new chapter: Fuselage
|
|
|
|
|
|
| Reto S |
|
Ace
Posts: 320
Time Online: 13 days 19 hours 26 minutes
|
Dear members
Question:
Is 1 inch trim tab deflection up/down appropriate to gain adequate trim authority?
Thank you
Reto
|
|
|
|
|
|
| pkoszegi |
|
 Ace AcePosts: 1,363
Time Online: 41 days 7 hours 42 minutes
|
Seems ok with such a big surface you have... |
|
|
|
|
|
| Harless Greear |
|
 Ace AcePosts: 884
Time Online: 35 days 14 hours 19 minutes
|
I don't think you will ever need any DOWN trim.. |
| HARLESS in Va. |
|
|
|
|
|
| Tom |
|
Ace
Posts: 744
Time Online: 16 days 10 hours 21 minutes
|
Dear Reto,
This is very beautiful looking work.
Tom |
|
|
|
|
|
| Reto S |
|
Ace
Posts: 320
Time Online: 13 days 19 hours 26 minutes
|
Dear forum members
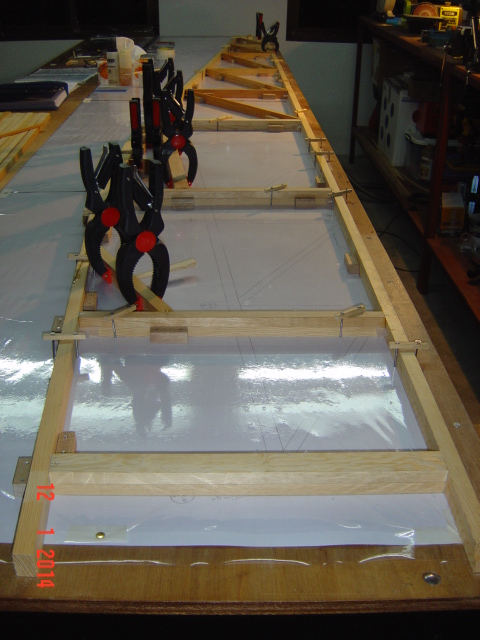
I will soon cover the two fuselage sides with Mahogany plywood and wondering if it might be better to do it:
- After the fuselage sides are glued together in the final curved shape (suggested earlier by some forum members)...
- Before bending the sides (suggested in the building manual)...
Any inputs?
Thanks
Reto
|
|
|
|
|
|
| tjspindler |
|
Ace
Posts: 411
Time Online: 14 days 1 hours 55 minutes
|
I think you need more than 1 inch down movement on your trim. The elevator isn't balance so you will need a good amount of down just to hold the elevator up just for level flight. I made my per the flight manual and started with 10° per the manual and I had to bend it to 20° to just take the stick pressure off and I have the light tail. Now if you plan on using a spring or bundge cord to hold your elevator up then you can get buy with less trim. Just my 3 cents.
Tom |
|
|
|
|
|
| maxpayne |
|
Flight Leader  Posts: 155
Time Online: 15 days 1 hours
|
Not sure but did we not learn that you could put more washers under the tail in the rear,to trim it out for level flight?  |
|
|
|
|
|
| Reto S |
|
Ace
Posts: 320
Time Online: 13 days 19 hours 26 minutes
|
I don't think you will ever need any DOWN trim..
Hi Harless May I ask, is the above statement based on your own flying experience? I was hoping to have a setting with neutral trim in cruise, T/O down trim and approach up trim, like most other airplanes... Springs attached to the stick base could be used to help to define a neutral position and generate some generic feel (resistance)... Is that how the MM can be flown? Thank you and regards Reto |
|
|
|
|
|
| Reto S |
|
Ace
Posts: 320
Time Online: 13 days 19 hours 26 minutes
|
Seems ok with such a big surface you have...
Hi pkoszegi Thank you for your comment. I am very curious to see how the MM behaves... Regards Reto |
|
|
|
|
|
| Reto S |
|
Ace
Posts: 320
Time Online: 13 days 19 hours 26 minutes
|
Dear Reto,
This is very beautiful looking work.
Tom
Hi Tom Thank you, not much to see yet... Regards Reto |
|
|
|
|
|
| Reto S |
|
Ace
Posts: 320
Time Online: 13 days 19 hours 26 minutes
|
I think you need more than 1 inch down movement on your trim. The elevator isn't balance so you will need a good amount of down just to hold the elevator up just for level flight. I made my per the flight manual and started with 10° per the manual and I had to bend it to 20° to just take the stick pressure off and I have the light tail. Now if you plan on using a spring or bundge cord to hold your elevator up then you can get buy with less trim. Just my 3 cents.
Tom
Hi Tom Interesting point you make. If W&B is done correct and the horizontal stabilizer is set up per design, it's hard to believe that such amount of trim will be required. That would imply that something is wrong with the design... By changing the trim horn I obviously can change the deflection up to about 2 inch. Never seen any aircraft flying around like this though... I am planning to use springs on the stick. Tnx & regards Reto |
|
|
|
|
|
| Reto S |
|
Ace
Posts: 320
Time Online: 13 days 19 hours 26 minutes
|
Not sure but did we not learn that you could put more washers under the tail in the rear,to trim it out for level flight?
Hi maxpayne That would make sense to me.. Might be difficult to fabricate a wedge type strip of material to support the tail section equally on the fuselage tail area. Wouldn't just washers create damage/stress? Does every MM model need such a procedure? Tnx & regards Reto |
|
|
|
|
|
| Reto S |
|
Ace
Posts: 320
Time Online: 13 days 19 hours 26 minutes
|
Dear forum members
I will soon cover the two fuselage sides with Mahogany plywood and wondering if it might be better to do it:
- After the fuselage sides are glued together in the final curved shape (suggested earlier by some forum members)...
- Before bending the sides (suggested in the building manual)...
Any inputs?
Thanks
Reto
Glueing the plywood with side sections flat on working bench (per manual)... Just read the "drama" of Ari's fuselage (described quite a while ago)... http://www.lonesomebuzzards.com/cgi-bin/forum/Blah.pl?m-1185574047/s-210/Anybody? Tnx Reto |
|
|
|
|
|
| lake_harley |
|
Ace
Posts: 1,090
Time Online: 25 days 1 hours 54 minutes
|
I glued the ply onto the side structures while flat on the workbench. I was familiar with the drama you mentioned, used a little extra care, and it would appear all went well with bending the nose in, as well as bending and gluing the bottom ply. On the bottom ply, which caused me more concern, I used a LOT of staples and weighted it all down with about 60 or 80# of World Book Encyclopedias Lynn |
|
|
|
|
|
| Ricardo |
|
 Videos in UTube: ral1951 AcePosts: 2,772
Time Online: 75 days 23 hours 15 minutes
|
I built a similar trim as yours, is operated by a Ray Allen electric control that has a position light on the instrument pannel.
The trim is very useful if you like to fly at different speeds. The W&B in my plane came perfect with the battery up front.
If you can operate it manually will be less complicated (many wires have to go all the way to the tail).
The deflection angle on the trim is always very little but the effect is also very noticeable.
You're doing a great job!
|
|
|
|
|
|
| Harless Greear |
|
Ace
Posts: 884
Time Online: 35 days 14 hours 19 minutes
|
Reto,
Ive never used any down trim.. Even when my CG was near the aft limit.. I use up trim for take off and climb out and then back to almost neutral for cruise.. To decend i just pull the power back for the proper FPM. Then I trim up for final approach speed and control decent with the throttle..
keep in mind that each Max is a little different and you will have to usse the trial and error method to know for sure what you need..
The spring works well too, I used to have one but I wanted a tab on the elevator so I might have a better chance to land if my elevator cable should ever fail.. (murphy's law) |
| HARLESS in Va. |
|
|
|
|
|
| Reto S |
|
Ace
Posts: 320
Time Online: 13 days 19 hours 26 minutes
|
I glued the ply onto the side structures while flat on the workbench. I was familiar with the drama you mentioned, used a little extra care, and it would appear all went well with bending the nose in, as well as bending and gluing the bottom ply. On the bottom ply, which caused me more concern, I used a LOT of staples and weighted it all down with about 60 or 80# of World Book Encyclopedias Lynn
Hi Lynn Thank you, will proceed similarly except the Encyclopaedia part... Reto |
|
|
|
|
|
| Reto S |
|
Ace
Posts: 320
Time Online: 13 days 19 hours 26 minutes
|
I built a similar trim as yours, is operated by a Ray Allen electric control that has a position light on the instrument pannel.
The trim is very useful if you like to fly at different speeds. The W&B in my plane came perfect with the battery up front.
If you can operate it manually will be less complicated (many wires have to go all the way to the tail).
The deflection angle on the trim is always very little but the effect is also very noticeable.
You're doing a great job!
Hi Ricardo Thank you for the encouragement. I use the same trim system. What is your flying experience, are you using control stick springs in any form? I was hoping to have a setting with neutral trim in cruise, T/O down trim and approach up trim, like most other airplanes... Springs attached to the stick base could be used to help to define a neutral position and generate some generic feel (resistance)... Is that how your MM behaves? Thank you as always Reto |
|
|
|
|
|
| Reto S |
|
Ace
Posts: 320
Time Online: 13 days 19 hours 26 minutes
|
Reto,
Ive never used any down trim.. Even when my CG was near the aft limit.. I use up trim for take off and climb out and then back to almost neutral for cruise.. To decend i just pull the power back for the proper FPM. Then I trim up for final approach speed and control decent with the throttle..
keep in mind that each Max is a little different and you will have to usse the trial and error method to know for sure what you need..
The spring works well too, I used to have one but I wanted a tab on the elevator so I might have a better chance to land if my elevator cable should ever fail.. (murphy's law)
Hi Harless Thank you for further explaining your setting. Did you initially use only one spring to aid back pressure on the stick (and now replaced by trim tab)? Regards Reto |
|
|
|
|
|
| Harless Greear |
|
Ace
Posts: 884
Time Online: 35 days 14 hours 19 minutes
|
RETO,
Actually I didn't use a spring, I used a small Bungee cord........ |
| HARLESS in Va. |
|
|
|
|
|
| maxpayne |
|
Flight Leader Posts: 155
Time Online: 15 days 1 hours
|
The spring going from tailwheel to elev horn works good. I like how the kitfox trims the hole elev. |
|
|
|
|
|
|


 Logged