|
|
 beragoobruce beragoobruce |
|
Built an Eros - now I'm flying it! Ace Posts: 1,065
Time Online: 19 days 10 hours 41 minutes
|
Blimey - that is one very bent bit of spar cap in your photo. I'm surprised it was shipped to you.
But your completed spar looks superb, as ever. Soon be time to slide on the ribs - woo-hoo!
Bruce |
|
|
|
|
|
| Reto S |
|
Ace
Posts: 320
Time Online: 13 days 19 hours 26 minutes
|
Blimey - that is one very bent bit of spar cap in your photo. I'm surprised it was shipped to you.
But your completed spar looks superb, as ever. Soon be time to slide on the ribs - woo-hoo!
Bruce
Unfortunately half of the caps are/were like that... Already the fuselage was difficult to build, but for the spars it's much more critical... Had to replace the twisted RS23 planks with new spruce too... It takes a lot of time to adjust the angles of the adjacent wood which is joining the caps and I can't just make the caps true, because they are already undersized... Struggling quite a bit  |
|
|
|
|
|
| beragoobruce |
|
Built an Eros - now I'm flying it! AcePosts: 1,065
Time Online: 19 days 10 hours 41 minutes
|
Well your work so far looks nothing less than first class. I'm guessing there isn't a local wood equivalent to spruce in Thailand either. Just keep in my mind how much you're going to enjoy your beautiful build when it turns from sawdust and sticks into a beautiful aeroplane  Bruce |
|
|
|
|
|
| Reto S |
|
Ace
Posts: 320
Time Online: 13 days 19 hours 26 minutes
|
Just keep in my mind how much you're going to enjoy your beautiful build when it turns from sawdust and sticks into a beautiful aeroplane Bruce
Thank you Bruce for your words of encouragement... |
|
|
|
|
|
| Reto S |
|
Ace
Posts: 320
Time Online: 13 days 19 hours 26 minutes
|
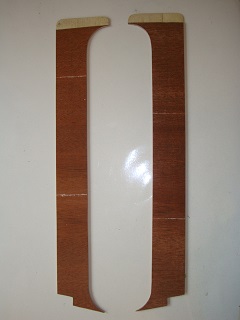
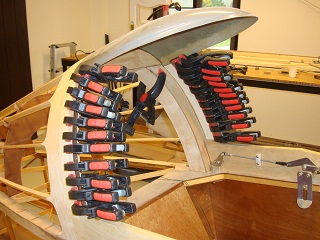
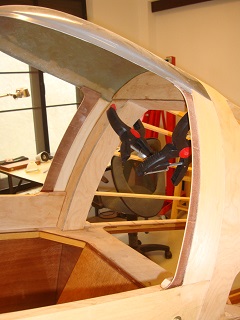
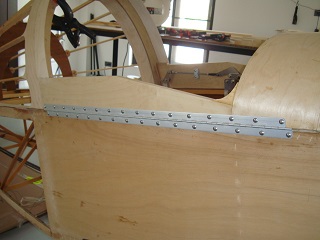
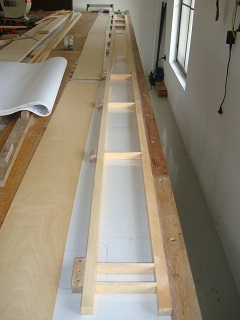
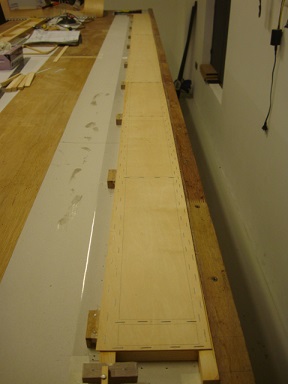
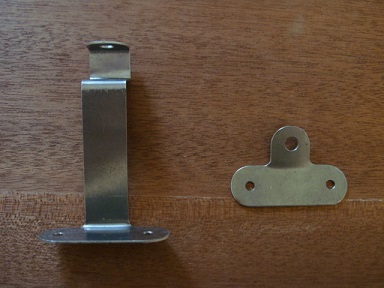
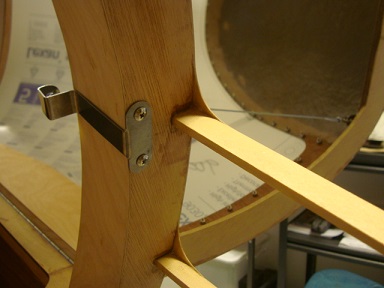
I made same kind of A-pillars out of Mahogany-ply and installed the upgraded hinge material. Finally the first rear spar is taking shape too... But then I got a nasty flu...
|
|
|
|
|
|
| aeronut |
|
 blue sky and tail winds to everyone AcePosts: 1,560
Time Online: 28 days 22 hours 31 minutes
|
That is a pretty impressive build that you have; hope your feeling better today. |
| never surrender; never give-up |
|
|
|
|
|
| beragoobruce |
|
Built an Eros - now I'm flying it! AcePosts: 1,065
Time Online: 19 days 10 hours 41 minutes
|
Yes, looking good Reto. Hope you beat the bug & get back to building soon. You're nearing the last leg now!
Bruce |
|
|
|
|
|
| Reto S |
|
Ace
Posts: 320
Time Online: 13 days 19 hours 26 minutes
|
hope your feeling better today.
Thank you for your well wishes, still AOG... Cheers Reto |
|
|
|
|
|
| Reto S |
|
Ace
Posts: 320
Time Online: 13 days 19 hours 26 minutes
|
Hope you beat the bug & get back to building soon.
Bruce
Can't believe that I'm spending most of my time the u/s and flat in the bed, instead fiddling in the workshop... |
|
|
|
|
|
| Reto S |
|
Ace
Posts: 320
Time Online: 13 days 19 hours 26 minutes
|
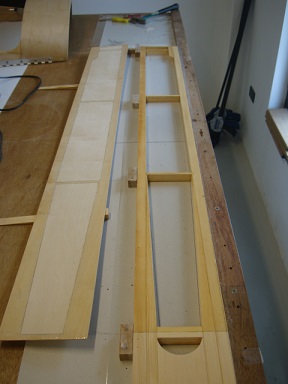
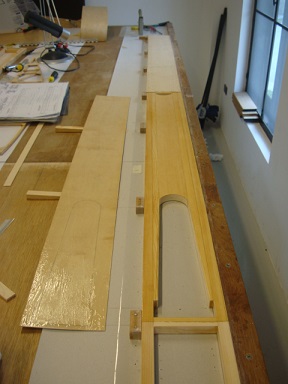
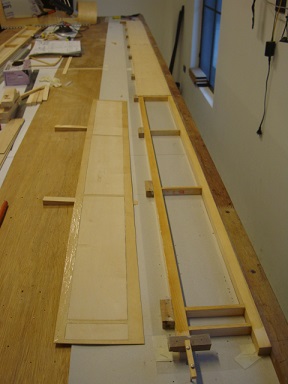
First I and then one of our lovely cats got sick. But finally I am back in the workshop. The second rear spar takes shape...
|
|
|
|
|
|
| Dick Rake |
|
 Home phone 602-999-3715/Mini-max with Hirth 2704 AcePosts: 755
Time Online: 40 days 13 hours 26 minutes
|
First I and then one of our lovely cats got sick. But finally I am back in the workshop. The second rear spar takes shape...
Reto, your workmanship looks outstanding. |
|
|
|
|
|
| beragoobruce |
|
Built an Eros - now I'm flying it! AcePosts: 1,065
Time Online: 19 days 10 hours 41 minutes
|
It is good to see you back, Reto. Great work as always. You must be close now to the exciting part - assembling all those bits into a wing!
Bruce
|
|
|
|
|
|
| Reto S |
|
Ace
Posts: 320
Time Online: 13 days 19 hours 26 minutes
|
Reto, your workmanship looks outstanding.
Thank you Dick, but just on the small size pictures though... Cheers Reto |
|
|
|
|
|
| Reto S |
|
Ace
Posts: 320
Time Online: 13 days 19 hours 26 minutes
|
It is good to see you back, Reto. Great work as always. You must be close now to the exciting part - assembling all those bits into a wing!
Bruce
Bruce, I'm fabricating a new style of a brake system. Pics will follow. After that the cockpit Lexan and then, Eureka, hopefully the wings... Cheers Reto |
|
|
|
|
|
| bigbrixx1 |
|
 Ace AcePosts: 822
Time Online: 20 days 16 hours
|
Awesome! Interested in your brake system. That is my next hurdle |
| V-max. Finished. Now in phase one flight |
|
|
|
|
|
| Reto S |
|
Ace
Posts: 320
Time Online: 13 days 19 hours 26 minutes
|
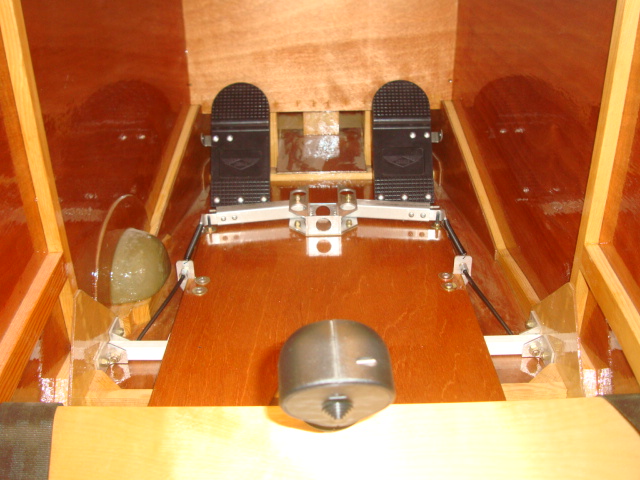
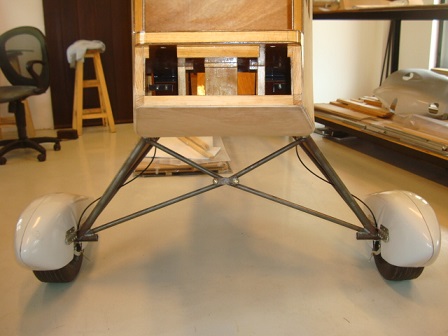
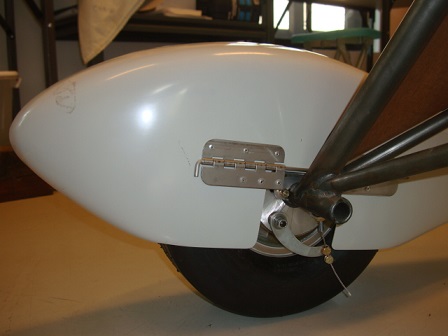
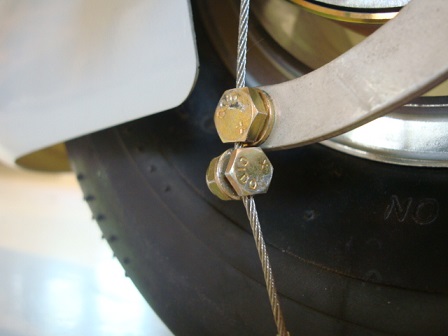
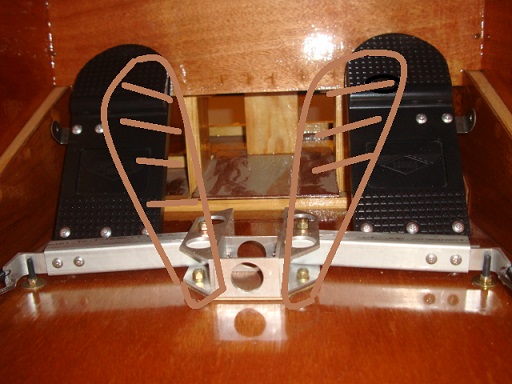
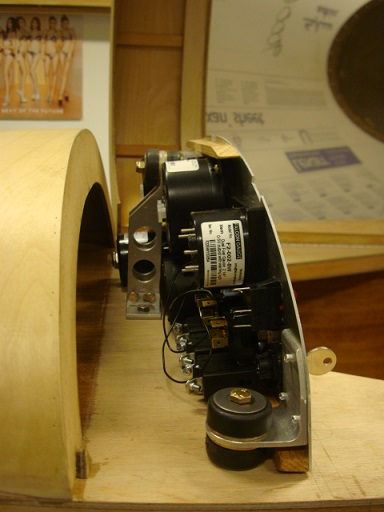
Finally the brake system is completed. I will try to add an additional park brake function. Apologies Brian for the late reply regarding the brake arrangement, it took more time to complete the system than I anticipated. The wheel pants look quite nice. The steel landing gear side covers are made from 1/8" Mahogany aircraft ply.
Today was "black Tuesday" as my band saw "exploded" twice ... Now I've got no saw blades any more...
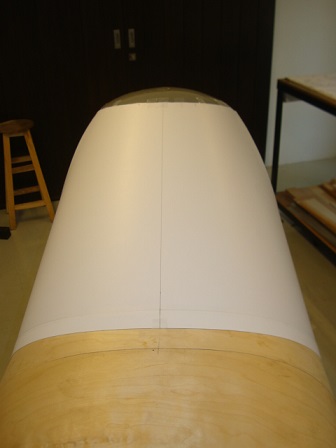
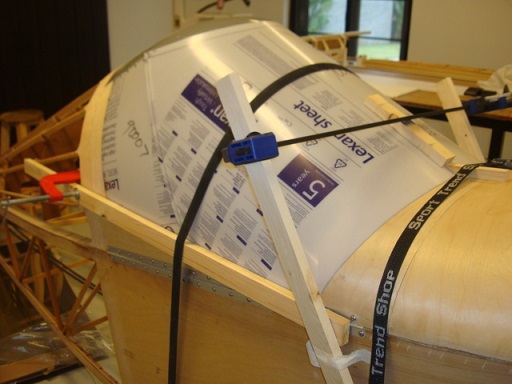
It took me a whole day to cut a precise template for the front "Lexan".
Bruce, I am thinking installing and test run the engine first, before I start with the wing construction. Was it messy when you did it? What about the danger for oil contamination of the uncovered fuselage?
|
|
|
|
|
|
| Ricardo |
|
 Videos in UTube: ral1951 AcePosts: 2,772
Time Online: 75 days 23 hours 15 minutes
|
Impecable work Reto!
The brake system picture is not very clear to figure out. Could you post another picture?
Thanks! |
|
|
|
|
|
| beragoobruce |
|
Built an Eros - now I'm flying it! AcePosts: 1,065
Time Online: 19 days 10 hours 41 minutes
|
Hey Reto - lovely shiny work!
Heel brakes look well made, but one point occurs to me. The way you have arranged the levers, you have a mechanical disadvantage. That is, your heel presses on the lever between the cable end and the pivot. This may mean you have to apply very high pushing force to get much stopping power on the brakes. Or it may work fine!
If you find in service you have to press too hard, you could think about relocating the cable attach point inboard, nearer the pivot point, with your heel contact outboard of the cable attach. That way you get a mechanical advantage on the lever.
As to running up the engine, my first runs did result in some black oil spots over the forward fuse. Since I had varnished it all, this wasn't a problem. But if you have untreated wood, you may find spots of oil soak into the grain. Again, it depends on what finish you intend for the forward fuselage. If you are going to cover with Dacron, no problem. If you are going to paint, maybe they would show through. But if you epoxy varnish first (which I think is a good idea to maintain moisture content at optimum), any spots will just wipe off.
I'm greatly looking forward to hearing how your Hirth engine performs.
Bruce |
|
|
|
|
|
| Reto S |
|
Ace
Posts: 320
Time Online: 13 days 19 hours 26 minutes
|
Impecable work Reto!
The brake system picture is not very clear to figure out. Could you post another picture?
Thanks!
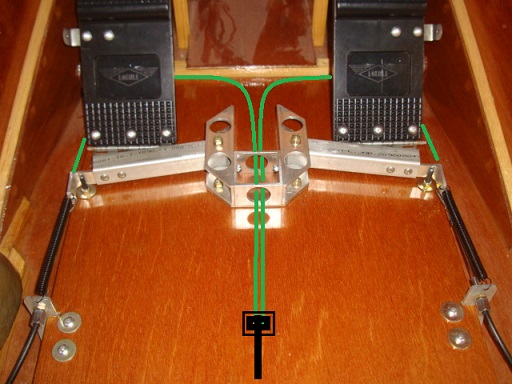
Ricardo Tom Bruce Thank you for your kind words. Please find attached better pictures of the brake system. You can see the future handbrake lever in the middle (black), which will be attached to the brakes (green lines). Deliberately I don't want "strong" brakes, as we all know, braking with a tail dragger is tricky. I do have, even after 30 odd years, still the flutter when I remember my almost ground loop with a Bücker Bü 131 in a pre-military training course. Therefore the park brake will be for engine run up and the un-leveraged brakes for gentle braking... My shoe size is 11 and I am 6'3" tall, the resting position of the feet is in the middle on the brake quadrant and the feet are slanted outwards, towards the rudder pedals (feet position shown in brown colour). Cheers Reto
|
|
|
|
|
|
| Reto S |
|
Ace
Posts: 320
Time Online: 13 days 19 hours 26 minutes
|
...Again, with the heel brakes there was not an issue of needing leverage as you might with the hand lever type of activation... TTT
Hi Tom Thank you for your valuable quality inputs regarding the brake arrangement. I have tortured my brain to find a solution which works with my body/feet size. Please see me reply to Ricardo above... I hope it makes sense the way I wrote it... Cheers Reto |
|
|
|
|
|
| Reto S |
|
Ace
Posts: 320
Time Online: 13 days 19 hours 26 minutes
|
The way you have arranged the levers, you have a mechanical disadvantage. That is, your heel presses on the lever between the cable end and the pivot.
Again, it depends on what finish you intend for the forward fuselage.
Bruce
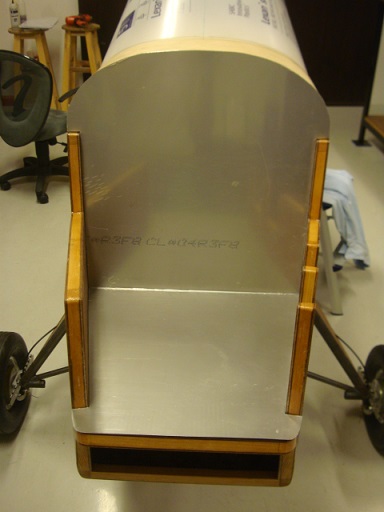
Hi Bruce Thank you for your inputs. I do have considered your point regarding my arrangement with only linear mechanical brake force (not leveraged). Please have a look at my reply to Ricardo above... I started already with West System epoxy fuse painting and more important the SS firewall is in (see below)... Hope all well with your flying lessons! Cheers Reto |
|
|
|
|
|
| Reto S |
|
Ace
Posts: 320
Time Online: 13 days 19 hours 26 minutes
|
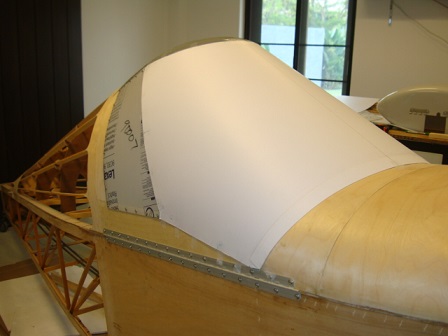
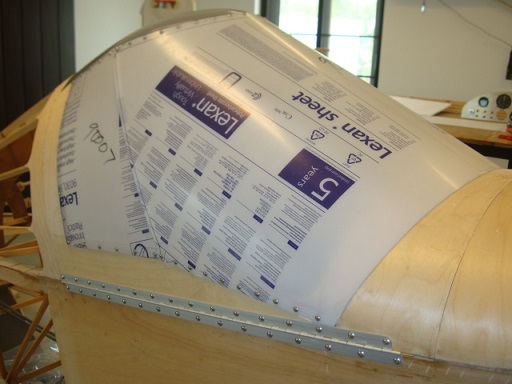
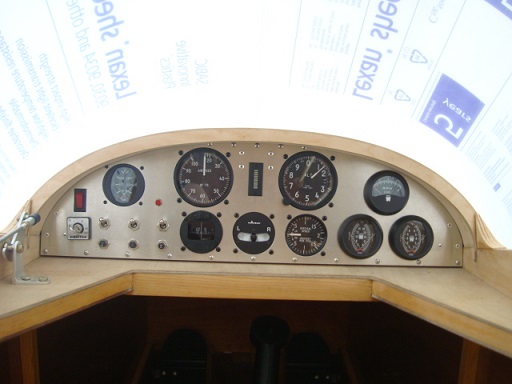
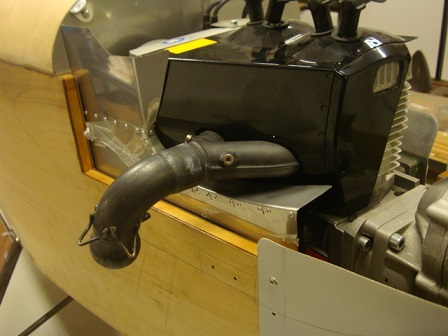
Canopy Lexan installed with some "cheeks" on the side for more cockpit space.
Engine SS firewall installed.
|
|
|
|
|
|
| bigbrixx1 |
|
Ace
Posts: 822
Time Online: 20 days 16 hours
|
Great work! I like your brake setup! Lots of great ideas! Thanks for posting the photos! I am starting the brake system next! These ideas will be very helpful! Keep up the great work! |
| V-max. Finished. Now in phase one flight |
|
|
|
|
|
| Reto S |
|
Ace
Posts: 320
Time Online: 13 days 19 hours 26 minutes
|
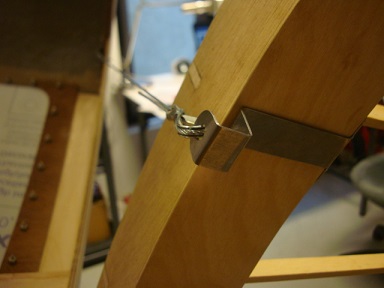
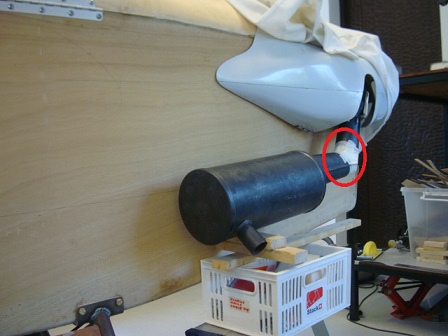
Canopy restrain, without interfering with head, shoulder or seatbelt position.
|
|
|
|
|
|
| beragoobruce |
|
Built an Eros - now I'm flying it! AcePosts: 1,065
Time Online: 19 days 10 hours 41 minutes
|
|
|
|
|
|
| Seaplane Pirate |
|
 To master flight you must first seek to listen. Flight Leader  Posts: 118
Time Online: 21 hours
|
Outstanding work ! Very impressive panel setup as well. I'm excited to follow your progress. |
|
|
|
|
|
| Reto S |
|
Ace
Posts: 320
Time Online: 13 days 19 hours 26 minutes
|
Outstanding work ! Very impressive panel setup as well. I'm excited to follow your progress.
Hi PP Thank you for your kind works. Actually just finished the panel yesterday... I am very curious about your project, especially the floats... Got a MukTuk kit here too... Cheers Reto
|
|
|
|
|
|
| Reto S |
|
Ace
Posts: 320
Time Online: 13 days 19 hours 26 minutes
|
That looks great Reto!
Thank you Bruce, working on the engine bay heat shields and air guides. Got the local Harley shop guy TIG welding me exhaust, pick up today. Did you do a static test run with full cowling on to see what eng temp result? Cheers Reto
|
|
|
|
|
|
| Reto S |
|
Ace
Posts: 320
Time Online: 13 days 19 hours 26 minutes
|
Great work! I like your brake setup! Lots of great ideas! Thanks for posting the photos! I am starting the brake system next! These ideas will be very helpful! Keep up the great work!
Brian I will use a ready made trailer hand brake as park brake. Some cool designs are available for low price. You might be the first conquering the skies, as Bruce is doing his training... Cheers Reto |
|
|
|
|
|
| Seaplane Pirate |
|
To master flight you must first seek to listen. Flight Leader Posts: 118
Time Online: 21 hours
|
Mine are what I would call "highly modified" muktuk's I've reengineered them significantly. I have a much better (larger) float design for my next plane. Let me know if I can help you in any way, I build primarily for seaplanes now but my prior boatbuilder skills come in handy. Incidentally we have looked at moving out your way at some point, it's on the list after Alaska. |
|
|
|
|
|
|


 Logged