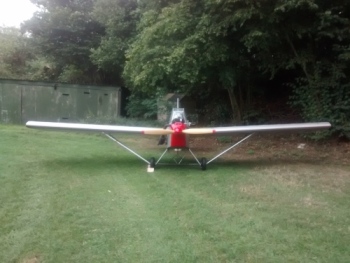
Fuselage Tank installed, This was quite a bit more work than I anticipated but I am pleased. The installation details are based on the 1030 minimax plans. The gas cap will get its own fairing to clean things up.
LOL! You flatter me! I wish I had started that young!
I'm 49 with 2 grown kids (24 and 20), one still at home and have been married for 26 years this August. Showed my wife the images of your build to give her a sense of the space needed for the fuselage and she even commented on how great the max looks. Really looking tidy to my newbie eyes.
I'm a portfolio manager for a fixed income firm and am studying for the CFA designation (doing this instead of getting an MBA). 3 grueling annual exams, pass ratios ~40%. Sat for level 1 on June 23 and will receive results end of August. If I pass, I'll sit for the level 2 exam next June but will have to start studying in October and will be doing nothing else other than studying for that 8 months stretch. However, if I failed the exam in June then I'll level 1 exam again in December and start studying in November 1.
One way or another, I AT LEAST have the next 3 months to focus on the aircraft.
Now I feel really bad to assume you were a teeny bopper that was building his own airplane. I reckon an adult built airplane would be nicer anyway.
Eating an elephant, one bite at a time Fledgling Member
Posts: 23
Time Online: 13 hours 49 minutes
LOL - no worry at all. I wish I were, believe me. Nice tank installation. I'm not that far along and haven't looked at my plans but for safety purposes is there any special attention that you have to care given the installation location? Is it secured in place by the brackets or by other means?
Starting to look like a himax, or maybe a baby cessna 150? There are so many little details that can confuse you but if you build it part by part it will make sense, atleast is says that in the plans,
Slots for the upper spar pins are cut out, More vertical framing members installed, engine bay cut out. Ran out of materials to progress much further! That should be here tomorrow. Lets get this fuselage finished and build us some wings!
Progress is slow on the upper cabin build. Got one of the upper carry through spars glued in place and a bunch of other minor details done. The seat cushion I had years ago and was gonna use on my gyroplane but It made things uncomfortable there. I won't be able to test it until I get the airplane on its gear. The hunk of metal is a drill guide that will come in handy, the bottom is v-shaped so you can drill perfectly centered holes in round tubing.
Front cabane tubes installed, just need to make the two rear ones. Just a little word of caution when working aluminum parts, I rough cut everything with a Milwaukee bandsaw and then get it to its final shape with the side wheel on the belt sander. Don't let the part heat up above what is comfortable to hold in your hand or you will remove the temper or hardness and make a weaker part, just sayin!
Dumb question: what's the white box behind the seat with the antennae?
Thats the ads-b receiver I built. Cabane tubes and brackets are finished and the door opening is rough cut in. The top skin and windshield will be left off until the wings are built to make drilling the wing spar pins easier.
Just a general note: If you coat one side of a piece of plywood with epoxy and leave the other sides bare it will warp somewhat with changes in humidity. This may or may not be a problem depending on how critical it is in the particular application. It's something to think about though.
Just a general note: If you coat one side of a piece of plywood with epoxy and leave the other sides bare it will warp somewhat with changes in humidity. This may or may not be a problem depending on how critical it is in the particular application. It's something to think about though.
Tom
. Yeah the epoxy is only for high wear areas, the rest of the wood will get coated with quality spar varnish. Gear legs are coming together and I should have a tailwheel very soon.
OK you're gonna be mad at me, but...... Later on you may have trouble getting in and out. However it's best to wait to fix it until the struts are on. The lower left (in the picture) corner of the door may need to be cut off to allow the door to pass over the strut, if you have trouble getting in. I'm contemplating that now.
OK you're gonna be mad at me, but...... Later on you may have trouble getting in and out. However it's best to wait to fix it until the struts are on. The lower left (in the picture) corner of the door may need to be cut off to allow the door to pass over the strut, if you have trouble getting in. I'm contemplating that now.
I need to get in touch with coop about removing the door for summer flying. I don't get mad, I get err done


 Logged
 I reckon an adult built airplane would be nicer anyway.