|
|
 Bob Daly Bob Daly |
| February 13, 2019, 5:46pm |
|
Ace
Posts: 888
Time Online: 45 days 22 hours 25 minutes
|
How would you compare the Himax build with the Skypup build? Easier, harder, similar? |
|
 Logged Logged |
|
|
|
|
| gyrojeffro |
| February 14, 2019, 3:21am |
|
Guest User |
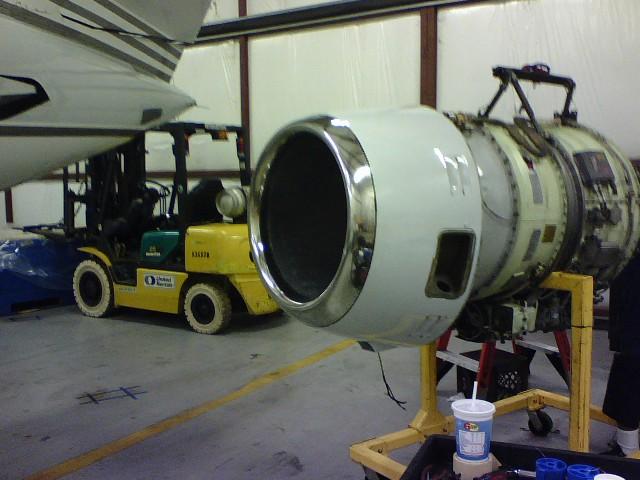
I think I understand. The photo of the Hirth that you posted on February 11 shows the propeller hub powered by a belt drive mounted lower than the cylinder, so the prop wash will cool the cylinder. If I install my Hirth the same as your photo, I should be safe from the overheating problem. Is that correct?
You are right , but from what I have seen hirth offers a different cylinder head with larger cooling fins for pusher aircraft. |
|
| Logged |
|
|
|
|
| gyrojeffro |
| February 14, 2019, 3:48am |
|
Guest User |
How would you compare the Himax build with the Skypup build? Easier, harder, similar?
The skypup plans are much easier to understand for a beginner, Steve woods was a Cessna engineer. The cantilever wing design required very careful drilling into the wing blocks, the hardest part of the the build. The max plans look overwellming at first glance but they are just very detailed. Got the engine board made for the hirth, the engine had to be shifted forward so the carb would clear the fuselage. This will also help shift the cg forward. The lord plate mounts will go in the outer holes
|
|
| Logged |
|
|
|
|
| nathan.bissonette |
| February 14, 2019, 3:37pm |
|
 Flight Leader  Posts: 118
Time Online: 1 days 9 hours 13 minutes
|
Gyrojeffro, thanks for the reply. I have another question: my Hirth F-33 has the same carb as the one you pictured but I didn't get a manual when I salvaged it from the barn. My carb has two cables on it: one connects to the top of the carb and one connects off to the side. The top one is obviously the throttle - I can see it move up and down. What's the side one for?
|
|
|
|
|
|
| gyrojeffro |
| February 15, 2019, 4:17am |
|
Guest User |
That is for the choke cable.for easy starting all you need is a plunger primer. Fitting the windshield
|
|
| Logged |
|
|
|
|
| gyrojeffro |
| February 15, 2019, 4:40am |
|
Guest User |
Maybe I should elaborate more, the choke only enrichs your fuel mixture.if your carb bowls are empty the choke is no good. A real primer squirts a tiny amount of fuel past the carb. |
|
| Logged |
|
|
|
|
| nathan.bissonette |
| February 15, 2019, 6:43pm |
|
Flight Leader Posts: 118
Time Online: 1 days 9 hours 13 minutes
|
|
|
|
|
|
| gyrojeffro |
| February 16, 2019, 4:11am |
|
Guest User |
This windshield is now officially the hardest part of the build.omg! |
|
| Logged |
|
|
|
|
| gyrojeffro |
| February 17, 2019, 2:29am |
|
Guest User |
My windshield building attempt was a failure, luckily I'm only out $60 for the cost of the poly-carbonate and shipping. The plans don't teach you how to make your windshield and there is very little info out there, I even searched the old forum. Luckily you guys can learn from my mistake. See if you can find the things I did wrong. 
|
|
| Logged |
|
|
|
|
| gyrojeffro |
| February 18, 2019, 2:01am |
|
Guest User |
I was able to salvage my windshield by moving it backwards about two inches. The reason it wouldn't lay flat on the top of the wing is because I screwed it to the sides first. The windshield has to be secured to the top of the wing before any bending takes place. The square blocks you see clamped in place are to keep the windshield from bulging out, there is alot of stress in this area where the windshield is trying to bend in two different directions. Wood blocks will be placed inside the windshield on top of the fuse so it can be secured with screws there.
Here is a couple of tips for future max builders when building your windshields. All holes should be drilled a minimum of 3/4" from the edges. Only use pan head screws not countersink screws. The holes in the poly carbonate should be drilled over sized and all the screws should have a washer under the head.
|
|
| Logged |
|
|
|
|
| gyrojeffro |
| February 18, 2019, 2:23am |
|
Guest User |
|
| Logged |
|
|
|
|
| cdlwingnut |
| February 18, 2019, 2:37am |
|
Ace
Posts: 416
Time Online: 3 days 22 hours 22 minutes
|
it's looking like a nice airplane. If spring ever comes you will be flying that thing |
|
|
|
|
|
| gyrojeffro |
| February 18, 2019, 3:32am |
|
Guest User |
it's looking like a nice airplane. If spring ever comes you will be flying that thing
Thanks CD, I'm looking forward to you flying your Piet! I think I will be flying more towards late summer of this year. I heard a saying on the paramotor podcast, the size of your engine doesn't matter a real man lowes his L/D ratio and and removes the six pack of beer from the airplane. Nope I just made that crap up  |
|
| Logged |
|
|
|
|
| Keith103 |
| February 18, 2019, 3:56am |
|
 Ace AcePosts: 632
Time Online: 13 days 6 hours 31 minutes
|
Glad you got it right, Jeff.
You are making great progress. |
|
| Logged |
|
|
|
|
| gyrojeffro |
| February 18, 2019, 4:11am |
|
Guest User |
Glad you got it right, Jeff.
You are making great progress.
Thanks Keith, once you get a good taste of it , there is no turning back!  |
|
| Logged |
|
|
|
|
| gyrojeffro |
| February 19, 2019, 3:39am |
|
Guest User |
Finishing the windshield. The wood blocks are what secures the bottom of the windshield.to the fuselage.
|
|
| Logged |
|
|
|
|
| gyrojeffro |
| February 21, 2019, 3:37am |
|
Guest User |
The windshield is finished. Drilling the steel fittings for the ailerons. And a picture of georges cockpit because that is how I will finish out my cockpit. Half inch foam will be glued to aluminum foil and covered with marine carpet. It will weigh 255 lbs, sue me.
|
|
| Logged |
|
|
|
|
| nathan.bissonette |
| February 21, 2019, 2:39pm |
|
Flight Leader Posts: 118
Time Online: 1 days 9 hours 13 minutes
|
I'm curious what goes into the weight calculation? I notice you have a padded seat. If you were to substitute a plain wooden seat when weighing it, but throw in a cushion when flying it, would that removable cushion put you over the 254 pound limit? Or would it be like your cell phone - an extra item that got carried aboard for flight?
Seems to me there might be a little wiggle room for a creative builder. Is there a website or guide detailing what's weighed and what's not?
|
|
|
|
|
|
| TreeTopsTom |
| February 22, 2019, 12:59am |
|
 Ace AcePosts: 566
Time Online: 26 days 13 hours 37 minutes
|
The question is... Will anyone ever approach and say..." I need to weigh your airvehicle" ?
Jeff, You might want to consider adding an extra layer of plywood to the bottom front
corner area where the door open I g has been cut out.
I think this is a (weak) area. I only way this because I know of at least 2 people that have
had a crack develop there. Of course there could be other reasons for it to happen.
Just thought I would give you one more thing to think abou. Like you don't have enough
to do. TTT |
|
| Logged |
|
|
|
|
| PUFF |
| February 22, 2019, 12:20pm |
|
 Ace AcePosts: 1,518
Time Online: 34 days 6 hours 18 minutes
|
TTT add a 3rd with a crack repaired. ME. I ended up extending the gusset in the corner and putting a joiner across the outside of the aircraft and gluing it in. |
|
|
|
|
|
| TreeTopsTom |
| February 22, 2019, 4:08pm |
|
Ace
Posts: 566
Time Online: 26 days 13 hours 37 minutes
|
Ok Puff. I seem to remember talking to someone on here that chimed in when I originally mentioned this
(Defect) on mine. Not sure how appropriate it is to call it a defect.
Maybe deficiency is a better word. With at least 3 incidents now I think it's something
to be brought up and maybe Jeff will choose to address it in the building
segment (which is the easiest time to address the potential problem).
Be it understood that this might only be a (problem) for those that have on occasion
stressed the landing gear/ airframe to it's limits & beyond.
So I think it's safe to say...Everyone. Lol.
Obviously, there is quite a lot of sidewall plywood that is removed when cutting out for the door
and it leaves quite little left there in an area that I assume takes quite a load on any hard landings. This ...crack. TTT |
|
| Logged |
|
|
|
|
| gyrojeffro |
| February 23, 2019, 4:56am |
|
Guest User |
Last time I checked I wasn't an aero engineer.! |
|
| Logged |
|
|
|
|
| gyrojeffro |
| February 23, 2019, 5:12am |
|
Guest User |
|
| Logged |
|
|
|
|
| PUFF |
| February 25, 2019, 12:37pm |
|
Ace
Posts: 1,518
Time Online: 34 days 6 hours 18 minutes
|
The fix for mine was carefully removing the gusset at the corner and replacing it with a much larger one. Then going to the outside and gluing in a "bridge" over the crack. |
|
|
|
|
|
| gyrojeffro |
| February 26, 2019, 3:37am |
|
Guest User |
|
| Logged |
|
|
|
|
| mullacharjak |
| February 26, 2019, 5:24am |
|
 Ace AcePosts: 281
Time Online: 3 days 21 hours 12 minutes
|
Gyro
Your video on installing the aieleron straps has added to my confusion rather than clarifying the picture.
You installed an AN4 bolt in the hinge when the plans show a socket head bolt towards the tip and you tightened the 3/16 bolts first and 1/4 bolt later which I think is
opposite of whats in the instructions. Your aieleron doesnt seem removable or do you have some trick up your sleeve.
Also in the middle hinge area rib 5 where the aieleron spar web window is cut out how is the 1/4 inch hole supporting the bolt because if you follow the plans exactly there is
no wood support for the forward half of the hole as the web has been removed in this area.
KK
|
|
|
|
|
|
| gyrojeffro |
| February 27, 2019, 4:46am |
|
Guest User |
Everything is temperary. The socket head bolts " good luck finding em" is to allow easy alieron removal. Socket head bolts have a 3/8" diameter head! My airplane will be hangered ! |
|
| Logged |
|
|
|
|
| LSaupe |
| February 27, 2019, 10:38am |
|
Flight Leader Posts: 161
Time Online: 1 days 10 hours 40 minutes
|
|
|
|
|
|
| gyrojeffro |
| February 28, 2019, 3:48am |
|
Guest User |
[quote=525]Are you talking Socket Head Cap Screws? Most hardware stores and supply houses carry them. https://www.aircraftspruce.com/catalog/hapages/NAS1351H.phphttps://www.mcmaster.com/socket-head-cap-screws[/quot Aircraft spruce doesn't supply that bolt in 2" length. The socket head bolt allows the ailerons to be removed easily by allowing the aileron strap to slip past the bolt head by loosening the other two bolt. I can't understand why anyone would need to remove their ailerons that much unless the rat appocalyse broke out. Got the rs17 stock glued to the first wing. Team put out an ad on beefing up the rs17 stock to keep it from coming unglued by over shrinking the fabric. I just put a little extra glue in that spot , and I will be sure to shrink the fabric less in that area
|
|
| Logged |
|
|
|
|
| gyrojeffro |
|
Guest User |
|
| Logged |
|
|
|
|
|


