Bruce, you did a great job with your cowling cooling arrangement. I particularly like your added outlet guide vanes. Contemplating too to open the rear part of my cowling for the air to escape. It's quite difficult to predict what actually will happen and how the air will flow though... I think we need a wind tunnel...
Decided not to test run the Hirth again, as it was done extensively in the factory. Too many other things on the list...
I have only limited experience of cowling issues, but I do think you should be aiming for a greater exit area than inlet. It seems reasonable to assume that whilst the air mass travelling in and out is the same, the volume exiting must be greater as it's hotter, so it will flow more freely if you don't have a hot and high pressure at the outlet.
Bruce: I think you should start doing engine tests to see what kind of numbers you get, Many factors are involved in the final CHT which seems to be your main concern. Static test and taxi test will give an idea where things are , then work from those numbers on. The CHT in my plane was slightly high when I started testing the plane. Nothing to worry about, Then I decided to go air free, installed the air scoop and removed the fan and the belt. The cooling effect was so high that I barely meet the temp minimums on CHT. It gain some power also (not something you need) but one less issue to inspect such as belt tension and age. So there's always that route as a better option. I just hope it works the same with your engine.
I have only limited experience of cowling issues, but I do think you should be aiming for a greater exit area than inlet.
Colin
Yes, I agree Colin. But I'm working on the principle that some openings are better than none. Also that the pressure gradient will help a bit: high pressure at the intakes, with my cutouts positioned in lower pressure areas.
Since there is no mention of any exit air cutouts on the drawings, & nobody has mentioned this in any posts I have read, I assume they are not generally used. So on that basis, it can't be too great a problem.
As with so much else, I won't be in a position to know until I've flown (whenever that may be ) But at least it's easy enough to make the cutouts bigger should they need it, rather than smaller!
As an aside, have you been able to play with with NADS yet? The weather looks to be improving for you recently.
Static test and taxi test will give an idea where things are , then work from those numbers on.
That's true for sure, Ricardo. I would dearly love to at least taxi, but because my plane now lives at an airfield, I cannot even taxi it until I get my licence sorted out. Because it is an airfield used by passenger aircraft, I can't even taxi 'out of hours'. I envy you your lovely grass strip outside your house!
Great that you got your temps down with free air cooling. That would be a bit harder for me, as my engine is lower down in the engine bay. But it remains an option.
Any more videos from you? I need something to remind me of what I'm aiming for!
As an aside, have you been able to play with with NADS yet? The weather looks to be improving for you recently.
Hi Bruce,
on G-NADS the plan seems to have been to direct the hot air out over the carb body, I'll take a few pictures of the cowling at the weekend.
It's not flying yet. Time has been short but we have been doing a few jobs on the airframe. A particular issue I found was that the Pitot piping has been secured with aircraft type metal p-clips that have a rubber sleeve and the plasticiser in the rubber has reacted with the pipe so it has gone brittle and fractured at most places where it is clipped. The reaction is such that the pipe looks almost burned. I haven't tested it yet, but am hoping the static pipe is not affected as that will be a pain to replace. I'd recommend thinking about access for maintenance of the pipes on new builds.
We have replaced the battery and installed a new battery box under the seat. Also sorted the seat pads. The strobe, EFIS and the gauges all work so the electrics seem ok.
The only real problem at the moment is that the engine won't start, although I understand it had been run very recently by the previous owner after an overhaul. I think it is a fuel issue as we have a spark, but not sure what. I may have just missed something in the system, but every time we get it outside and try to start it the heavens open and we get drenched!! We are planning to strip and replace all the fuel pipework and clean the filters this weekend anyway. Hopefully the issue will come to light.
Bruce, mine has left side 0 deg, right side +1 deg toe. I read somewhere 0 deg to slight plus shall be better for directional stability of a tail dragger. Not sure if that is the case though...
With toe-in, when in a crosswind landing as the into wind wing lifts & thereby transfers loading to the opposite wheel, the effect will be for the nose to swerve into wind.
I am not at all happy with my steel gear. It has potentially dangerous toe-in, and the stub axles are too short by 1" which necessitated machining on the wheel bearings and makes access to the strut pin very tight.
I would advise anybody buying steel gear to carefully check its geometry, & reject it if these faults are found.
It's been a long time since I posted on this thread. I keep posting new stuff on different threads. So in order to be more ordered, I'm posting this here.
I've been taxiing my 'finished' plane on the tarmac runway at my local airfield. I've got to the stage where I can hold the tail up for the full length (5000'), albeit in a bit of a wandering line. So there doesn't seem much point in doing more until the grass strip is opened (it's been closed for the last several months due to unusually wet weather, causing large potholes). I don't want to do my first flights off tarmac because I'm concerned about my toe-in issue, described above. Grass strips are much more forgiving, allowing more slipping between wheel & surface. I'm probably going to need all the factors I can get to go in my favour for first flight, so I'm prepared to wait for the grass strip. Shouldn't be much longer, now the weather has warmed up & it's finally stopped raining.
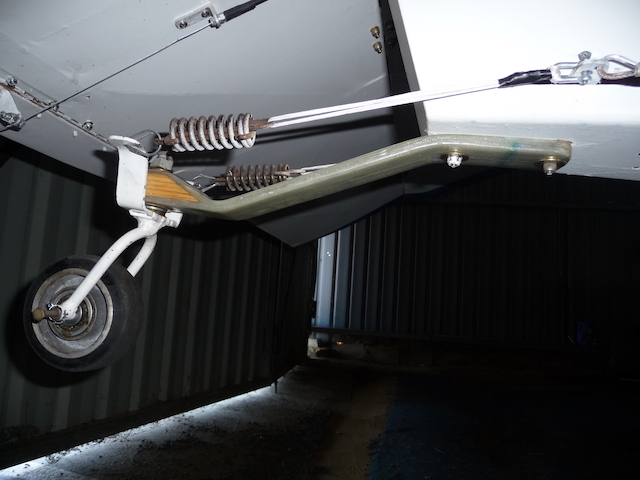
Howsomever, all that taxiing did show up a problem with my tailspring. Even though I'm not aware of having given it a hard time, I found that it is straightening out, under just normal taxi use on tarmac. I supported the rear fuselage on a saw horse, & leant down on the tailwheel. The steel leaf just bent right back very easily.
So I don't believe this is spring steel. If it has been heat treated, it hasn't been done properly, & I didn't see any evidence of 'bluing' that I would expect if this were so. As the (mild?) steel leaf straightens, so the chain connections to the steering arm go slack, & I lose most of the tailwheel steering input. This doesn't seem to make much difference, as at tailup speeds it's all rudder anyway!
But I feel the need for a bit of tailwheel suspension. Besides, I've always hated that big heavy lump of steel right at the extreme aft end - it's screwing my W&B.
So I decided to make a composite spring.
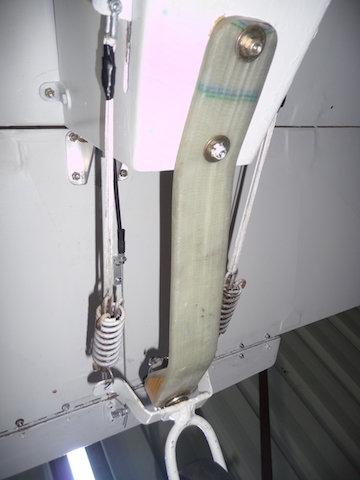
I made a simple mould by bending a strip of 1/8" aluminium, 2" wide, to the shape I wanted. Then I made a 2nd one to suit the top surface. I mounted the lower one on a wooden base, & made some ply sides. I stuck some brown plastic parcel tape over all surfaces, to act as a release agent (I've found this works very well).
I bought some heavy duty bi-directional twill E-glass, & cut around 15 strips. The arm is tapered toward the end, by progressively shortening the laminates. Where it fixes to the fuse is about 10mm thick, reducing to about 8mm at the wheel.
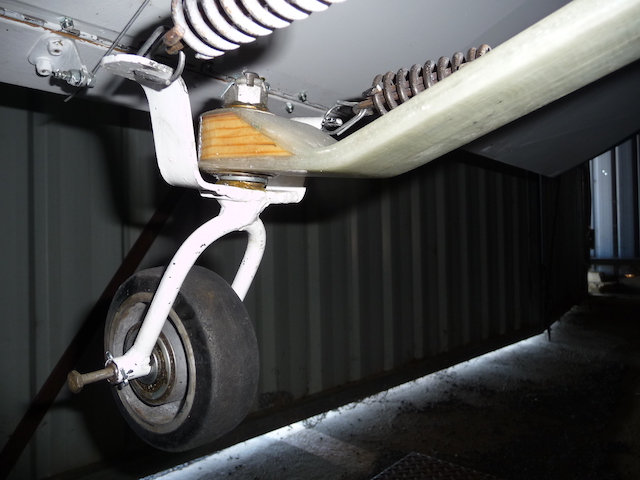
To provide a bearing housing to suit the existing (heavy) tailwheel assembly, I moulded in a block of wood to give the correct depth of section. I laid up several plies of glass top & bottom. I used epoxy resin in the layup, & rolled repeatedly between each layer. I knew I had saturation as the glass went translucent. I clamped the 2 halves of the mould together in several places, squeezing out a lot of excess epoxy.
I allowed it 24 hours in the mould, then released it & tidied it all up. For the tailwheel steering bearing, I bored a 3/4' dia hole perpendicular to the end of the spring. I sealed the bottom, & filled the hole with epoxy resin. When it had cured, I bored a 1/2" dia hole through the resin.
Then I bonded some large diameter 'mudguard washers' to upper & lower surfaces, again with accurate 1/2" dia holes, just to back up the epoxy bearing surface with a bit of steel.
I greased the steering axle, & reassembled everything. I had previously positioned an inspection hole just forward of the tailspring on the underside of the fuse. This is primarily to access the vertical stabiliser bolts, but also enables me to reach the tailspring bolt heads.
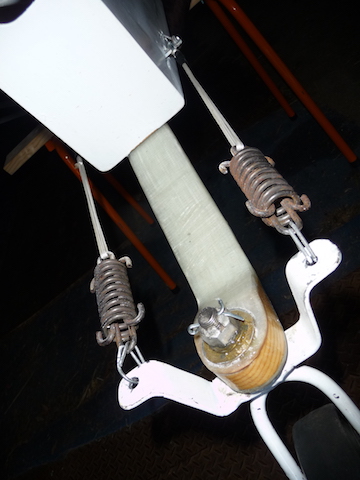
Instead of the rather flimsy looking chains, I used nylon braided cord to join the cables to the steering springs. It's lighter, & easier to adjust.
I've drop tested the spring, & it seems adequate. I'll keep a close eye on it (that's why I haven't painted it), but at least if it fails it will be on the ground! It's easy enough to make another one with more laminates if I need it. I bought a square metre of cloth for $15, & still have 90% of it left. The composite spring feels about half the weight of the steel, but I'll weigh the original to find out exactly how much weight is saved.
Looks like really good work on that spring. George S. make one and I have the spring but it is not installed on my aircraft yet. The spring is in Maine and I am in Florida now or I would show a picture of it. I was also looking to reduce weight.
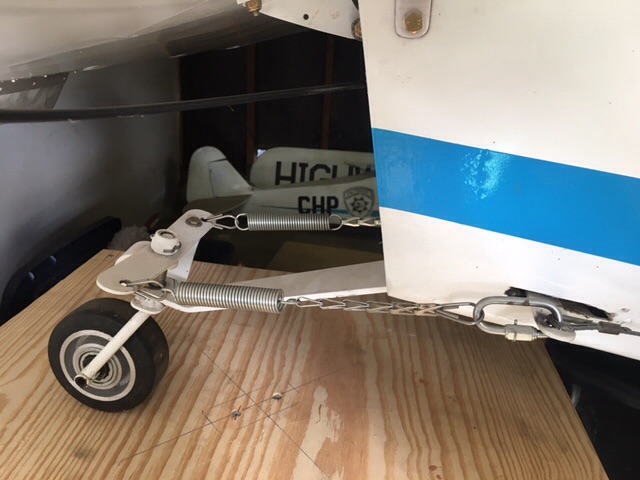
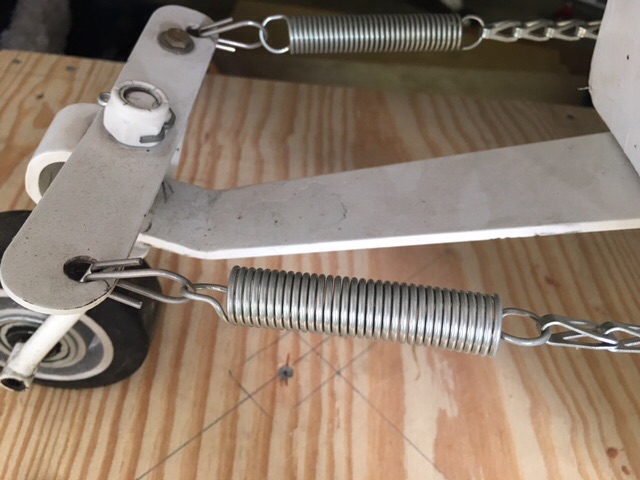
Outstanding work as usual, Bruce. One suggestion I would make is to change the springs. I originally installed the same springs you have but found the forces placed on them while the aircraft is moving wasn't enoug to get any "spring" action, and it was very squirrely. A fellow buzzard suggested I change the "compression" type springs for "tension" style springs with less strength (I think I said that right, basically change to springs that stretch when pulled as opposed to closing when pulled). I found the new setup to be much more forgiving when "fast" taxiing with the tail down; I could hardly believe the difference it made in the handling. I will try to attach a picture of the setup later today if I have time.
I'm looking forward to reading about your first flight!!
Good setup, Sean. I don't like those big compression springs - they look huge in MiniMax context. Last time I was in the local hardware store I looked around for springs with the idea of replacing the A/S ones, but couldn't find any.
It's good to know your solution gives an improvement in handling - I will copy it shamelessly!
I'll only comment based on what seemed to be a good reason to use compression vs tension springs. If a tension spring breaks there is absolutely no connection for tailwheel control to that side. If a compression spring breaks, depending on where the break occurs, there might be at least some control and connection left. The control is certainly compromised but there is still a connection to afford some control. As is often said...."just sayin'"
Couple of points on that. Firstly, I plan to make a loop of a few lengths of my lanyard cord, about 30% longer than the closed length of the spring. These will be fixed to the steering bar at one end & the spring end of the main lanyard at the other, inside the body of the spring. So if the spring breaks, there will still be some attachment of the steering cable to the arm on the tailwheel.
Secondly, I'm not sure how much of a problem it would be if a spring did fail with no backup. I don't know how long my steel arm had been almost straightened out on the plane, but the effect was for the steering cables to be very slack, to the extent that normal rudder pedal use would hardly have moved the tailwheel. Remember some aircraft have castoring tailwheels, that just follow the effect of the rudder. So I'm not sure it would be a showstopper if a tension spring did fail.
This last post is to tidy up all the loose ends of my various build postings. Along the long - and very enjoyable - road of my Eros build, I’ve made various excursions off the path of strict adhesion to the (excellent) original design. This has been because there are a few areas of the Max I wanted to modify to suit my preferences, not because Wayne Ison’s superbly conceived design needs any changes. I posted most of these build mods under separate threads, and I just want to tie all the records together. This is in part because our Australian aviation authority wants a build record, & that was one reason I began posting on this board. So it helps if all my stuff is accessible from one thread.
So for good housekeeping, and for any who may be interested, I’m appending links to those other build posts the end of this one.
It’s now been over a year since I trailed my Max to its home at my local airfield, where it sat for another seven months while I grappled with the mire of regulations to permit me to actually fly. It didn’t help that I’d mislaid my UK pilot licence & logbooks detailing all my previous flying during my move to Australia. And I had to find a suitably qualified witness to my weight & balance testing. And I was still finishing off all the little jobs that were needed before I could finally say “It is done”. I still can’t say that, but that’s part of the fun of a homebuilt - licence to fiddle.
Eventually all the bureaucratic hurdles had been negotiated, & I had got to grips with ground handling over a couple of hours or more of taxi trials. And I’d run out of excuses not to fly.
I’ve posted on this before, but suffice to say it was one of the most satisfying experiences of my life to successfully complete my first flight. The little plane handles like a dream: it’s responsive, agile, climbs very impressively, flies comfortably hands off and despite the shoulder wing format gives superb views of the beautiful Aussie bush & mountains in my area. It is just about the most fun you can have with your clothes on.
I would recommend the Max as a build to anyone who can use his hands with wood, and counsel any builder whose enthusiasm may be flagging to keep at it, a little every day. You will soon get your mojo back, and the end result is so worthwhile and such a blast to fly.
So for those still to take the leap, I say ‘go for it’. And to those already on the way, good luck with your build & happy trails in the sky.


 Logged

 ) But at least it's easy enough to make the cutouts bigger should they need it, rather than smaller!