|
|
 bigbrixx1 bigbrixx1 |
| January 13, 2016, 12:33pm |
|
 Ace Ace Posts: 822
Time Online: 20 days 16 hours
|
20 dollars a month! thats awesome!!!! The build is looking great! Question....How did you run your rudder cables? The plans show metal angle brackets about 5 1/2 inches ahead of horizontal stabilizer bolted to fuse side frames. Problem they seem to conflict with turtleneck stringers.
Thanks as always for your help |
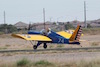
| V-max. Finished. Now in phase one flight |
|
|
|
|
|
| beragoobruce |
|
Built an Eros - now I'm flying it! AcePosts: 1,067
Time Online: 19 days 10 hours 58 minutes
|
Brian
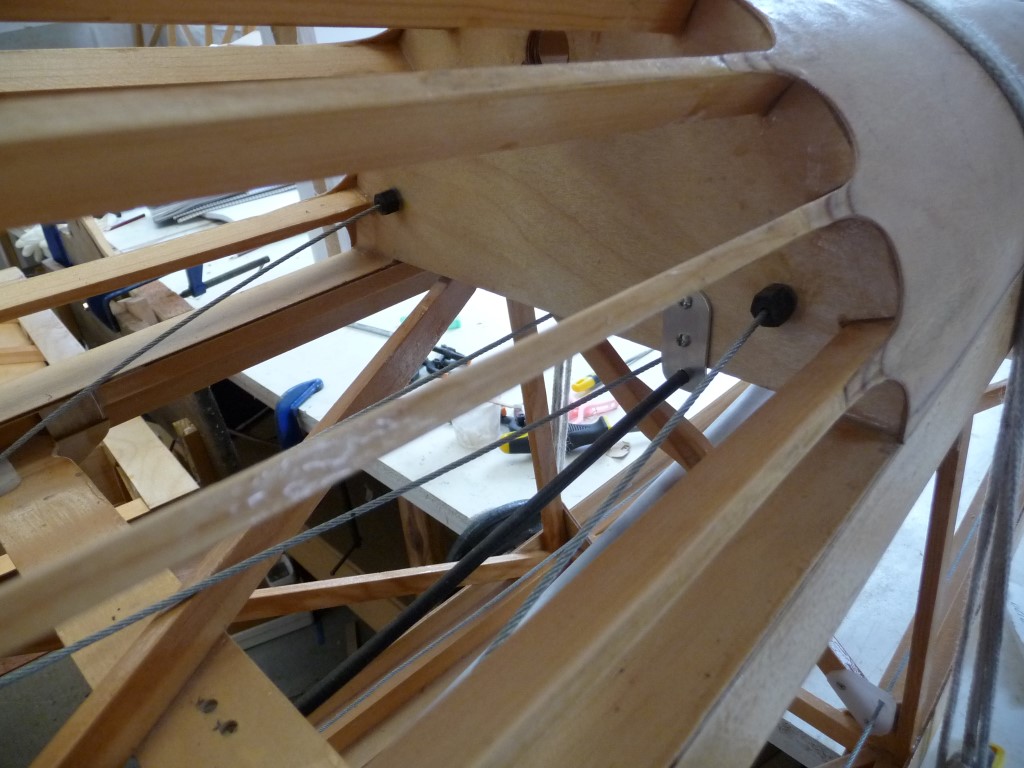
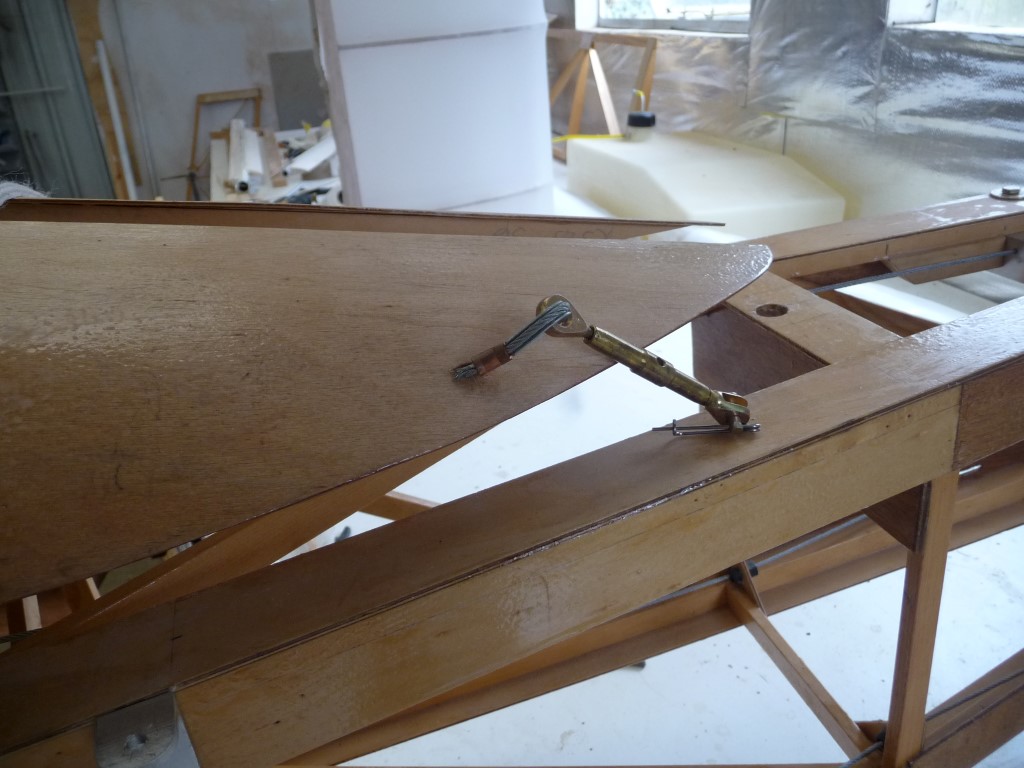
I've had a good look through my plans, & have to confess I can't find any metal brackets where you describe. Do you mean the mounting brackets for the horizontal stabilizer? If so, these are nowhere near my rudder cable runs. Or turtledeck stringers.
I've attached a couple of pics of how my cables are arranged. They pass through F6 & then out through my plywood tail fairing. (The metal bracket in the first pic is supporting the elevator trim tab cable, so isn't shown on the plans)
Sorry, this probably isn't helpful. Can you photograph the area of the plans you're referring to?
Cheers
Bruce
|
|
|
|
|
|
| bigbrixx1 |
|
Ace
Posts: 822
Time Online: 20 days 16 hours
|
Thanks Bruce! That's the way I will run them. I am glad your ahead of me with install. I can glean some of your great ideas! Keep up the great work! |
| V-max. Finished. Now in phase one flight |
|
|
|
|
|
| beragoobruce |
|
Built an Eros - now I'm flying it! AcePosts: 1,067
Time Online: 19 days 10 hours 58 minutes
|
No worries. I'm about to begin covering & I've read your posts on this several times. Mutual help is what this forum is all about! |
|
|
|
|
|
| beragoobruce |
|
Built an Eros - now I'm flying it! AcePosts: 1,067
Time Online: 19 days 10 hours 58 minutes
|
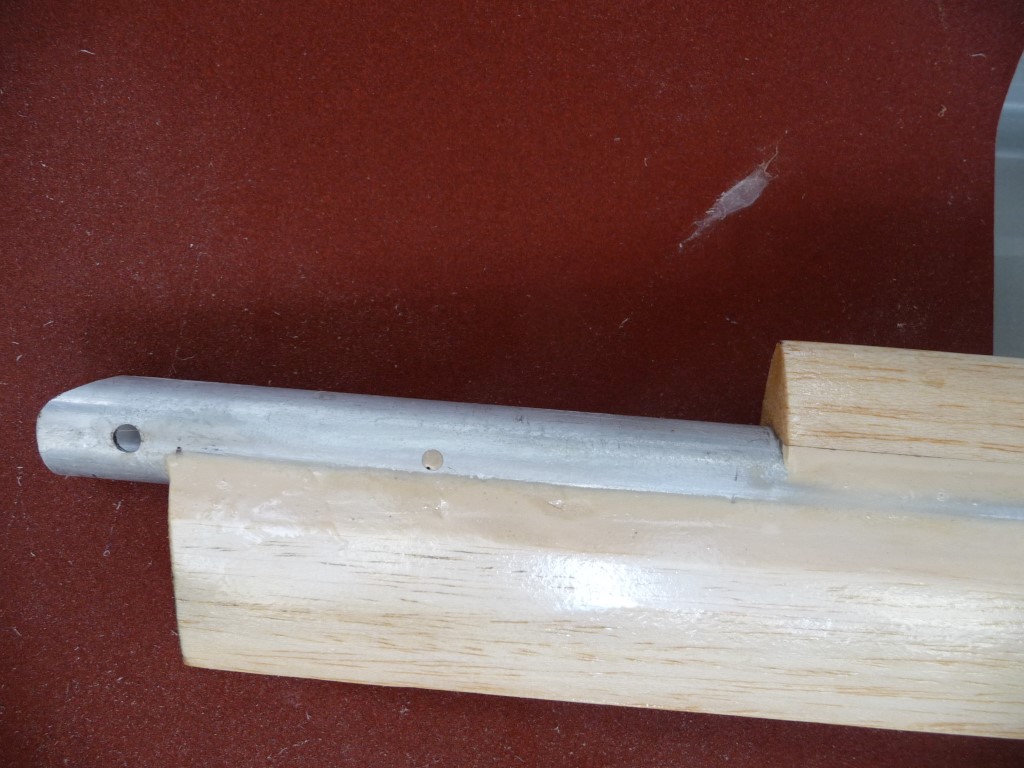
I was going to leave things like fairings until after I'd flown, but being realistic about it, I realised if I did that it probably wouldn't happen. So I've faired my main struts, and hope to do likewise with fin supports & steel u/c diagonals concurrent with covering.
I thought about several different ways of fairing the very draggy struts. My preferred option was to use 1.5mm ply, soaked in ammonia to get a 1/4" leading edge radius, and wrapped around & bonded to the struts. I didn't do that because the cost of the ply & shipping was way too high.
I also considered using aluminium flashing from the hardware shop, but a test piece showed this to be hard to form smoothly & quite heavy. I have some spare Lexan from making my 2nd canopy, and considered using that. But again, heavy & increased frontal area by a little bit!
I don't like working with glassfibre, so didn't go there. And it's too expensive to ship long items like ready made fairings from the USA.
So I decided to make my own from balsa wood. This is relatively cheap & available, very light, & easy to work.
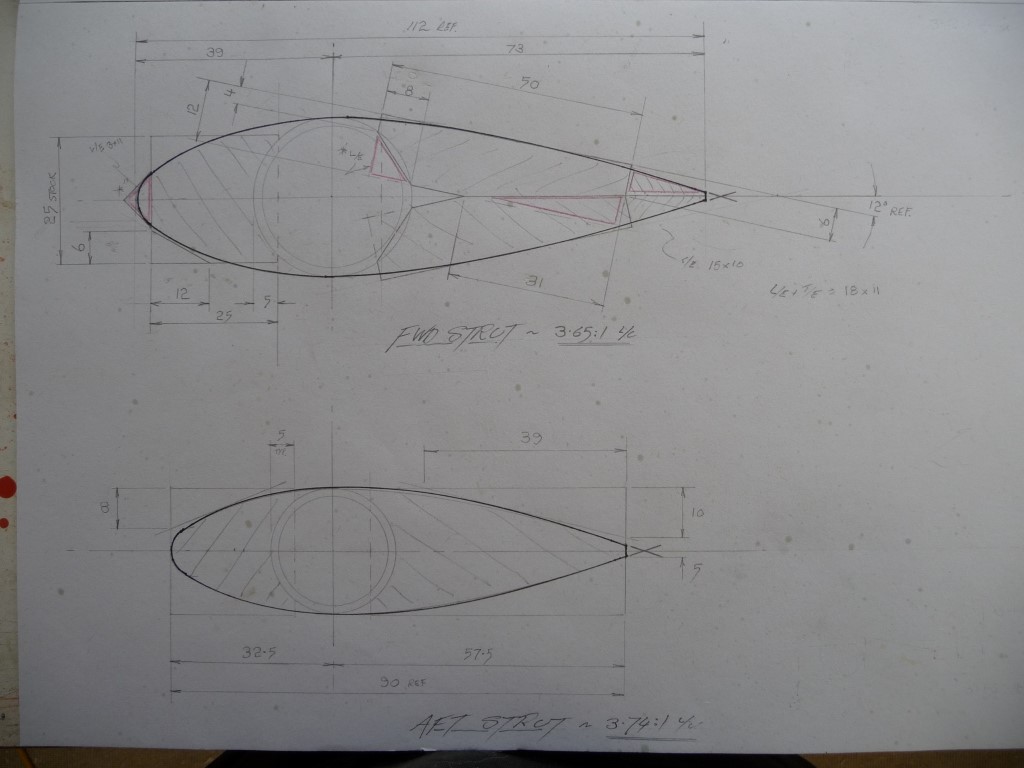
I drew the struts & the profile I wanted, & marked out tangent lines to pre-form the blocks of balsa with a plane before bonding them to the struts. I went for about 3.5:1 length to chord ratio as a compromise between optimum & practical, & to suit size of wood available.
|
|
 |
|
|
|
|
|
|
| beragoobruce |
|
Built an Eros - now I'm flying it! AcePosts: 1,067
Time Online: 19 days 10 hours 58 minutes
|
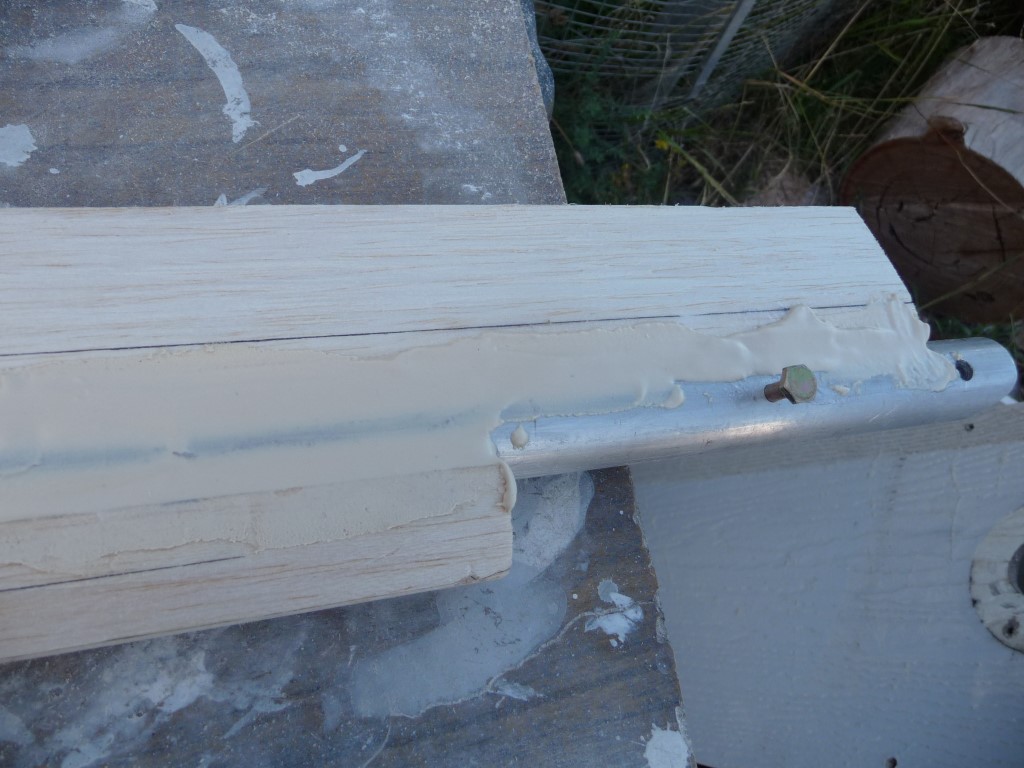
I marked out the blocks from the drawings, & planed down to the lines. Then I cleaned the struts, degreased them with acetone, & rough sanded them, & wiped down with acetone again. I made a mix of WEST epoxy thickened with microfibres, and having pre wetted everything with unthickened epoxy, I glued the blocks to the struts. To test the integrity of the bond between balsa & both steel & aluminium, I earlier bonded a block of balsa to offcuts of both struts. After 24 hours, it took several quite heavy blows with a big hammer to knock the wood off, & then it was split, with the wood failing rather than the glue joint. May not be too technical, but it satisfied me, & I'm the test pilot on this aeroplane  After the WEST/microfibre mix had hardened, I made a paste of WEST plus their 410 Microlight filler additive. This is mixed in in sufficient quantity to give a stiff paste. When set, it is very easy to sand (about the same hardness as the balsa, happily), and weighs very little. It also has some adhesive strength. I used this to infill the interface between balsa & metal to above surface level.
|
|
 |
|
|
|
|
|
|
| Arthur Withy |
|
 Happy 1500R owner - building a Jodel D18 AcePosts: 2,532
Time Online: 32 days 12 hours 14 minutes
|
Hey Bruce ,
I would of slipped a thin plywood in on the trailing edge for durability....I used it on balsa wing tips for my RC racing and Pattern ships.
it adds very little weight ( use cyno glue) and a lot of strength , durability and sharpness to the shape
cheers Arthur |
|
|
|
|
|
| beragoobruce |
|
Built an Eros - now I'm flying it! AcePosts: 1,067
Time Online: 19 days 10 hours 58 minutes
|
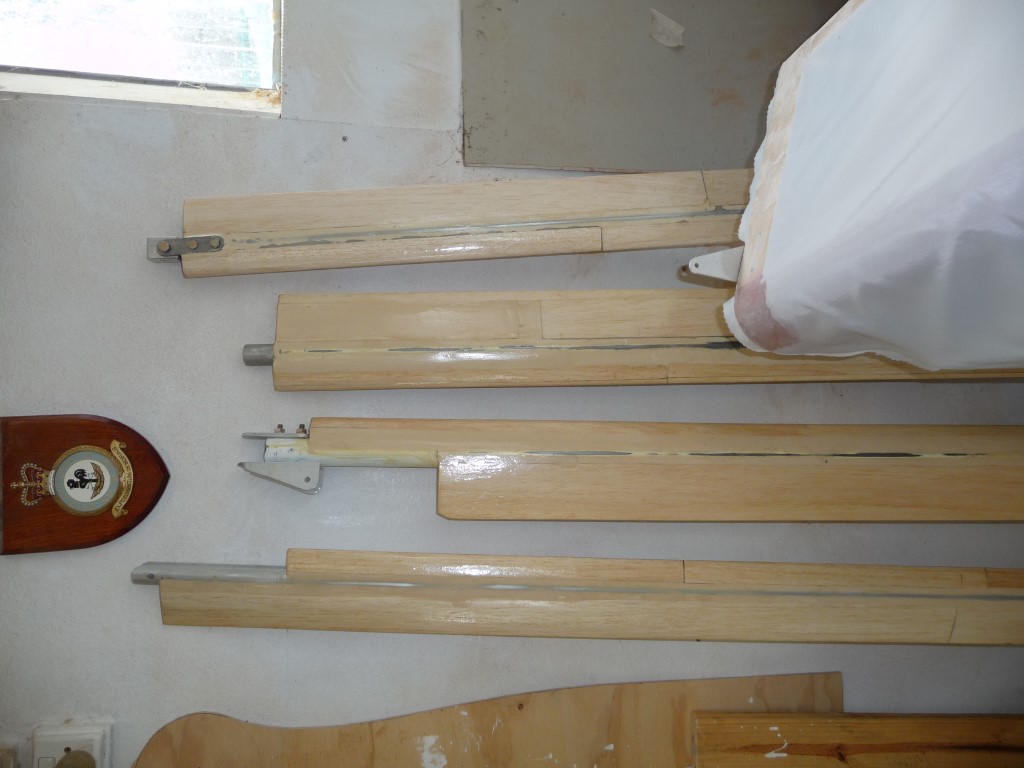
Then I sanded the blocks down, starting with with very coarse 80 grit, down to 240. I gave the whole lot 2 coats of epoxy to seal & harden the surface.
I was going to cover the fairings with thin glass & epoxy, but the surface after just WESTing is very tough. So I'll just paint it when I spray the rest of the plane.
|
|
|
|
|
|
| beragoobruce |
|
Built an Eros - now I'm flying it! AcePosts: 1,067
Time Online: 19 days 10 hours 58 minutes
|
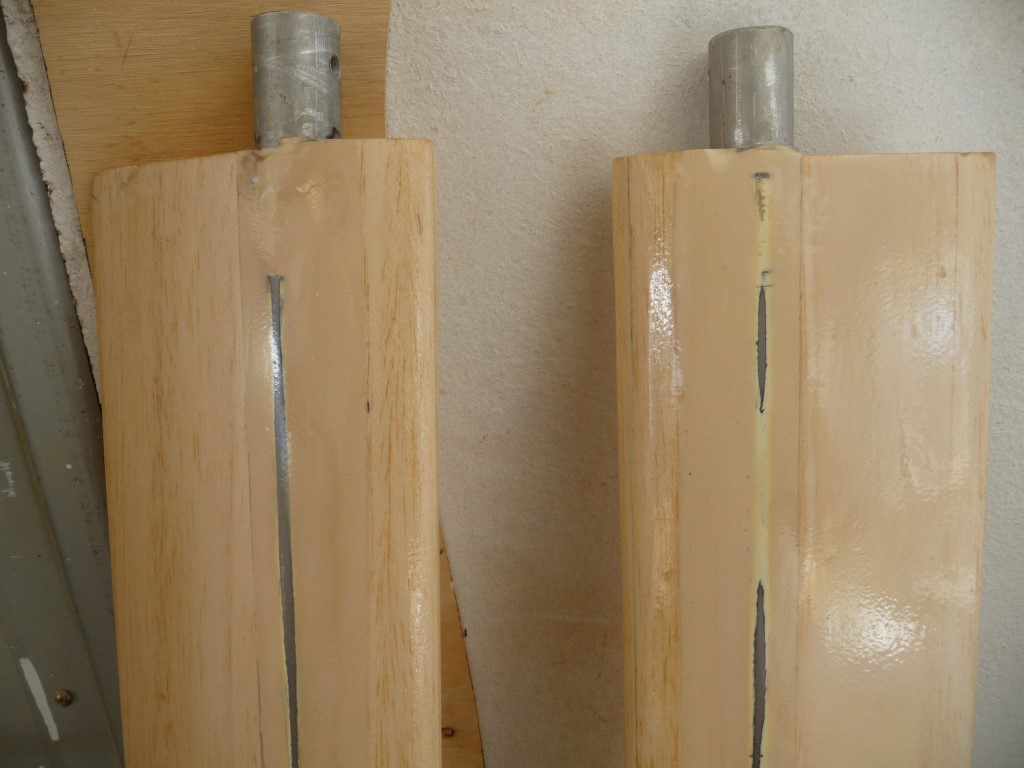
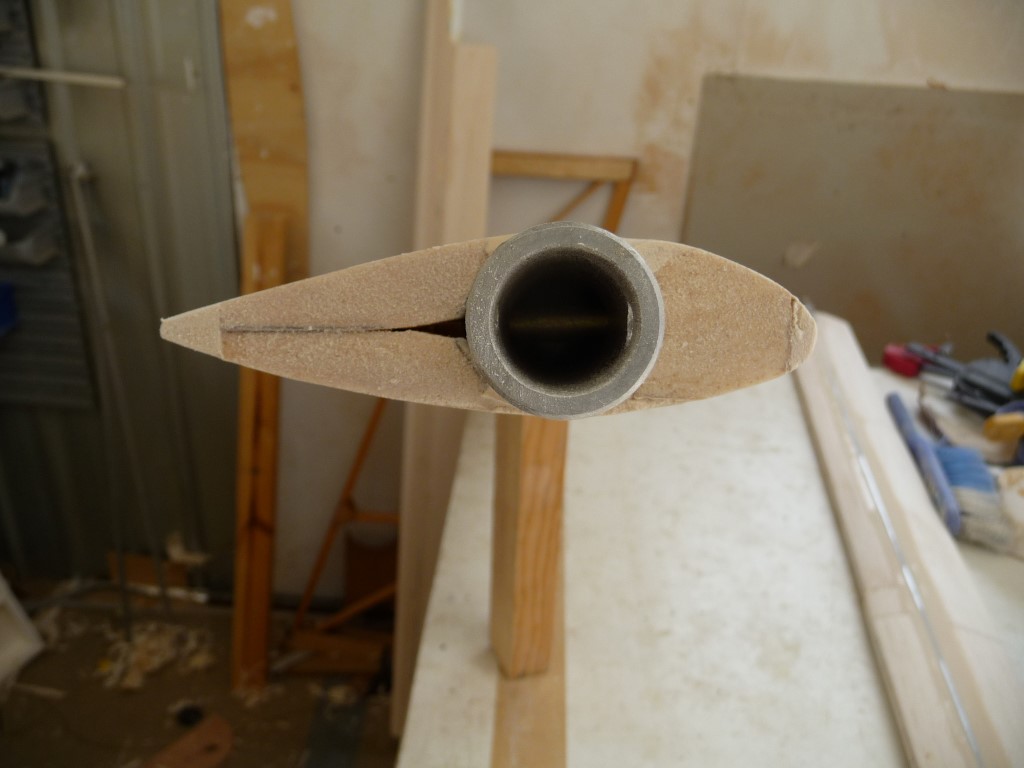
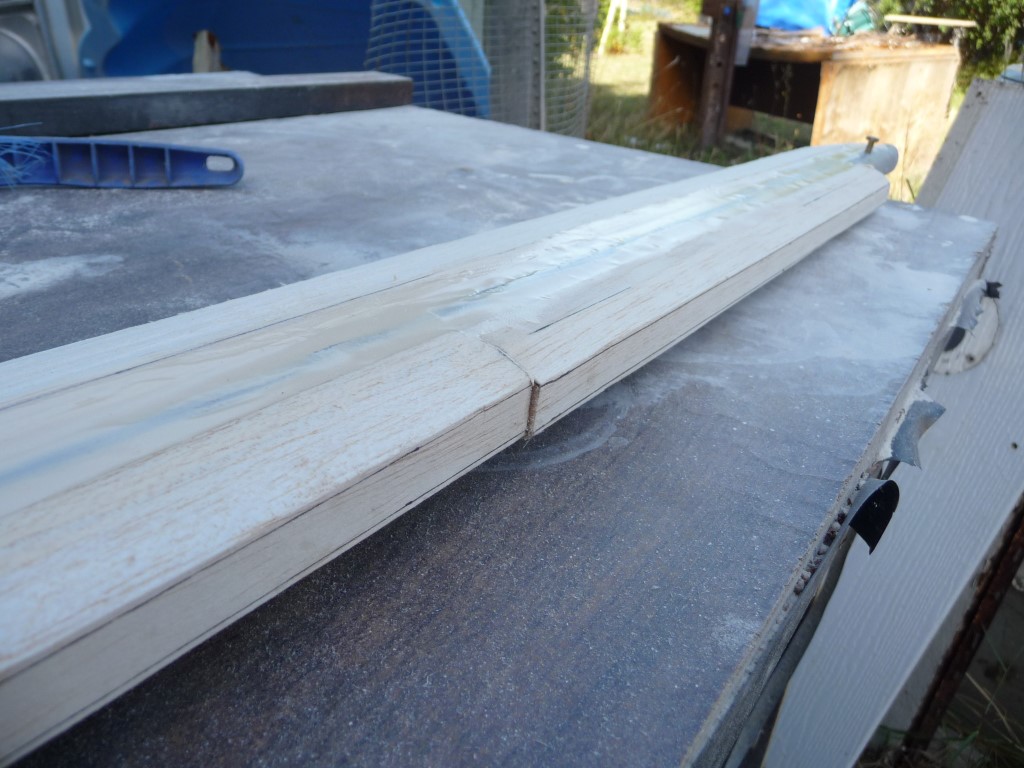
A last one showing the profile of the main strut fairing.
|
|
|
|
|
|
| beragoobruce |
|
Built an Eros - now I'm flying it! AcePosts: 1,067
Time Online: 19 days 10 hours 58 minutes
|
Good tip, Arthur: thanks. I'll see how these go in service, but with the epoxy 'skin' they seem fairly durable as they are. |
|
|
|
|
|
| stevejahr |
|
 Airbike plans examiner AcePosts: 200
Time Online: 4 days 11 hours 43 minutes
|
That is certainly one way to do it and of course there are others. One could use foam for base shape with epoxy/glass covering. Or if you really hate glass then a thin balsa sheeting on top of the foam. Or you could make balsa ribs and sheet over them. Another tricky approach would be to use epoxy and brown shipping paper as a covering. All tricks borrowed from the R/C construction techniques  |
|
|
|
|
|
| beragoobruce |
| February 17, 2016, 2:40am |
|
Built an Eros - now I'm flying it! AcePosts: 1,067
Time Online: 19 days 10 hours 58 minutes
|
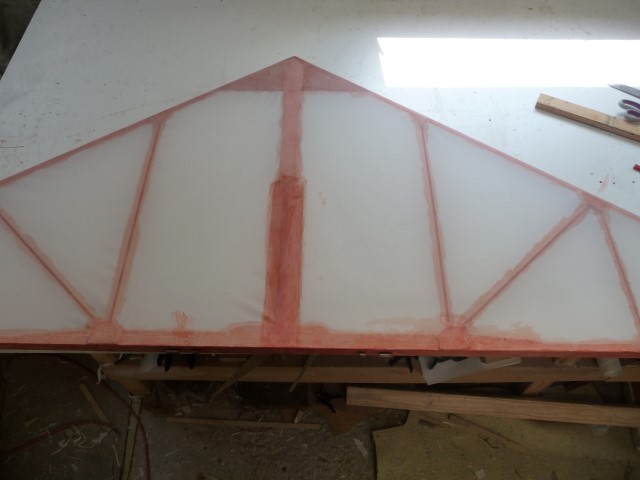
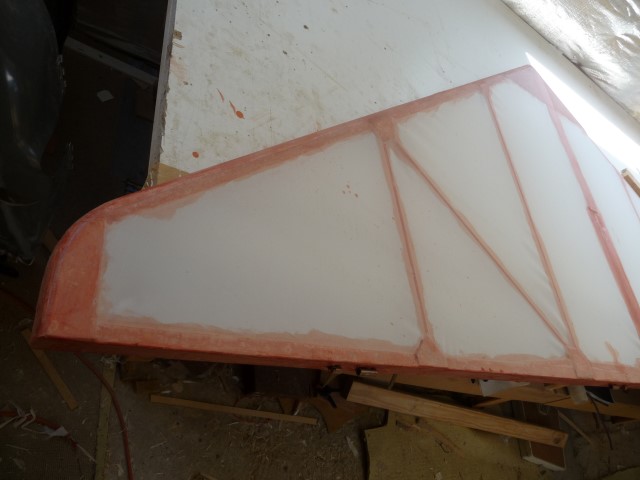
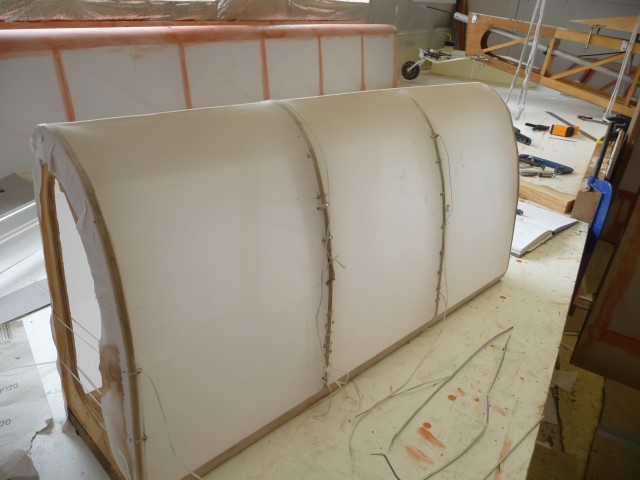
I have reached the stage where I can no longer put off covering. Having followed Brian's thread with interest (thanks BigB!), watched a few EAA 'how to' videos, downloaded & studied both the Polyfiber & Stewart system manuals, it was time to start.
As they suggest, I started with the empennage. I found no real difficulties, until I came to my radiussed corners, on both fin & tailplane. Serves me right for daring to be different, I guess. A few wrinkles resisted the iron, but I think - I hope - they're shallow enough to be lost under the paint.
|
|
|
|
|
|
| beragoobruce |
| February 17, 2016, 2:46am |
|
Built an Eros - now I'm flying it! AcePosts: 1,067
Time Online: 19 days 10 hours 58 minutes
|
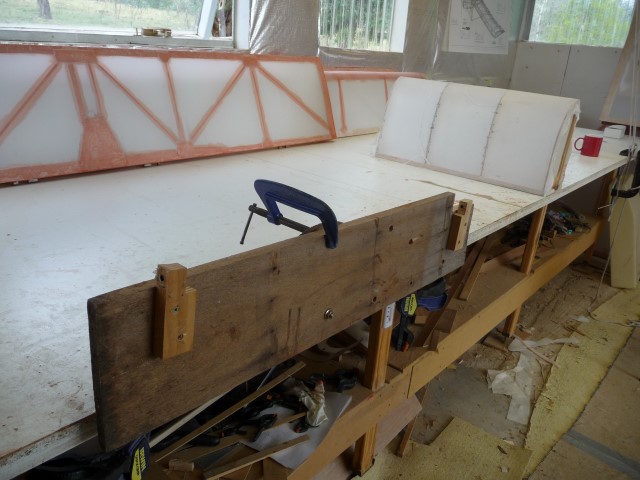
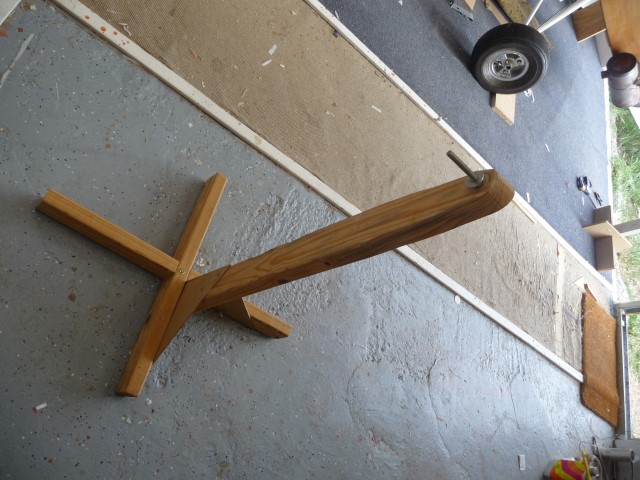
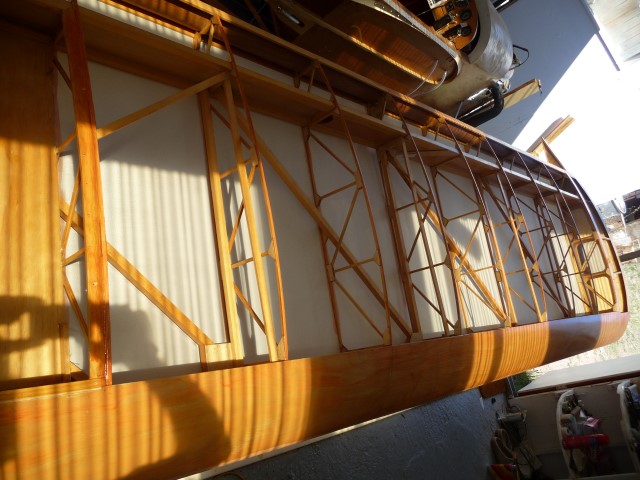
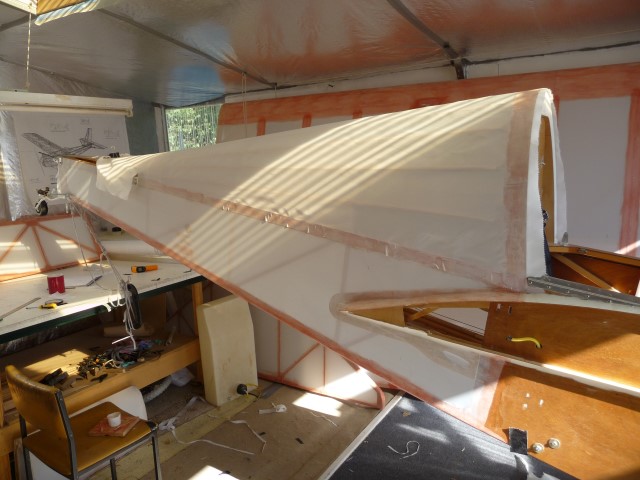
Wings next. As I'm working by myself, it was clearly going to be worthwhile making a jig to permit rotating the wing. It was made a little bit harder because of my Hoerner wingtips, but I used the tiedown hard point to pivot the outboard end on. The inner end I mounted on a board using the wing attach lugs, with a central bolt to allow rotation.
|
|
|
|
|
|
| beragoobruce |
| February 17, 2016, 2:53am |
|
Built an Eros - now I'm flying it! AcePosts: 1,067
Time Online: 19 days 10 hours 58 minutes
|
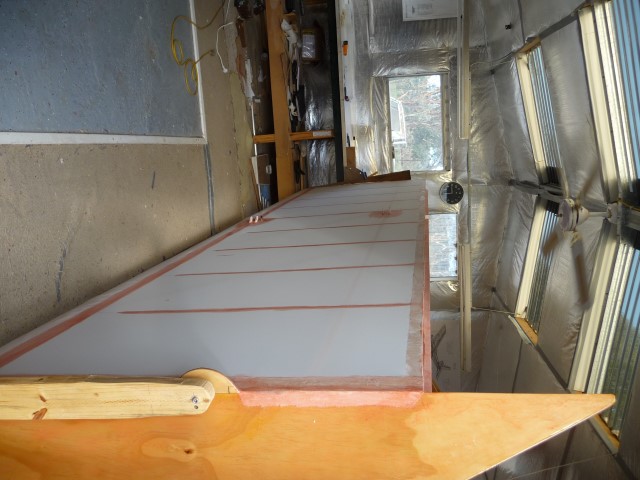
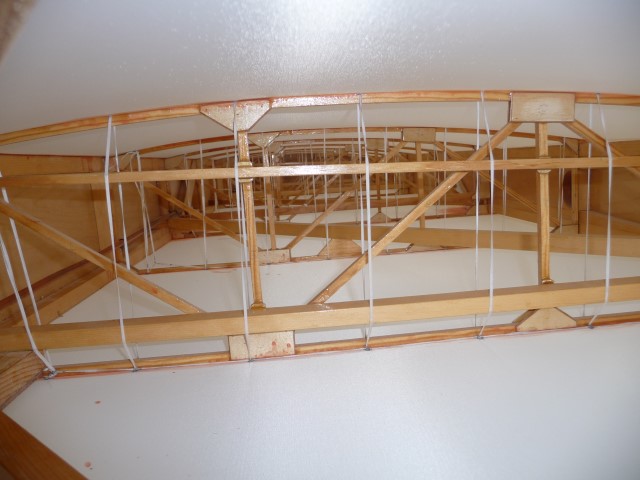
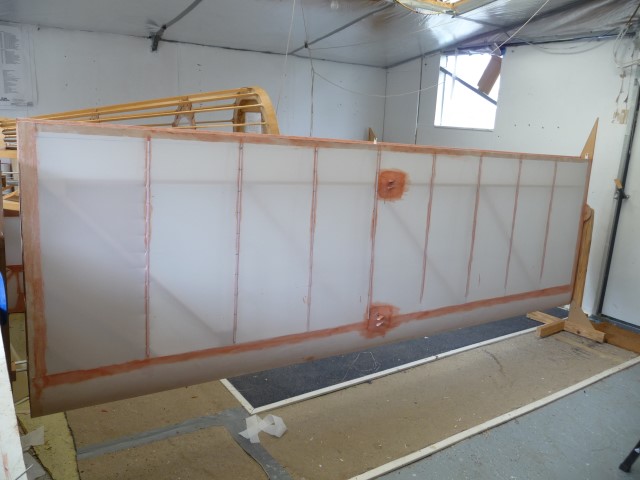
I covered the lower wing surface ok, & was about to do the upper surface when I thought about rib stitching of the inner rib.
Because I have a fuel tank in each wing, the Lexan tank cover will be fixed over the upper covering, with several screws clamping the cloth to the rib. So no ribstitching needed here. But there would be for the bottom surface.
So I thought to stitch the lower covering directly to the rib while I could get to both sides.
|
|
|
|
|
|
| beragoobruce |
| February 17, 2016, 3:12am |
|
Built an Eros - now I'm flying it! AcePosts: 1,067
Time Online: 19 days 10 hours 58 minutes
|
The top surface covering went ok, & I managed to get the Dacron round the wingtip fairly neatly.PolyTak & PolyBrush are very good at what they do - sticking fabric both to itself & the wooden substrate. BUT - they are VERY SMELLY & noxious.
Polytak is very volatile, so you have to be very quick in putting the cloth over the newly glued area, or the glue doesn't wick up through the cloth properly. I found it better if I thinned the PolyTak by about 20% with MEK. Gave slightly longer wet out time, & wicked through better.
PolyBrush is much easier to use. I used 2 coats on the rib caps & leading edge D box before covering, and brushed on a well thinned line after covering. This activated the underlying glue very well. I suspect to the extent that rib stitching is not strictly necessary - but this is of course conjecture.
MEK is evil stuff. I have used several pints of acetone for brush cleaning, etc, while using T88 & WEST epoxy during my build. I use it to clean epoxy off my fingers. I have never had a problem with it. But although I am careful to always use latex gloves when covering, MEK burns my hands even through the gloves! I have also developed a rash between my fingers, so use a barrier cream in addition to gloves. Be warned!
Also, the fumes are most unpleasant. Despite having my workshop doors open, & a large overhead fan going full speed, I still have to go outside on occasion to get some fresh air & clear my lungs. (Not helped by shop temperatures of over 100 degrees on many days).
Still, the covering certainly seems to be well bonded.
|
|
 |
|
|
|
|
|
|
| beragoobruce |
| February 17, 2016, 3:29am |
|
Built an Eros - now I'm flying it! AcePosts: 1,067
Time Online: 19 days 10 hours 58 minutes
|
I bought an iron (my wife wouldn't let me use hers), a digital probe thermometer, some heatsink compound, & a non- contact infra red thermometer. I spent the best part of a day calibrating the settings on my iron, timing the cycles & how long the temp stayed within spec (+ - 15 deg), & checked the digi thermometer against the i/r. I had chosen an iron with a dark grey Teflon base, which gave good i/r readings due to its emissivity, and also proved to not stick to the glue blobs on the Dacron.
I lightly shrunk the fabric at 225 degrees, which worked very well, then on to the dreaded ribstitching.
I again watched the EAA videos, & re-read the polyfiber manual, & Brian's thread. But I decided to make a test section of dummy wing, to practice stitching on. And I'm glad I did - I would highly recommend this to anyone who has to learn stitching by himself - saves making a mess of the real wing.
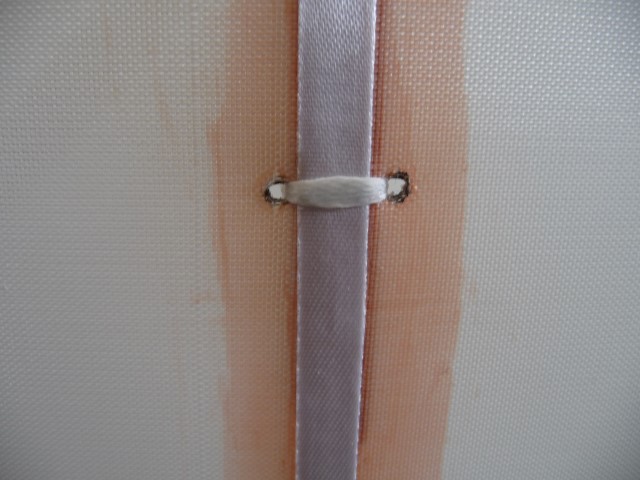
I played around with practice stitching, initially trying for the modified seine knot. I think this would be better named the 'insane knot'. Because that's what it drove me.
Fortunately, the Beech Staggerwing knot is way simpler, hides easily under the fabric out of sight, & is good for 200 knots. And if I ever make 200 knots in my Max I'm going to have other problems beside wing covering detachment. . .
So having sussed the basic technique on the test piece. I taped over the ribs & stitched at 3.5" pitch.
|
|
 |
|
|
|
|
|
|
| beragoobruce |
| February 17, 2016, 3:45am |
|
Built an Eros - now I'm flying it! AcePosts: 1,067
Time Online: 19 days 10 hours 58 minutes
|
I had a huge learning curve on the ribstitching. The 'plain' ribs were fine, but those with compression struts were a nightmare.
At one point I just couldn't see how I could possibly put a needle in one side, navigate it around 2 lots of compression rib, & exit via a pre-punched hole the other side, all blind because you can't see through Dacron. And all by myself! I began to consider taking up sailing instead. . .
The answer turned out to be the correct shape of needle. I made my own from 2.5mm dia welding rod, & it was very quick to knock out whatever shape I needed. Picture shows the ones I finished up using. The one with the square bends in it was used for most of the compression ribs, & the curved one at the first & last stitch on the compression rib.
By the time I'd finished stitching the 2nd wing I got it down to around 30 minutes for a plain rib & 45 for a compression rib. It would have been much longer without the wing-turning stands. But I was not sorry to finish, and unlike Brian I will not be stitiching either the feathers or the empennage! (More power to your patience, Brian!)
|
|
 |
|
|
|
|
|
|
| beragoobruce |
| February 17, 2016, 4:03am |
|
Built an Eros - now I'm flying it! AcePosts: 1,067
Time Online: 19 days 10 hours 58 minutes
|
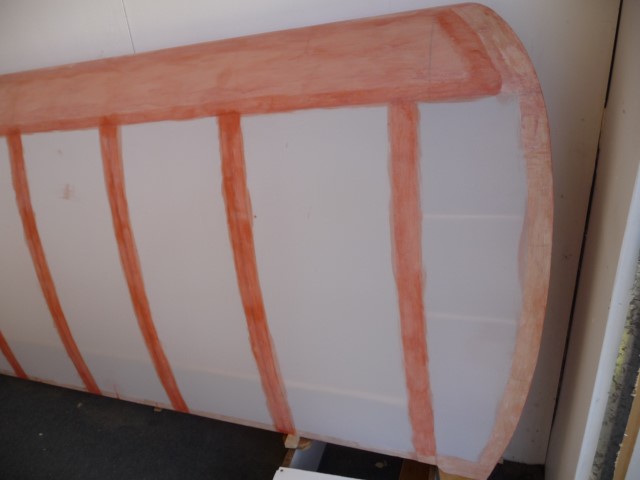
After ribstitching I shrunk the fabric to 260 and finally to 300 degrees. It comes up very satisfactorily drum taut without any airframe distortion that I could see.
I pre-shrunk some scrap fabric & cut out tapes for the ribs with pinking shears, and PolyBrushed these on as per the manual.
I finished with PolyBrushing the entire L/E 'D' box.
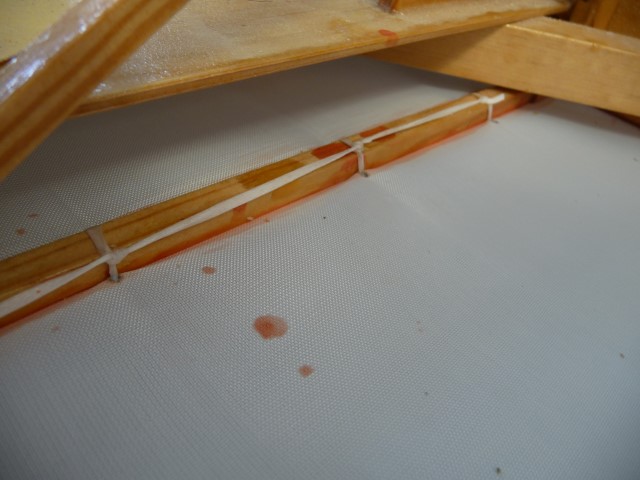
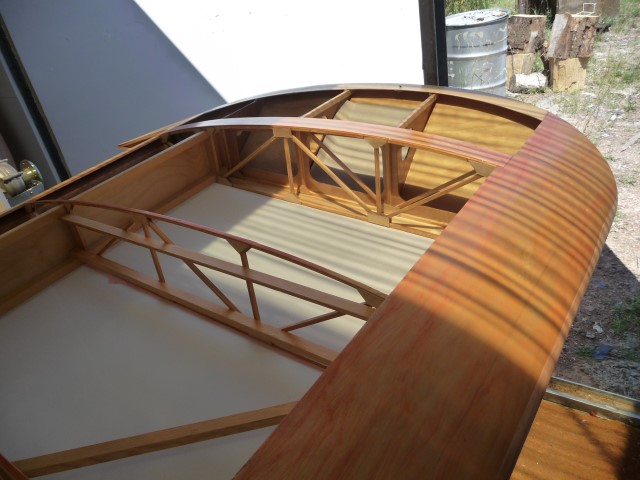
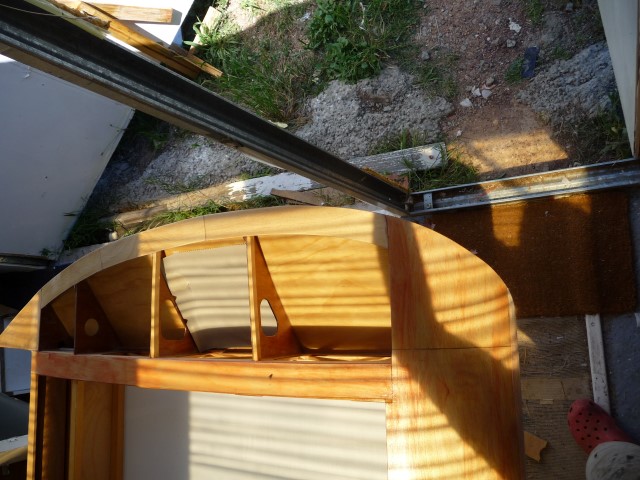
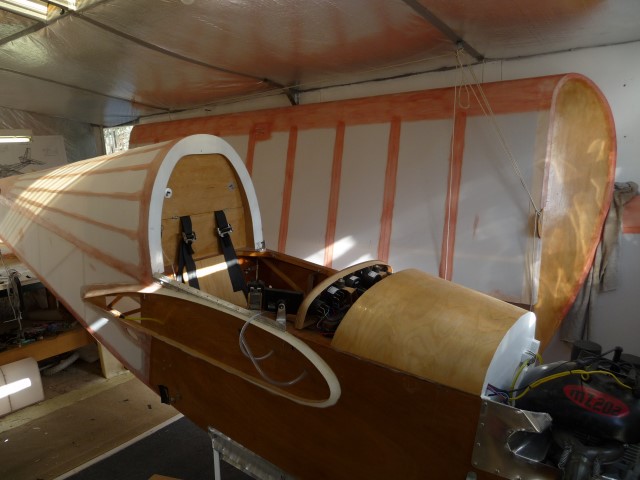
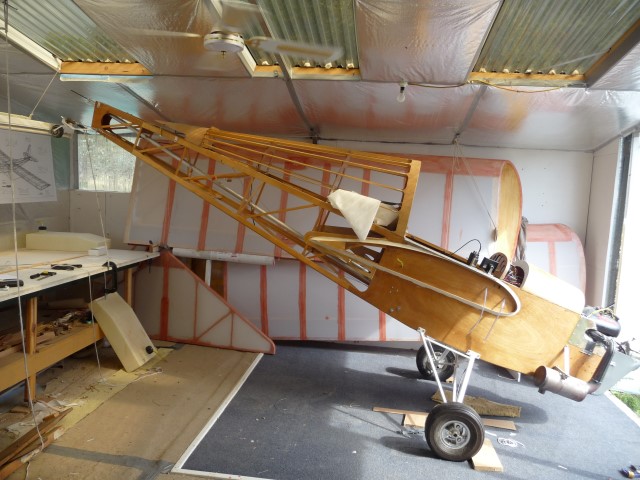
After this experience, the fuselage was fairly straightforward to do. I glued the lower fuse covering with the plane in 'crash mode', as I have the engine & u/c installed. I had a good long look around the interior before the last (turtledeck) skin went on.
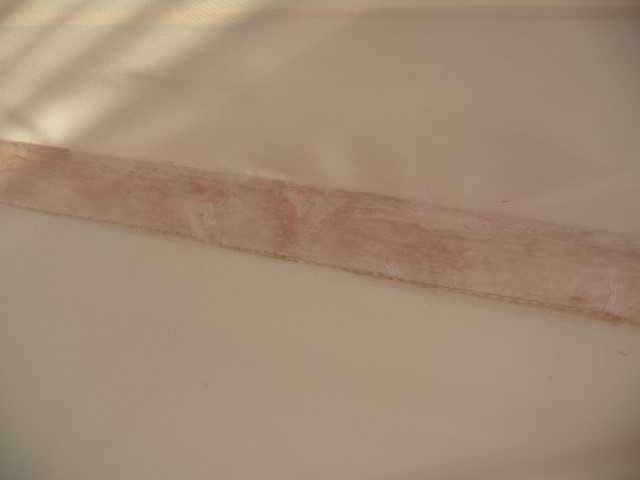
After shrinking all the skins I cut out all the various openings needed (static pressure line; tailwheel cables; aileron pushrod holes; lifting handles etc) with a soldering iron.
I had a bit of a problem with some wrinkles on one fuse longeron. But it is amazing how you can take these out with an iron at 240 degrees & a bit of patient ironing. See before & after pix of same area (nos 4&5).
So that's the covering all done, except the steel gear legs.
Now I have to decide on the paint scheme.
Bruce
|
|
 |
|
|
|
|
|
|
| Dick Rake |
| February 17, 2016, 5:08am |
|
 Home phone 602-999-3715/Mini-max with Hirth 2704 AcePosts: 755
Time Online: 40 days 13 hours 26 minutes
|
Damn Bruce you've been busy! It's looking good and the way you're going it won't be long now. There's something very satisfying watching the fabric shrink and smelling the glue. |
|
|
|
|
|
| rlc45lc |
| February 17, 2016, 6:58am |
|
Fledgling Member  Posts: 24
Time Online: 8 days 19 hours 19 minutes
|
Nicely done and well presented.
You get a gold star!
RonC |
|
|
|
|
|
| Arthur Withy |
| February 17, 2016, 9:04am |
|
Happy 1500R owner - building a Jodel D18 AcePosts: 2,532
Time Online: 32 days 12 hours 14 minutes
|
well Bruce as always...compliments..!!!!! nicely done |
|
|
|
|
|
| aeronut |
| February 17, 2016, 1:22pm |
|
 blue sky and tail winds to everyone AcePosts: 1,560
Time Online: 28 days 22 hours 31 minutes
|
Except for flying, the covering was the most rewarding part of the build for me. Just think flying is getting closer and closer. Once you get past the apprehension, the flying is a fantastic reward for all the hard work that you have endured. Great build. |
| never surrender; never give-up |
|
|
|
|
|
| Ricardo |
| February 17, 2016, 2:50pm |
|
 Videos in UTube: ral1951 AcePosts: 2,772
Time Online: 75 days 23 hours 15 minutes
|
Superb work Bruce!. Iron does marvels shrinking the fabric, does'n it?
About MEK, as you say, that stuffs causes cancer and kills lung cells. You need to be very well protected and wear gas mask.
the effect shows later in life if taken too light. I used Stewart System any time to avoid the risks. |
|
|
|
|
|
| bigbrixx1 |
| February 17, 2016, 5:38pm |
|
Ace
Posts: 822
Time Online: 20 days 16 hours
|
Great work Bruce! She is looking great! The welding rod makes a perfect needle for stitching.... And the shapes we can come up with make the process doable! It wasn't that long ago we were building ribs! Using the MEK isn the finishing process was out for me. I cover and build in the basement! My past indiscretions have certainly shortened my life, but I owe it to my wife to let her try to outlive me. It is a nasty chemical. I noticed you didn't cover the solid part of fuselage with the cloth..... Do i see a nice warm natural wood finish up there perhaps? Well either way Great job! |
| V-max. Finished. Now in phase one flight |
|
|
|
|
|
| beragoobruce |
| February 18, 2016, 3:02am |
|
Built an Eros - now I'm flying it! AcePosts: 1,067
Time Online: 19 days 10 hours 58 minutes
|
Thanks to all for your comments - most kind!
Brian, I have now covered just the coaming (top of fuse between firewall & instrument panel area) with Dacron. I don't see the point of adding weight by covering over solid ply with fabric, except where it's in full sun for a bit of extra protection.
I would have used Stewart systems, but the Polyfiber came with the kit. I could have done without the MEK fumes. Also, I enquired from a local dealer regarding additional PolyBrush, and the 'dangerous goods' shipping charge was more than the Polybrush! So you have to really want it. As I said, it does look like good stuff, though.
Bruce |
|
|
|
|
|
| Arthur Withy |
| February 18, 2016, 10:30am |
|
Happy 1500R owner - building a Jodel D18 AcePosts: 2,532
Time Online: 32 days 12 hours 14 minutes
|
HI Bruce,
Im looking forward to read all about your airframe weights..before covering, after covering and then with paint....Very interesting
cheers Arthur |
|
|
|
|
|
| beragoobruce |
| February 18, 2016, 11:08am |
|
Built an Eros - now I'm flying it! AcePosts: 1,067
Time Online: 19 days 10 hours 58 minutes
|
Glad I'm not the only one Art! I'll post when i have some figures.
Bruce |
|
|
|
|
|
| Reto S |
| February 19, 2016, 1:36pm |
|
Ace
Posts: 320
Time Online: 13 days 19 hours 26 minutes
|
Bruce You getting closer to the finishing line by the day. What a monumental effort, what a result! But as they say, the journey is the destination (or something like that...)... Thank you for sharing your experience, it helps a lot. Keep going! Cheers Reto |
|
|
|
|
|
| Arthur Withy |
| February 20, 2016, 2:32pm |
|
Happy 1500R owner - building a Jodel D18 AcePosts: 2,532
Time Online: 32 days 12 hours 14 minutes
|
Yes reading through this thread has been a wonderful experience.....so why do I want to test fly this aeroplane..??? LOL Because.....its built very well |
|
|
|
|
|
| stevejahr |
| February 20, 2016, 7:23pm |
|
Airbike plans examiner AcePosts: 200
Time Online: 4 days 11 hours 43 minutes
|
...I don't see the point of adding weight by covering over solid ply with fabric, except where it's in full sun for a bit of extra protection.
YMMV -- In the modelling world we are always concerned about weight, possibly more so than in the full size world since the affects of weight are greater on the small end of the gene pool. Yet we run covering over all the wood parts because it does add some additional strength. Those fabric fibers make a composite with the wood and the glue/paint also provides a composite affect with the surface fibers in the wood. Covering definitely improves the surface durability over the soft woods. |
|
|
|
|
|
|


 Logged