|
|
 beragoobruce beragoobruce |
|
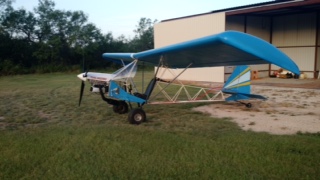
Built an Eros - now I'm flying it! Ace Posts: 1,067
Time Online: 19 days 10 hours 58 minutes
|
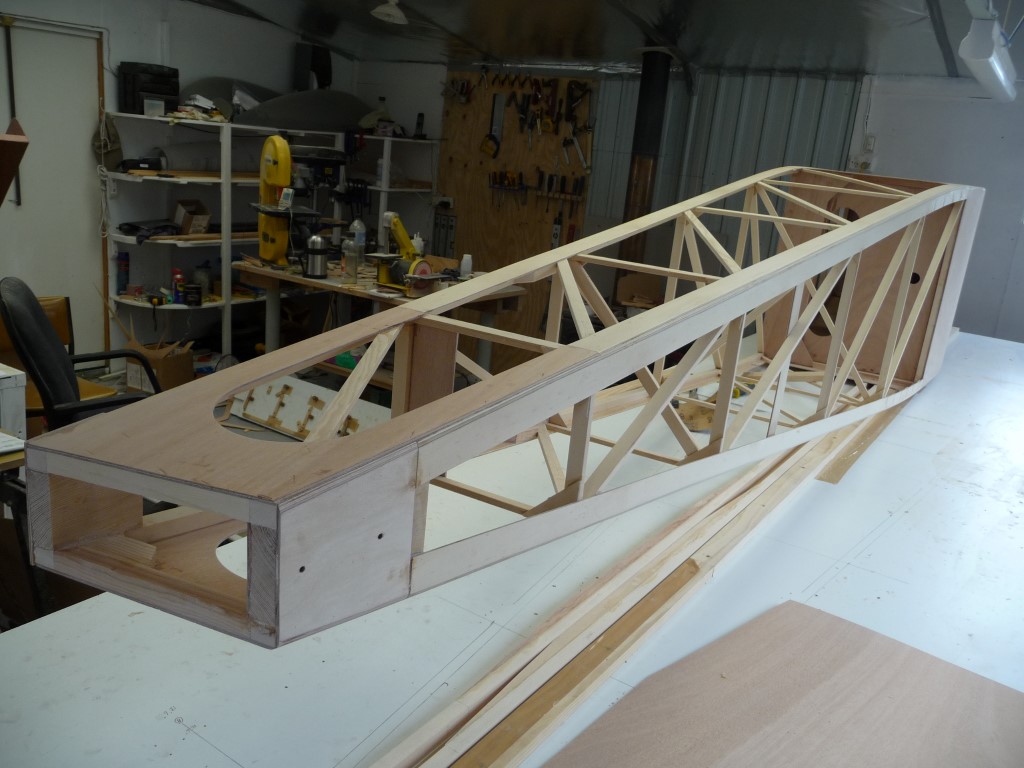
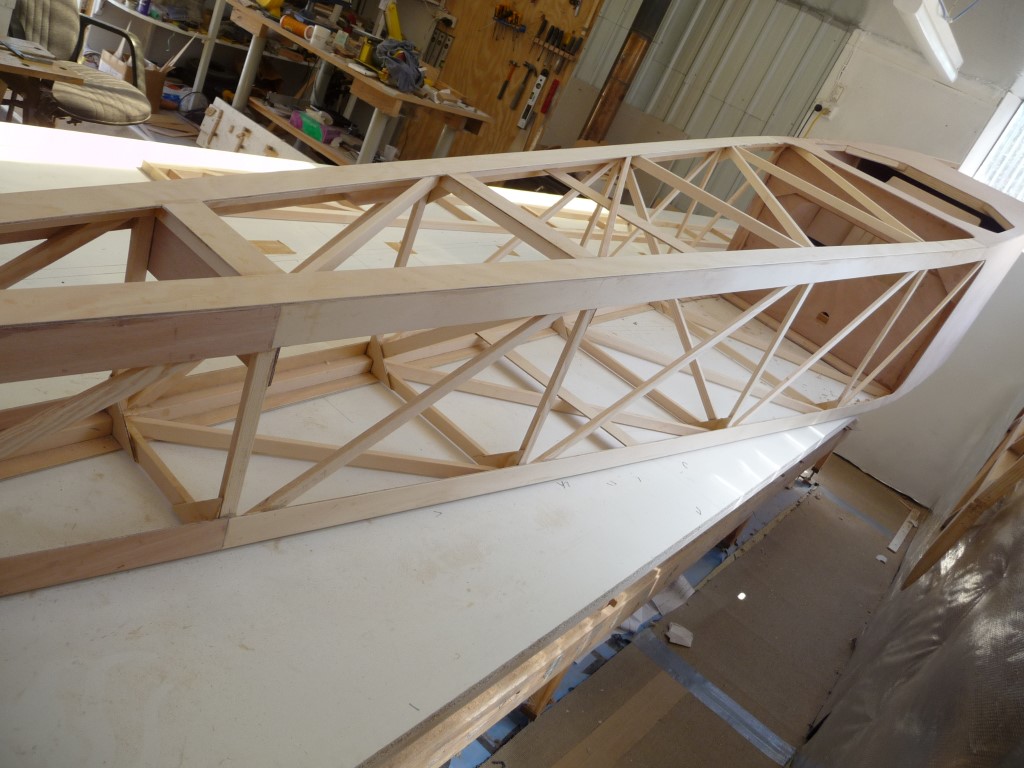
Then I built the aft end. I used a couple of straight lengths of 2x1 to keep the longerons straight.
|
|
|
|
|
|
| beragoobruce |
|
Built an Eros - now I'm flying it! AcePosts: 1,067
Time Online: 19 days 10 hours 58 minutes
|
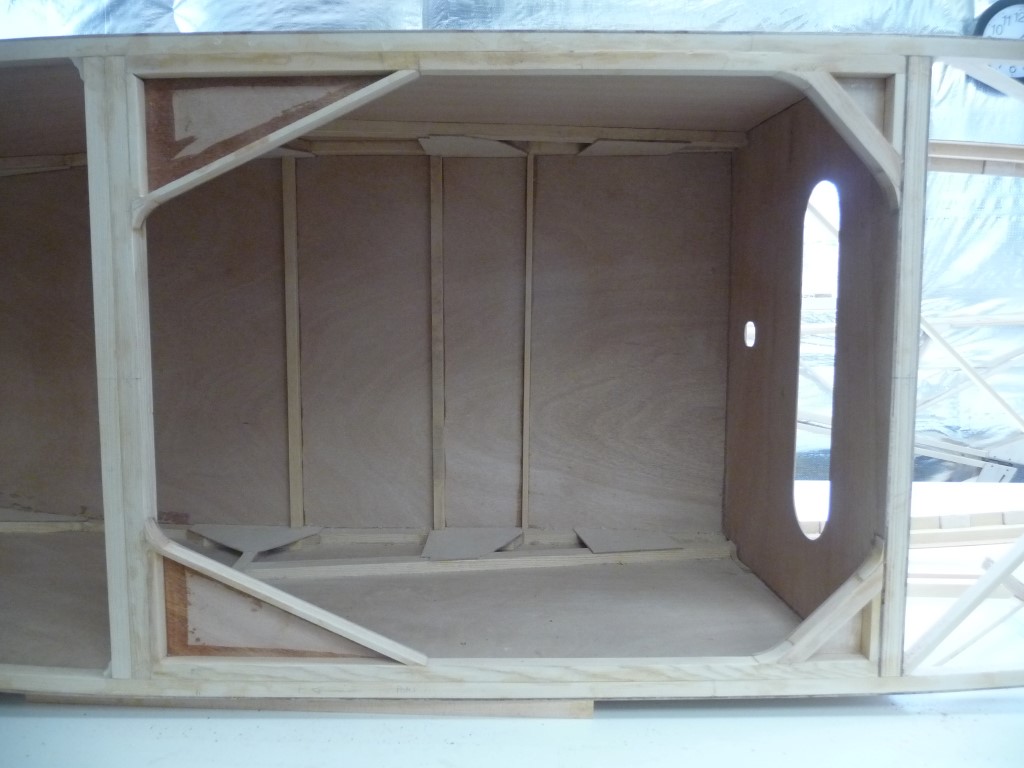
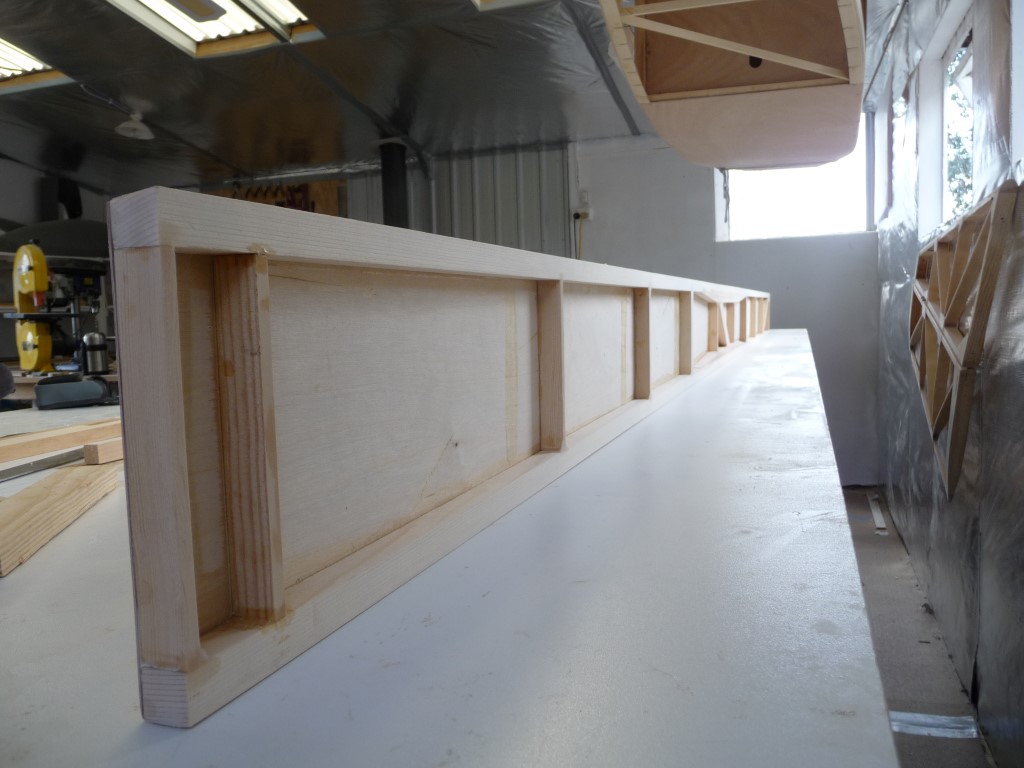
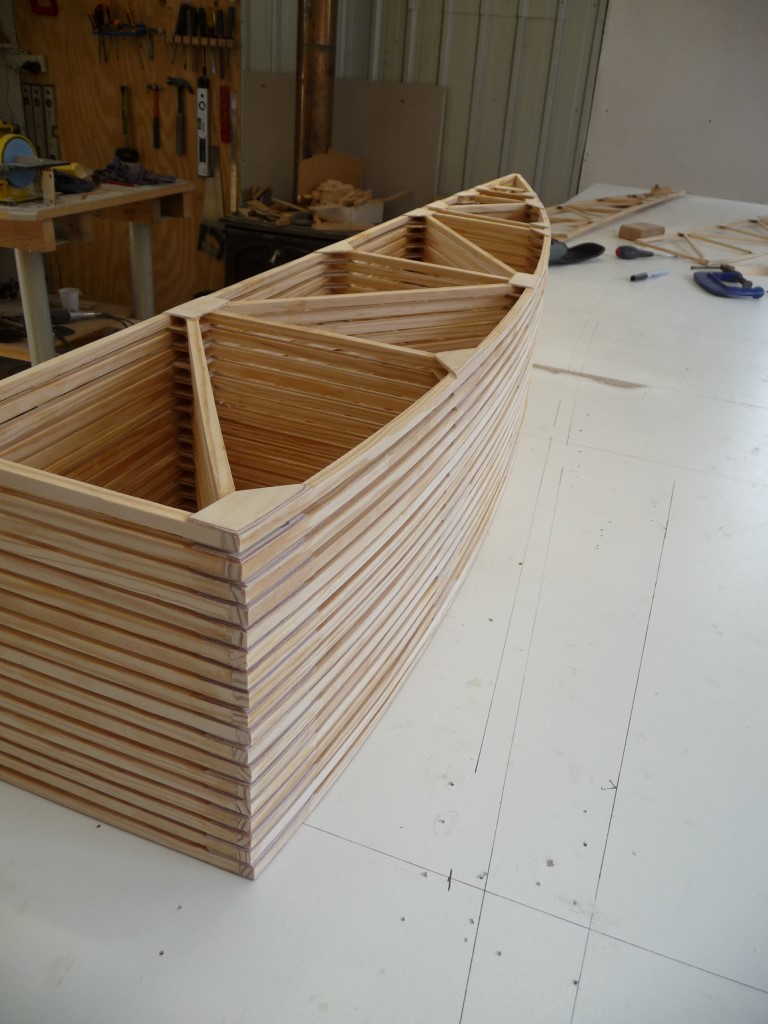
Cut & glued all the various crossmemers, and finally the ply strips. Then I routed the corner radius.
|
|
|
|
|
|
| beragoobruce |
|
Built an Eros - now I'm flying it! AcePosts: 1,067
Time Online: 19 days 10 hours 58 minutes
|
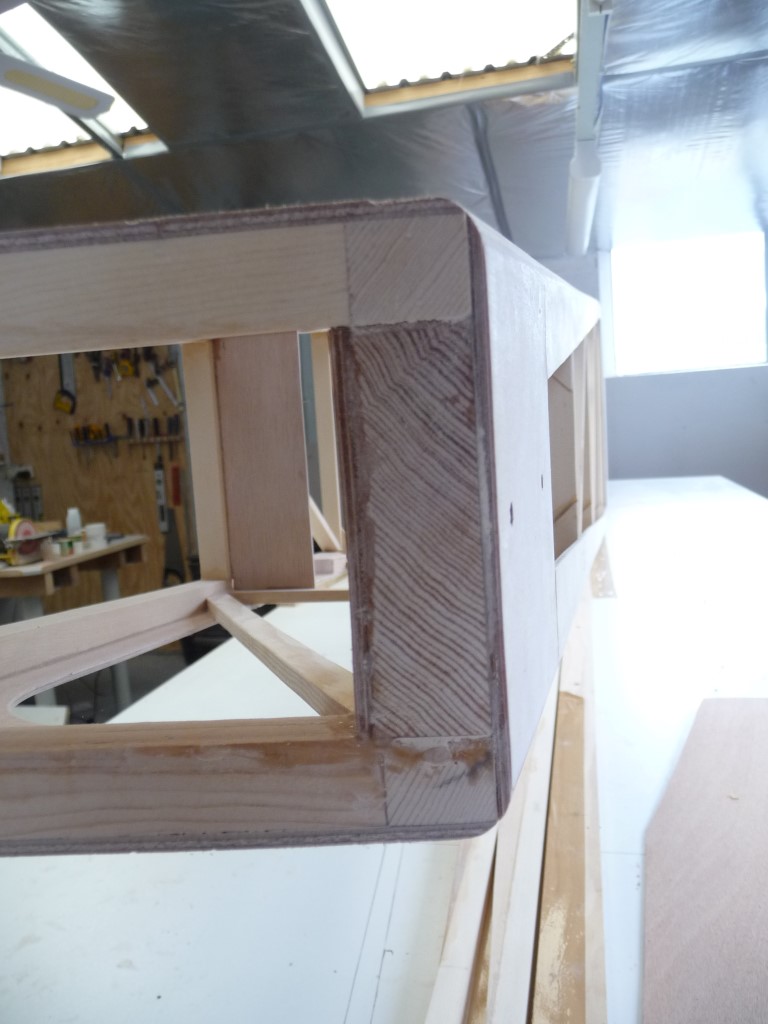
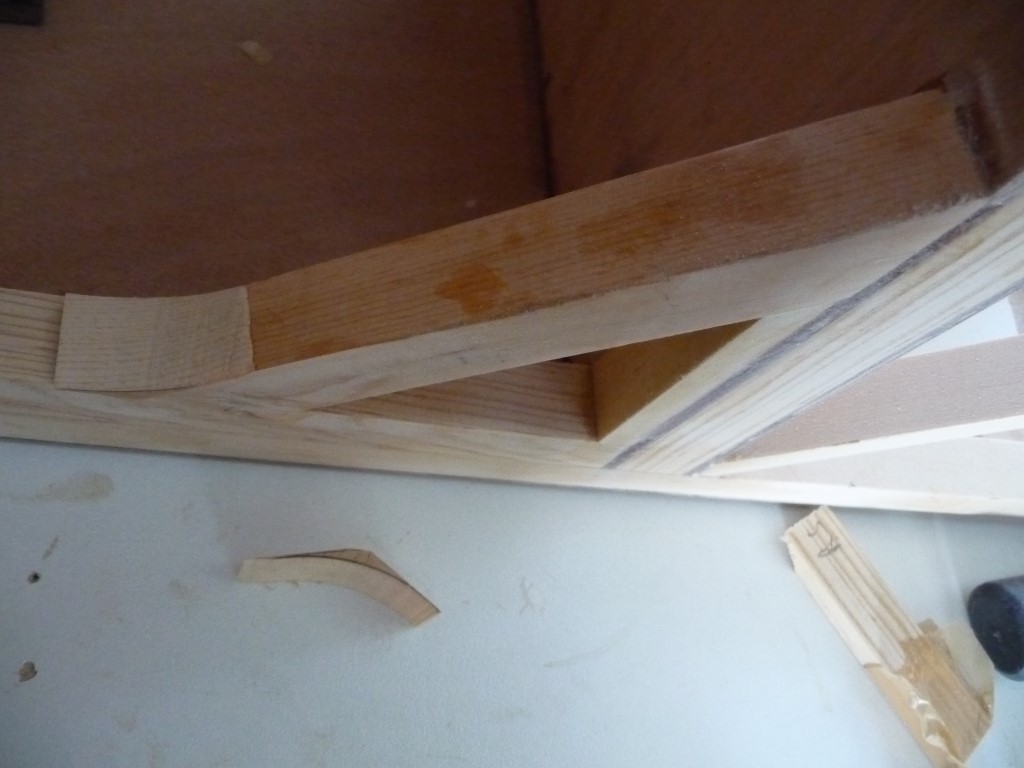
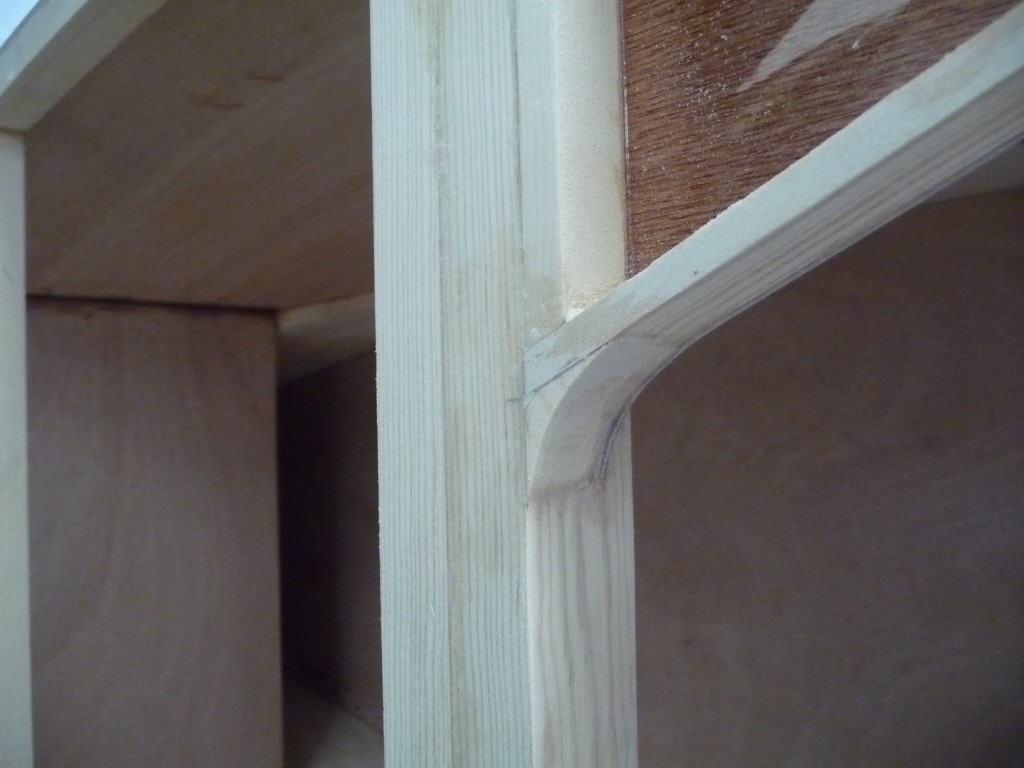
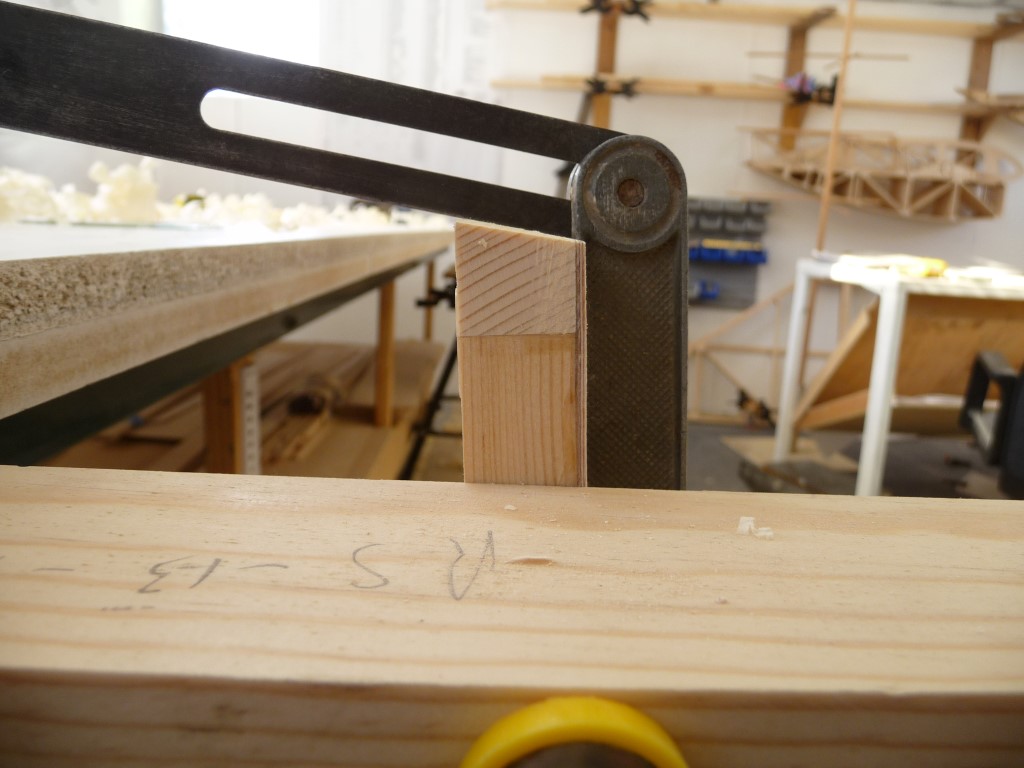
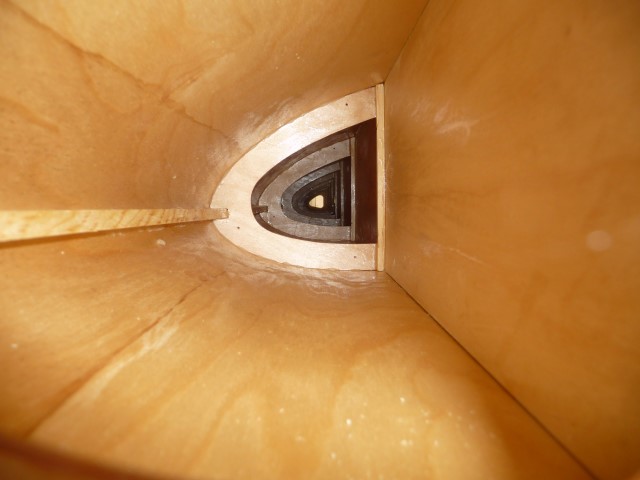
I wanted a nice solid look to the corners of the cockpit opening, so I cut some little fillets to go in where the braces meet the fuse longerons. A bit fiddly, but I think it will look a bit better when it's finished.
|
|
|
|
|
|
| beragoobruce |
|
Built an Eros - now I'm flying it! AcePosts: 1,067
Time Online: 19 days 10 hours 58 minutes
|
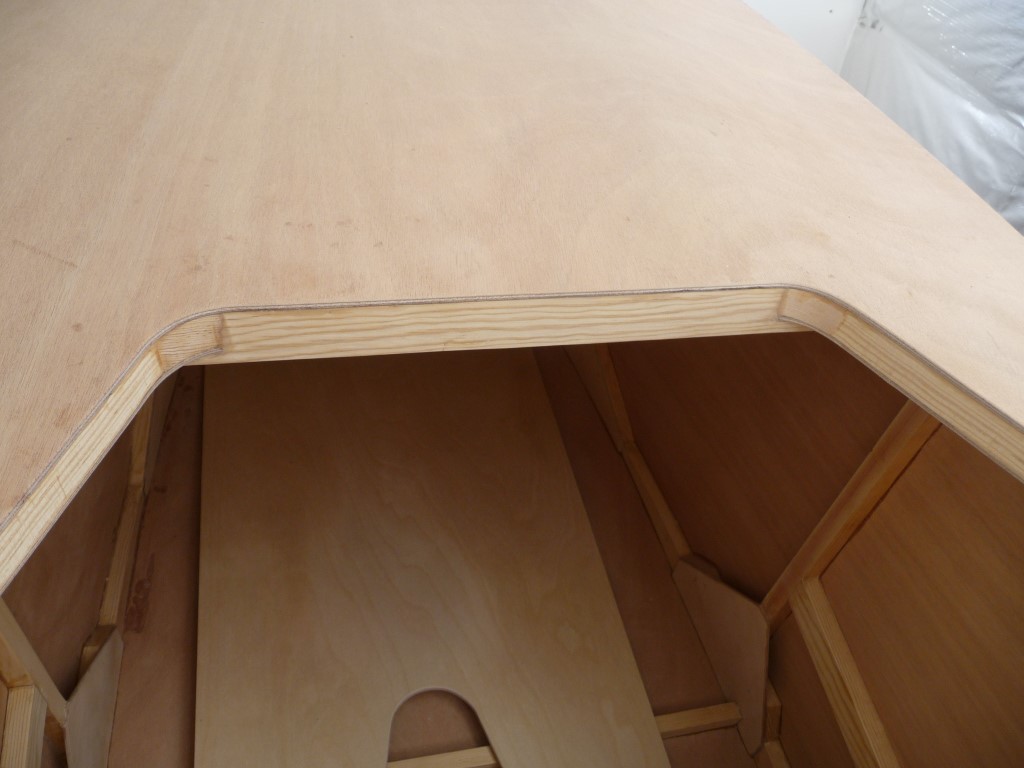
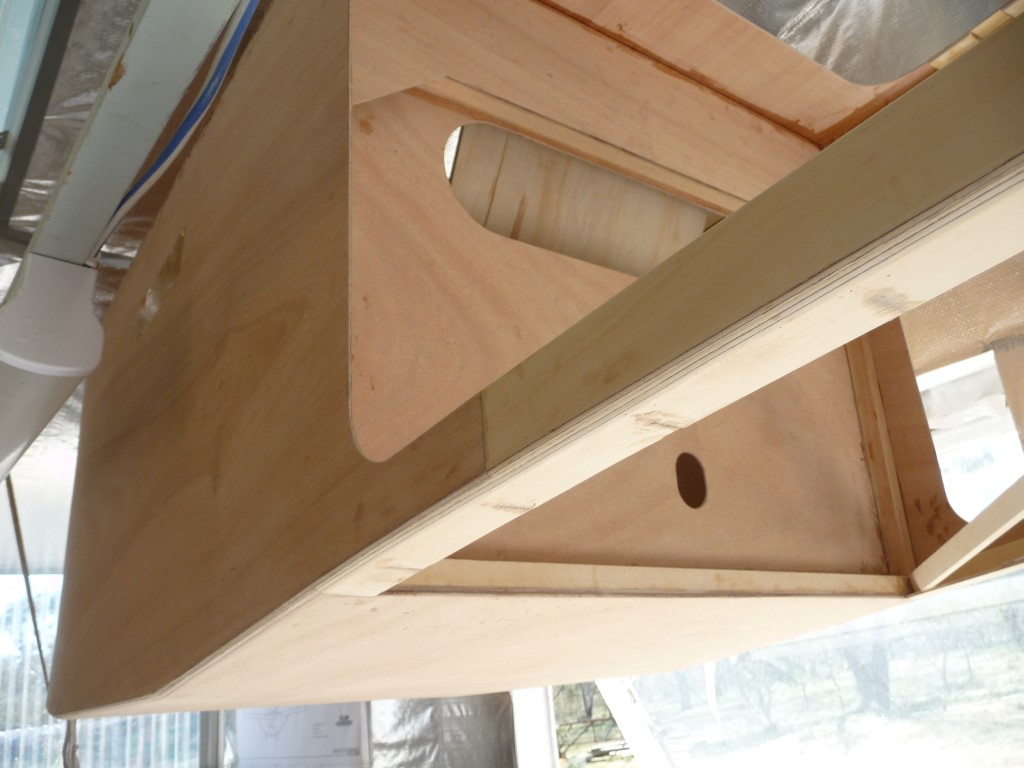
Although the plan calls for the top skin in the cockpit area to be made of 4 different pieces, since my kit came with a piece of ply big enough to make the whole upper skin in one piece, I did that. This way, when I varnish, you won't see joins in the wood.
|
|
|
|
|
|
| beragoobruce |
|
Built an Eros - now I'm flying it! AcePosts: 1,067
Time Online: 19 days 10 hours 58 minutes
|
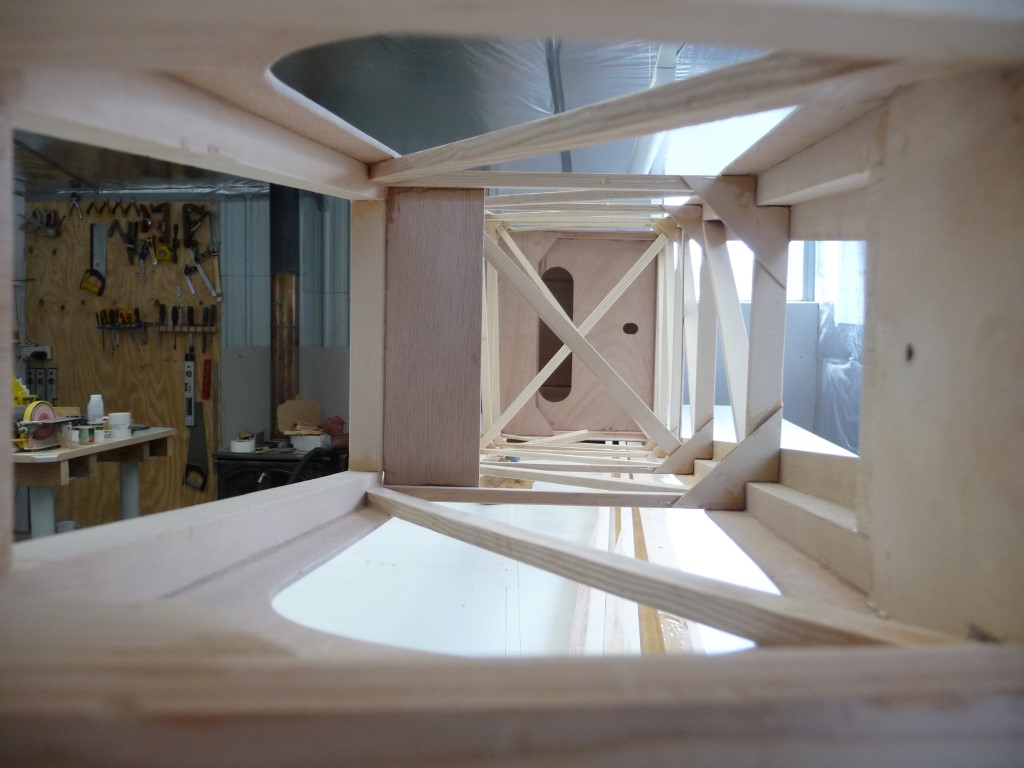
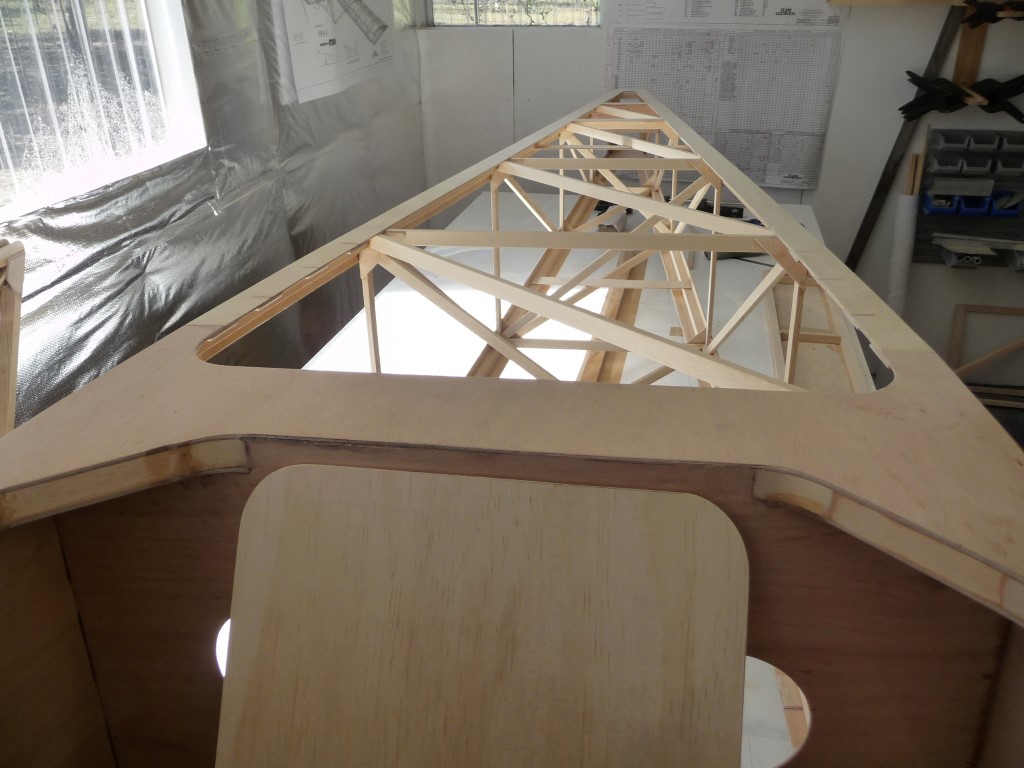
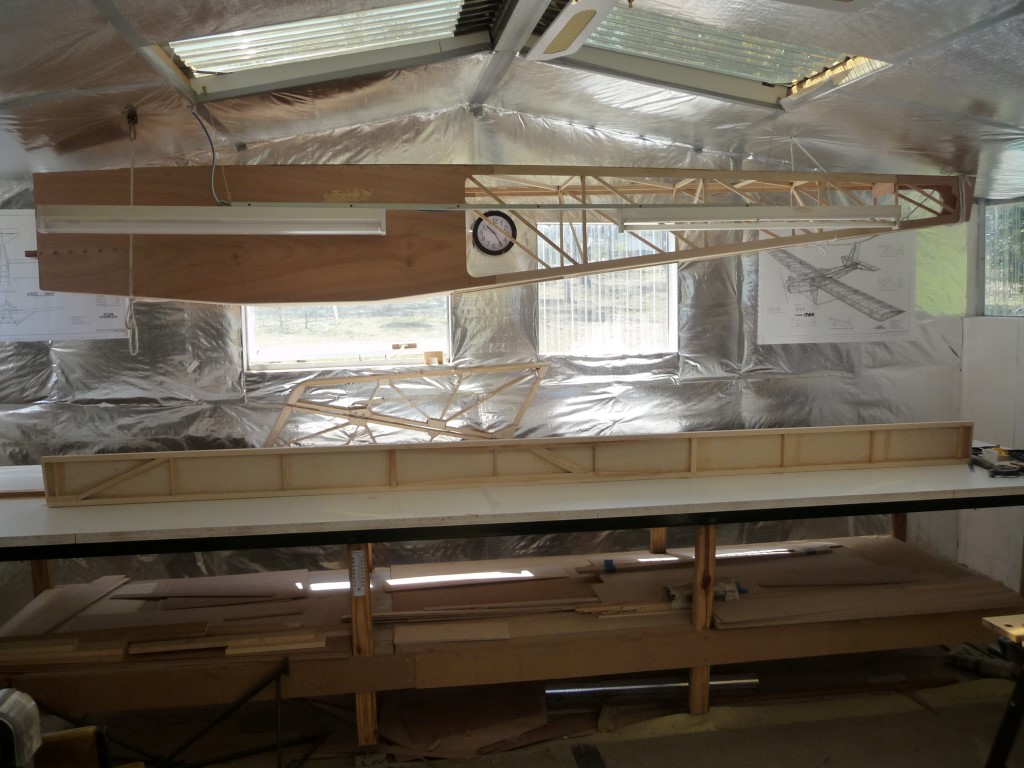
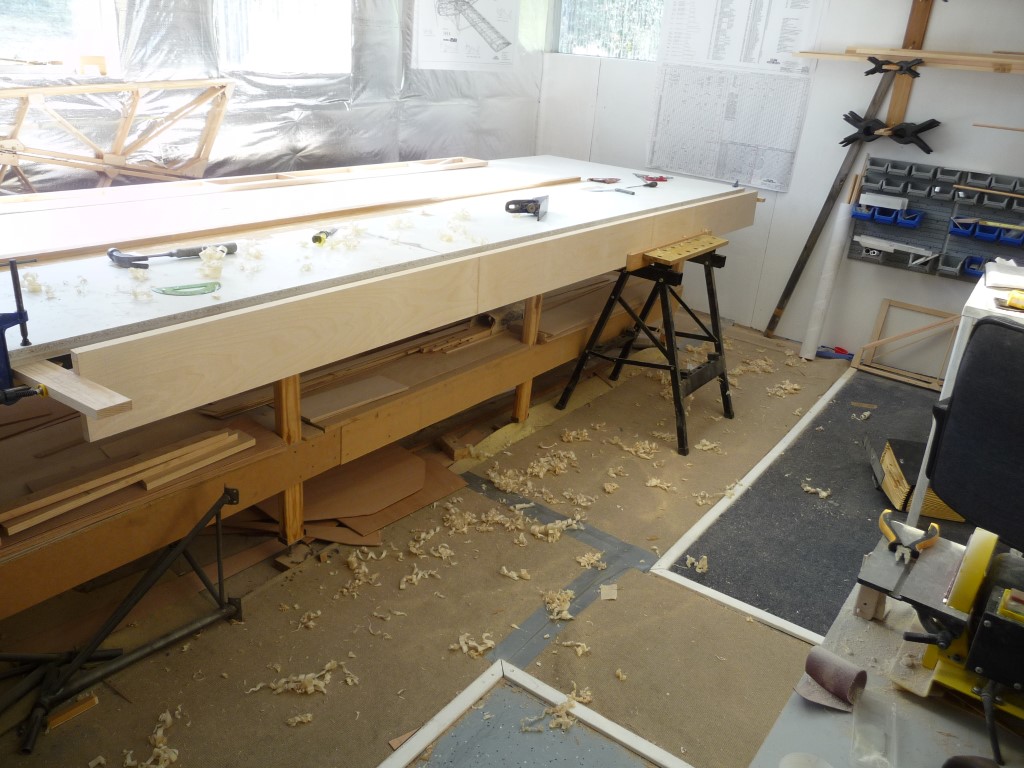
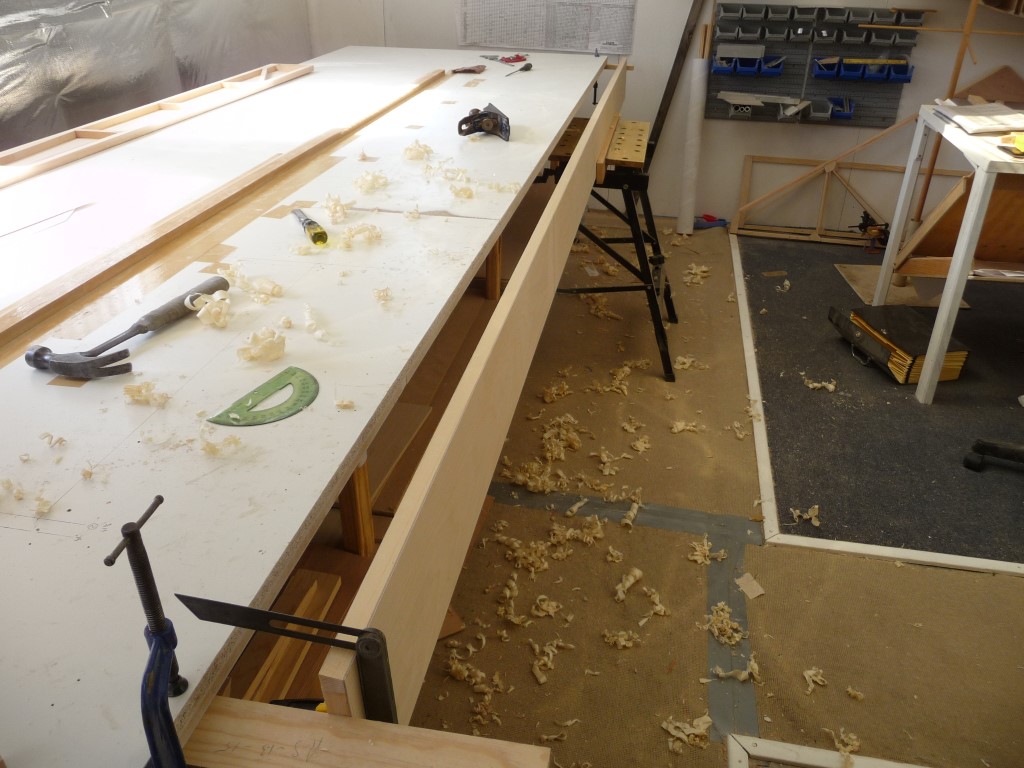
I finished all the loads of other little areas, and cleaned up all the glue dribbles, etc, and roughly sanded it all down. I didn't want to continue to the turtledeck yet, as I only have limited storage space. About the only place I have to store the fuse at this stage is over the build table. Hope it doesn't fall on the wings underneath! (you can see a completed spar on the bench, but I haven't written that bit up yet).
It's getting to over 90 in my shed by midday, so I'm having to back off a bit until the evening. Even then it doesn't cool down much. And it's only the start of Spring here. Hope my wood doesn't dry out at the 30% humidity that's typical here. Maybe I should start varnishing/epoxying all my completed parts.
Bruce
|
|
|
|
|
|
| Arthur Withy |
| October 25, 2014, 10:59am |
|
 Happy 1500R owner - building a Jodel D18 AcePosts: 2,532
Time Online: 32 days 12 hours 14 minutes
|
Really wonderful progress...great Photos
are you keeping a log on your build hours Bruce..?
regards Arthur |
|
|
|
|
|
| beragoobruce |
| October 25, 2014, 11:41am |
|
Built an Eros - now I'm flying it! AcePosts: 1,067
Time Online: 19 days 10 hours 58 minutes
|
Thanks, Arthur.
Yes, I'm recording all my hours. From memory, I'm up to about 565 hrs so far.
If ever I feel like a laugh, I read the bit where it says the build hours for this plane are 325 - 400. Never fails to make me smile: bit like engine manufacturers' weight & horsepower figures, or most aircraft specs on take off distances, climb rate, etc.
Before I ordered the kit I'd reckoned about 1000 hours, but it will prolly be over that. Not that I mind - I'm in no hurry, & greatly enjoying the build. But I don't think it improves aircraft dealers' credibility by publishing figures that are clearly bullshit.
Bruce |
|
|
|
|
|
| bigbrixx1 |
| October 25, 2014, 12:14pm |
|
 Ace AcePosts: 822
Time Online: 20 days 16 hours
|
Great job looks great! I plan on starting my fuse soon! Thanks for the great tips! |
| V-max. Finished. Now in phase one flight |
|
|
|
|
|
| beragoobruce |
| October 25, 2014, 12:46pm |
|
Built an Eros - now I'm flying it! AcePosts: 1,067
Time Online: 19 days 10 hours 58 minutes
|
Hi Bigbrix
I've been reading your wing build again - there's some useful stuff in that, so thanks. Your wings look well built.
I doubt you'll have any problems with the fuselage: it will be a walk in the park for you!
How much T88 have you used? I've nearly used the quart that came with the kit. Ordered some more from Spruce.
Bruce |
|
|
|
|
|
| bigbrixx1 |
|
Ace
Posts: 822
Time Online: 20 days 16 hours
|
I have ordered two quarts in additition to what was supplied with the kit. Soon I will need another quart! How do you remove the "drips" or squeeze out. I find a heat gun and scraper work very well for me. |
| V-max. Finished. Now in phase one flight |
|
|
|
|
|
| beragoobruce |
|
Built an Eros - now I'm flying it! AcePosts: 1,067
Time Online: 19 days 10 hours 58 minutes
|
Yeah, it's too easy to get blobs of glue & fingerprints everywhere. I just try and get the right amount of glue in the joint, and scrape off droppings as I go. My worktable is white melamine and hardened glue blobs come off that with a bluntish chisel. For squeezeout I generally use a fine metal file, then finish with sandpaper. I use small needle files (flat & square) quite a lot. Haven't had to use the hot scraper yet, but it's good to know it's available. I'm going to need it one day  Bruce |
|
|
|
|
|
| texasbuzzard |
|
 airbike Buzzard AcePosts: 1,238
Time Online: 8 days 23 hours 51 minutes
|
Bruce you are really doing a great job. You're about ready to sit in it and make airplane sounds.
Monte |
|
|
|
|
|
| beragoobruce |
|
Built an Eros - now I'm flying it! AcePosts: 1,067
Time Online: 19 days 10 hours 58 minutes
|
I already have!  It's very roomy in there, and quite comfortable even sitting on bare boards. I need to mock up some rudder pedals to get a proper feel for it. Yaaay! Bruce |
|
|
|
|
|
| Arthur Withy |
|
Happy 1500R owner - building a Jodel D18 AcePosts: 2,532
Time Online: 32 days 12 hours 14 minutes
|
Yes I have the inch and a half cushions...plus a car seat cushion....from Sprint Autos.....about $10....looks great and comfortable
cheers Arthur |
|
|
|
|
|
| beragoobruce |
| November 15, 2014, 5:35am |
|
Built an Eros - now I'm flying it! AcePosts: 1,067
Time Online: 19 days 10 hours 58 minutes
|
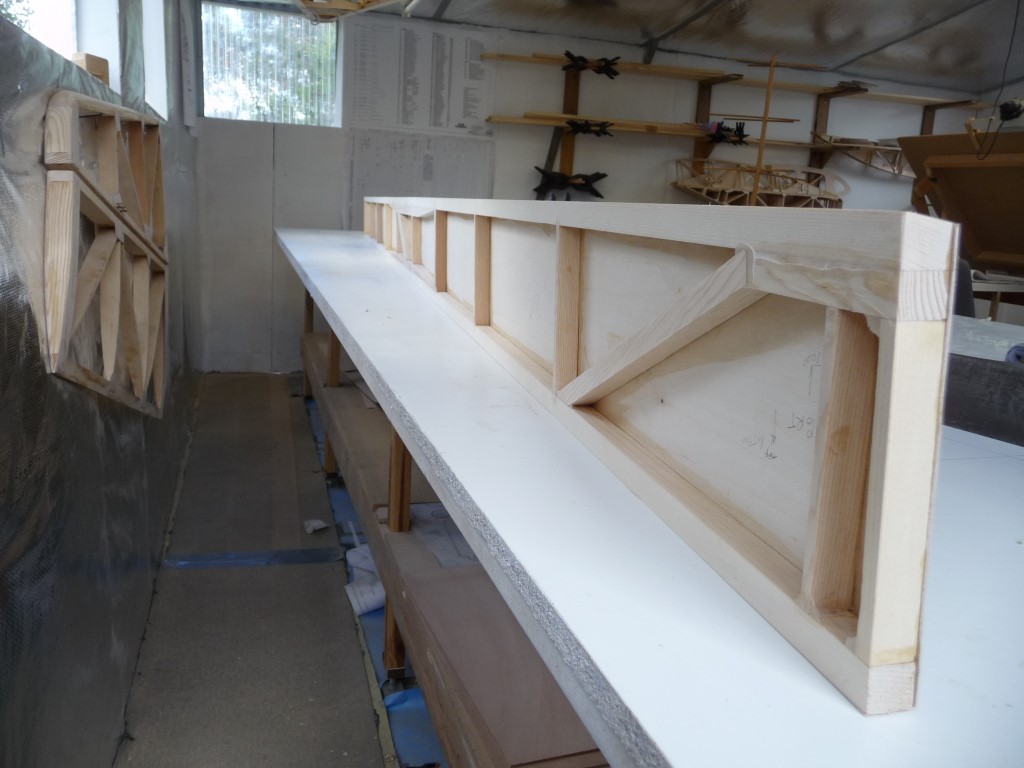
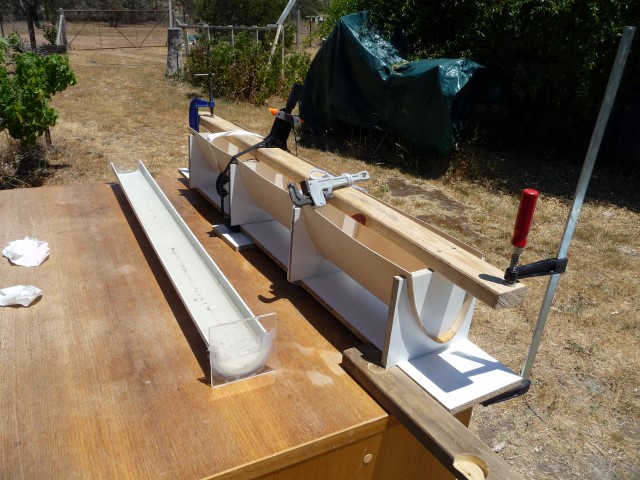
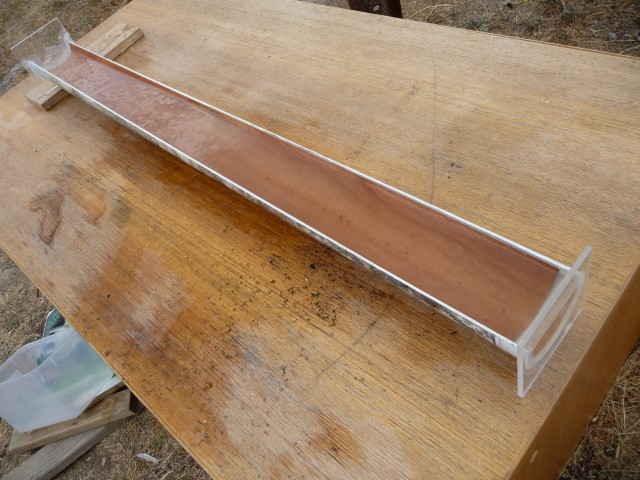
So on to the wings. I can't add much to Bigbrix's excellent wing posting, so I'll just post a few random pix of my wings under construction. Starting with the spars. I planed the bevels on the top spars by hand, as I don't trust my table saw not to chew chunks out of the spar caps
|
|
|
|
|
|
| beragoobruce |
| November 15, 2014, 5:42am |
|
Built an Eros - now I'm flying it! AcePosts: 1,067
Time Online: 19 days 10 hours 58 minutes
|
. . .and a couple more of the bevels:
|
|
|
|
|
|
| beragoobruce |
| November 15, 2014, 5:51am |
|
Built an Eros - now I'm flying it! AcePosts: 1,067
Time Online: 19 days 10 hours 58 minutes
|
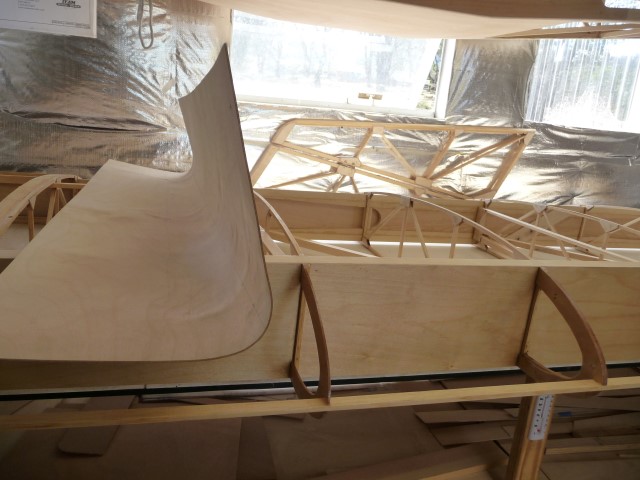
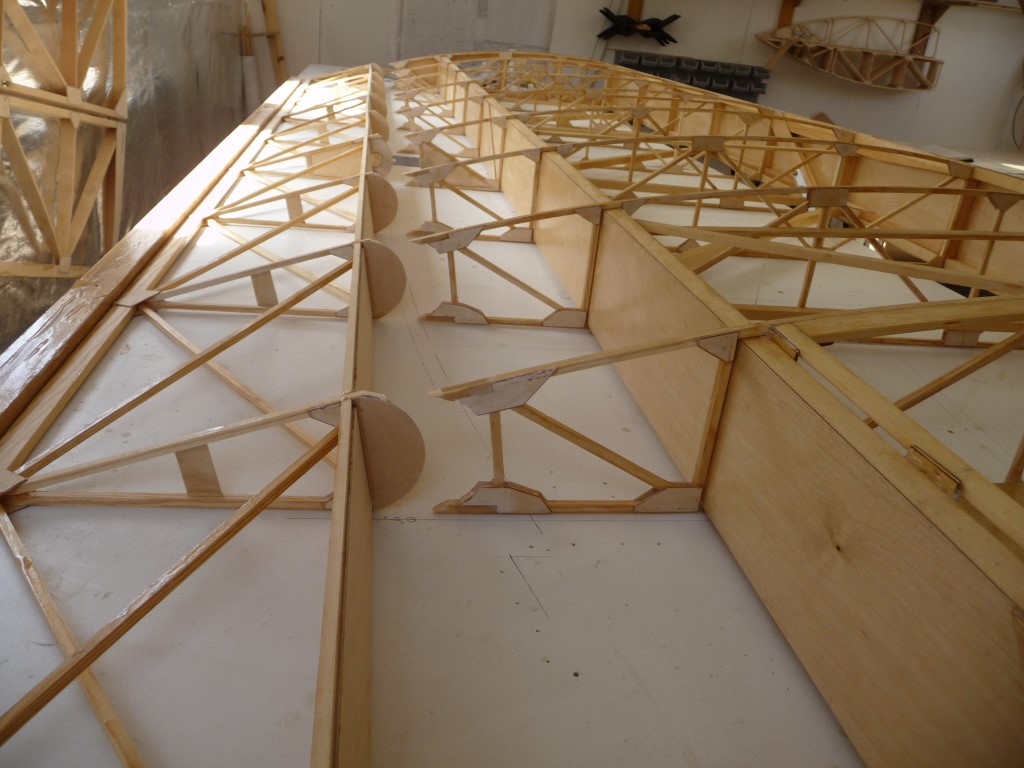
Then I just took a pile of ribs I made earlier (as they used to say on TV), and slotted them onto the spars, per build notes.
|
|
|
|
|
|
| beragoobruce |
| November 15, 2014, 5:58am |
|
Built an Eros - now I'm flying it! AcePosts: 1,067
Time Online: 19 days 10 hours 58 minutes
|
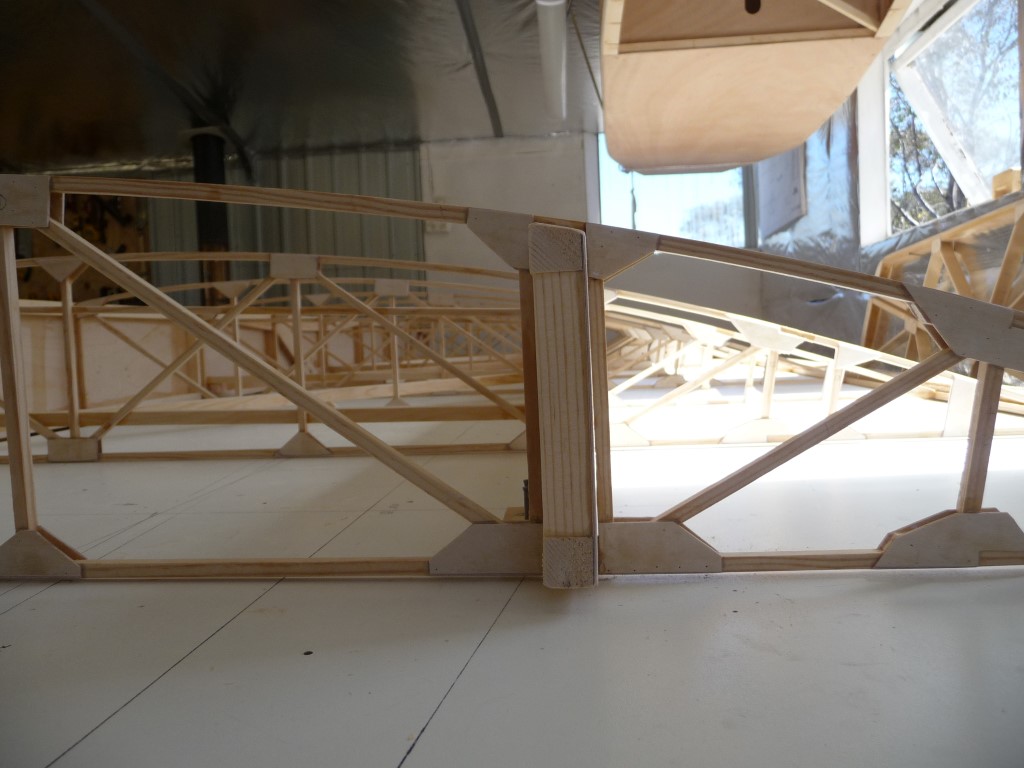
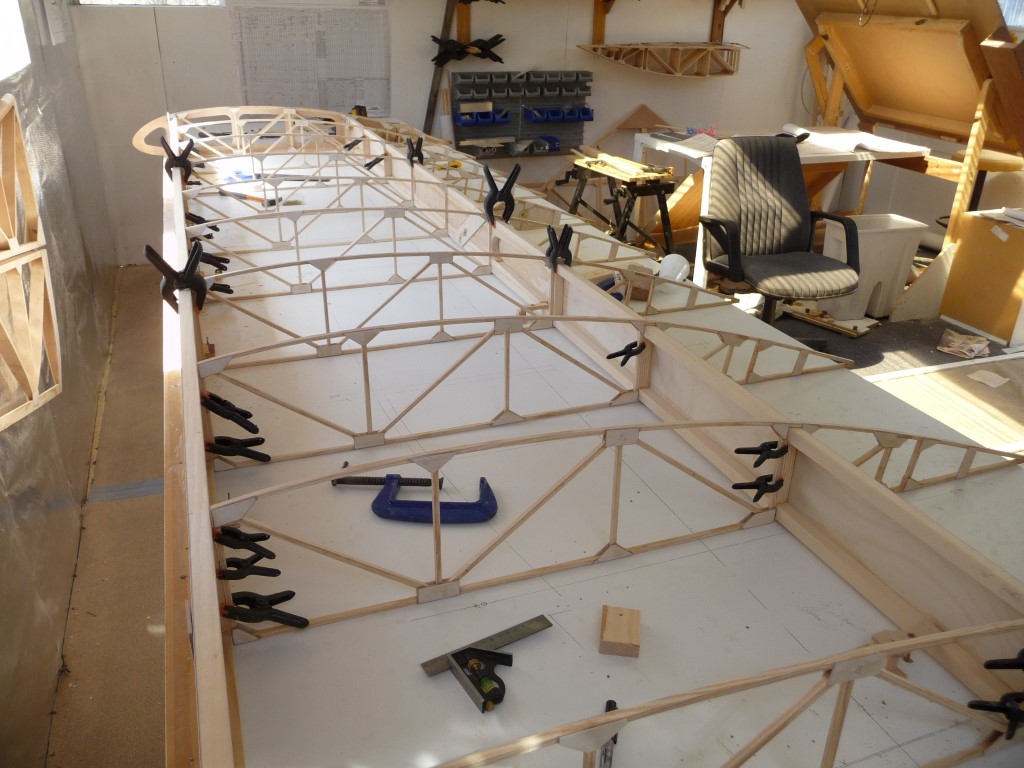
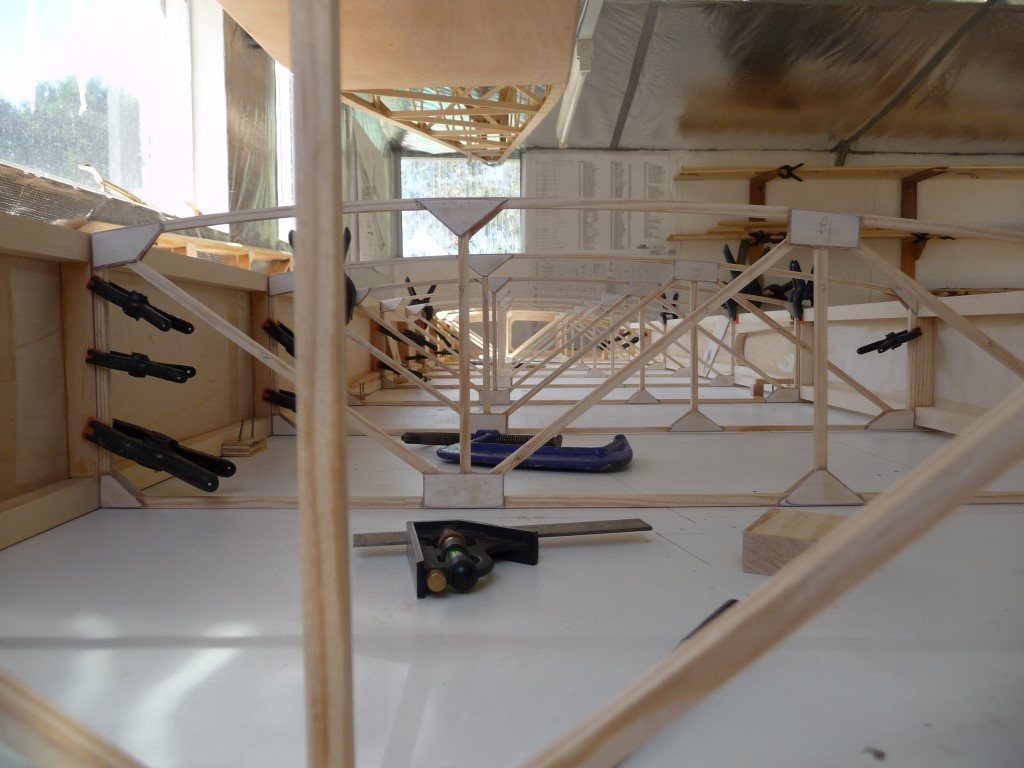
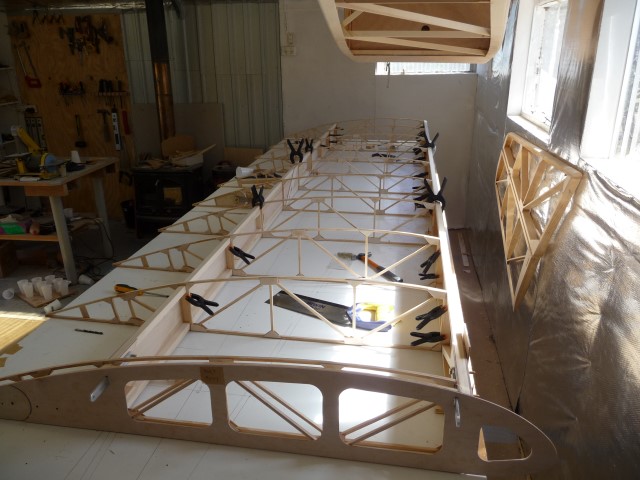
I found the assembly straightforward enough. It's great having spent so long making the parts to be able to fit them all together. You get a sense of progress as something more complex takes shape.
So more random wingpix:
|
|
|
|
|
|
| beragoobruce |
| November 15, 2014, 6:18am |
|
Built an Eros - now I'm flying it! AcePosts: 1,067
Time Online: 19 days 10 hours 58 minutes
|
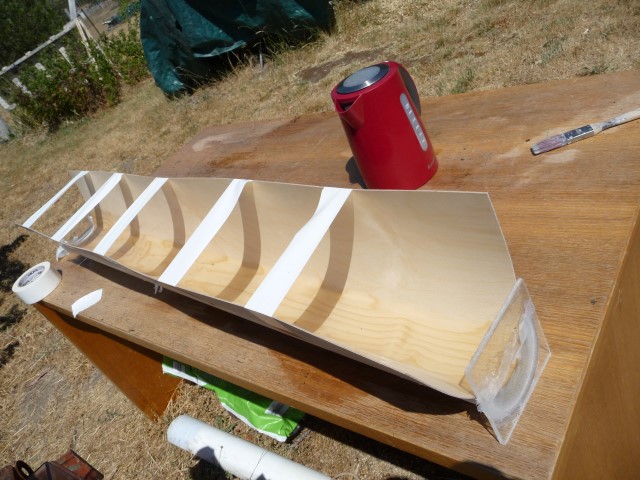
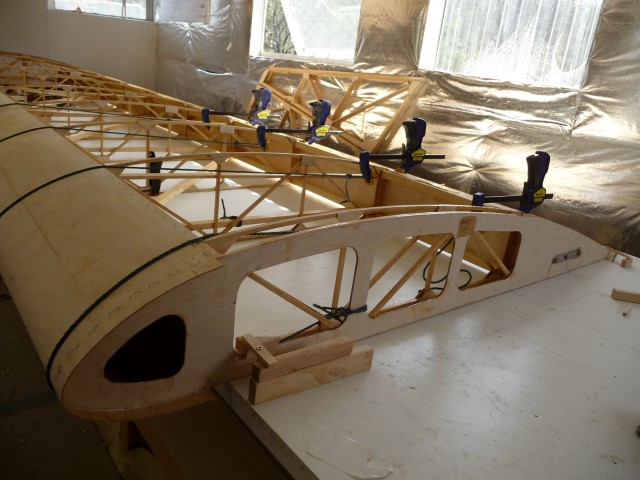
Having glued the body of the wing together, the trickier bit was the ply leading edge skin.
I would have preferred not to have had to wet the wood, as I believe it does reduce its strength a bit, but it wouldn't wrap round without cracking unless I pre-bent it.
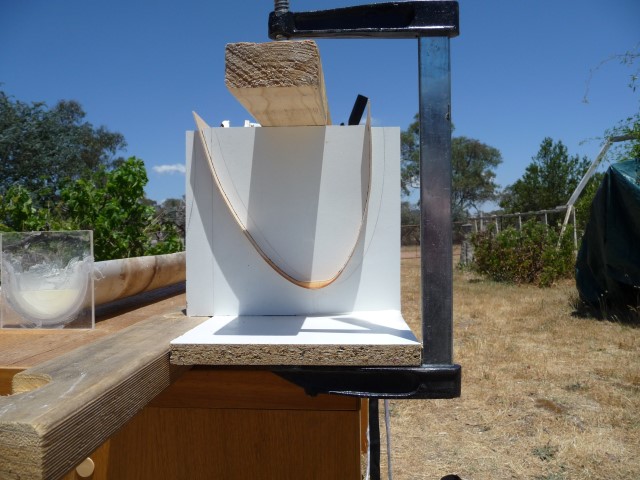
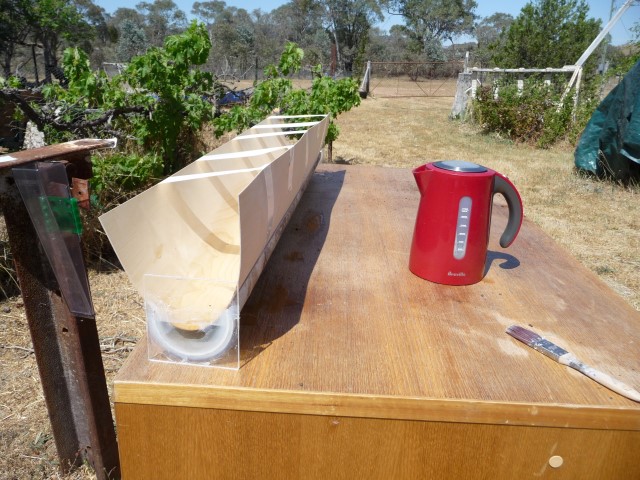
So I made a quick bend jig by just drawing round a nose rib, & cutting out carefully with a bandsaw, as I needed both bits. I used some 5/8" chipboard offcuts for the jig. I screwed the halves to a base plate & a top member of 2x4. The thickness of the bandsaw blade pretty much equals the thickness of the ply being bent.
To soak the skin, I cut a piece of 4" water pipe in half, & siliconed on some perspex end plates. I filled this with boiling water, and gradually bent the ply skin until it would fit in the pipe bath. I taped the free edges to each other until it had soaked for an hour or so. (I would have used a bath, but we don't have one - can't spare the water)(and yes we do have a shower!)
I clamped the two halves of the bend jig together & left it to set overnight. Came out with a semi-permanent bend that fitted quite closely to the noseribs.
|
|
 |
|
|
|
|
|
|
| beragoobruce |
| November 15, 2014, 6:40am |
|
Built an Eros - now I'm flying it! AcePosts: 1,067
Time Online: 19 days 10 hours 58 minutes
|
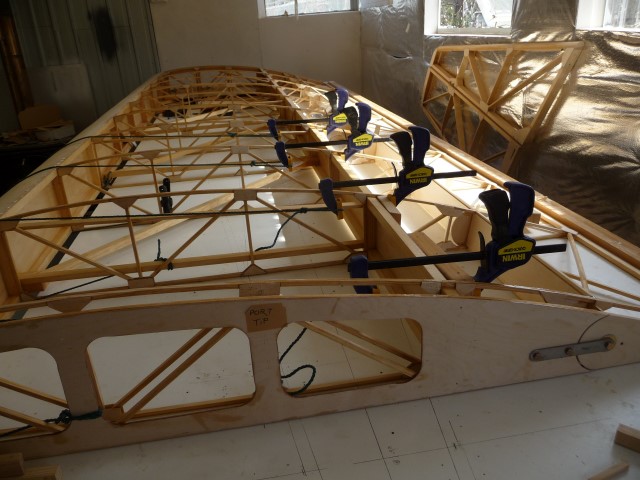
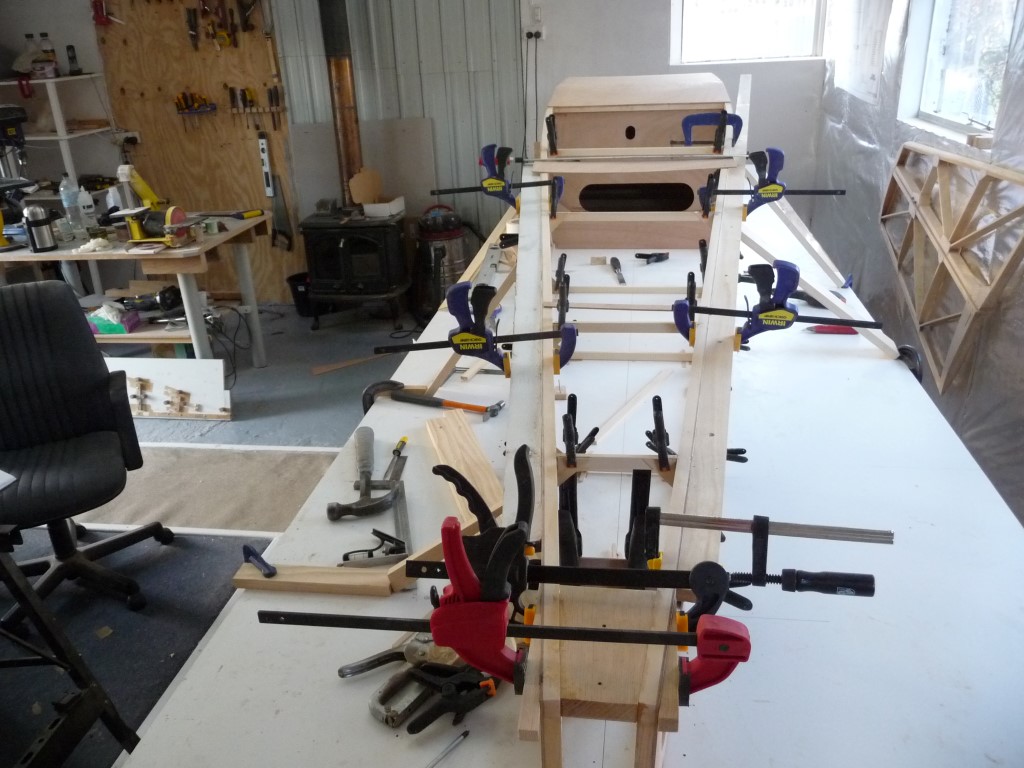
Before gluing the L/E in place, I 'varnished' it with a thin coat of WEST. That way, I could bond it on without marking the ribs and doing all that faff with part varnish, part epoxy.
Although I've only used T88 for gluing up to now, I used WEST for the skin/noserib joint. I thickened the epoxy with microfibres, so I had quite a good bead of epoxy paste over the ribs. That way, I could be sure that even if the ply skin didn't exactly follow the rib profile, it would still be bonded.
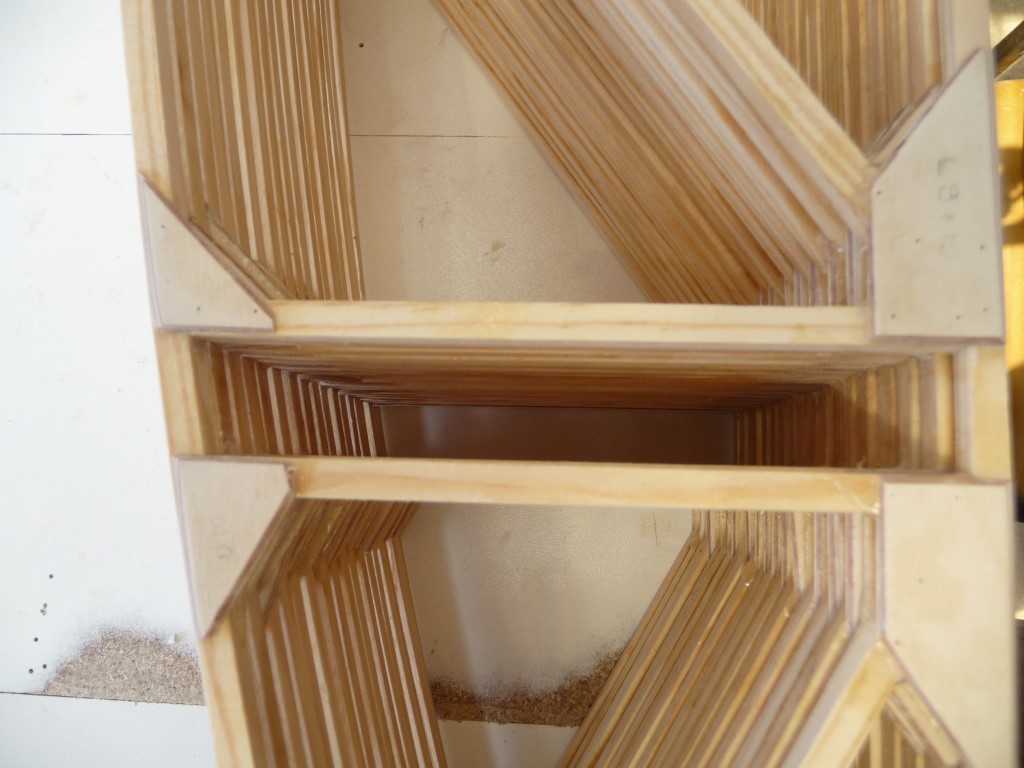
To get the skin snug over the ribs, I cut some lengths of rope and put a loop in one end. I tied the other end to structure aft of the main spar, wrapped the rope around the L/E, and used a clamp behind the rear spar to pull the rope tight. I used some scrap wood to spread the load over the rear spar. Pic should make it clear. This system worked quite well - see interior shot of L/E box section.
|
|
|
|
|
|
| beragoobruce |
| November 15, 2014, 7:03am |
|
Built an Eros - now I'm flying it! AcePosts: 1,067
Time Online: 19 days 10 hours 58 minutes
|
At last, the moment came to liberate the aileron from the body of the wing. This was the part of the drawings that I had to spend most time to understand when I first started looking at my downloaded drawings. But it's simple when you see it.
I decided not to follow the instruction to glue on the 2"ish piece of ply to box in the end double ribs. I couldn't see how I would be able to see where to cut through the rib members in the right place to free the aileron. Also, I want this closing ply in one piece to sit over the RS17 members that run along the top & bottom of the rear spar. So I'll install it after I've fitted the RS17.
Again, I've had to soak the aileron ply L/E in the pipe bath to pre bend it enough to wrap around the aileron noseribs.
Don't know why the last pic posted twice - and I can't see how to delete attachments.
|
|
|
|
|
|
| texasbuzzard |
| November 15, 2014, 10:49am |
|
airbike Buzzard AcePosts: 1,238
Time Online: 8 days 23 hours 51 minutes
|
Bruce since you are a very good craftsman and have a beautiful shop, any thoughts to offer your service to those that don't have building skills? I am sure there are those who would like a new max but lack the skills and tools to build one.
Monte |
|
|
|
|
|
| beragoobruce |
| November 15, 2014, 11:42am |
|
Built an Eros - now I'm flying it! AcePosts: 1,067
Time Online: 19 days 10 hours 58 minutes
|
Love to, Monte, and thank you for your kind words. Unfortunately, as I live in Australia, the shipping charges would prove prohibitive  And frankly, even if I could build a Max in 350 hours, and at, say, $25 an hour, the labour would come to $8750. Add the cost of materials plus engine and you're getting into silly money. When you look at how much Bob Hoskins recently sold his beautiful HiMax for, I think it underlines the fact that Max's really aren't worth very much - except, of course, to their owners. Bruce |
|
|
|
|
|
| texasbuzzard |
| November 15, 2014, 12:25pm |
|
airbike Buzzard AcePosts: 1,238
Time Online: 8 days 23 hours 51 minutes
|
Yes you can buy a used max a lot cheaper than to build one but the satisfaction of building one then hopping into it and fly cannot be explained until you have done it. Maybe you could get some of your Aussie friends interested in a build and give them some help. Keep up the great work, can't wait to see the finished product.
Monte |
|
|
|
|
|
| Tom |
| November 15, 2014, 12:52pm |
|
Ace
Posts: 744
Time Online: 16 days 10 hours 21 minutes
|
A few extra thoughts for those watching this incredibly excellent build:
He states that he feels wetting the wood might weaken it. In a sense he is right. The higher the moisture content the lower the stiffness and strength figures tend to be. However once the wood dries again it becomes just as stiff and strong as it was before. This is true of just plain green wood, wet wood, boiled wood, or steamed wood.
Although he does not mention it you may notice that the wood has been very carefully sanded with a very slight radius on all corners of solid wood. You may have noticed that done this way the aircraft seems to look especially robustly built. Interestingly this will not be an illusion. A member with very slightly radiused corners will be stronger than one with perfectly sharp corners. This is especially true of wood.
While a person who has built one MiniMax, saved his jigs and patterns, and remembers exactly how he did everything could probably build a duplicate in about the same time as the "estimated build time", I think the average person would be better off taking the designed gross weight of the aircraft in pounds and calling that the number of hours it takes to build. That probably wouldn't work for a scratch built foam and composite aircraft but I think it is about right for wood and other materials. That is provided that you don't count time to set up a shop, or make tables and jigs.
Tom |
|
|
|
|
|
| bigbrixx1 |
| November 15, 2014, 1:11pm |
|
Ace
Posts: 822
Time Online: 20 days 16 hours
|
It is a very exciting time as the pieces come together to form a plane! Your work is outstanding! |
| V-max. Finished. Now in phase one flight |
|
|
|
|
|
| Dick Rake |
| November 15, 2014, 2:51pm |
|
 Home phone 602-999-3715/Mini-max with Hirth 2704 AcePosts: 755
Time Online: 40 days 13 hours 26 minutes
|
"I think the average person would be better off taking the designed gross weight of the aircraft in pounds and calling that the number of hours it takes to build."
Hey Tom, I like theory on build time as it relates to gross weight so I'm going to raise the gross weight on my Max to 1250 pounds. I knew there had to be some advantage to being a slow builder. LOL
Dick |
|
|
|
|
|
| Ricardo |
| November 15, 2014, 3:35pm |
|
 Videos in UTube: ral1951 AcePosts: 2,772
Time Online: 75 days 23 hours 15 minutes
|
Wow! Bruce, if you fly as good as you build, then you´re my hero... I built mine with over 1000 hours on and off. Can't wait to see that plane finished. What type of engine do you have in mind? |
|
|
|
|
|
| Tom |
| November 15, 2014, 3:47pm |
|
Ace
Posts: 744
Time Online: 16 days 10 hours 21 minutes
|
Dick,
Perhaps my gross weight idea is more applicable to someone who has done a lot of building with wood and epoxy and therefore wouldn't be hesitating and sitting and thinking out procedures. Of course on the other hand if hours spent building are a bad thing perhaps we'd all be better off just buying older aircraft. My figure would probably only apply to the hours actually spent making things and that maybe implies more wood and epoxy skills than many of us might have starting out.
Tom |
|
|
|
|
|
| Dick Rake |
| November 15, 2014, 4:13pm |
|
Home phone 602-999-3715/Mini-max with Hirth 2704 AcePosts: 755
Time Online: 40 days 13 hours 26 minutes
|
Tom,
I my defense for taking so long to build I did include my drinking beer and BS time with the local airport bum's. If I correct my time to only build time I'll stick with my current gross weight of 640 pounds. 1250 lbs would be nice to have though!
Dick |
|
|
|
|
|
|


 Logged