|
|
 cdlwingnut cdlwingnut |
|
Ace
Posts: 416
Time Online: 3 days 22 hours 22 minutes
|
I opened the can of varnish and did one coat to the upper part of the center section and the inside of the leading edge plywood.
|
|
|
|
|
|
| cdlwingnut |
|
Ace
Posts: 416
Time Online: 3 days 22 hours 22 minutes
|
Did another coat of varnish on the inside of the plywood leading edge. The holes are drilled in the strut brackets and i installed them, then I removed them again to varnish the holes and the area where they go on the spar. |
|
|
|
|
|
| cdlwingnut |
|
Ace
Posts: 416
Time Online: 3 days 22 hours 22 minutes
|
The piece of leading edge plywood was glued in place today.
|
|
|
|
|
|
| cdlwingnut |
|
Ace
Posts: 416
Time Online: 3 days 22 hours 22 minutes
|
I measured and cut two pieces of plywood for the middle section of my leading edge. Why two? somehow I managed to cut one too short, so now have to order another piece of plywood. I the correct sized one was soaked and clamped to the leading edge to form. I also managed to get the second coat of varnish on the center section wing area.
|
|
|
|
|
|
| cdlwingnut |
|
Ace
Posts: 416
Time Online: 3 days 22 hours 22 minutes
|
eading edge plywood panel number two lgot its first coat of varnish on the inside, the fuselage was put back on sawhorses and the gear legs put back on it.
|
|
|
|
|
|
| cdlwingnut |
|
Ace
Posts: 416
Time Online: 3 days 22 hours 22 minutes
|
second coat of varnish is on the inside of the plywood piece. and started work on getting the landing gear put back on
|
|
|
|
|
|
| cdlwingnut |
|
Ace
Posts: 416
Time Online: 3 days 22 hours 22 minutes
|
The second leading edge wing panel is glued on
|
|
|
|
|
|
| cdlwingnut |
|
Ace
Posts: 416
Time Online: 3 days 22 hours 22 minutes
|
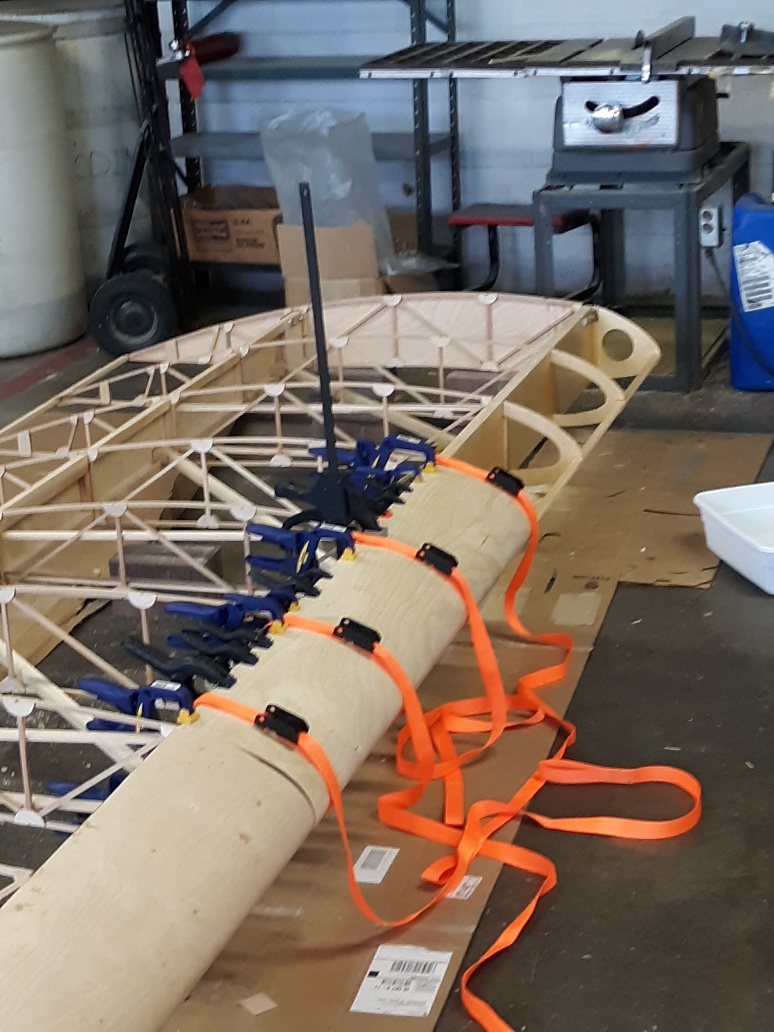
The last wing plywood panel was measured, cut, soaked, and is strapped to the leading edge to pre-bend. It was just too hot in the shop to do any more
|
|
|
|
|
|
| cdlwingnut |
|
Ace
Posts: 416
Time Online: 3 days 22 hours 22 minutes
|
the last plywood leading edge panel is glued onto the wing.
|
|
|
|
|
|
| cdlwingnut |
|
Ace
Posts: 416
Time Online: 3 days 22 hours 22 minutes
|
I've been working on more of the fiddly bits for the wing,
|
|
|
|
|
|
| aeronut |
|
 blue sky and tail winds to everyone AcePosts: 1,560
Time Online: 28 days 22 hours 31 minutes
|
Good to see you are making progress. I enjoy your posts of your build very much. Keep on there will be a reward at the end of the tunnel.  |
| never surrender; never give-up |
|
|
|
|
|
| cdlwingnut |
|
Ace
Posts: 416
Time Online: 3 days 22 hours 22 minutes
|
Thanks aeronut
i got a couple more pieces cut and glued in place today, not much but progress
|
|
|
|
|
|
| cdlwingnut |
|
Ace
Posts: 416
Time Online: 3 days 22 hours 22 minutes
|
I got the wing flipped over and the plywood strips put on the bottom side. I also tinkered with my brakes a little.
|
|
|
|
|
|
| cdlwingnut |
|
Ace
Posts: 416
Time Online: 3 days 22 hours 22 minutes
|
|
|
|
|
|
| cdlwingnut |
|
Ace
Posts: 416
Time Online: 3 days 22 hours 22 minutes
|
I pulled the staples from the plywood strips and then installed the brake peddles
|
|
|
|
|
|
| cdlwingnut |
|
Ace
Posts: 416
Time Online: 3 days 22 hours 22 minutes
|
i mixed up some t-88 and glued the plywood web to the ailerons, then made the brackets for where the struts will attach to the fuselage.
|
|
|
|
|
|
| cdlwingnut |
| September 7, 2019, 1:22am |
|
Ace
Posts: 416
Time Online: 3 days 22 hours 22 minutes
|
did some more tinkering with my brakes, I made the part to hold the cable while the peddles are pressed. Then gave the wheels a spin and tested the peddles, they seemed to work.
|
|
|
|
|
|
| cdlwingnut |
| September 10, 2019, 11:38pm |
|
Ace
Posts: 416
Time Online: 3 days 22 hours 22 minutes
|
Cut some more wood and glued in the pieces that go behind the plywood web on the ailerons.
|
|
|
|
|
|
| cdlwingnut |
| September 27, 2019, 2:24pm |
|
Ace
Posts: 416
Time Online: 3 days 22 hours 22 minutes
|
I finished the wood work on my aileron this week, been too busy to do much else
|
|
|
|
|
|
| cdlwingnut |
| September 28, 2019, 12:36pm |
|
Ace
Posts: 416
Time Online: 3 days 22 hours 22 minutes
|
managed to get one coat of varnish on one of the ailerons
|
|
|
|
|
|
| cdlwingnut |
|
Ace
Posts: 416
Time Online: 3 days 22 hours 22 minutes
|
I snuck off for a while and turned a strip of metal into a steering bar for the tail wheel and rudder, and a bracket for the wires to the horizontal stab.
|
|
|
|
|
|
| cdlwingnut |
|
Ace
Posts: 416
Time Online: 3 days 22 hours 22 minutes
|
Haven't made any progress worthy of a picture lately, but I have been working on getting a coat of varnish on the wings. so far about 3/4 of the way done with one wing. I didn't realize there were so many small places hard to work a brush into. |
|
|
|
|
|
| cdlwingnut |
|
Ace
Posts: 416
Time Online: 3 days 22 hours 22 minutes
|
Did a bit more varnishing on my wings, but I did take a break to make the parts the pulleys attach to for the ailerons.
|
|
|
|
|
|
| cdlwingnut |
| October 11, 2019, 11:47pm |
|
Ace
Posts: 416
Time Online: 3 days 22 hours 22 minutes
|
Still working on vanishing, one coat is now on both wings |
|
|
|
|
|
| cdlwingnut |
|
Ace
Posts: 416
Time Online: 3 days 22 hours 22 minutes
|
sorry for the lack of updates but haven't had any progress to report until today. I haven't had much free time lately. I did find some time to do a job I have been putting off out of fear of screwing up parts that took a lot of time to build. I cut the slots for the hinges on my horizontal stab and elevators.
|
|
|
|
|
|
| aeronut |
| November 9, 2019, 12:29pm |
|
blue sky and tail winds to everyone AcePosts: 1,560
Time Online: 28 days 22 hours 31 minutes
|
Yes those one shot to get it correct can be a little stressful. I remember the drilling of the strut ends for attach point at the wing. It was cause for pause .  Nice job on those tail feathers. |
| never surrender; never give-up |
|
|
|
|
|
| cdlwingnut |
| December 20, 2019, 2:14am |
|
Ace
Posts: 416
Time Online: 3 days 22 hours 22 minutes
|
sorry for lack of updates, with work and the flue going though the house i haven't gotten to visit the project much. i have managed to finish installing the hinges to the elevators and the control horns to the elevators and rudder. I am also still working on varnishing so hopefully by the end of winter I can start covering.
|
|
|
|
|
|
| cdlwingnut |
|
Ace
Posts: 416
Time Online: 3 days 22 hours 22 minutes
|
got another coat of varnish on the tail feathers, they are nearly ready to be covered.
|
|
|
|
|
|
| cdlwingnut |
| January 10, 2020, 10:44pm |
|
Ace
Posts: 416
Time Online: 3 days 22 hours 22 minutes
|
did some work on the front turtle deck, fitted the front plywood, and stringers. nicopressed the rudder cabels. now I can make final adjustments to the front gas tank and start gluing.
|
|
|
|
|
|
| cdlwingnut |
| February 27, 2020, 3:14am |
|
Ace
Posts: 416
Time Online: 3 days 22 hours 22 minutes
|
finally got some shop time in after being so busy flying and instructing lately. I decided it was time to seal up the nose and then did some finishing touches to the rear turtle deck.
I also realized that is has been 3 years I have been working on this project.
|
|
|
|
|
|
|


 Logged