|
|
 texasbuzzard texasbuzzard |
|
 airbike Buzzard Ace Posts: 1,238
Time Online: 8 days 23 hours 51 minutes
|
Brian mine was on the plane when I bought but was built at the original team factory. I would call team and see if it is still available. It mounts under the elevator with a pushrod back to the tab, then a small two wire cable runs up to the cockpit where it connects to the 9v battery. The activation is mounted at the stick grip. Works very well.
Monte |
|
|
|
|
|
| texasbuzzard |
|
airbike Buzzard AcePosts: 1,238
Time Online: 8 days 23 hours 51 minutes
|
|
|
|
|
|
| Ricardo |
|
 Videos in UTube: ral1951 AcePosts: 2,772
Time Online: 75 days 23 hours 15 minutes
|
Great progress by all means!
Before I covered my plane I did a weight and balance to see where the battery was going to be.
It is easier to work the battery location without the fabric. |
|
|
|
|
|
| bigbrixx1 |
|
 Ace AcePosts: 822
Time Online: 20 days 16 hours
|
Thanks guys we are getting there.. Monte great link I am going to check into into it! Seems lighter than my setup. Ricardo that is a genius idea! I should have thought of it! Thank you all
B- |
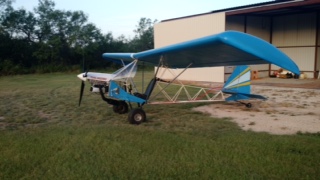
| V-max. Finished. Now in phase one flight |
|
|
|
|
|
| bigbrixx1 |
|
Ace
Posts: 822
Time Online: 20 days 16 hours
|
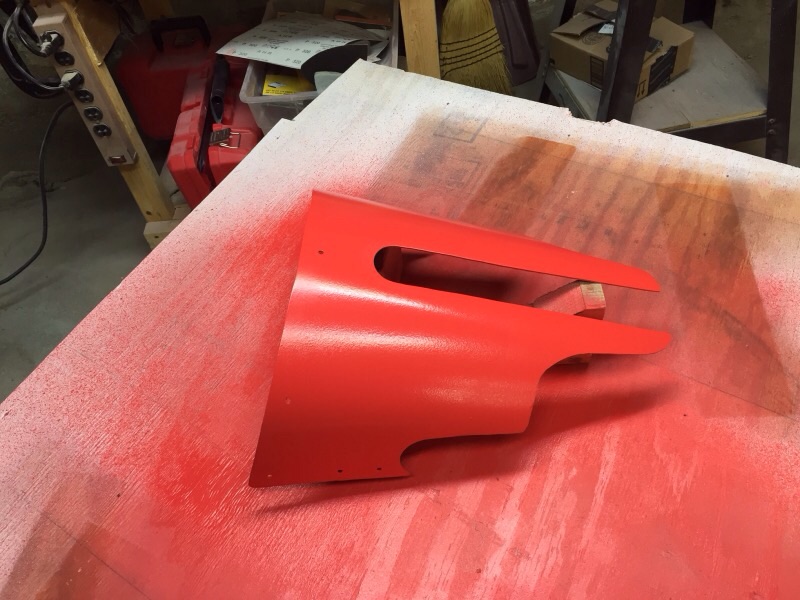
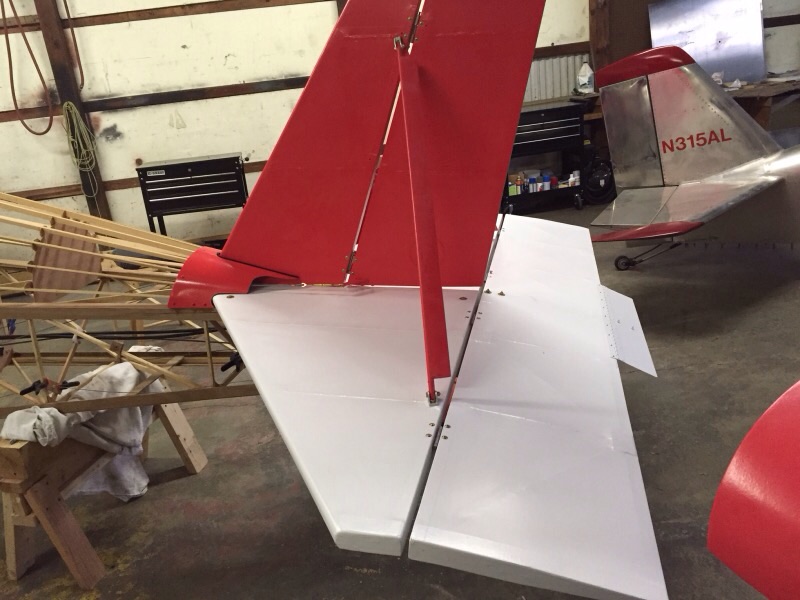
Let's see this week I did a final fit on wingtips and tail piece. Then primed and painted. In regards to the plywood inserts on the wingtips I epoxied them and also secured them with screws. I don't want them getting loose and jamming the ailerons. Don't have any photos but I have finished the control cable install including nylon guides. I ran them under the seat. A couple extra guides kept them out of the way of everything. I am a little worried about the rudder pedals..... They seem flimsy.... Anybody out there have any problems with the factory setup? I am thinking of doubling them up for strength. Also note drain holes on inside lower portion of wingtips. I would hate to imaging the effect of a couple gallons of water filling up in there would have on flight!
|
| V-max. Finished. Now in phase one flight |
|
|
|
|
|
| bigbrixx1 |
|
Ace
Posts: 822
Time Online: 20 days 16 hours
|
I found by elongating holes in the wingtips it eliminated some bowing between bolts due to the different expansion rates of the two different materials I.E. Fiberglass and wood! If doing it again I would definitely add Bruce's style wingtips...But if I keep going back and changing things I will never fly her... Same as Monties elevator trim setup..... Nice.... But I must keep moving forward! Screws primed, painted. Then a dab of pAint on slot offer final install👍😀😔
|
| V-max. Finished. Now in phase one flight |
|
|
|
|
|
| beragoobruce |
|
Built an Eros - now I'm flying it! AcePosts: 1,067
Time Online: 19 days 10 hours 58 minutes
|
Great paint job, Brian. Looks very shiny - I thought you were going for semi-gloss? |
|
|
|
|
|
| bigbrixx1 |
|
Ace
Posts: 822
Time Online: 20 days 16 hours
|
Great paint job, Brian. Looks very shiny - I thought you were going for semi-gloss?
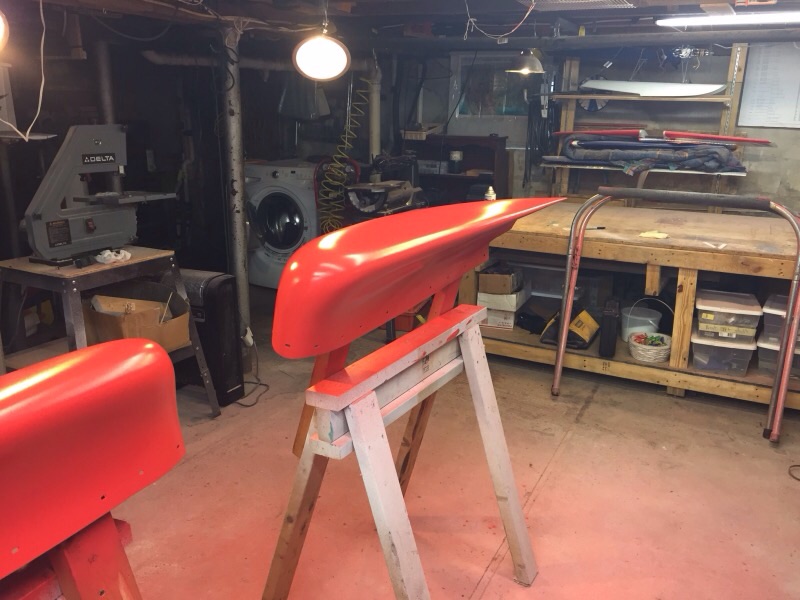
Thanks Bruce you are correct semigloss is the finish......wing tip photo was taken when paint was still wet! Here you see wingtips on the wing and paint dried. Also notice tank covers... You can see spinner painted in the background of a photo or two! Still need to paint tank cover screws!!!
|
| V-max. Finished. Now in phase one flight |
|
|
|
|
|
| bigbrixx1 |
|
Ace
Posts: 822
Time Online: 20 days 16 hours
|
Couple more
|
| V-max. Finished. Now in phase one flight |
|
|
|
|
|
| bigbrixx1 |
|
Ace
Posts: 822
Time Online: 20 days 16 hours
|
Tailpiece fit. By the time I made the cable access hole large enough so that there was no rubbing they looked unsightly. I decided to go with an open style cover.... It may be redone after initial flights....it may not !!!! Jury is still out....don't love it. Don't hate it!!!😉 An opinion on using the House latex style pain as finish. So for I am impressed! Ease of use A+. Ability to touch up hanger rash ( 😊Yes I have some already A+) hey if you make a major mistake spraying just remove sprayed paint immediately with windex and blue shop towels! Start over!!!!!! Long term durability and hardness still to be determined!
|
| V-max. Finished. Now in phase one flight |
|
|
|
|
|
| Reto S |
|
Ace
Posts: 320
Time Online: 13 days 19 hours 26 minutes
|
I decided to go with an open style cover.... It may be redone after initial flights....it may not !!!! Jury is still out....don't love it. Don't hate it!!!😉
It's a different style, but it looks good! You should leave it...  |
|
|
|
|
|
| bigbrixx1 |
|
Ace
Posts: 822
Time Online: 20 days 16 hours
|
Thanks Retro... Yes it starting to grow on me.... Engine mount made and engine mounted. Notice. I left off firewall. I will make a temporary one to mount various items then when everything is where I want it fuel lines ect! then I will finish firewall
|
| V-max. Finished. Now in phase one flight |
|
|
|
|
|
| bigbrixx1 |
|
Ace
Posts: 822
Time Online: 20 days 16 hours
|
More
|
| V-max. Finished. Now in phase one flight |
|
|
|
|
|
| bigbrixx1 |
|
Ace
Posts: 822
Time Online: 20 days 16 hours
|
One more
|
| V-max. Finished. Now in phase one flight |
|
|
|
|
|
| bigbrixx1 |
|
Ace
Posts: 822
Time Online: 20 days 16 hours
|
Maybe pick up some of these from AS and fiberglass them in to make for a nice smooth transition where the cable exits out of the cover?
But the way you have it looks just fine as well.
I will remove after a few days so as not to interrupt your build log. TTT
Very nice! May be a post flight upgrade! No need to delete... Great idea ...Let's share it with other stuff! |
| V-max. Finished. Now in phase one flight |
|
|
|
|
|
| bigbrixx1 |
|
Ace
Posts: 822
Time Online: 20 days 16 hours
|
Great photo TTT leave it here. No need to delete. Great sharing of info. I also like your heel brake setup. Good idea being able to remove and service rudder pedals.
Thank you
B-😀 |
| V-max. Finished. Now in phase one flight |
|
|
|
|
|
| bigbrixx1 |
|
Ace
Posts: 822
Time Online: 20 days 16 hours
|
Finishing up control install. You see throttle push pull vernier and elevated trim along with ballistic chute handle in final positions. It is set up "lefty" which works out well because I am a lefty😀 I hate to do it but there is going to be a slight panel redesign. The original transponder i was going to use is a real energy hog. And HEAVY!!! So I bit the bullet and ordered up the Trigg22 transponder. Mode S and lite at 0.8 pounds. Also energy demands are 0.23 amps idle to max 0.37 along with strobe at 1 amp. Ignition .75 amps and backup fuel pump at 1 amp for a total of 2.5 amps that lets my little wind generator supply plenty of power. My handheld radio will have it own battery. It also saves me about 6 pounds in equipment!
|
| V-max. Finished. Now in phase one flight |
|
|
|
|
|
| lowandslow |
|
 Wing Man  Posts: 76
Time Online: 19 hours 19 minutes
|
Brian - did you happen to look at a Sandia Xpdr? I chose one for my glider due to its size, weight and current draw (as did you) but it is considerably less expensive than the trig, a tad smaller, has a coupe of neat features and built in the good 'ol US of A. It is "only" a "C" mode transponder but I couldn't figure out why I needed a mode "S".
Just curious - did I miss something in my decision tree or is it just personal preference??
Anyone else have an input?
Cheers,
Darrel |
| Building an AeroMax My build log is available at http://www.mykitlog.com/lowandslow/ |
|
|
|
|
|
| Ricardo |
|
Videos in UTube: ral1951 AcePosts: 2,772
Time Online: 75 days 23 hours 15 minutes
|
Brian: It doesn't look that you varnished the wood or are you going to paint it? I imagine you'll disassembly all parts to do that.
Just being curious. Awesome panel you got. |
|
|
|
|
|
| bigbrixx1 |
|
Ace
Posts: 822
Time Online: 20 days 16 hours
|
Brian - did you happen to look at a Sandia Xpdr? I chose one for my glider due to its size, weight and current draw (as did you) but it is considerably less expensive than the trig, a tad smaller, has a coupe of neat features and built in the good 'ol US of A. It is "only" a "C" mode transponder but I couldn't figure out why I needed a mode "S".
Just curious - did I miss something in my decision tree or is it just personal preference??
Anyone else have an input?
Cheers,
Darrel
Looks like a nice transponder at a decent price! Appears to be an easy upgrade able to ADSB when 2020 arrives.....had I known about it it may have been my choice. Certantly a nicer price point! So many choices! Ricardo you are correct. Once everything is in place a final tear down happens then varnish, covering and paint! You may also notice the hardware is very random and most not even lock style nuts. I use older stuff for mockup and like the wings I will use new hardware at final assembly ! |
| V-max. Finished. Now in phase one flight |
|
|
|
|
|
| bigbrixx1 |
|
Ace
Posts: 822
Time Online: 20 days 16 hours
|
Still plugging away! Updates soon. Doing a lot of detail work so photos wil not show much. Will have some photos soon! Still hoping to be flying inJuly! |
| V-max. Finished. Now in phase one flight |
|
|
|
|
|
| bigbrixx1 |
|
Ace
Posts: 822
Time Online: 20 days 16 hours
|
After stalling antenna, static lines for pitot tube. Strobe wiring ect. Fuel lines yada yada everything came out and now varnishing the fuselage! Notice wing rotisserie modified to work with fuselage. Once Everything goes in for final assembly I wil post more detailed photos trying to post some now. Internet too slow will try in the morning! |
| V-max. Finished. Now in phase one flight |
|
|
|
|
|
| bigbrixx1 |
|
Ace
Posts: 822
Time Online: 20 days 16 hours
|
Here you go
|
| V-max. Finished. Now in phase one flight |
|
|
|
|
|
| bigbrixx1 |
|
Ace
Posts: 822
Time Online: 20 days 16 hours
|
Another
|
| V-max. Finished. Now in phase one flight |
|
|
|
|
|
| bigbrixx1 |
|
Ace
Posts: 822
Time Online: 20 days 16 hours
|
Rotisserie
|
| V-max. Finished. Now in phase one flight |
|
|
|
|
|
| bigbrixx1 |
|
Ace
Posts: 822
Time Online: 20 days 16 hours
|
Another
|
| V-max. Finished. Now in phase one flight |
|
|
|
|
|
| bigbrixx1 |
|
Ace
Posts: 822
Time Online: 20 days 16 hours
|
Last one tonight
|
| V-max. Finished. Now in phase one flight |
|
|
|
|
|
| Ricardo |
|
Videos in UTube: ral1951 AcePosts: 2,772
Time Online: 75 days 23 hours 15 minutes
|
Nice set up.
What kind of plane are building next to yours? |
|
|
|
|
|
| lowandslow |
|
Wing Man Posts: 76
Time Online: 19 hours 19 minutes
|
Brian - great work and progress. I'm learning a lot from watching and reading your blog. I do have a couple of observations to share - and knowing that pictures don't always tell everything - they may be useless but in the spirit of trying to contribute, I'll share here.
If what I think to be a radio antenna really is one - I don't see a ground plane. Do you plan on adding one later?
If what I think are your static lines are static lines, the pick up line comes in from the bottom (unless the fuselage is on your rotisserie and it is upside down) where the two yellow lines connect. As a minimum, you might want to bring it in from the top - to minimize the risk of moving water into the single line. Alternatively, some folks add a closed canister at about the connection point to capture water and keep it out of the line altogether. |
| Building an AeroMax My build log is available at http://www.mykitlog.com/lowandslow/ |
|
|
|
|
|
| bigbrixx1 |
|
Ace
Posts: 822
Time Online: 20 days 16 hours
|
If what I think to be a radio antenna really is one - I don't see a ground plane. Do you plan on adding one later?
If what I think are your static lines are static lines, the pick up line comes in from the bottom (unless the fuselage is on your rotisserie and it is upside down) where the two yellow lines connect. As a minimum, you might want to bring it in from the top - to minimize the risk of moving water into the single line. Alternatively, some folks add a closed canister at about the connection point to capture water and keep it out of the line altogether.
Thank you for the compliment and observations. I purchased a commercially available antenna. It doesn't require a ground plane. The "rubber duckie" antenna underneath the whip antenna acts as the ground plane (at least that is what the manufacture states!) I will be testing it soon. The picture is deceiving. The static "pickups" are on the fuselage side as per TEAM recommendations. I do plan on drains in the lowest point in the system. There are 2 lines since my pitot tube is mounted in the vertical fin! Keeps the comments and observations coming guys! That's how we learn! |
| V-max. Finished. Now in phase one flight |
|
|
|
|
|
|


 Logged