|
|
 bigbrixx1 bigbrixx1 |
| February 12, 2016, 11:04pm |
|
 Ace Ace Posts: 822
Time Online: 20 days 16 hours
|
More
|
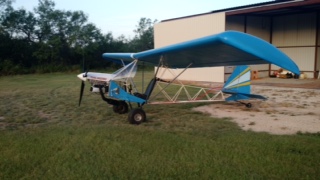
| V-max. Finished. Now in phase one flight |
|
|
|
|
|
| bigbrixx1 |
| February 12, 2016, 11:05pm |
|
Ace
Posts: 822
Time Online: 20 days 16 hours
|
And
|
| V-max. Finished. Now in phase one flight |
|
|
|
|
|
| bigbrixx1 |
| February 12, 2016, 11:07pm |
|
Ace
Posts: 822
Time Online: 20 days 16 hours
|
And finally. Sorry the photos are kinda big. Next time I will size them a bit smaller
|
| V-max. Finished. Now in phase one flight |
|
|
|
|
|
| edwinkania |
| February 13, 2016, 11:31pm |
|
Flight Leader  Posts: 140
Time Online: 1 days 15 hours 51 minutes
|
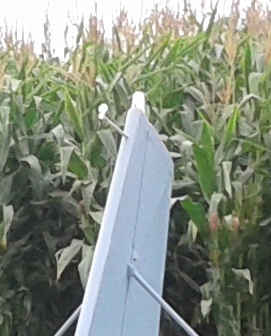
Nice work!! That pitot tube has to run a long way......I am wondering that too much prop wash will spoil the measurement? Usually you see these away from the wash somewhere on a outboard panel of a wing.
EK~ |
|
|
|
|
|
| bigbrixx1 |
| February 15, 2016, 1:03am |
|
Ace
Posts: 822
Time Online: 20 days 16 hours
|
Nice work!! That pitot tube has to run a long way......I am wondering that too much prop wash will spoil the measurement?
EK~
There is a great thread documenting this position here on LB. the users had great luck with the pitot tube mounted up on the tin. Hopefully I do to! I like it up there where nobody can bump into it! Let's hope it works! |
| V-max. Finished. Now in phase one flight |
|
|
|
|
|
| Ricardo |
| February 15, 2016, 2:38pm |
|
 Videos in UTube: ral1951 AcePosts: 2,772
Time Online: 75 days 23 hours 15 minutes
|
I have exactly the same arrangement without any problems.
|
|
|
|
|
|
| edwinkania |
| February 17, 2016, 12:18am |
|
Flight Leader Posts: 140
Time Online: 1 days 15 hours 51 minutes
|
OK was just thinking out loud, so now I know where to mount it.
Thanks guys.
EK |
|
|
|
|
|
| bigbrixx1 |
| February 17, 2016, 5:32pm |
|
Ace
Posts: 822
Time Online: 20 days 16 hours
|
Thanks for the post Ricardo...... It gives me confidence in my decision to put the pitot tube there. EK keep the comments and suggestions coming! Thinking out loud is encouraged in my thread....it gets us some great ideas! and that my friend is why we are all here!
Stitching done on empennage. I only Stitched the parallel ribs. Not the diagonals. Over kill... Yea, but I like the look. It's all primed with ecofill and painting tomorrow! Lost another pound! Who hoo!
|
| V-max. Finished. Now in phase one flight |
|
|
|
|
|
| bigbrixx1 |
| February 17, 2016, 5:33pm |
|
Ace
Posts: 822
Time Online: 20 days 16 hours
|
Primed, drying. Painting tomorrow!
|
| V-max. Finished. Now in phase one flight |
|
|
|
|
|
| edwinkania |
| February 18, 2016, 12:18am |
|
Flight Leader Posts: 140
Time Online: 1 days 15 hours 51 minutes
|
Ricardo, Brix,
I have learned so much here from all the posts, Thanks for the responses and explanations.
EK~ |
|
|
|
|
|
| beragoobruce |
| February 18, 2016, 3:09am |
|
Built an Eros - now I'm flying it! AcePosts: 1,067
Time Online: 19 days 10 hours 58 minutes
|
Looking good Brian!!
Which primer are you using? I assume you are brushing the primer on & you said earlier you were spraying the top coat. Do you wet & dry sand the primer after it has hardened?
Have you done any 'before & after' weighing to find out how much the paint weighs? I'm doing this with the elevator. I weighed it before covering, then after covering. I'll weigh it again during & after painting. Bit anal, maybe, but I'm interested to know the weight per square foot of cloth + paint (versus, say, aluminium sheet).
Bruce |
|
|
|
|
|
| Tom |
| February 18, 2016, 12:57pm |
|
Ace
Posts: 744
Time Online: 16 days 10 hours 21 minutes
|
Paint weight can be very significant. I think making sure you know how much weight you are adding per square foot on that is a very good idea. I've done a lot of calculations of paint weight and it always startling to see how much is really added.
Tom |
|
|
|
|
|
| bigbrixx1 |
| February 18, 2016, 4:56pm |
|
Ace
Posts: 822
Time Online: 20 days 16 hours
|
Looking good Brian!!
Which primer are you using? I assume you are brushing the primer on & you said earlier you were spraying the top coat. Do you wet & dry sand the primer after it has hardened?
Have you done any 'before & after' weighing to find out how much the paint weighs? I'm doing this with the elevator. I weighed it before covering, then after covering. I'll weigh it again during & after painting. Bit anal, maybe, but I'm interested to know the weight per square foot of cloth + paint (versus, say, aluminium sheet).
Bruce
Thank Bruce! Darn that would have been a great idea! Sadly I did not weigh the prices before painting. I am priming the parts with stewards system Ecoprime. I am applying with 3 inch foam brush with a light sanding after each coat dries. I am applying 3 cross coats on top and 2 cross coats on bottom surfaces. White has been applied to empennage. I only applied 2 light coats in vertical stab it will be painted red. I spray the color coats. I had a heck of a time trying to spray the ecoprime
|
|
 |
|
| V-max. Finished. Now in phase one flight |
|
|
|
|
|
| Reto S |
| February 19, 2016, 1:50pm |
|
Ace
Posts: 320
Time Online: 13 days 19 hours 26 minutes
|
Brian
Belated congratulations to your license achievement!
Your project looks fantastic...
What a progress!
Can't wait to see your finished red and white Max...
Cheers
Reto |
|
|
|
|
|
| bigbrixx1 |
| February 28, 2016, 2:49pm |
|
Ace
Posts: 822
Time Online: 20 days 16 hours
|
Brian
Belated congratulations to your license achievement!
Your project looks fantastic...
What a progress!
Can't wait to see your finished red and white Max...
Cheers
Reto
Thanks Retro ! A build update and promising flying news. First the flying news👍 I went over to try a cub on fir size in order to get my tail wheel endorsement along with the under 87 knt sport pilot endorsement required to fly my soon to be Vmax. I fit and in 3 pounds the weight and balance will allow enough fuel to train. The engine is getting overhauled so it will be a few weeks! But soon onto the next phase. Now back to the max. Empennage painted. Hinged and mounted. Control cables routing as we speak! Notive I streamlined the struts. Hopefully that helps with a mile an hour. Pitot tube and strobe light mount on top of fin. Adjustable trim tab on elevator
|
| V-max. Finished. Now in phase one flight |
|
|
|
|
|
| bigbrixx1 |
| February 28, 2016, 2:55pm |
|
Ace
Posts: 822
Time Online: 20 days 16 hours
|
Also I am using a wind powered generator for power. I purchased a piece of 6061 aluminum extrusion 1/4 x4 and carved out a mount. It kind of funny. My wife came home and I told her how I made the mount. She picked up the uncut aluminum piece looked it over and told me it was nice work😀..... Lol at least she is supportive !!!!!
|
| V-max. Finished. Now in phase one flight |
|
|
|
|
|
| bigbrixx1 |
| February 28, 2016, 2:56pm |
|
Ace
Posts: 822
Time Online: 20 days 16 hours
|
Wind generator mount. The screws holding it in place are only temporary
|
| V-max. Finished. Now in phase one flight |
|
|
|
|
|
| bigbrixx1 |
| February 28, 2016, 2:57pm |
|
Ace
Posts: 822
Time Online: 20 days 16 hours
|
In position
|
| V-max. Finished. Now in phase one flight |
|
|
|
|
|
| bigbrixx1 |
| February 28, 2016, 3:03pm |
|
Ace
Posts: 822
Time Online: 20 days 16 hours
|
Some detail stuff. I wanted to paint the fuel tank covers and have them match the finish on the wing...... But how to finish Lexan... Well my experiments with stewards system adhesive proved to have a tenacious bond to Lexan. So I cover the tank covers with cloth remnants from the wing using it. Primed it with ecofill and they are ready for paint! |
| V-max. Finished. Now in phase one flight |
|
|
|
|
|
| bigbrixx1 |
| February 28, 2016, 3:04pm |
|
Ace
Posts: 822
Time Online: 20 days 16 hours
|
Covers. Edges of material rolled over and glue applied underneath. Time to paint!
|
| V-max. Finished. Now in phase one flight |
|
|
|
|
|
| bigbrixx1 |
| February 28, 2016, 3:19pm |
|
Ace
Posts: 822
Time Online: 20 days 16 hours
|
I am now preparing closed canopy for plant. This is same technique I used on open canopy and instrument panel. Tit gives a nice finish and very light. First I use 3/4 ounce fiberglass cloth. And Zpoxy finishing resin. This resin is very sand able but not a structural epoxy! It is almost the consistency of milk when warm. You will lay the cloth where you want it to be then pour Zpoxy and work into cloth and spread with an old credit card or used hotel room key. Take off all excess.
|
| V-max. Finished. Now in phase one flight |
|
|
|
|
|
| bigbrixx1 |
| February 28, 2016, 3:30pm |
|
Ace
Posts: 822
Time Online: 20 days 16 hours
|
Then quickly roll toilet paper ( works much better than paper towels) over the wet Zpoxy. let it absorb the extra. You may need to do this a couple times until there are no shiny spots. Let this cure, then lightly sand with 300 grit sand paper or a green scotch bride pad. After each sanding apply thin coat of Zpoxy with credit type card. Absorb extra with toilet paper. Repeat as necessary until the finish you want is achieved. It's important to just lightly sand...your trying to take off the top layer of Zpoxy and not cut into fiberglass cloth. After a few times the voids are filled.Usual 2 repeat coats followed by a couple wet sanded coats of high build primer will result is a fantastic finish. I will post more photos as I progress
|
| V-max. Finished. Now in phase one flight |
|
|
|
|
|
| texasbuzzard |
| February 28, 2016, 4:25pm |
|
 airbike Buzzard AcePosts: 1,238
Time Online: 8 days 23 hours 51 minutes
|
Brian, does your engine not have a alternator to charge the battery?
Monte |
|
|
|
|
|
| bigbrixx1 |
| February 28, 2016, 4:36pm |
|
Ace
Posts: 822
Time Online: 20 days 16 hours
|
Brian, does your engine not have a alternator to charge the battery?
Monte
No it doesn't. Any provisions to add one will not really work with the minimax without adding a LOT of weight. Or eliminating the magnito. One provision adds an accessory case to. The rear of engine... Heavy and adds length to the motor that will not work with the Vmax.... Another option puts the alternator up front. But I would then have to eliminate the starter...really want the starter...... There is a third method that drives an alternator off the crankshaft nut... But I would have to eliminate magnito. This is a self contained unit. Should provide 4-5 amps at cruise. I have decided upon keeping the magnito and an electronic secondary ignition. My power demands will be strobe (led) 3/4 amp, aux fuel pump 1 amp, single electronic ignition 1 amp and transponder 1.1 amp standby 1.8 transponding aux pump take off and landing unless there is a problem. Same with strobe except that 30 mins before sunrise and after sunset. This setup should keep me charged up... Maybe a boost charge at the end of the flight.... Time will tell....after my initial flights I can put battery on charger that monitors mah to full charge and see if it handles the demand ok |
| V-max. Finished. Now in phase one flight |
|
|
|
|
|
| texasbuzzard |
| February 28, 2016, 5:53pm |
|
airbike Buzzard AcePosts: 1,238
Time Online: 8 days 23 hours 51 minutes
|
Brian that is a great idea with the wind generator to charge the battery  kudos to you. Monte |
|
|
|
|
|
| bigbrixx1 |
| February 29, 2016, 12:15am |
|
Ace
Posts: 822
Time Online: 20 days 16 hours
|
Brian that is a great idea with the wind generator to charge the battery kudos to you. Monte
Thanks monte but it a product called jennipod, seems well made. I expect a loss of 2-3 mph but should get that back by following your lead and streamlining struts! |
| V-max. Finished. Now in phase one flight |
|
|
|
|
|
| ulbuilder |
| February 29, 2016, 1:48am |
|
N349LE AcePosts: 302
Time Online: 8 days 20 hours 59 minutes
|
The bracket for the generator looks great.
|
|
|
|
|
|
| bigbrixx1 |
|
Ace
Posts: 822
Time Online: 20 days 16 hours
|
The bracket for the generator looks great.
Thank you! It came out better than I had expected! |
| V-max. Finished. Now in phase one flight |
|
|
|
|
|
| bigbrixx1 |
|
Ace
Posts: 822
Time Online: 20 days 16 hours
|
Now finishing up canopies. Final assembly and painting. Also fuel tank cover painted. The black anti glare panels are flat black with a satin clear finish. As you notice it will be a true convertible. I forced myself to build both options at the same time.... Easily interchangeable with the pull of the wire on the piano hinge.
|
| V-max. Finished. Now in phase one flight |
|
|
|
|
|
| bigbrixx1 |
|
Ace
Posts: 822
Time Online: 20 days 16 hours
|
Few more
|
| V-max. Finished. Now in phase one flight |
|
|
|
|
|
|


 Logged