|
|
 bigbrixx1 bigbrixx1 |
| February 13, 2015, 9:36pm |
|
 Ace Ace Posts: 822
Time Online: 20 days 16 hours
|
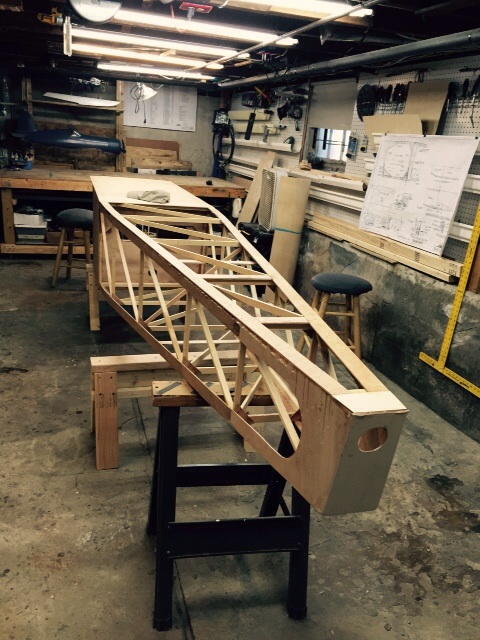
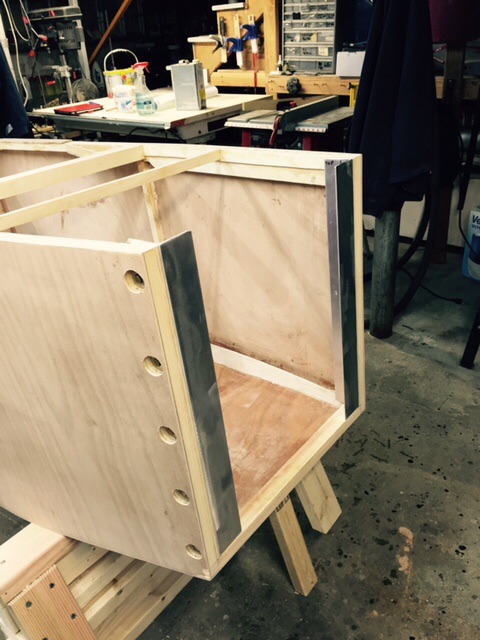
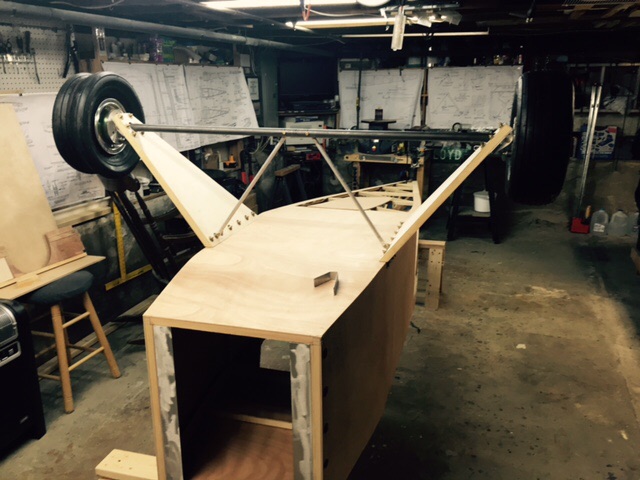
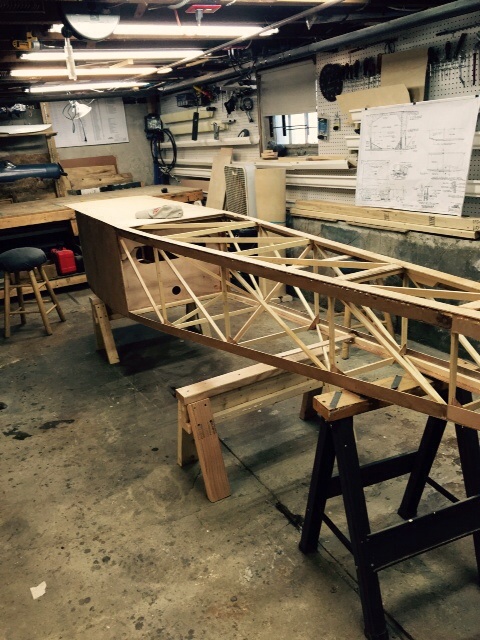
Beginning to fit forward fuse plywood top. Strapping tape being used to keep fuse sides in position.
|
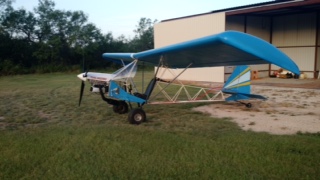
| V-max. Finished. Now in phase one flight |
|
|
|
|
|
| bigbrixx1 |
| February 13, 2015, 9:36pm |
|
Ace
Posts: 822
Time Online: 20 days 16 hours
|
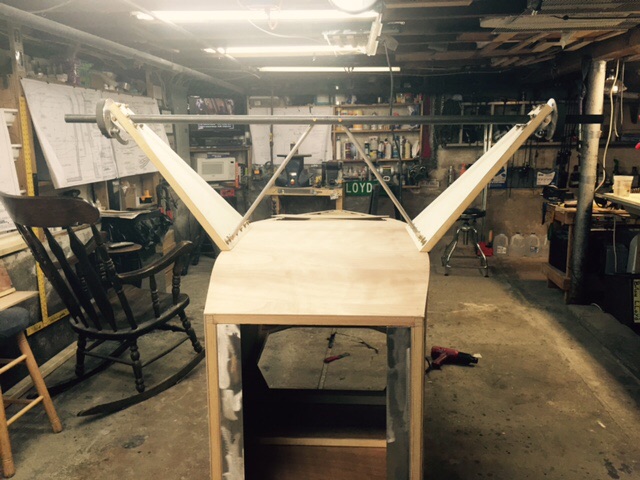
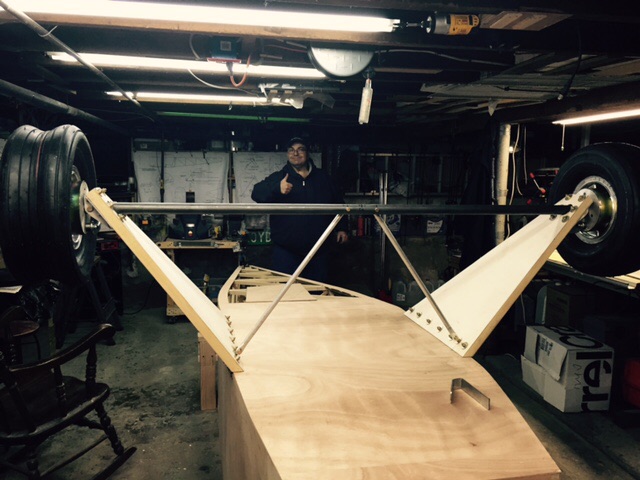
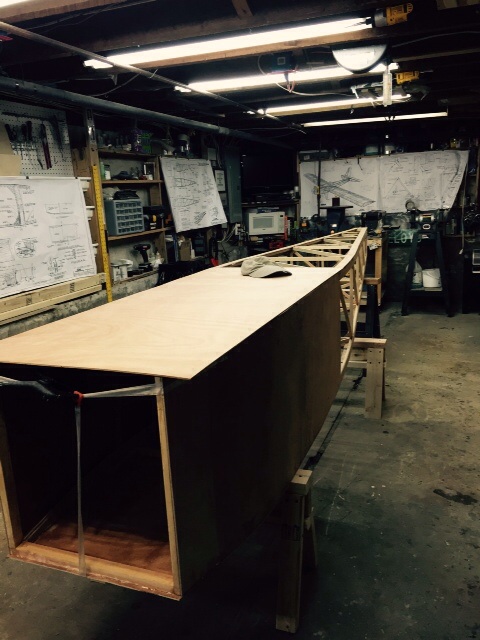
One more. Still need to clean up excess epoxy....
|
| V-max. Finished. Now in phase one flight |
|
|
|
|
|
| bobnafe |
| February 14, 2015, 12:39am |
|
Flight Leader  Posts: 173
Time Online: 17 days 7 hours 38 minutes
|
Looking good. Are you going to make skies or just snow shovels for your gear?  It still is cold but no snow in central NC. Nice time to be in Hawaii. Looks like you were really enjoying you trip. BobN |
|
|
|
|
|
| bigbrixx1 |
| February 15, 2015, 5:53pm |
|
Ace
Posts: 822
Time Online: 20 days 16 hours
|
Looking good. Are you going to make skies or just snow shovels for your gear? It still is cold but no snow in central NC. Nice time to be in Hawaii. Looks like you were really enjoying you trip. BobN
We had a great time! Another 14 inches of snow today. May need ski's and a shovel! |
| V-max. Finished. Now in phase one flight |
|
|
|
|
|
| alex3 |
| February 15, 2015, 6:11pm |
|
Wing Man  Posts: 80
Time Online: 1 days 22 hours 51 minutes
|
Welcome back. Now my turn! Pensacola today ti Friday then Douglas AZ next Sunday. |
|
|
|
|
|
| bigbrixx1 |
| February 19, 2015, 12:48pm |
|
Ace
Posts: 822
Time Online: 20 days 16 hours
|
Welcome back. Now my turn! Pensacola today ti Friday then Douglas AZ next Sunday.
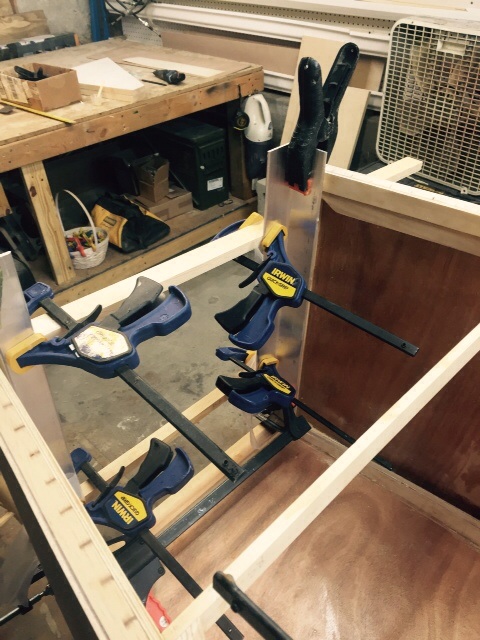
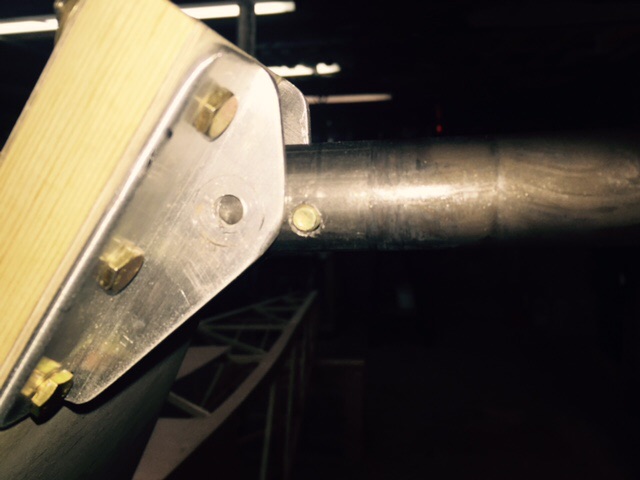
Enjoy! Sounds like a great trip! Cockpit corners cut and glued. Front horizontal forward doublers cut from RS-12. Gluing to RS-21. Aligning everything perfectly so that the aluminum motor mounts would be flush seemed like a problem. I decided to use them as a guide. First I clamped them to a couple straight edges. Then they were used as alignment guide and clamped to doublers to keep everything true!
|
| V-max. Finished. Now in phase one flight |
|
|
|
|
|
| bigbrixx1 |
| February 19, 2015, 12:50pm |
|
Ace
Posts: 822
Time Online: 20 days 16 hours
|
One more
|
| V-max. Finished. Now in phase one flight |
|
|
|
|
|
| texasbuzzard |
| February 19, 2015, 1:07pm |
|
 airbike Buzzard AcePosts: 1,238
Time Online: 8 days 23 hours 51 minutes
|
looking good Brixx, are you installing a step to mount the beast?
monte |
|
|
|
|
|
| bigbrixx1 |
| February 19, 2015, 7:18pm |
|
Ace
Posts: 822
Time Online: 20 days 16 hours
|
looking good Brixx, are you installing a step to mount the beast?
monte
Thank you! Yes I will be adding the step very soon! The factory fiberglass step seems a little shallow. I plan on mounting it in a test stand first! |
| V-max. Finished. Now in phase one flight |
|
|
|
|
|
| lake_harley |
| February 19, 2015, 9:30pm |
|
Ace
Posts: 1,093
Time Online: 25 days 5 hours 37 minutes
|
To practice getting in your MiniMAX, you might want to brush up on the pirouettes you learned in ballet class!  Here's how one search result summed up a pirouette .... "The pirouette, a spin around on one leg, is one of the most difficult of all dance steps"......and they didn't even mention the difficult move necessary to get in a MiniMAX. Lynn |
|
|
|
|
|
| alex3 |
| February 21, 2015, 3:33pm |
|
Wing Man Posts: 80
Time Online: 1 days 22 hours 51 minutes
|
Brixx, AZ got pushed back. Now they're sending me to the wilds of long island. Anyway since my next step (at some point) will be doing the plywood on the fuselage, and you just did that, is 2 full sheets of 1/8 ply enough or should I order more?
thanks,
Alex |
|
|
|
|
|
| bigbrixx1 |
| February 22, 2015, 12:42pm |
|
Ace
Posts: 822
Time Online: 20 days 16 hours
|
Brixx, AZ got pushed back. Now they're sending me to the wilds of long island. Anyway since my next step (at some point) will be doing the plywood on the fuselage, and you just did that, is 2 full sheets of 1/8 ply enough or should I order more?
thanks,
Alex
I believe 2 sheets will do it, let me take some measurements tomorrow. I ordered the kit. But I doubt there was more than that in there |
| V-max. Finished. Now in phase one flight |
|
|
|
|
|
| bigbrixx1 |
| February 24, 2015, 7:53pm |
|
Ace
Posts: 822
Time Online: 20 days 16 hours
|
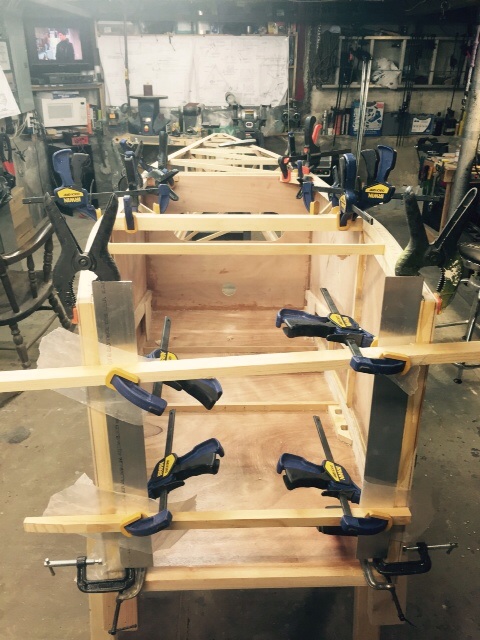
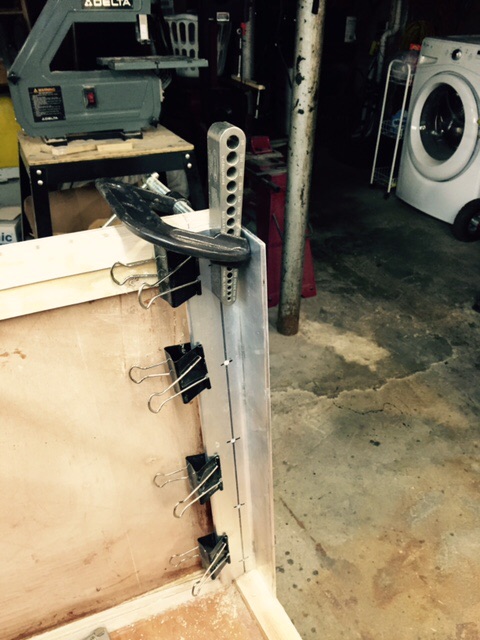
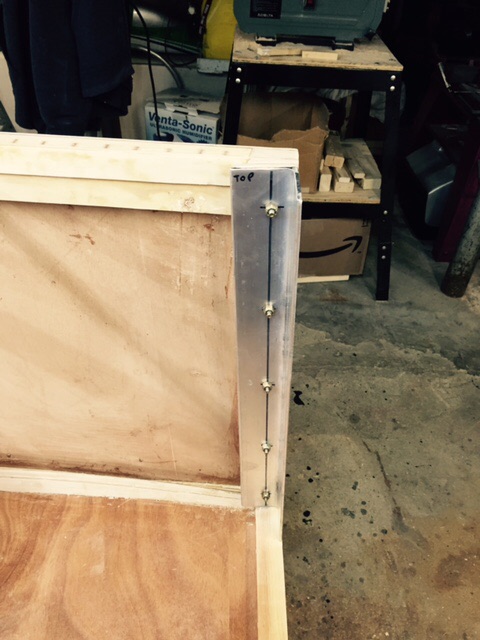
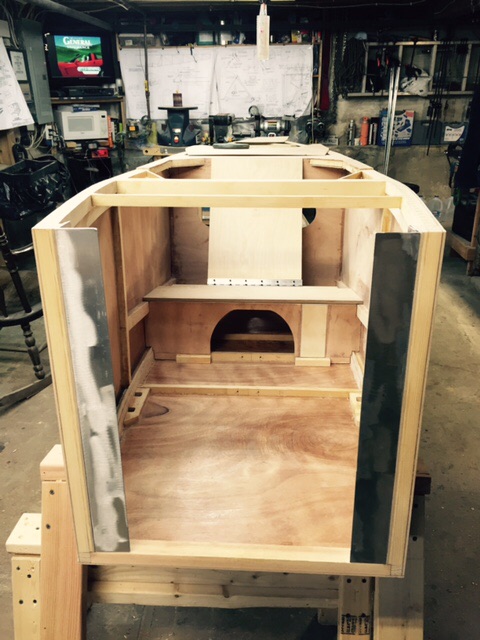
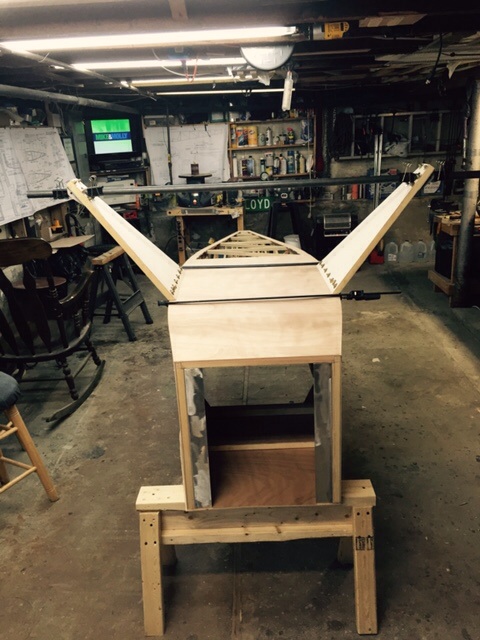
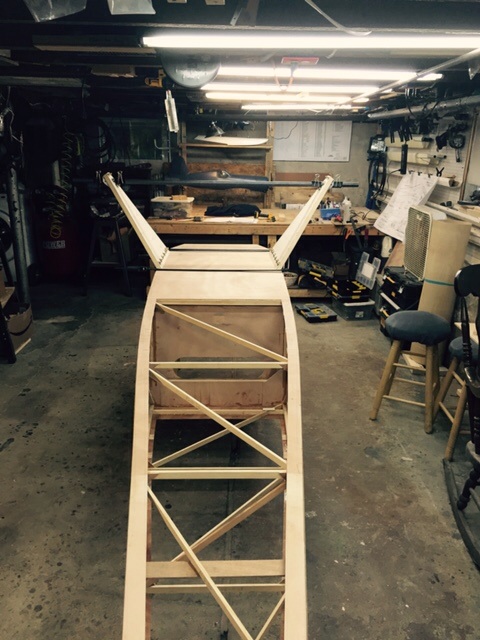
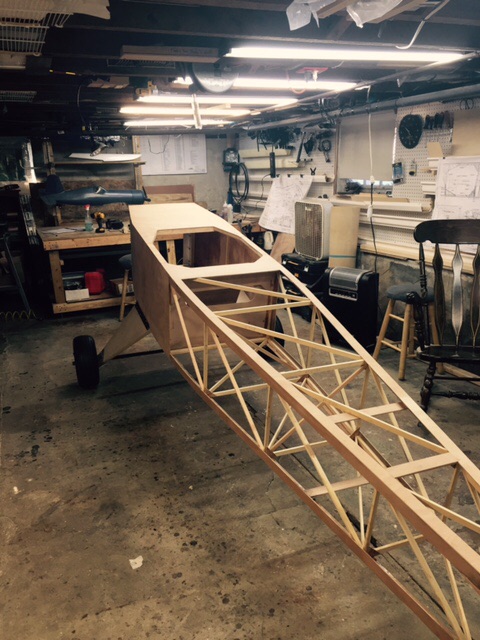
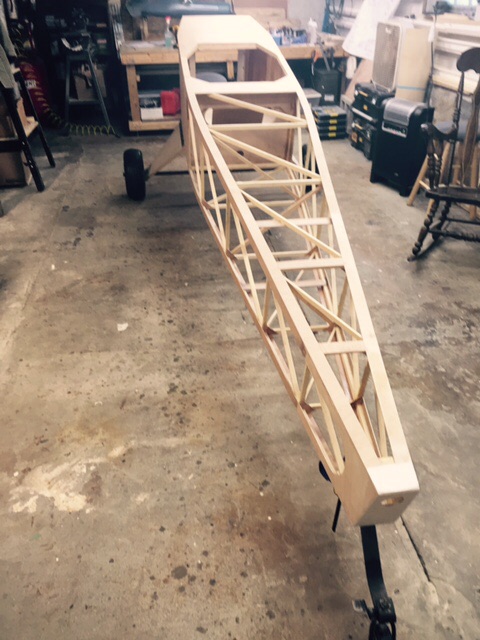
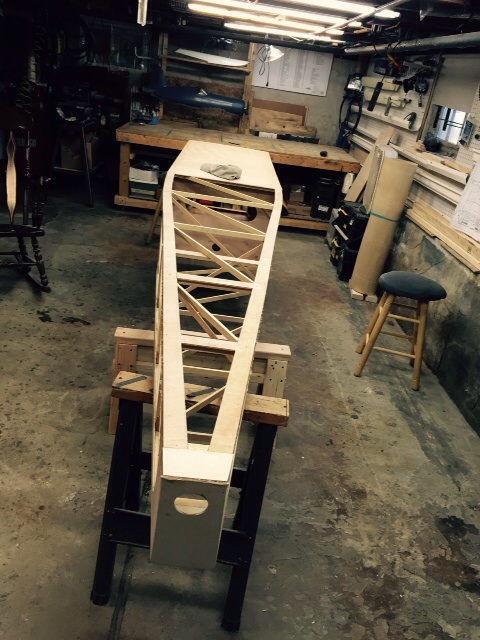
Moving forward. Seat area completed. Pretty straight forward. Fitting the aluminum firewall engine mounts was very straight forward also. Decided to drill out the aluminum mounts. Then secure them to vertical braces. Using a drill jig I then drilled from the inside out using 3/16 drill bit since the inside surface is 90 degrees to firewall. Then I stepped up the 3/16 to the next dimension (maybe 5/16?  using step drill. Followed by standard drill and drill jig. (BTW great item. Don't know what I would do without it!) finally counter sunk fuse from outside using 1 inch spade bit. Measure dept carefully here. A little epoxy in holes and glued in RS-601 anti compression spacers. Then varnish forward section and bolted it all together.
|
| V-max. Finished. Now in phase one flight |
|
|
|
|
|
| bigbrixx1 |
| February 24, 2015, 7:58pm |
|
Ace
Posts: 822
Time Online: 20 days 16 hours
|
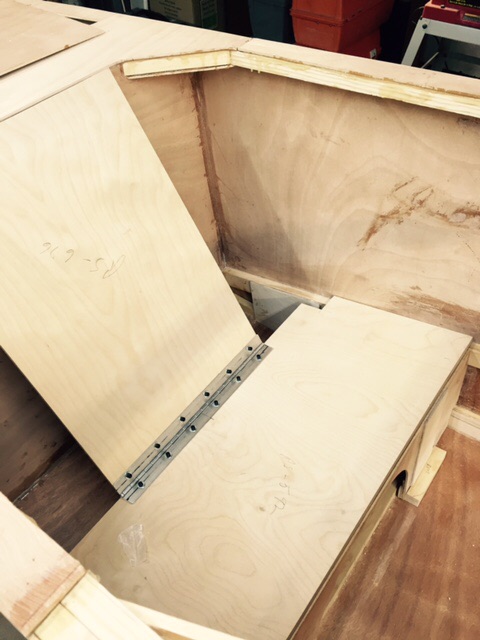
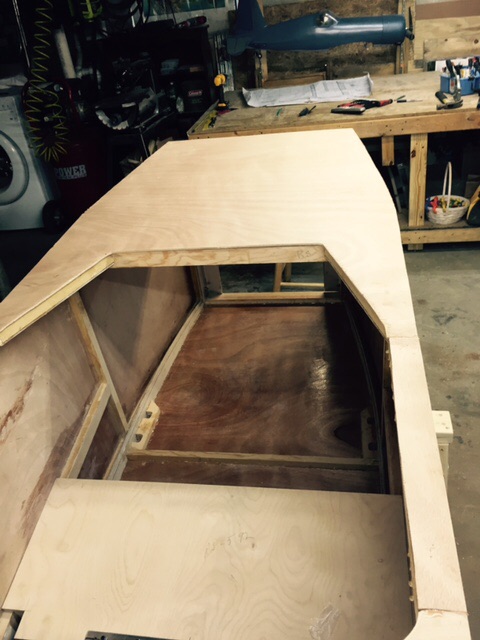
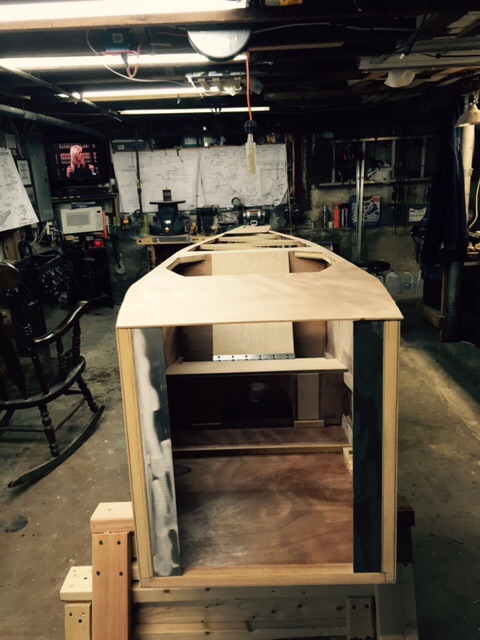
Added and glued on top deck behind seat, cut and fit forward section. I stapled forward deck on for now. Won't glue just yet. Want to keep it removable for access at this time. A little hint. I found when drilling recess for bolts in forward fuse. I needed to increase dept a bit after compression spacers in place. I cut off pilot drill part of spade drill and was able to "fine tune" the dept without marring up spacer. Will add pics to explain better tomorrow!
|
| V-max. Finished. Now in phase one flight |
|
|
|
|
|
| bigbrixx1 |
| February 24, 2015, 8:08pm |
|
Ace
Posts: 822
Time Online: 20 days 16 hours
|
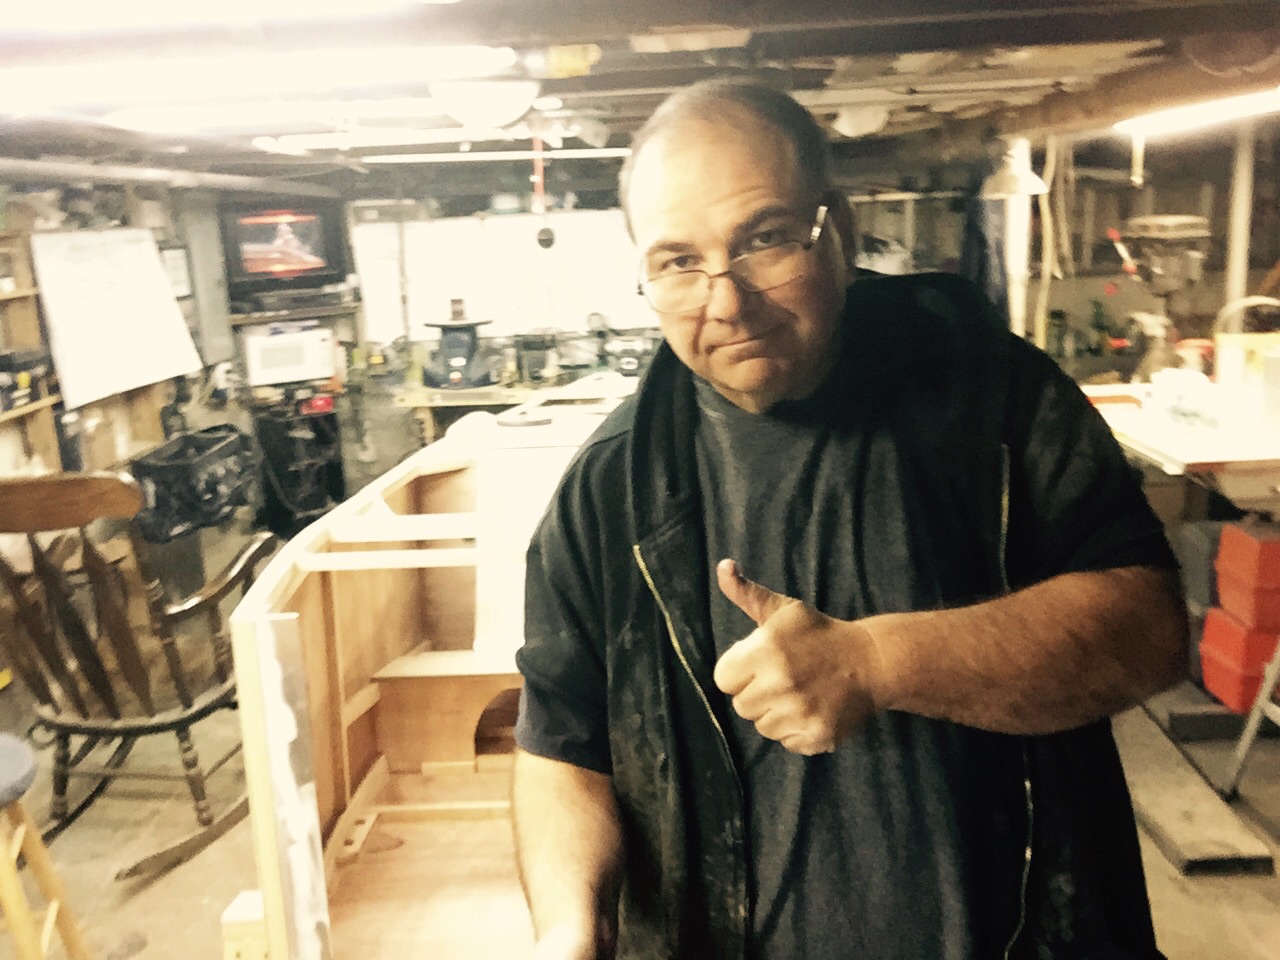
Let's add 4.2 pounds to the loss side total 67.8. ... BTW taken with my new selfie stick👍
|
| V-max. Finished. Now in phase one flight |
|
|
|
|
|
| aeronut |
| February 24, 2015, 10:02pm |
|
 blue sky and tail winds to everyone AcePosts: 1,560
Time Online: 28 days 22 hours 31 minutes
|
WOW you are going great guns on both projects. Hope all goes well with both of them.  |
| never surrender; never give-up |
|
|
|
|
|
| Ricardo |
| February 25, 2015, 11:50pm |
|
 Videos in UTube: ral1951 AcePosts: 2,772
Time Online: 75 days 23 hours 15 minutes
|
|
|
|
|
|
| bigbrixx1 |
| February 26, 2015, 9:48pm |
|
Ace
Posts: 822
Time Online: 20 days 16 hours
|
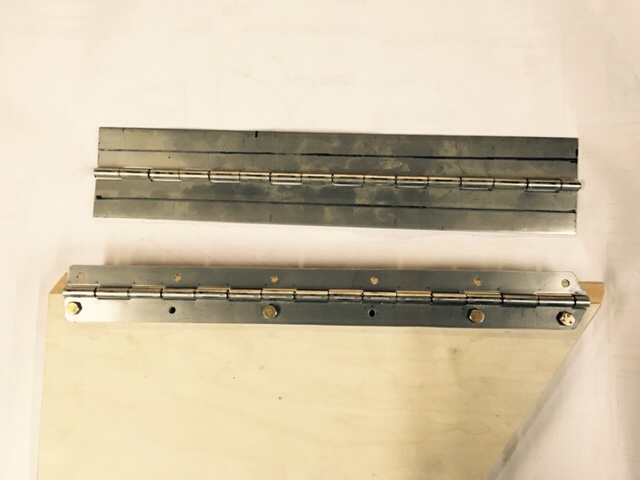
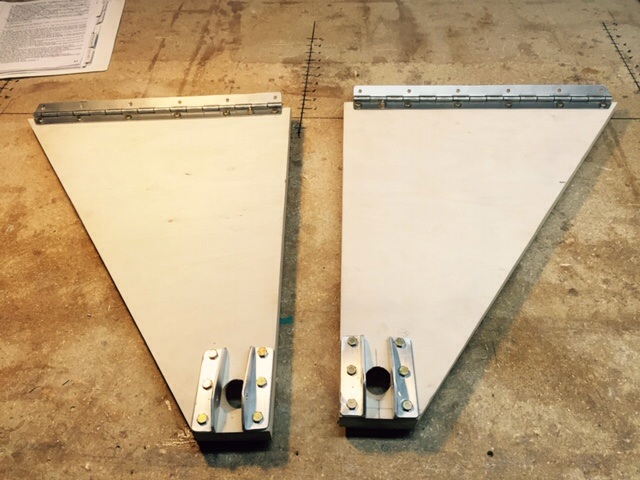
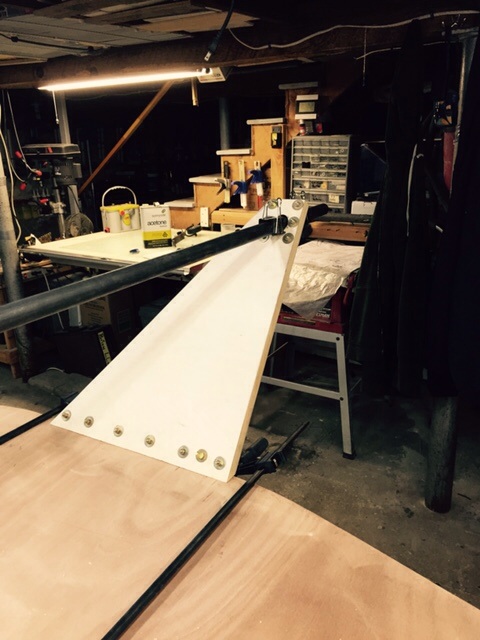
Thanks Aeronut and Ricardo! After building the wings. The fuse is a piece of cake........so far lol I decided to stick with the stock LG. The factory welded gear added six pounds. Although it would have saved some time and eliminated the "grass catcher" cross bar. as we all know weight is a big (excuse the pun) issue with me
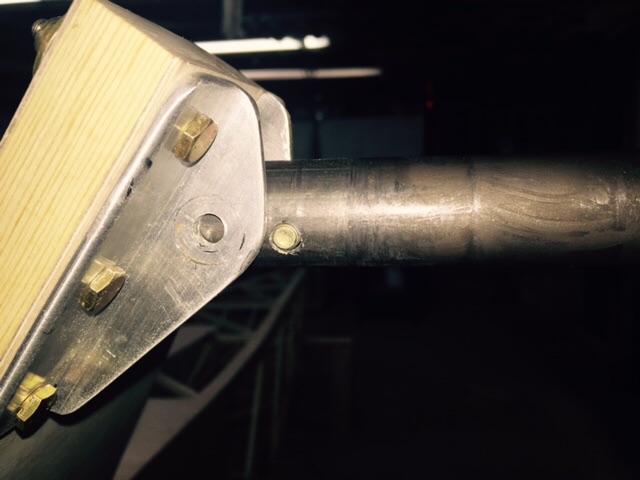
Cut and formed hinge for LG. Then brackets for main LG axel . The hinge as supplied is much wider than necessary. It could be left as is, but weight again being an issue I cut them to size. Saved 12 ounces in extra material here. Using jig as outlined in the plans 1 1/8 holes cut at 37 degrees. All bolted together. Ready to mount on the fuse bottom
|
| V-max. Finished. Now in phase one flight |
|
|
|
|
|
| bigbrixx1 |
| February 26, 2015, 10:09pm |
|
Ace
Posts: 822
Time Online: 20 days 16 hours
|
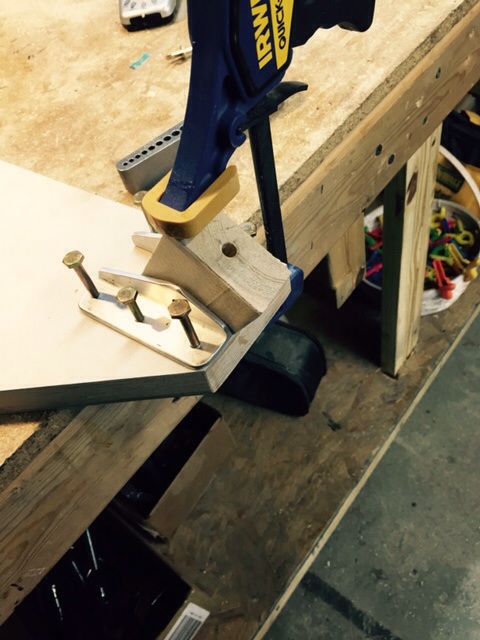
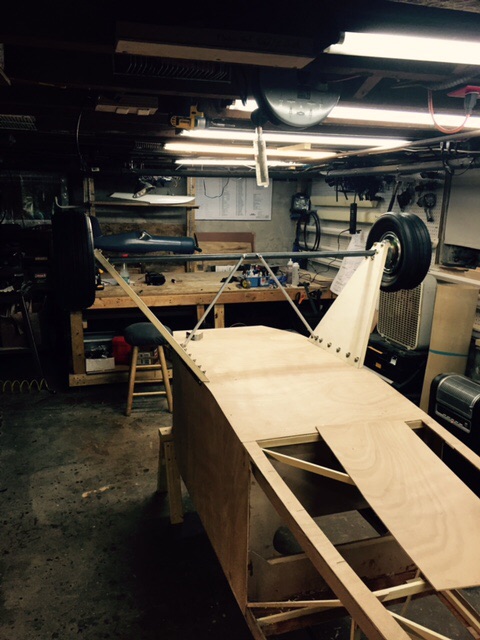
Jigged to the fuse. Angles set at 37 degrees. Drilled and bolts installed. Notice those handy binder clips keeping the axel in place.
|
| V-max. Finished. Now in phase one flight |
|
|
|
|
|
| beragoobruce |
| February 27, 2015, 2:30am |
|
Built an Eros - now I'm flying it! AcePosts: 1,067
Time Online: 19 days 10 hours 58 minutes
|
Looking good Brian! Glad to see you've gone for the 3 bolt bottom bracket. That adds quite a lot of strength to the gear for very little extra weight.
Are you doing the double F3 boxed-in frame at the aft end of the cockpit for rollover protection as per UK directive? I've done it & it looks reasonably strong & stiff. I'll post pix soon: I'm re-arranging my workshop at the moment.
Bruce |
|
|
|
|
|
| bigbrixx1 |
| February 27, 2015, 3:47am |
|
Ace
Posts: 822
Time Online: 20 days 16 hours
|
Thanks Bruce, yes I plan on doing all the UK modifications including the F3 boxed in roll over frame. I Look forward to your pics on this. I also am seriously considering changing my wing tips and incorporating your design, although I like the drooped look, it could be a considerable weight savings! I understand the re-arranging. My basement ceiling height is a limiting factor for me. My space is also limited. The bench was build with the concept that allowed me to break it down in order to make room in my shop and allow me to work at a better height on the fuse! |
| V-max. Finished. Now in phase one flight |
|
|
|
|
|
| bigbrixx1 |
| February 28, 2015, 2:32am |
|
Ace
Posts: 822
Time Online: 20 days 16 hours
|
Wheels and brakes fitted. These two piece rims are a bear to put together. Punctured one tube ( notice flat tire) need to come up with a mounting arrangement for the drum brakes. Any ideas?
|
| V-max. Finished. Now in phase one flight |
|
|
|
|
|
| bigbrixx1 |
| February 28, 2015, 2:33am |
|
Ace
Posts: 822
Time Online: 20 days 16 hours
|
One more
|
| V-max. Finished. Now in phase one flight |
|
|
|
|
|
| stevejahr |
| February 28, 2015, 8:58pm |
|
 Airbike plans examiner AcePosts: 200
Time Online: 4 days 11 hours 43 minutes
|
Did you assemble the rims with the tubes flat? Or did you air them up just a bit before you put the rims together?
Usually helps avoid pinch flats to put in just enough air for the tube to take/hold shape. That works for bicycles and motorcycles and I suspect on aircraft too since similar technology. |
|
|
|
|
|
| The Termite |
|
Ace
Posts: 588
Time Online: 5 days 3 hours 12 minutes
|
Punctured one tube ( notice flat tire) need to come up with a minting arrangement for the drum brakes. Any ideas?
Be careful. I don't like the Asuza wheels & brakes either, PITA to change tires. |
|
|
|
|
|
| bigbrixx1 |
|
Ace
Posts: 822
Time Online: 20 days 16 hours
|
Yea I really am not liking the drum brakes. Team is going to allow me to exchange for band brakes. Also I did finally figure out that adding some air allowed one to slowly bolt the rims together! Finally check out my main axel! Darn it I drilled one hole 1/4 inch off center. Tried it free hand.....never agian. .....Going to get another axel! Here she is sitting on her legs!
|
| V-max. Finished. Now in phase one flight |
|
|
|
|
|
| Tom |
|
Ace
Posts: 744
Time Online: 16 days 10 hours 21 minutes
|
This is a very nice thread. Very inspiring. I thank you for sharing all this with us.
Tom |
|
|
|
|
|
| texasbuzzard |
|
airbike Buzzard AcePosts: 1,238
Time Online: 8 days 23 hours 51 minutes
|
Brixx it must feel good to get her on the wheels. I've got band brakes on my max and they are ok at best. They work fine with slow taxi on the tarmac but don't have much effect on higher speed runs as they get hot very fast. Keep up the great work.
Monte |
|
|
|
|
|
| aeronut |
|
blue sky and tail winds to everyone AcePosts: 1,560
Time Online: 28 days 22 hours 31 minutes
|
Do I hear airplane noises emanating from your workshop?? Thanks for your posts; they are great. |
| never surrender; never give-up |
|
|
|
|
|
| bigbrixx1 |
|
Ace
Posts: 822
Time Online: 20 days 16 hours
|
This is a very nice thread. Very inspiring. I thank you for sharing all this with us.
Tom
Thank you guys for all your support! It has been a pleasure sharing This journey with all of you. I am so pleased I chose a Minimax as my first build. The support from Dave and the entire crew at TEAM minimax has been outstanding......along with the support and advice from all you buzzards has made this dream of mine possible!!!! In 1994 i was at Oshkosh air show. I watched minimaxes fly in the ultralight area. I wanted one ever since! ..... And yes Aeronut..it is quite possible you hear my making airplane noises in my basement!!!!!  .......but I also have to say when the wind blowing down from Maine I believe I hear your airplane noises also.... |
| V-max. Finished. Now in phase one flight |
|
|
|
|
|
|


 Logged