|
|
 korale korale |
|
 Wing Man  Posts: 55
Time Online: 1 days 20 hours 27 minutes
|
I have a question for all of you, how long should the extra RS8 brace piece be on the rear spar ?
I'm thinking 45 inches ?
|
|
|
|
|
|
| Tom |
|
Ace
Posts: 744
Time Online: 16 days 10 hours 21 minutes
|
I presume you don't have a scale rule which handles feet and inches, which allows you to lift the measurements off the drawing? You could construct one and it would be useful, but there is another way. If you take the spacing of the vertical pieces as the untapered part and add an 8 to 1 taper on each end you'd be OK. if this doesn't help you can private message me and I'll lift the dimensions off my set of Hi-Max drawings for you.
Tom |
|
|
|
|
|
| Bob Daly |
|
Ace
Posts: 888
Time Online: 45 days 22 hours 25 minutes
|
The taper length is about 6 inches. The total length is about 42". It's on the same plan page:
|
|
 Logged Logged |
|
|
|
|
| korale |
|
Wing Man Posts: 55
Time Online: 1 days 20 hours 27 minutes
|
Thanks Bob,
That's a head smacking moment for me. I just did not see that. |
|
|
|
|
|
| korale |
|
Wing Man Posts: 55
Time Online: 1 days 20 hours 27 minutes
|
Hi All,
I'm ready to start gluing up the fuselage sides.
The manual says to glue the ply side panels to the frame before forming the fuselage.
I know that some builders don't glue the ply sides on the fuselage until after fuselage has been formed as its easier to bend the frame without the ply,
would someone who glued the ply to the sides first tell me how hard it was to bend the sides ?
is it worth waiting to glue the side panels, or should I follow the directions in the manual? |
|
|
|
|
|
| cdlwingnut |
|
Ace
Posts: 416
Time Online: 3 days 22 hours 22 minutes
|
i glued the plywood to the sides first. it went into the jig easy and i didnt have to worry about my butt joints failing because the ply was a gusset |
|
|
|
|
|
| Bob Daly |
|
Ace
Posts: 888
Time Online: 45 days 22 hours 25 minutes
|
The sides are stiff with the ply glued on for sure. I used a Spanish windlass to pull them in and it worked well. |
|
| Logged |
|
|
|
|
| Fenix |
|
Fledgling Member  Posts: 31
Time Online: 9 hours 40 minutes
|
I don't remember it being difficult to pull the sides in with the ply glued on first. I did it both times that way and used furniture clamps. Having the ply on first does reduce the change of a "cluster glue joint" failure because the ply is the gusset.
In both of the fuselages that I built and in the case of a cabinet maker friend of mine who built one the bending after the ply is glued on creates a concave curve in the fuselage ply in the area of the bend. I remember Wayne Ison stating that some people complain about this concave area and in covering the fuselage you must glue the fabric fully to the ply or this area will show up as a fabric separation. I just took this as being all part of the minimax.
BUT my cabinetmaker friend, after discovering this concave area on his fuse, stated that if he had waited until after he bent the fuse sides in to glue the plywood on this would not happen. I've never tested his theory but am soon building a third fuselage and intend to glue the ply on first and just accept the concave area because it is not a big deal and eliminates the chance of a glue joint failure while bending.
|
|
|
|
|
|
| korale |
|
Wing Man Posts: 55
Time Online: 1 days 20 hours 27 minutes
|
Thank you cldwingnut, Bob and Fenix for you input.
I will be gluing in the sides, I was not comfortable with leaving those butt joints unsupported and did not want to do it unless there was a big advantage to doing it that way.
All the parts for the fuselage sides are cut now and ready for gluing. it's just too cold these days for epoxy I'd like it to be a little warmer before I start glue.
|
|
|
|
|
|
| korale |
|
Wing Man Posts: 55
Time Online: 1 days 20 hours 27 minutes
|
It's too cold for epoxy so I have been working on the metal bits.
These are four of the cabane brackets.
|
|
|
|
|
|
| Prajulad |
|
 Fledgling Member Posts: 4
Time Online: 1 hours 16 minutes
|
Hi Korale,
I'm from Port Macquarie, NSW. Been thinking of building a Hi-Max myself but cannot decide whether to go for a complete kit or source the wood locally here in Oz. Build time is not an issue for me as i do enjoy the process( built a few RC model kits over the years) Keen to know what has been your experience like so far...
cheers |
| Raj Praveen
|
|
|
|
|
|
| beragoobruce |
|
Built an Eros - now I'm flying it! AcePosts: 1,067
Time Online: 19 days 10 hours 59 minutes
|
Hi Prajulad If you search through the archives here you'll find at least one thread re your question. Trouble is, the search engine on this site is pretty rubbish. FWIW, here's my opinion. You may save some money by sourcing what you can in Oz. Disadvantages to going this way are: high cost of delivery, especially for long items like spar caps & fuselage stringers; not being able to inspect wood before you buy, unless you have a local source; need to buy planer thicknesser to machine timber down to required size; lack of availability of some items, mostly the aluminium parts, meaning you'll need to import these from the States. I couldn't find any Oz supplier of strut material, and long lengths means high shipping charges. There's also a whole lot of very small lengths of different extrusions needed - again, I couldn't find these over here. The build time will be close to identical whether you buy a kit or source your own materials, since the kit just supplies lengths of wood. You still have to form the 2000 odd little bits of stick to make your aeroplane. But without doubt you will save a huge amount of time buying the complete kit. Some items you'll almost certainly want to buy from TEAM. These would be the fibreglass engine cowl; fuel tanks; probably wheels. If you decide on local wood, Hoop Pine is the nearest we have here to aircraft quality spruce. A bit heavier, but a bit stronger. Have a look at Pacific Boatcraft here: https://boatcraft.com.au/Shop/.....9185. For epoxy, I much prefer using WEST systems adhesives: https://www.westsystem.com.au/products/Good luck whichever way you decide on. Building & flying my Eros was one of the most fun times of my life! Bruce p.s. Korale: sorry to hijack your thread. Your build is going great. |
|
|
|
|
|
| Prajulad |
|
Fledgling Member Posts: 4
Time Online: 1 hours 16 minutes
|
Hi Begaroobruce,
Appreciate your inputs mate! Yes i did find that thread 'build from kit vs build from plans' after i posted my question to Korale. In fact i just got off a looooong chat with Korale and he enlightened me with the pros and cons of both the approaches. It certainly is not an easy decision to make so i guess i'll have to do a bit of more research and have my work cut out for the next few days. I'll check out the links you've posted as well , thanks for that. |
| Raj Praveen
|
|
|
|
|
|
| Prajulad |
|
Fledgling Member Posts: 4
Time Online: 1 hours 16 minutes
|
Oops got your profile id wrong Beragoobruce! |
| Raj Praveen
|
|
|
|
|
|
| korale |
|
Wing Man Posts: 55
Time Online: 1 days 20 hours 27 minutes
|
I was a little wary of using Epoxy in the cold , so I got some cold weather hardener . and managed to get the fuselage sides glues up
I have trimmed the ply and sanded the grue drips and squeeze out.
Two sides are now ready to be joined.
Bruce ; don't worry about hijacking the thread, appreciate hearing from someone who has been down the path before.
|
|
|
|
|
|
| Arthur Withy |
|
 Happy 1500R owner - building a Jodel D18 AcePosts: 2,532
Time Online: 32 days 12 hours 14 minutes
|
Bruce is your man..an excellent builder and craftsman. His advise is 100% correct. He has built one of the best Minimaxes Ive had the pleasure to see and touch.
cheers Arthur |
|
|
|
|
|
| beragoobruce |
|
Built an Eros - now I'm flying it! AcePosts: 1,067
Time Online: 19 days 10 hours 59 minutes
|
|
|
|
|
|
| Arthur Withy |
|
Happy 1500R owner - building a Jodel D18 AcePosts: 2,532
Time Online: 32 days 12 hours 14 minutes
|
Its the truth..I have high standards as some of you know...so I speak the truth and I tip my hat to you Bruce....and you are assisting another builder down the path of success...THATs whats great about this forum...Its full of great Guys..from all parts of the world.
cheers Arthur |
|
|
|
|
|
| korale |
|
Wing Man Posts: 55
Time Online: 1 days 20 hours 27 minutes
|
Started to join the fuselage sides together, when offering up the bulkhead at station '4' I realised had made a mistake with the fuselage sides.
I had glued the seat support 1.5 inches too high. Not a disaster as I'm quite short (5 foot 3) and would probably have needed a thick cushion anyway.
jigged the fuselage sides into place and cut a few of the cross pieces. Did a quick check before stopping for the day, it is out of square by about 2mm, will deal with that tomorrow.
|
|
|
|
|
|
| Prajulad |
|
Fledgling Member Posts: 4
Time Online: 1 hours 16 minutes
|
The fuse seems to be coming along very nicely Korale |
| Raj Praveen
|
|
|
|
|
|
| Arthur Withy |
|
Happy 1500R owner - building a Jodel D18 AcePosts: 2,532
Time Online: 32 days 12 hours 14 minutes
|
|
|
|
|
|
| cdlwingnut |
|
Ace
Posts: 416
Time Online: 3 days 22 hours 22 minutes
|
Your plane is looking great, I remember how excited I was when I put the halves of the fuselage together and it started looking like an airplane. Keep up the good work |
|
|
|
|
|
| korale |
|
Wing Man Posts: 55
Time Online: 1 days 20 hours 27 minutes
|
You are correct cdlwingnut, its nice to see it coming together.
I managed to glue in the station 4 bulkhead and the cross pieces and braces for the straight part of the fuselage today. I had just enough epoxy for the job.
Unfortunately the lock down rules prevent me from going to buy more, and I think the place is not open anyway.
I have ordered some more epoxy online but it will take some time to get here. in the meantime I will start to close the front of the fuselage have all the cross pieces cut for when the glue arrives. |
|
|
|
|
|
| korale |
|
Wing Man Posts: 55
Time Online: 1 days 20 hours 27 minutes
|
|
|
|
|
|
| korale |
|
Wing Man Posts: 55
Time Online: 1 days 20 hours 27 minutes
|
I had a bit of a disaster.
I was in a too much of a hurry to close the front of the fuselage and did not use enough enough clamps and went too quick.
There was a crack and some of the plywood cracked and two of the joints on the left of the fuselage popped.
It looks like the ply split and the glue is fine. I will have to apply a scarfed ply patch. I have been reading up on AC 43.13 and I think I know what has to be done.
|
|
|
|
|
|
| mullacharjak |
|
 Ace AcePosts: 281
Time Online: 3 days 21 hours 12 minutes
|
Domt know why triangular wood pieces are not glued in the corners which would strengthen that area and relieve the plywood.Its commonly done on model airplanes and makes a lot of difference in the firewall area.Also the plywood looks suspect as it split too easily.Maybe they were too miserly with the glue used .
|
|
|
|
|
|
| korale |
|
Wing Man Posts: 55
Time Online: 1 days 20 hours 27 minutes
|
I think once the top and bottom plywood is installed it all acts as one big gusset. triangular gussets like you describe are glued into the rear of part of the fuselage.
I do have some doubts about the plywood now. I'm considering swapping out the marine ply for aircraft grade birch ply for the nose ribs.
The other places that use the marine ply are quite large and easily seen so I can be confident that a pre-flight will catch any issues. |
|
|
|
|
|
| korale |
|
Wing Man Posts: 55
Time Online: 1 days 20 hours 27 minutes
|
I kinda stopped building for a couple of months, but have been back at it for the past few weeks, rear fuselage is complete, need to do the front top ply and then the cockpit.
|
|
|
|
|
|
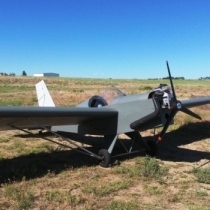
| PUFF |
|
 Ace AcePosts: 1,518
Time Online: 34 days 6 hours 18 minutes
|
Greg, I saw your airplane in a couple posts by the Shelbyville Sport Flyers yesterday. |
|
|
|
|
|
| Keith103 |
|
 Ace AcePosts: 632
Time Online: 13 days 6 hours 31 minutes
|
I too tried out marine plywood and very quickly realized that it may not work for the MiniMax.
The plywood holds the front fuselage together and is load bearing.
Aircraft grade 1/8 ply is light but strong.
Would love to hear from other Max builders who have used marine ply. |
|
| Logged |
|
|
|
|
|


