Print Topic - Archive
ETLB Squawk Forums / miniMax, Hi-Max, and AirBike General Discussions / project "sawdust" still going!
Posted by: jody miller, July 17, 2010, 1:33am
Posted by: jody miller, July 17, 2010, 1:34am; Reply: 1
Posted by: jody miller, July 17, 2010, 1:35am; Reply: 2
Posted by: jody miller, July 17, 2010, 1:36am; Reply: 3
Posted by: jody miller, July 17, 2010, 1:37am; Reply: 4
Posted by: jody miller, July 17, 2010, 1:38am; Reply: 5
Posted by: jody miller, July 17, 2010, 1:39am; Reply: 6
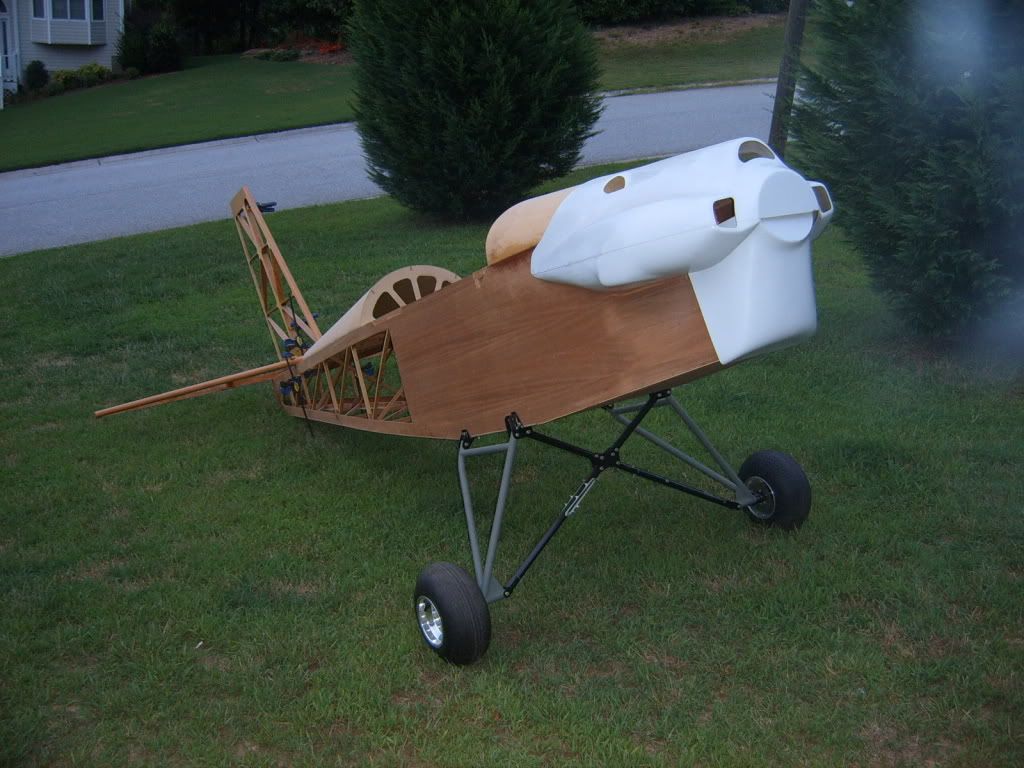
well i hope u enjoy the pics!
Posted by: CSCHMIDT, July 17, 2010, 2:19am; Reply: 7
Great wood work, But I have to ask, Where do the wing struts mount? And if they mount to the axel like the stock gear, what keeps the wings from flapping while attached to the shock absorbing landing gear?
Curt
Posted by: CSCHMIDT, July 17, 2010, 2:20am; Reply: 8
Ok, now I see where they mount.
Posted by: jody miller, July 17, 2010, 2:33am; Reply: 9
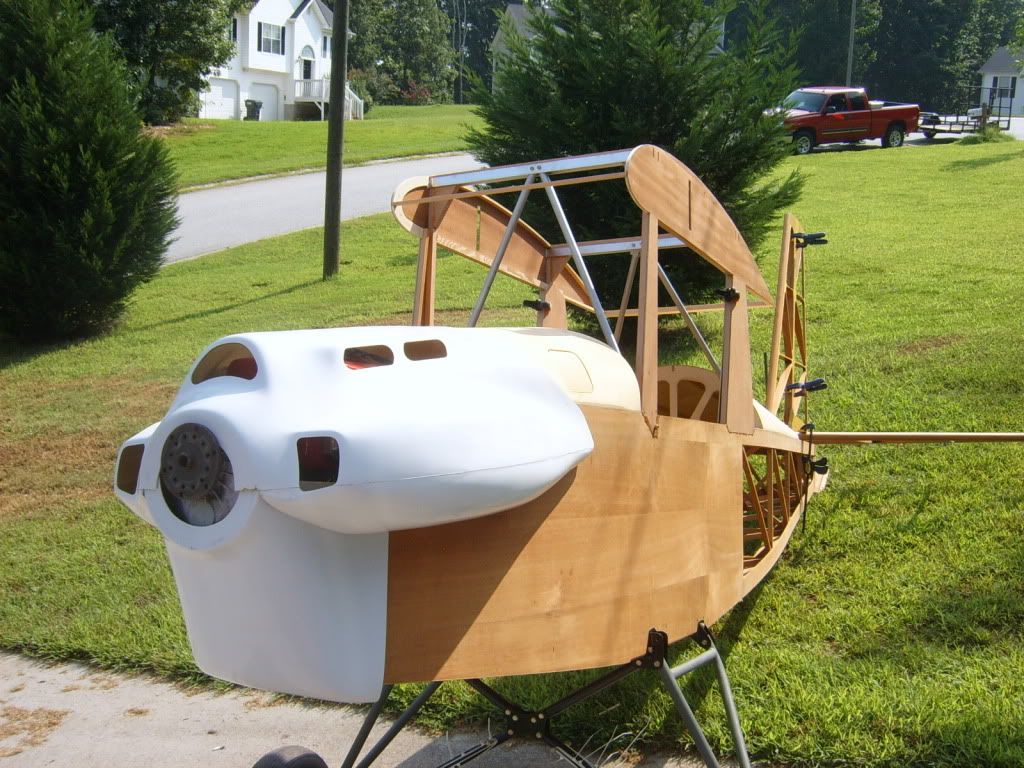
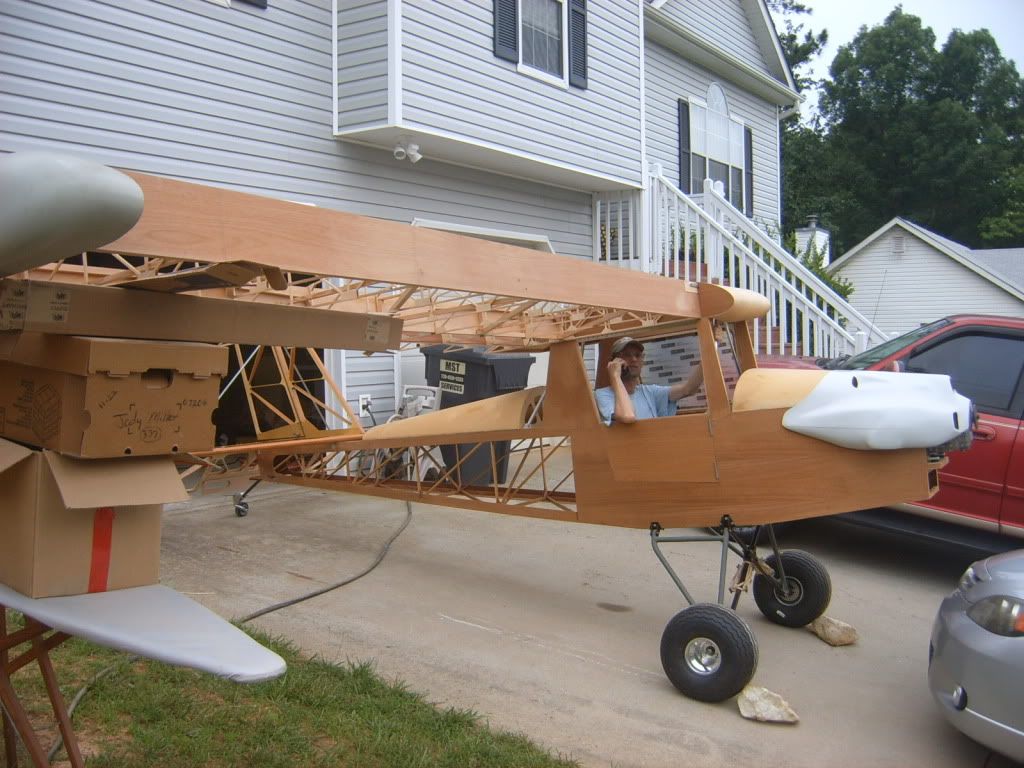
i am building the 1650r with the highwing option from plans.i built the strut attachment points into the brackets for the gear.inside the fuse i have metal that runs from side to side at the bracket locations for strength.
Posted by: BlueMax, July 17, 2010, 2:35am; Reply: 10
So the struts mount to the fusalage above the gear? Wont changing the angle of the struts reduce the G loading they can take before something fails?
Chris
Posted by: jody miller, July 17, 2010, 2:38am; Reply: 11
So the struts mount to the fusalage above the gear? Wont changing the angle of the struts reduce the G loading they can take before something fails?
Chris
no they r in the stock location.it is a himax.
Posted by: 990 (Guest), July 17, 2010, 2:58pm; Reply: 12
very good work.all of it is very fine work.keep up the good work,i an proud for u.fine job,no bs.
Posted by: jody miller, July 21, 2010, 4:59am; Reply: 13
Thank you!It feels good to start back building again. :)
Posted by: BlueMax, July 21, 2010, 3:45pm; Reply: 14
looks like if I had hit the refresh button instead of the post button I would have seen the answer to my question.
looking good!
Chris
Posted by: aeronut, July 21, 2010, 7:28pm; Reply: 15
Great looking project, I hope the work situation gets better for you. Your plane looks like it is going to be a real WINNER. :)
Posted by: 34 (Guest), July 21, 2010, 9:06pm; Reply: 16
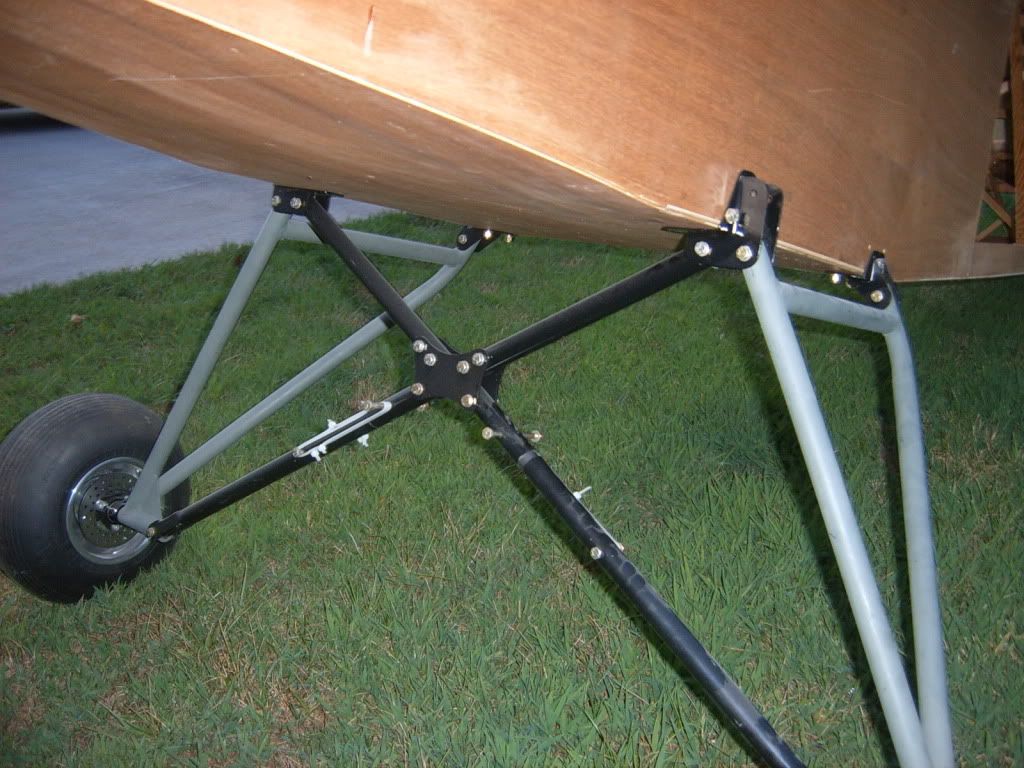
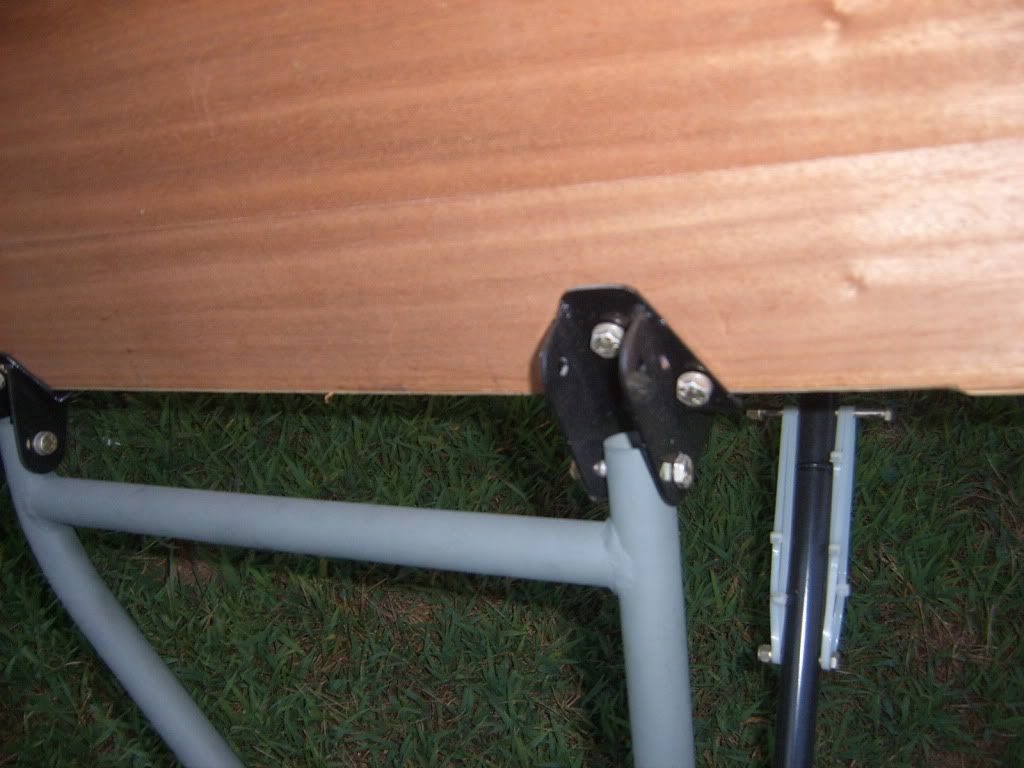
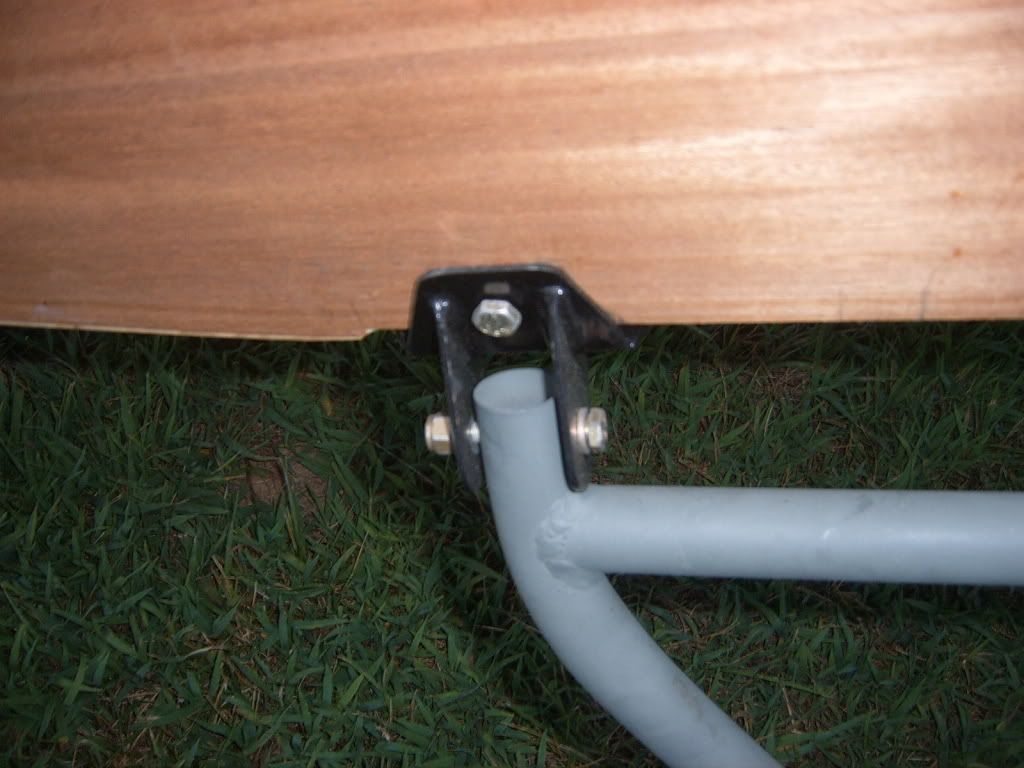
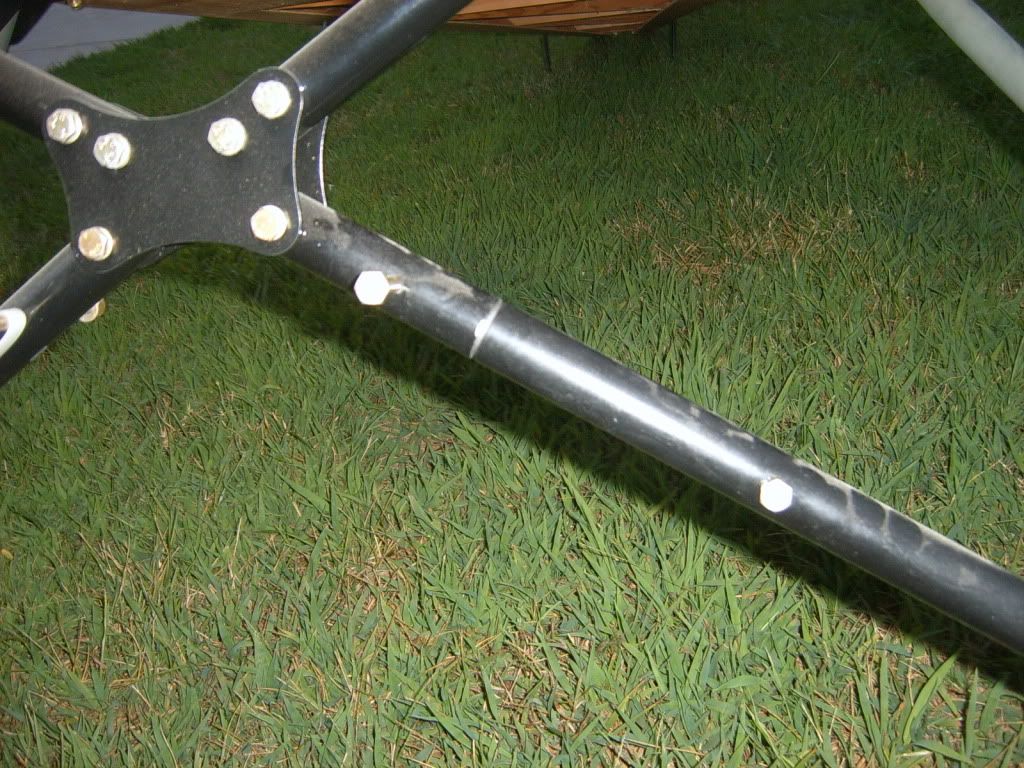
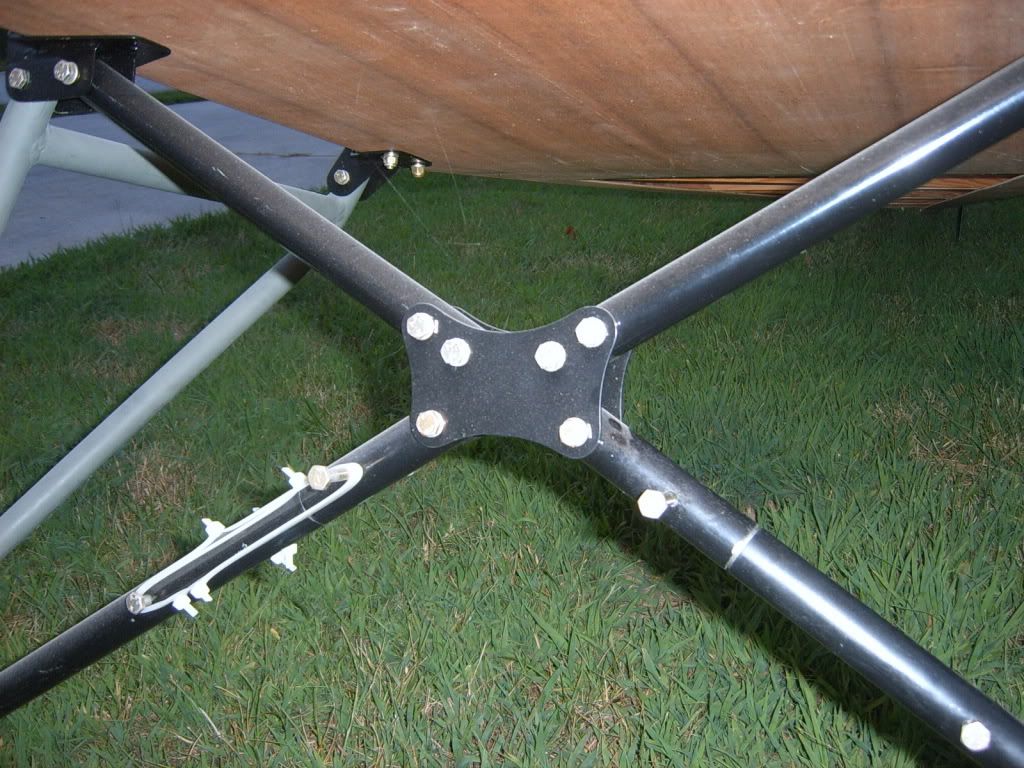
Jody, your work looks great. There is one thing that caught my eye. In pictures four and five that show the mounting of the Landng gear, the top of the gear is clearly shown. There is a bolt that goes through the top of the gear leg. There is very little for that bolt to ride on and a couple of hard landings, is very likely to tear that gear to pieces. I would weld a piece of tubing of the appropriate size into the gear leg to act as a bearing for the bolt. The bolt looks to be 1/4" so use 3/8" X .058. bushing material. There should also be a strap welded over the bushing to the leg it's self. Doing that, you will never have to worry about the top of the gear wearing or ripping out.
If you need a picture of what I'm talking about I can find one.
Dave
Posted by: jody miller, July 21, 2010, 11:23pm; Reply: 17
Dave
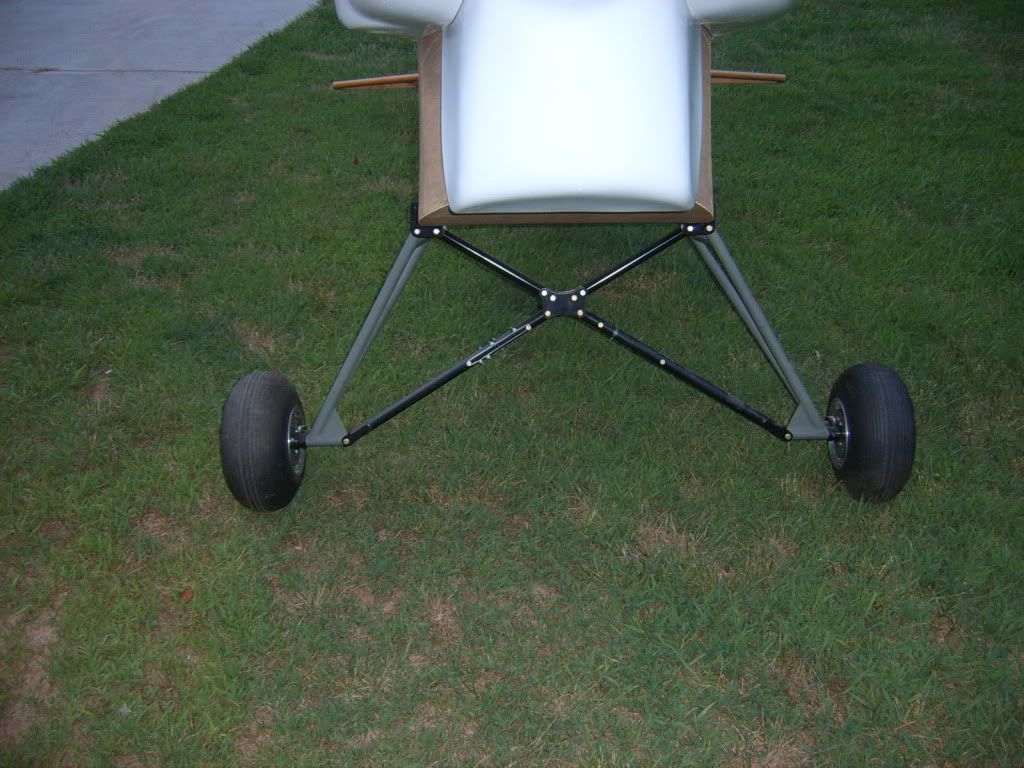
I have a tube 0f 4130 to do the very thing u talked about.I had planed on drilling out the holes and welding it in but have never got around to it.I wonted to make sure every thing was going to work/fit right before I welded them in.That's why I only put primer on the gear legs.when i built the gear i added 6"to the overall width and 4" to the overall height to make up for the flex in the gear.what is going to be fun is trying to fig out the amount and bungees needed when its all done! ;D
Posted by: jody miller, July 21, 2010, 11:36pm; Reply: 18
Ricardo
I have built the cross support for the back but have not built the one for the front brackets yet.Got to excited to see if what i had in my head would work out! ;D
Posted by: jody miller, July 21, 2010, 11:45pm; Reply: 19
cpd and aeronut
Thank you,I still got a ways to go,I just hope i get it done before i join the "died at 90% complete" club! ;D I started on the upper part of the fuse yesterday.Got to work on it for a few hours today but had to take a break when i started to sit and watch the glue dry !
Posted by: Harless Greear, July 22, 2010, 12:46am; Reply: 20
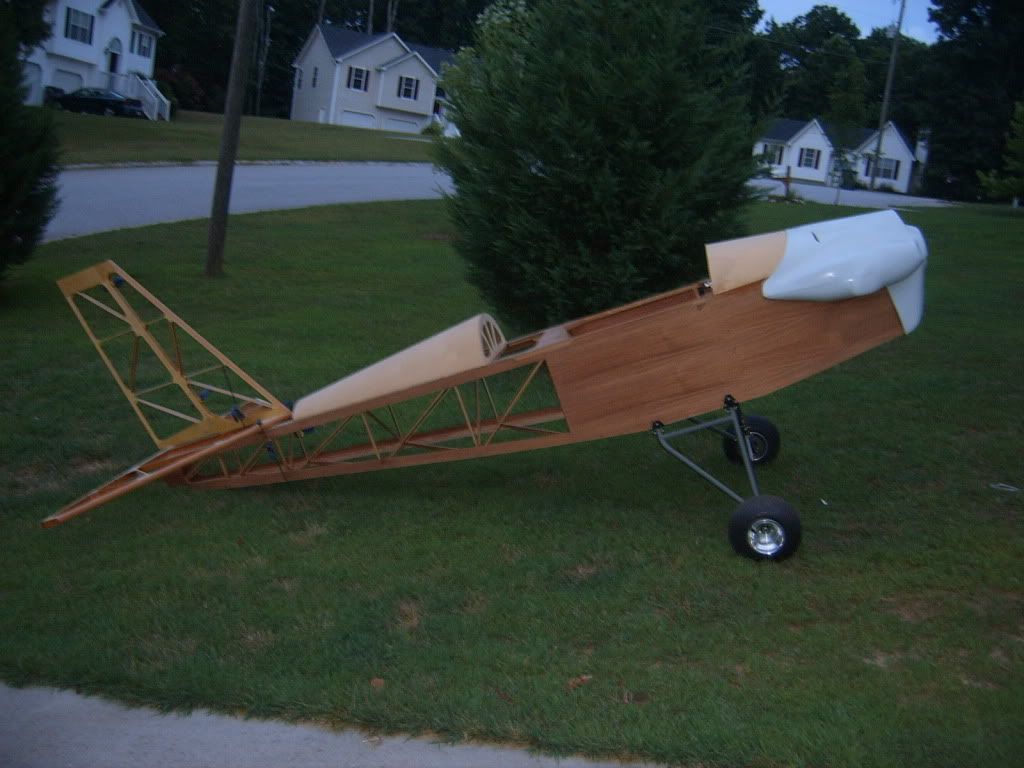
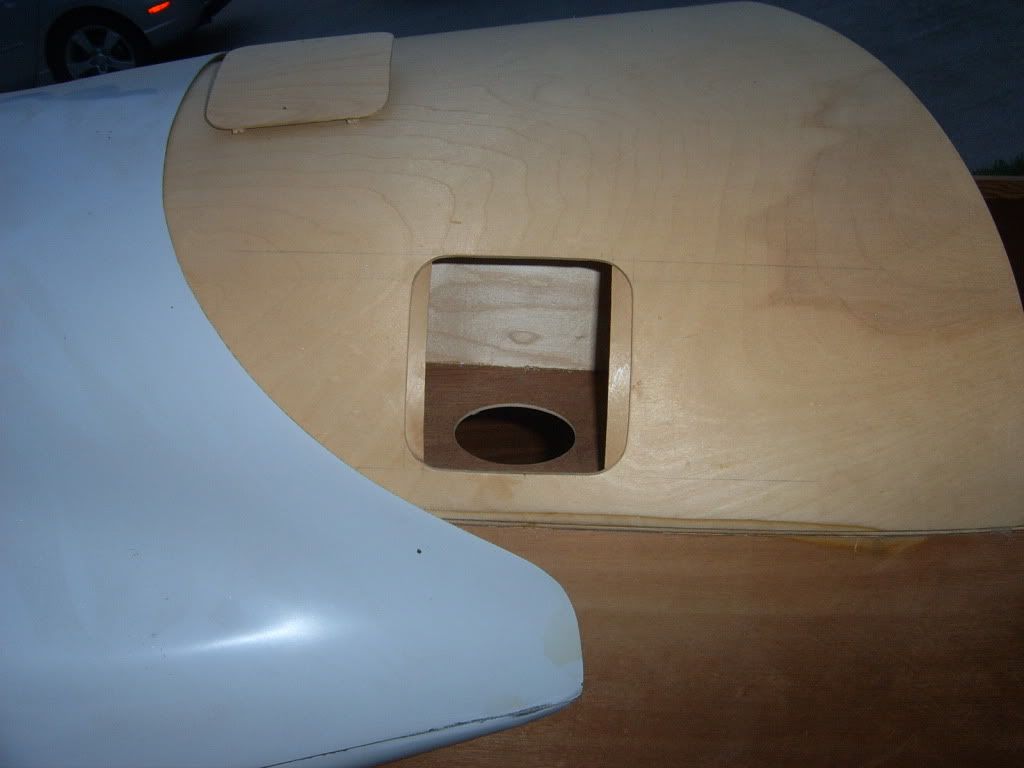
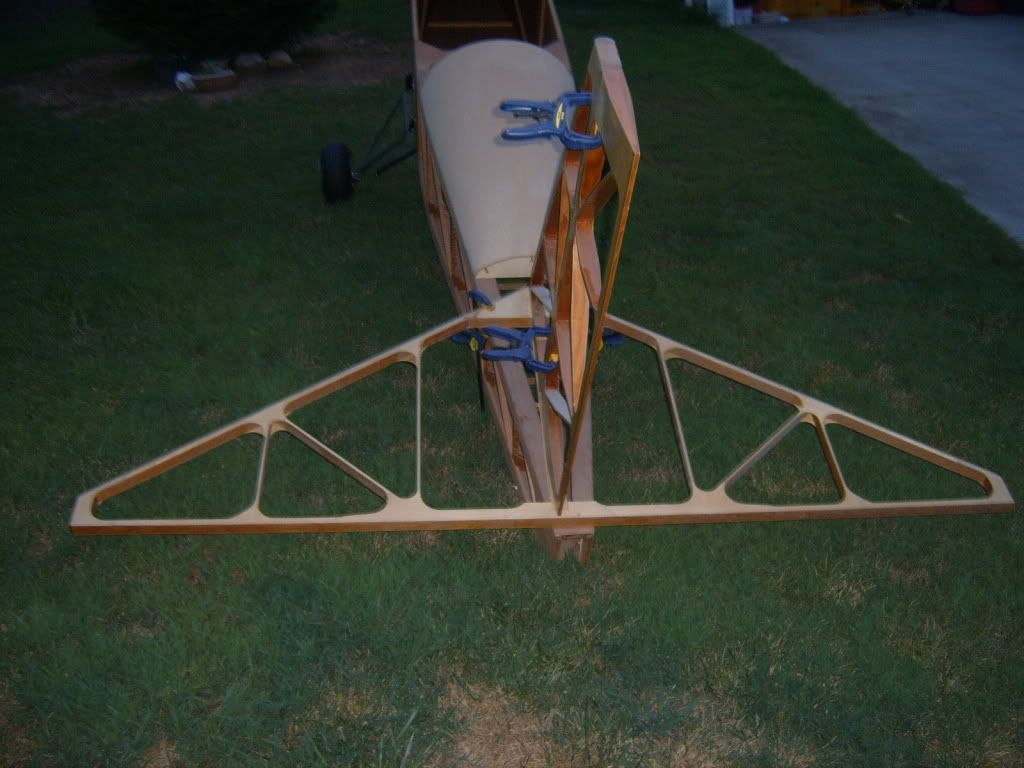
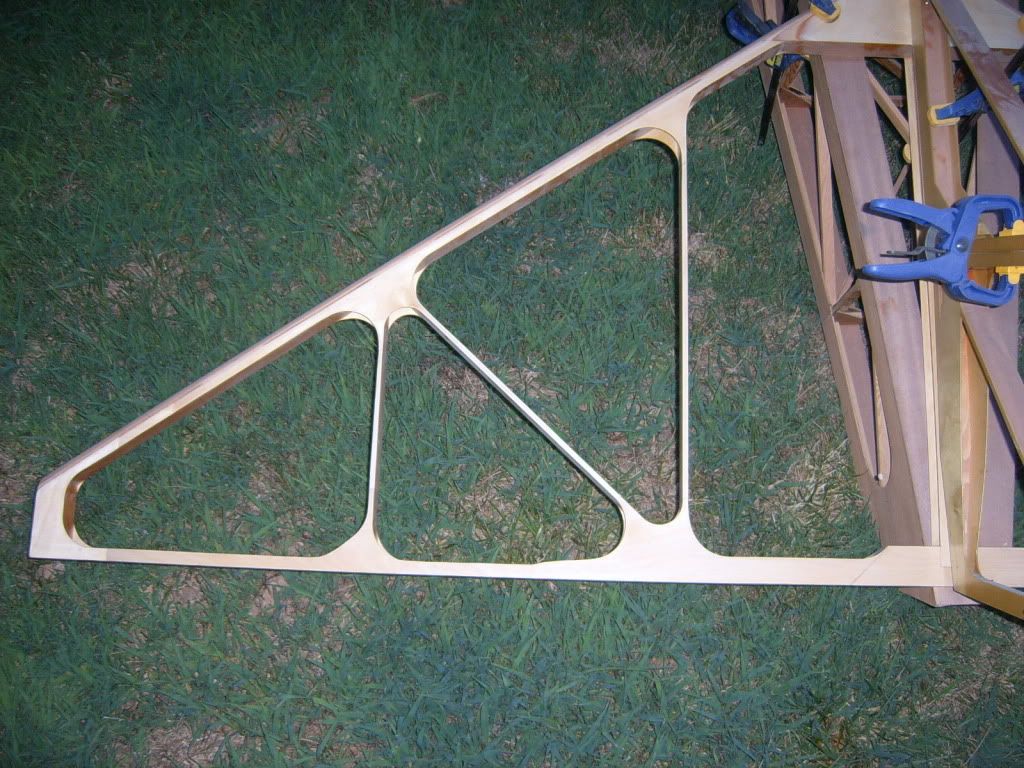
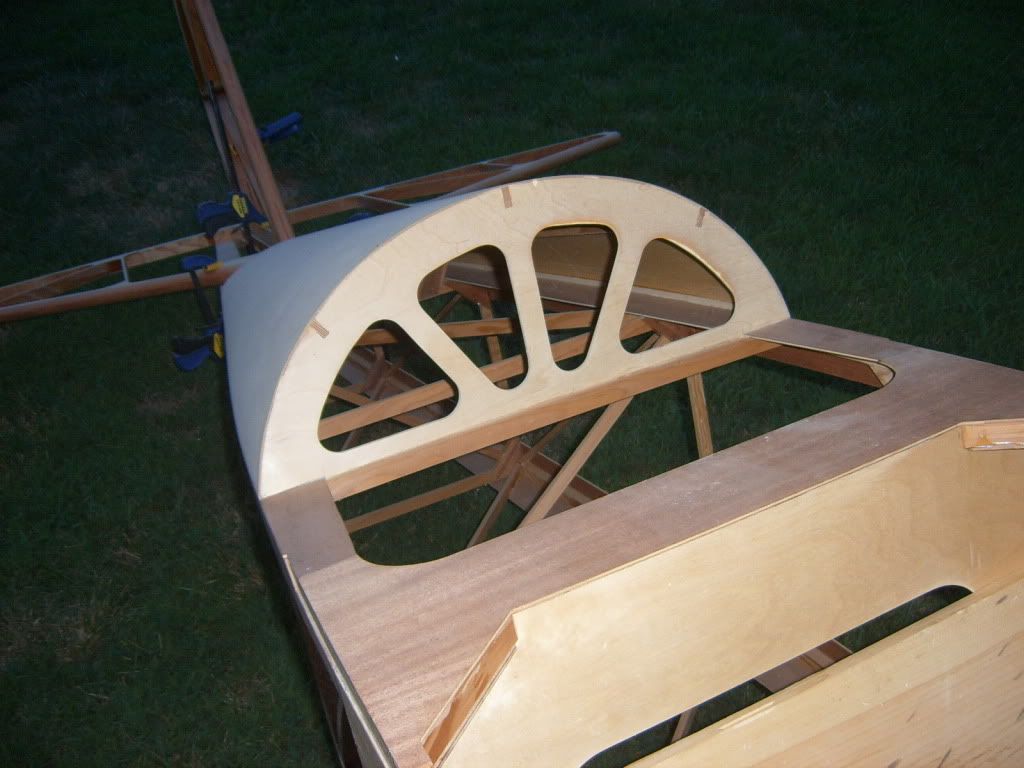
Jody, In your last picture, what is the purpose of the opening just ahead of the rear turtle deck??
Harless
Posted by: Ricardo, July 22, 2010, 12:56am; Reply: 21
That´s fine Jody, I had erased my pictures from this thread.
Your work looks just great!
Posted by: jody miller, July 22, 2010, 3:09am; Reply: 22
Jody, In your last picture, what is the purpose of the opening just ahead of the rear turtle deck??
Harless
On a himax the turtle deck does not come up as far as on a minimax.I plan on using this opening for the pushrods for the ailerons.After i get everything built and working i plan on making a cover plate for it. :)
Posted by: jody miller, August 9, 2010, 3:10pm; Reply: 23
Posted by: jody miller, August 9, 2010, 3:15pm; Reply: 24
Posted by: theflyingfireman, August 9, 2010, 10:58pm; Reply: 25
Looking good Jody. Keep it up and keep us posted........
Mark
Posted by: PUFF, August 10, 2010, 11:51am; Reply: 26
Posted by: jody miller, August 11, 2010, 3:40am; Reply: 27
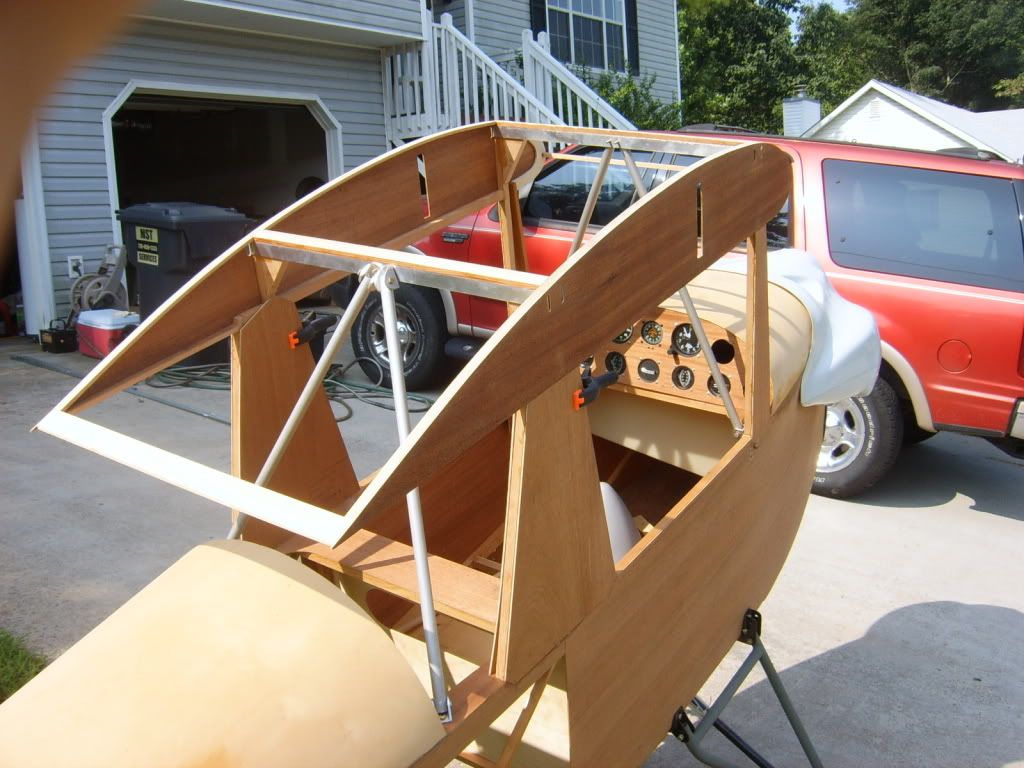
I plan on putting the plywood on the top in a few days and i need some input!I cant decide if i should put a skylight in the top.what would you do?And if so how far from the carrythroughs and sides would you set it in?Would you cut the hole with square corners or would you radias the corners?I had talked it over with a friend and he said to set it up with a skylight now and then later if i did not like it to replace the Plexiglas with plywood so i could have it ether way.what do u guys think i should do?
Posted by: Outlaw, August 11, 2010, 4:03am; Reply: 28
Jody radius corners are going to be stronger. I am also adding a sky light using 1/8 Lexan. I am going to make it as large as possible (20"x24") Then double up the ply all the way around as to make the lexan sit flush . On my plane they had it doubled on the edges to make the wing transition. So it won't be adding much more weight doing what I am. I will try and post pics as soon as I get it done. Keep it up love see your project coming together.
Posted by: 1073 (Guest), August 13, 2010, 11:52am; Reply: 29
Hey bro... I would definitely add the Skylight. My Hi-Max doesn't have that option and boy I sure wish it did. I'm used to flying a tomahawk also.. Lots of visibility, the more the merrier....
Keeb~
Posted by: Harless Greear, August 13, 2010, 1:34pm; Reply: 30
I wouldn't fly a hi-max without a skylite..
Posted by: jody miller, August 16, 2010, 1:15am; Reply: 31
Posted by: jody miller, August 16, 2010, 1:16am; Reply: 32
Posted by: Harless Greear, August 16, 2010, 1:39am; Reply: 33
Jody, What shape is your rear windshield going to be??
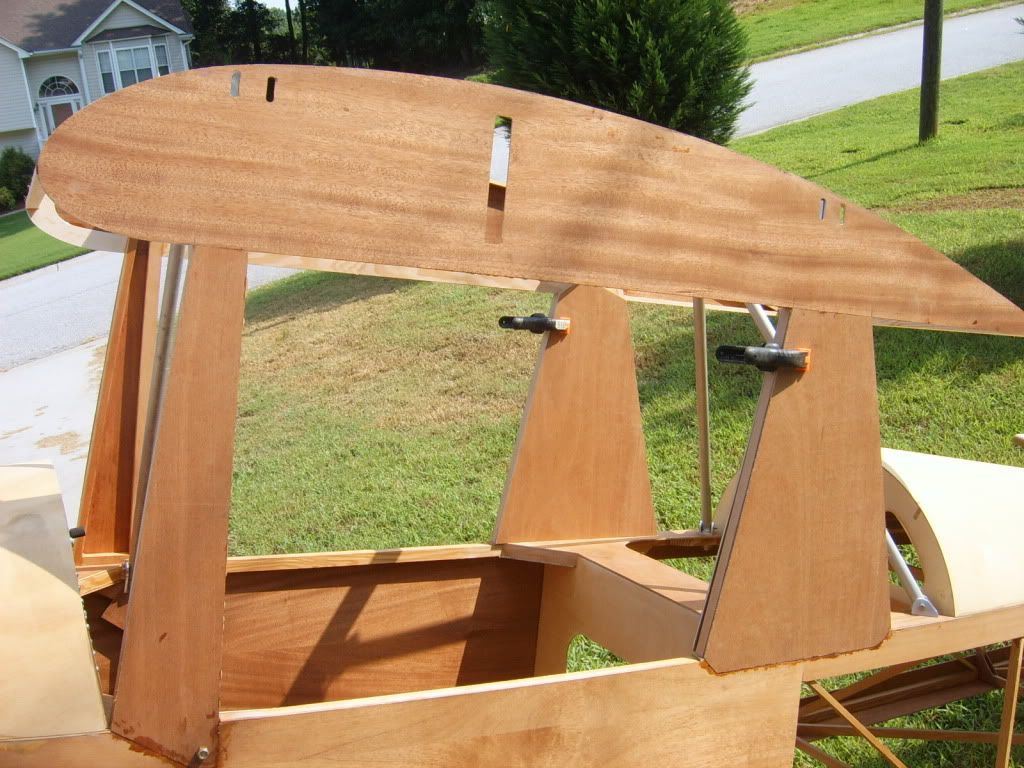
Posted by: jody miller, August 16, 2010, 1:50am; Reply: 34
i am going to to do my back window like george done on his.the window will go under the top and wrap around instead of over.there will be a peace of plywood on the underside of the top with a curve cut in it that the top of the window will form to.I will need to leave it off until i get the controls for the ailerons built.I may cut out a skylight in the rear also but i cant make up my mind.How big would u make the main skylight?
Posted by: Harless Greear, August 16, 2010, 2:30am; Reply: 35
mine is 22 inches long and 20 inches wide
Posted by: 776 (Guest), August 16, 2010, 2:37am; Reply: 36
As a former owner of a T-Craft L-2, make sure you like the hot sun and wearing a hat..... Just my .02
Posted by: jody miller, August 16, 2010, 2:52am; Reply: 37
to help deal with the sun i was thing about trying to rig up one of the tinted car sun screens in the roof.its the kind that u see on the side windows of cars to block the sun off of kids.they work like an old blind or projector screen.When i need it just pull it forward and latch it somehow.when not needed just unhook it and let it role up.
Posted by: jody miller, August 16, 2010, 2:56am; Reply: 38
Posted by: luis, August 16, 2010, 2:30pm; Reply: 39
Posted by: Harless Greear, August 16, 2010, 5:39pm; Reply: 40
I had one of those in my plane and never did use so I didn't put it back in. The sun does get a little warm on the head sometimes but I always wear a cap.
Posted by: jody miller, August 17, 2010, 12:24am; Reply: 41
Posted by: jody miller, August 17, 2010, 12:26am; Reply: 42
Posted by: jody miller, August 17, 2010, 12:27am; Reply: 43
Thanks harless for the numbers to run with on the skylight!
Posted by: Randy lewis, August 17, 2010, 1:12am; Reply: 44
Jody, it looks like you had room for two more clamps there. Better look into buying some more, maybe some green ones.
Posted by: jody miller, August 17, 2010, 1:21am; Reply: 45
Jody, it looks like you had room for two more clamps there. Better look into buying some more, maybe some green ones.
I do have a few clamps in my collection.I found a deal on the colored ones at wall mart a few years ago on the clearance rack.they had tubes with 20 clamps of different sizes and colors for $2.50 so i bought 10 tubes!A man can never have enough clamps! ;D
Posted by: 706 (Guest), August 17, 2010, 1:38am; Reply: 46
A airplane builder, like all of us, can never have too much money, too much sex or too many clamps!!
Posted by: KenL, August 17, 2010, 2:07am; Reply: 47
The sliding roof is a novel idea, but that garage door opener is gonna add lots of weight!
Posted by: 1090 (Guest), August 18, 2010, 12:29am; Reply: 48
i have a minimax low wing and have back problems getting in and out of it with out falling back toward the prop. this may be a dumb question but how are you going to get in this planes pilot seat? if you cut a door in the side of it, it will ruin the box structure and weaken it.i know you have this figured this out. what is it? going from low wing design to high wing designed. thanks tracy.
Posted by: jody miller, August 18, 2010, 2:25am; Reply: 49
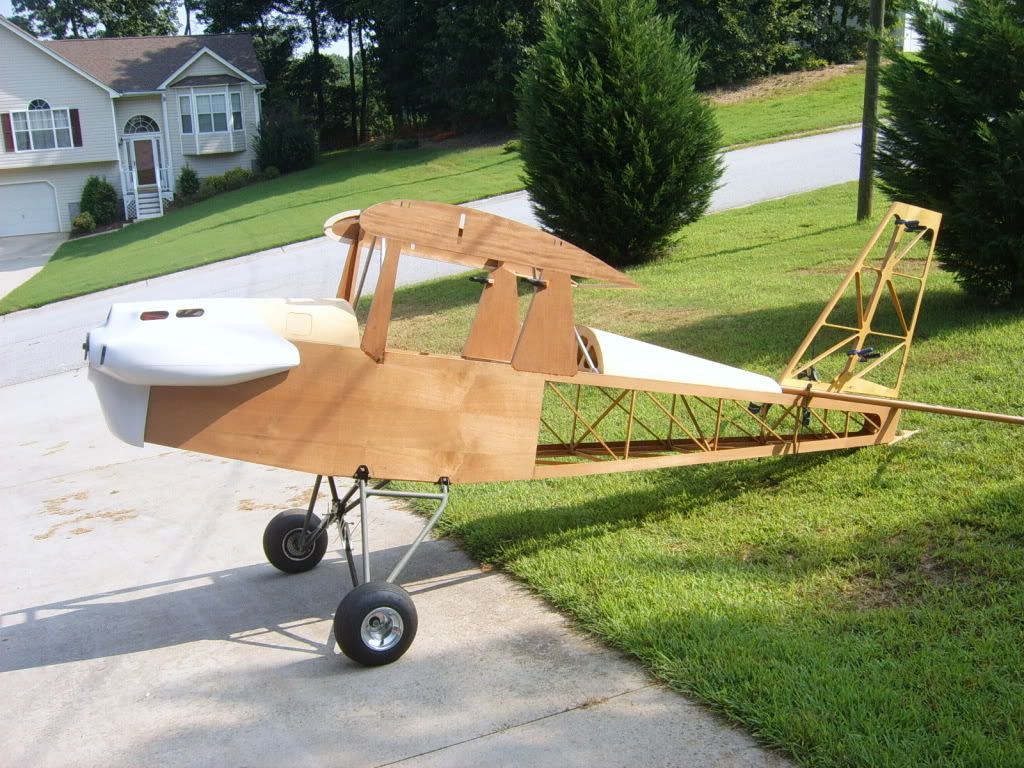
The door location is the same as any other himax.I am building the 1650r with the highwing option.All himax and minimax planes share the same basic airframe.There are differences between engine and mounting locations and a few other parts that are lighter or stronger depending on the model u build.As for the door there r only 2 supports and 2 gussets that u have to glue in place "as per plans" for the door opening.I have ruff cut the opening and glued in the supports.I will take some pics of it for you.
I have built it pretty much to plans,only changing a few things to suit my taste.
mod list....
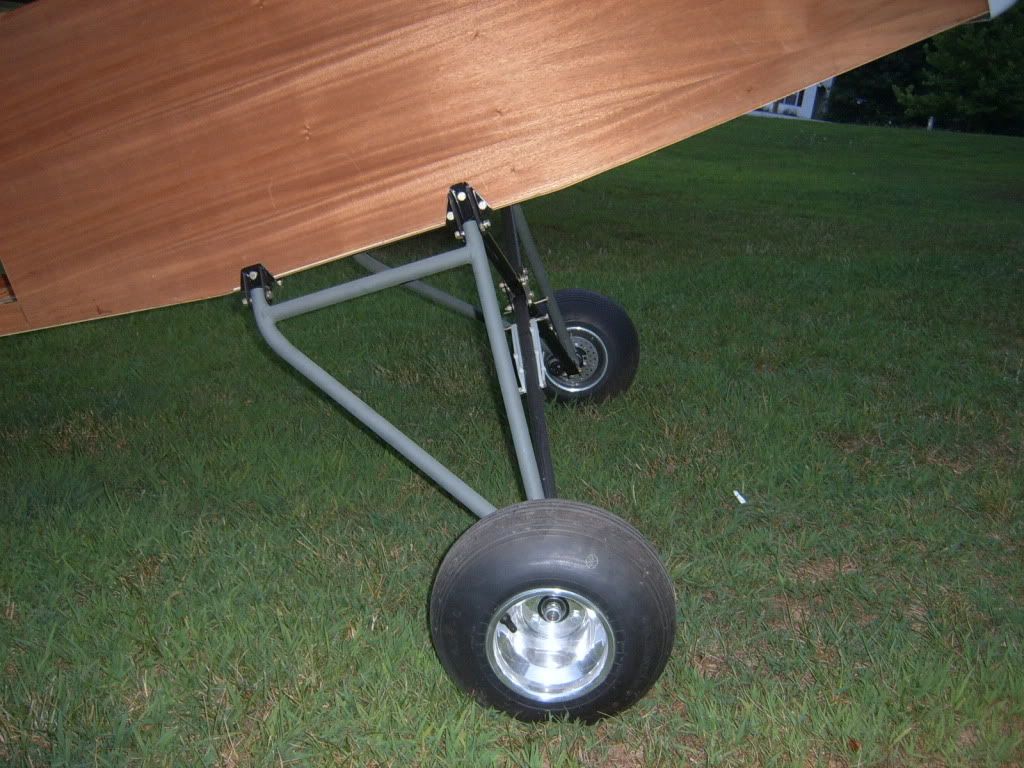
built my own bungee type gear and brackets
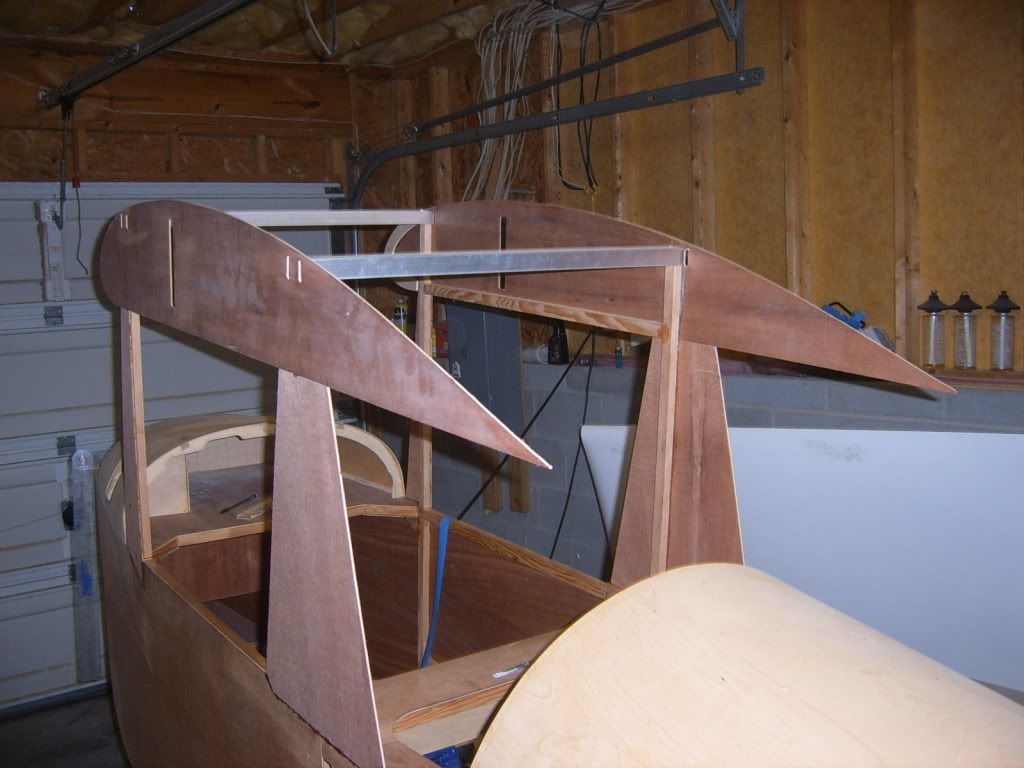
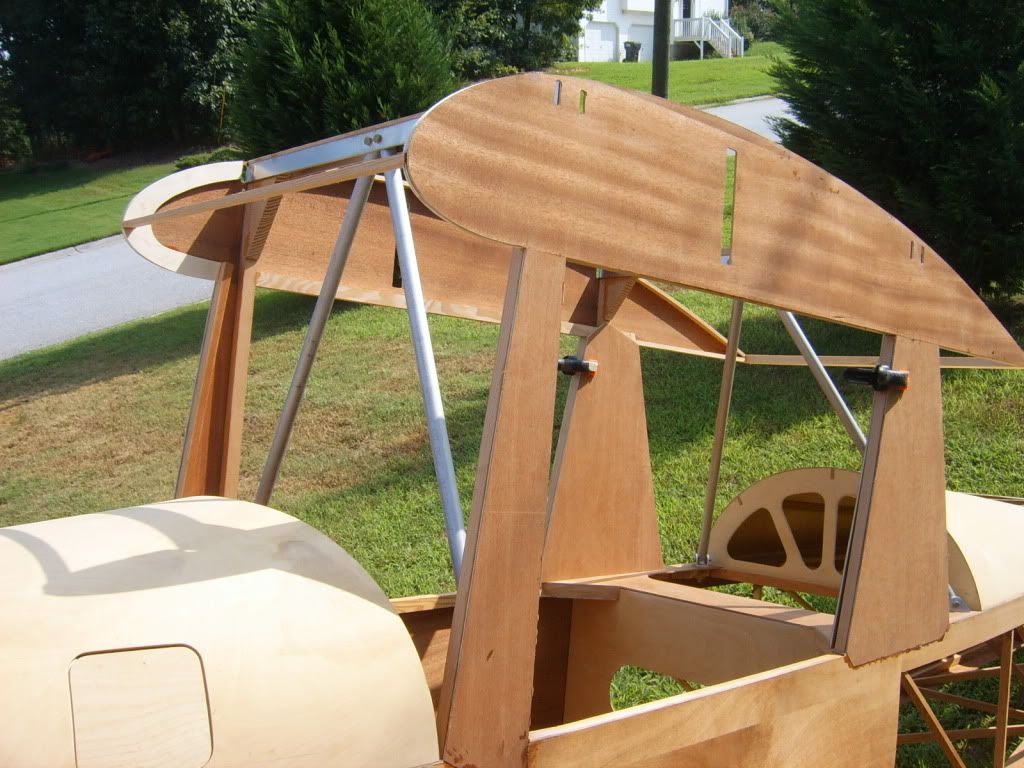
raised the roof 2" for better head room/line of sight down the wing. I'm 6'2"
raised the front of the turtle deck 1" raised the back 1/2"
left the roof the full airfoil shape like george did on his and plan on a push rod set up for the ailerons ,also like he did
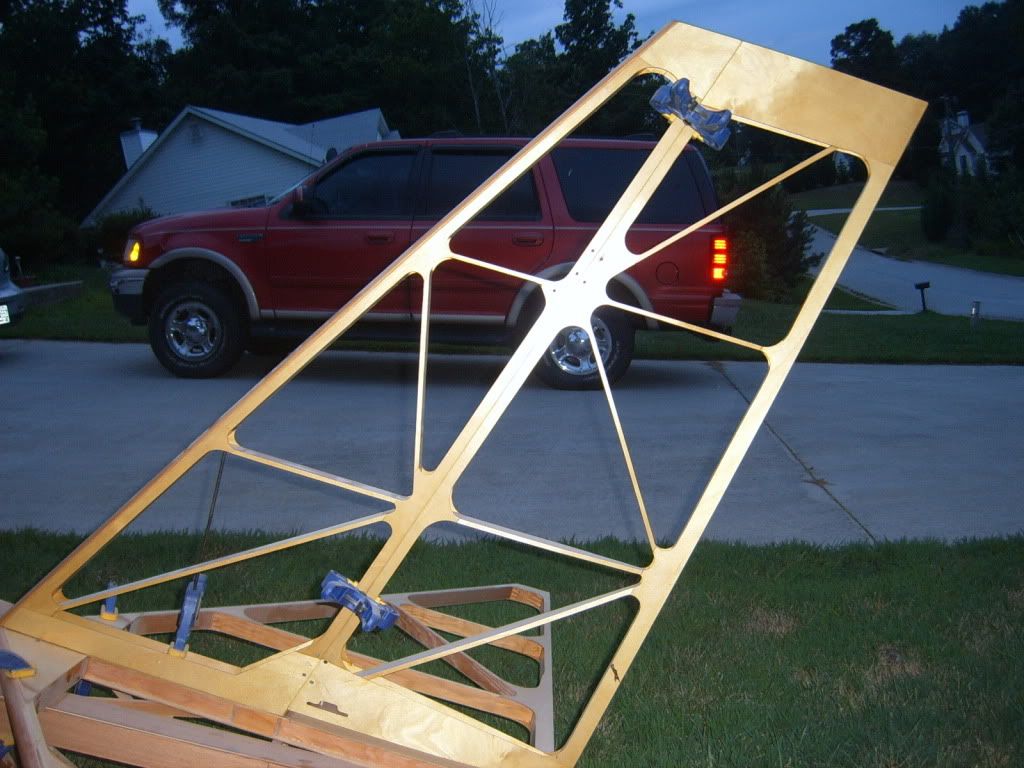
added gussets to the rear frame,where all the cross supports for the rear main frame come together instead of only one on the front or back i put them on both sides.It just gives me that warm and fuzzy feeling.
If i missed anything i will try to add it when i think of it.
every mod that i have done i have called john and talked it over with him and my eaa chapter before changing anything!
Posted by: jody miller, August 18, 2010, 2:57am; Reply: 50
I took some pics of what i changed
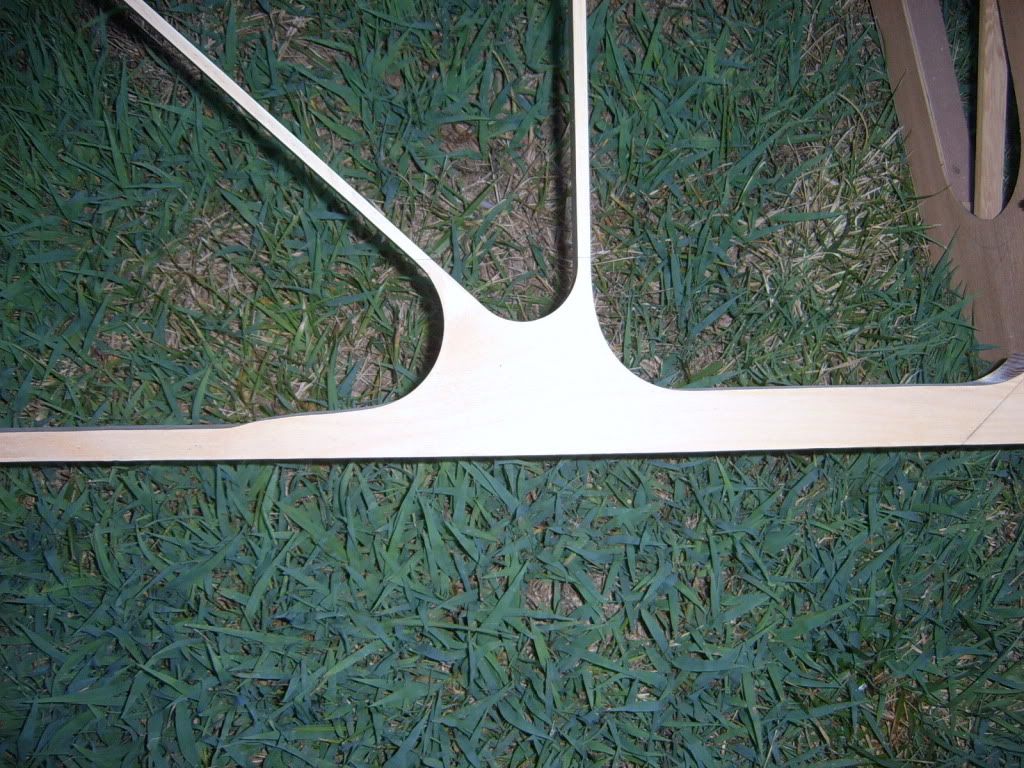
the extra gussets i was talking about

so i would not have the hump from the gussets in the covering

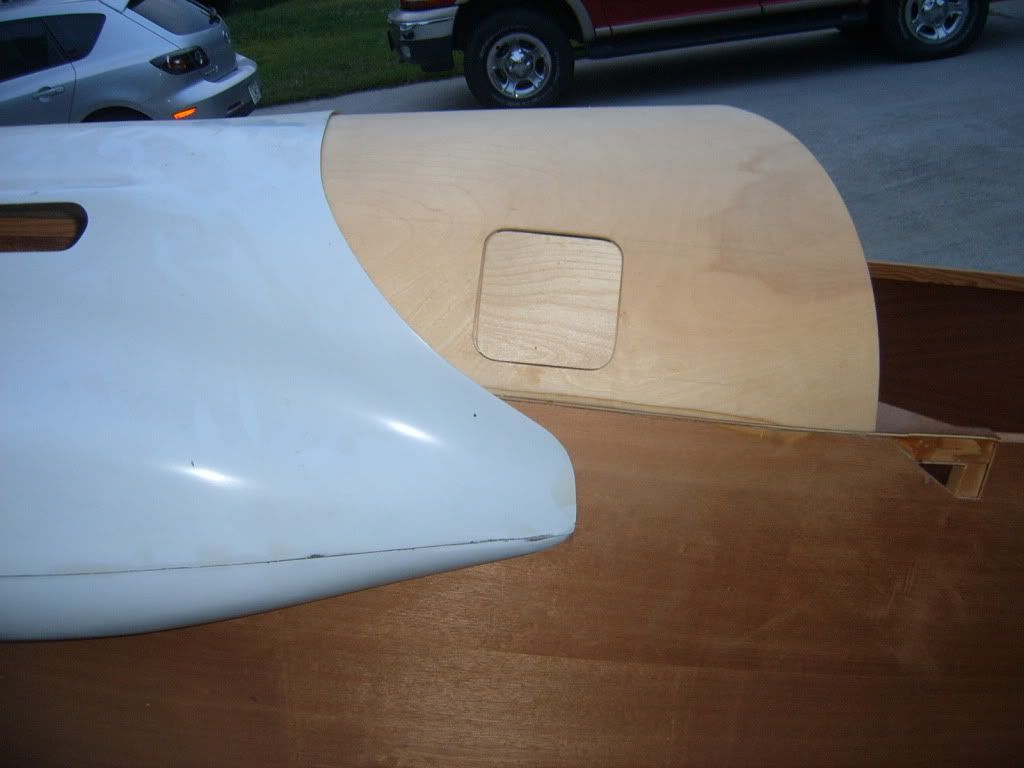
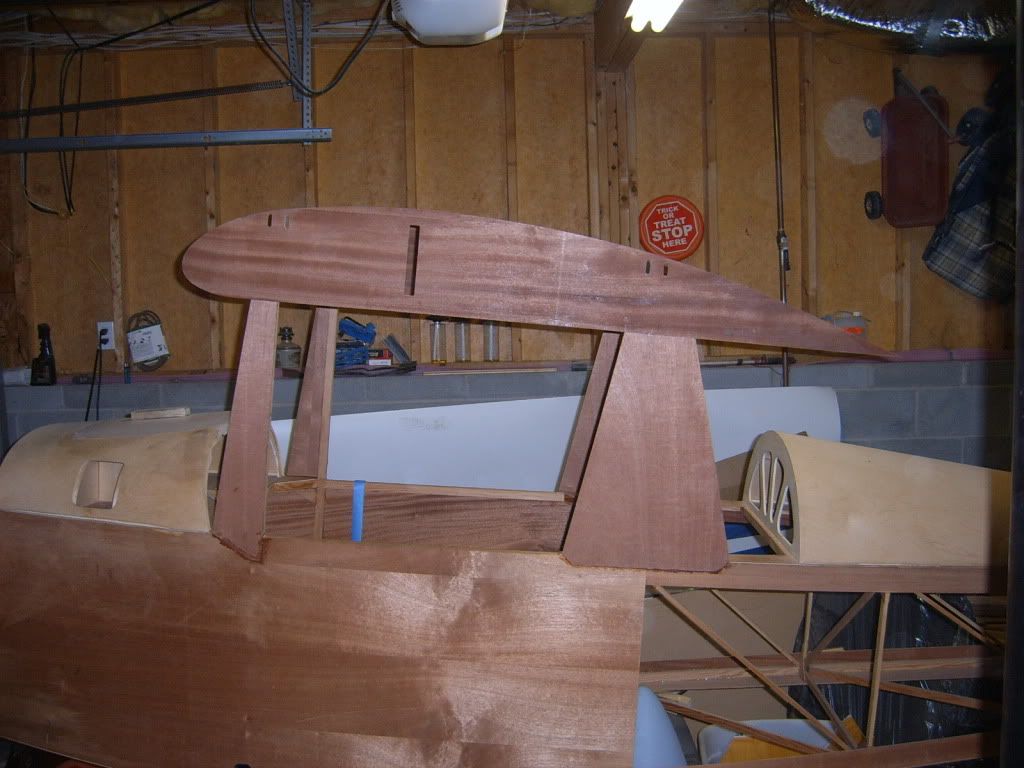
front turtle deck

rear turtle deck

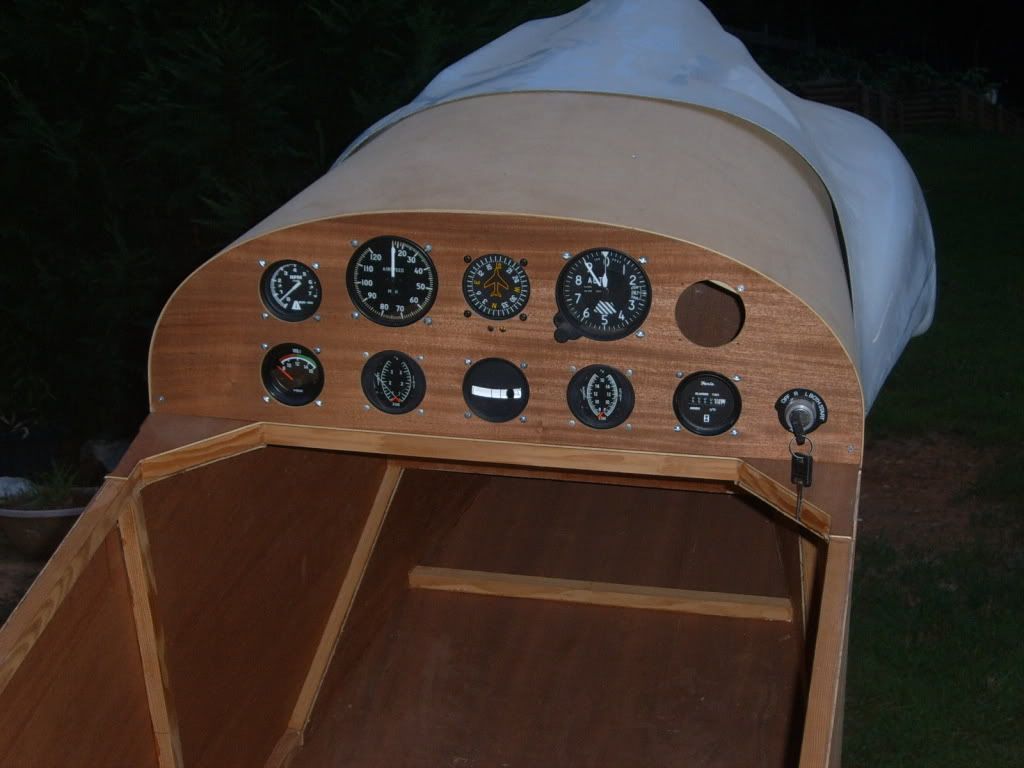
and where the panel goes..

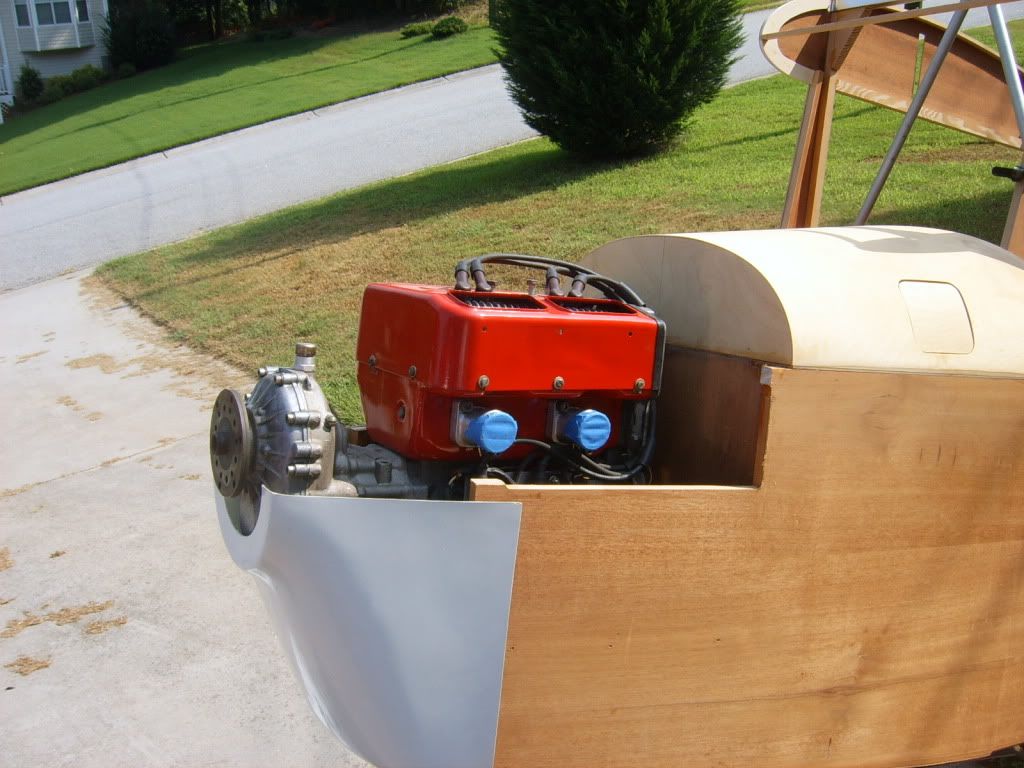
cowl in place and the flow is pretty good

Posted by: jody miller, August 18, 2010, 3:03am; Reply: 51
ruff cut out of the door opening.I had a bunch o clamps in my way and thats why it was cut so ruff!I will admit i was waiting for all hell to spring loose but nothing moved! ;D

Posted by: jody miller, August 18, 2010, 3:05am; Reply: 52
Posted by: jody miller, August 22, 2010, 2:42am; Reply: 53
Posted by: jody miller, August 26, 2010, 12:05am; Reply: 54
I got my spar caps and a few other pieces for the spars cut out last Sunday but have not taken pics yet.had to work monday,and then tuesday i went to aircraft spruce and got the last of the plywood that i needed.after getting back from acs i just sorried up and and layed around the rest of the day.Man it was a good day! ;D
Posted by: jody miller, September 15, 2010, 4:26am; Reply: 55
Posted by: 1134 (Guest), September 15, 2010, 10:18am; Reply: 56
G'Day Jody.
Nice workmanship, i like the Idea of a skylight.
I wanted to know what dimensions you made your spar caps?
Posted by: Avenger, September 15, 2010, 12:47pm; Reply: 57
Judging from you work boots in the last picture I take it you never drop sharp tools....lol Or heavy ones either
Posted by: RedBird, September 15, 2010, 8:36pm; Reply: 58
Jody,
I bought plans for EROS 1650 with himax supplement a couple years ago, but have yet to begin on the project. Your work is inspiring me. Thx!
Posted by: jody miller, September 17, 2010, 1:00am; Reply: 59
Quoted from 1134
G'Day Jody.
Nice workmanship, i like the Idea of a skylight.
I wanted to know what dimensions you made your spar caps?
Thank you!
The spar caps are 3/4x3/4.
:)
Posted by: jody miller, September 17, 2010, 1:09am; Reply: 60
Judging from you work boots in the last picture I take it you never drop sharp tools....lol Or heavy ones either
lol,when i took these pictures i had just got off the phone with a member of this board and just ran down stairs to snap the shots to send to him.
After posting them on here i seen what i had done and told my wife that i was getting ready for a bunch of "this little piggy" and "where can i get plans for them floats" jokes ! ;D
Posted by: jody miller, September 17, 2010, 1:12am; Reply: 61
Jody,
I bought plans for EROS 1650 with himax supplement a couple years ago, but have yet to begin on the project. Your work is inspiring me. Thx!
No,thank you!
And if there is anything that i may be able to help with just let me know!
Posted by: RedBird, September 17, 2010, 3:48am; Reply: 62
Actually ripped some planks today. I've been waiting over two years for the "right time" to begin. Even have had a couple false starts. Its obvious the right time isn't gonna just happen, so now seems as good as any... Therefore, I may be taking you up on your offer sooner rather than later Jody. I'm leaning heavy toward the Eros high wing and am sure to have a ton of questions...
Posted by: jody miller, December 25, 2010, 12:02am; Reply: 63
Posted by: jody miller, December 25, 2010, 12:05am; Reply: 64
Posted by: jody miller, December 25, 2010, 12:08am; Reply: 65
Posted by: Outlaw, December 25, 2010, 12:19am; Reply: 66
Show off ;D Looks awesome Jody, need to get back working on my project. Really like the opening window!
Posted by: RedBird, December 25, 2010, 12:21am; Reply: 67
Jody,
Love your photo documentation of your great work. As I mentioned before, very inspiring... And great timing too. I have decided to convert the 1100R project I picked up last year to a HiMax, or close (I'm calling it practice for my full EROS Himax build ;-)...). Was looking through the plans last night trying to visualize a couple things, and then saw your photos today. They were just the ticket I needed. Thank You!
Tony
Posted by: jody miller, December 25, 2010, 4:07am; Reply: 68
Outlaw
LoL,thank you,It took me a little while to fig out just how i was going to do my windows.Once i decided what i wonted to do things just fell into place.Hows your bird coming along?
Posted by: jody miller, December 25, 2010, 4:18am; Reply: 69
Tony
Thank you for the kind words.If there is anything that i may be able to help you with don't be afraid to ask! :)
Posted by: Ricardo, December 25, 2010, 5:34am; Reply: 70
Excelent work Jody, its going to be a winner.
Posted by: Harless Greear, December 25, 2010, 2:16pm; Reply: 71
Jody, I did my window the same as you did but when I put the wing on, it was just a little bit in the way of the window opening all the way, I had to modify the window. I also built the top of the door opening down 1/4" so there would be plenty clearance, and glad I did..
Harless in Va.
Posted by: jody miller, December 25, 2010, 2:30pm; Reply: 72
harless
i glued in a 1/8 ply strip under the wing to drop the window down some.I also left enough room to add another if needed.if another is needed all i will need to do is take 1/8 off the top of the window with my router.How did you like the window,and were you able to fly with it open? :)
Posted by: Harless Greear, December 25, 2010, 11:04pm; Reply: 73
I have flown with it open while taking pictures.. It will stay open by itself as long as you fly with the ball in the center but if
you fly uncoordinated it will flop around a bit.. You can make something to hold it open easy, I used a piece of velcro..
Posted by: RedBird, December 26, 2010, 3:20am; Reply: 74
Harless and Jody: I'm pretty sure I will follow your lead regarding the window mod. One thing that irritates me flying my 150 is the dirty window effect whenever I take photos. Maybe even more importantly, when I sat in the Himax project I had before, all I could think of was how hot it would be on the ground in summer (would have had to taxi with door open in that one).
Posted by: jody miller, December 30, 2010, 3:35am; Reply: 75
Posted by: jody miller, December 30, 2010, 3:38am; Reply: 76
Posted by: RedBird, December 30, 2010, 6:13am; Reply: 77
Posted by: jody miller, December 31, 2010, 5:44am; Reply: 78
Thank you.Just remember measure 26 times and cut 3 times! ;D
Posted by: jody miller, December 31, 2010, 5:52am; Reply: 79
Excelent work Jody, its going to be a winner.
Ricardo
Thank you,One day i hope to be as far along as you are!If you get a chance update us on your progress!Im looking forward to reading about your first flight!!!!! :)
Posted by: 1185 (Guest), December 31, 2010, 6:48am; Reply: 80
:) ;) Excellent craftmanship Jody......your eye for detail truly impresses ;D Buliding one of these little beauties sure makes shorting suit coat sleeves seem very boring !!!! More piccy's please for inspiration and ideas..........Guys its 40 degrees+ C here in Renmark South Australia (Bloody Hot)......no A/C up in the "Big Blue Shed" today.
Hoping you all in the USofA have a Safe and Happy New Years for 2011.
Cheers Alley...........Not 8) here!!!!!!!!!!!!
Posted by: Dick Rake, December 31, 2010, 4:12pm; Reply: 81
[quote=483]And the window frame installed.

Jody,
What kind of plywood did you use for your fuselage? I used birch on mine so I know what that looks like, but I can't tell if yours is mohogany or okum. Looks good whatever it is. Your workmenship is outstanding!
Dick
Posted by: jody miller, January 3, 2011, 2:23am; Reply: 82
studentbiggles
Thank you,It has been a very fun project.I kind of dread the day that's its done,I'm more of a builder at heart!I have a few more pics that i will post in a few days.I have changed to a split door and window and the door will be a lift off hinge design.pics coming soon! ;D
Posted by: jody miller, January 3, 2011, 2:28am; Reply: 83
Dick
Thank you,and the plywood that i used is aircraft birch and and aircraft mahogany.
Posted by: RedBird, January 4, 2011, 4:32am; Reply: 84
Hey Jody,
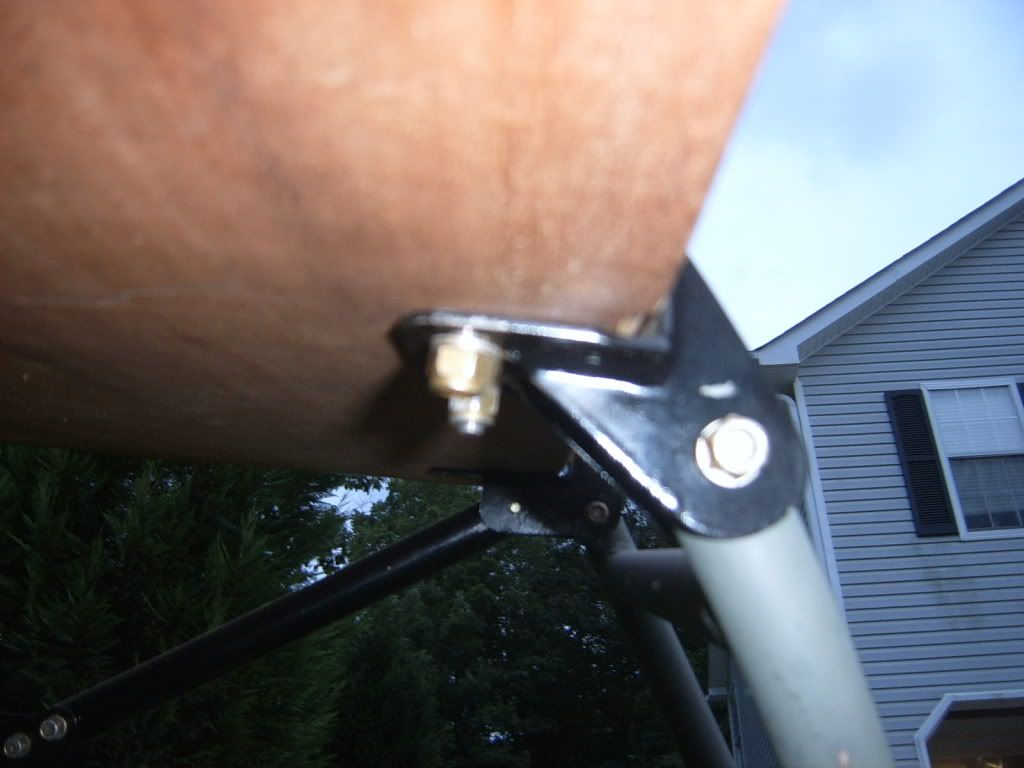
Do you have any close up photos of your wing strut attach bracket set up inside the cockpit? I see how you have integrated the strut attach point with your gear attach set up. Just looking for a visual of inside bracket and carry through...
Thanks.
Tony
Posted by: PUFF, January 4, 2011, 1:23pm; Reply: 85
Whoa! Are these going to be a "no-bounce" gear?
I'd love to see the drawings and pictures of that!
maybe keep me from "hard-landing" my Hi-Max....
Posted by: jody miller, January 7, 2011, 3:27am; Reply: 86
Tony
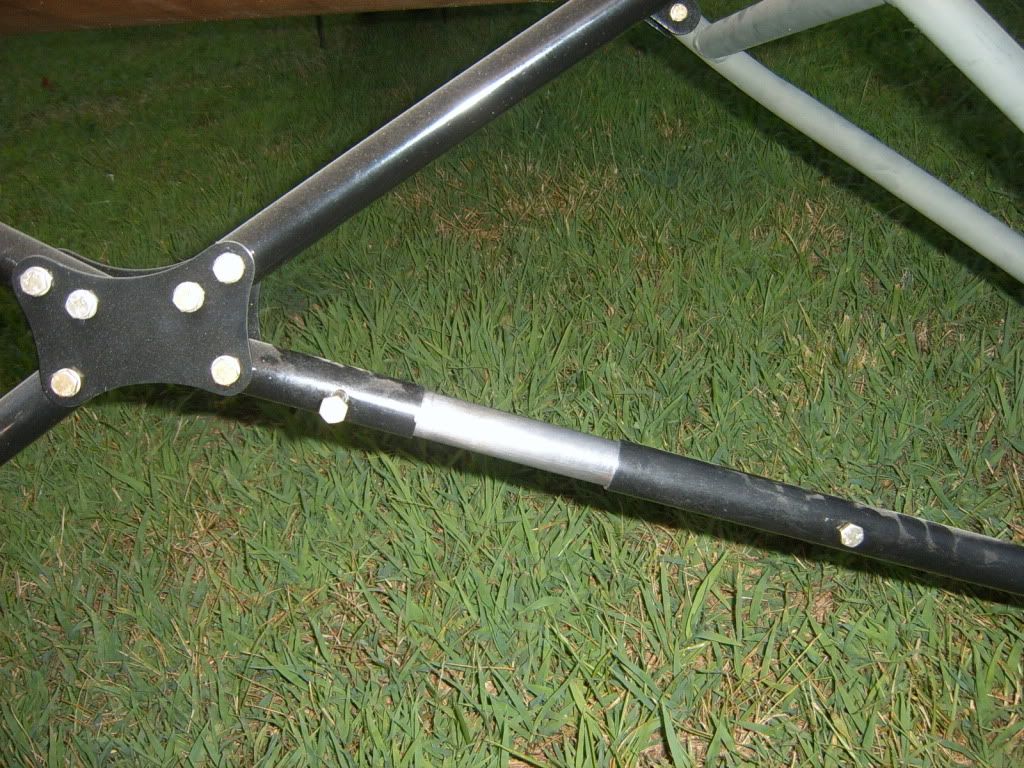
I hope this helps.I had built the back one out of 4130 and decided to change to 6061 to save on weight.I still need to install my corner blocks and cover with plywood but i did a mock up so you could see what i have in my mind.There is also a bolt hole in the outside bracket on the under side of the plane that will tie it all together. :)


Posted by: jody miller, January 7, 2011, 3:44am; Reply: 87
Whoa! Are these going to be a "no-bounce" gear?
I'd love to see the drawings and pictures of that!
maybe keep me from "hard-landing" my Hi-Max....
Puff
Thats the plan.I built the gear out of my head.I dont have any drawings,but i do have the templates that i made for the brackets around here somewhere.I still got a little more welding to do but hope that they work as planed!
When i built the gear i made it a few inches wider and taller.I had to make up for the flex of the gear and the height of the tail wheel i plan on using.Me being 6'2" the extra height under the wing should keep me from kissing my knees while trying to get in the plane.lol
Posted by: RedBird, January 7, 2011, 3:52am; Reply: 88
[quote=483]Tony
I hope this helps.
Jody - exactly what I was looking for. Thank you very much!
Posted by: jody miller, January 7, 2011, 4:02am; Reply: 89
Well i got the door and window ruffed in.
The window opens just like the other side .I liked the thought of not having to store the windows when i wonted to fly with out them so the plan is to latch them open like on a cub.
I made a lift off door.The way i made it the door must be open some in order for it to lift off.It should also make it a little easier getting in or out if needed as most himax doors that i have seen hit the lift strut and make for a little bit of a squeeze to get in and out of.The plan is to store the door where the header tank was going to be.That way if the day starts out cool i can remove it and store it in the plane later with no big ordeal. :)


Posted by: RedBird, January 7, 2011, 4:05am; Reply: 90
Posted by: 833 (Guest), February 3, 2011, 1:07am; Reply: 91
I can but repeat what others have said, very, very nice work Jody. You can justly be proud of yourself.
I do like those window fasteners you've use. Very neat and tidy with no sharp edges. When working in aluminum, those rows of ugly rivet always put me off.
Alley, you get around don't you. Every site I go to, you pop up. Keep spreading the word luv, 'specially about the best country in the world,despite what natures throwing at us at this time.
Stay safe everyone.
Posted by: 1194 (Guest), February 5, 2011, 7:06pm; Reply: 92
Awsome work Jody. I like the removable doors. Good idea. Reminds me of my doors on my jeep wrangler. Same design.
Doug
Posted by: jody miller, February 28, 2011, 12:56am; Reply: 93
Quoted from 833
I can but repeat what others have said, very, very nice work Jody. You can justly be proud of yourself.
I do like those window fasteners you've use. Very neat and tidy with no sharp edges. When working in aluminum, those rows of ugly rivet always put me off.
Alley, you get around don't you. Every site I go to, you pop up. Keep spreading the word luv, 'specially about the best country in the world,despite what natures throwing at us at this time.
Stay safe everyone.
Thank you.I was trying to find a way to hold the lexan in place without building another frame or without nuts sticking out on the inside.I was looking through the mcmaster car website when i found what i was looking for.the bag of 100 was only around $7.They are steal but are super light weight.I have enuff to change the skylight to these also.
here is a link to the weld nuts..
http://www.mcmaster.com/#weld-nuts/=b7zkge :)
Posted by: jody miller, February 28, 2011, 1:02am; Reply: 94
Quoted from 1194
Awsome work Jody. I like the removable doors. Good idea. Reminds me of my doors on my jeep wrangler. Same design.
Doug
Thanks,You are dead on about the jeep!Thats where that idea came from. ;D
Posted by: 1194 (Guest), February 28, 2011, 6:08pm; Reply: 95
Hi Jody. Have you decided what you are going to use for paint, colors, poly-fiber? Also, what engine are you going with? I'm pretty anxious to see it finished!
Doug
Posted by: jody miller, March 1, 2011, 12:09am; Reply: 96
Quoted from 1194
Hi Jody. Have you decided what you are going to use for paint, colors, poly-fiber? Also, what engine are you going with? I'm pretty anxious to see it finished!
Doug
Doug
when it comes to paint and colors,I have no clue!I do know that i would like to paint it in a simple/classic type of scheme.For the covering i will be using the stewart system.I got the chance to do some work with the system while my friends were building 6 piets at once and really liked it.
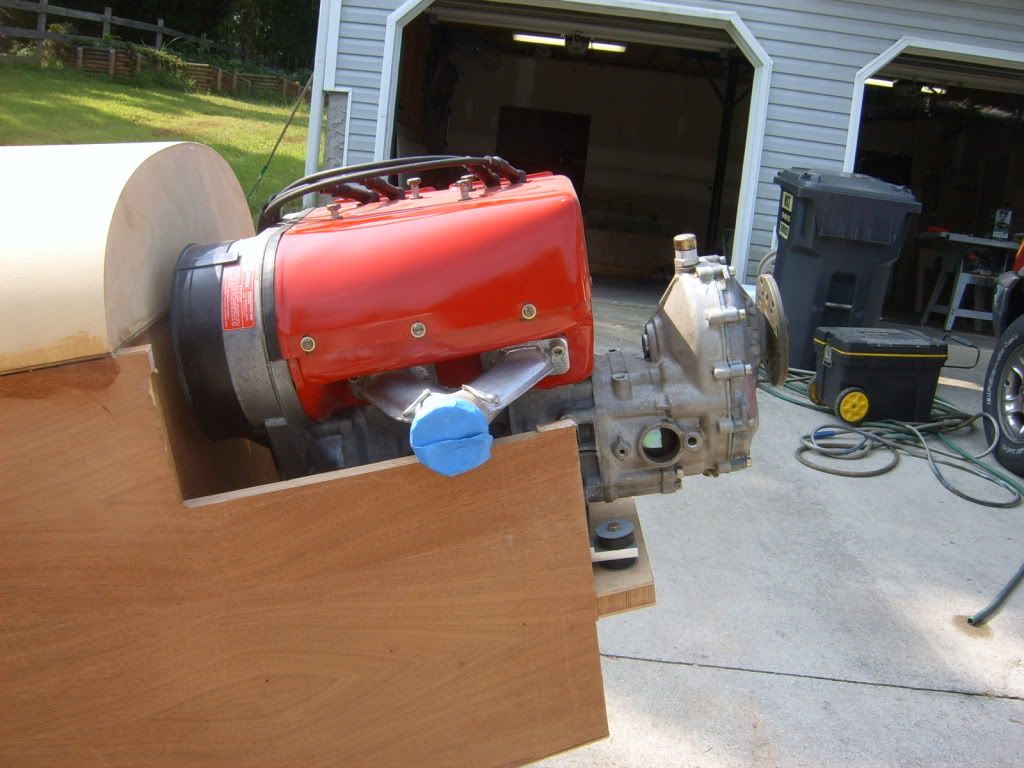
As for the engine I have a dcdi 503 and a C box with a clutch in it now.
My plan is to finish the build this year and cover and paint it next year.As things stand now i hope to start assembling the wings in a month or two. :)
Posted by: jody miller, July 12, 2011, 11:46pm; Reply: 97
Did not realize it had been this long since i had worked on my bird :o.I got to get my but in gear!
Posted by: 1229 (Guest), July 21, 2011, 11:30pm; Reply: 98
make sure you add that pride to your weight and balance. 5oz. per grin...gosh it looks great!
Posted by: jody miller, July 31, 2011, 4:13pm; Reply: 99
Quoted from 1229
make sure you add that pride to your weight and balance. 5oz. per grin...gosh it looks great!
Thanks!It's turned out to be a long project but It should be worth it in the end. :)
Posted by: jody miller, July 31, 2011, 4:21pm; Reply: 100
Haven't done much in a while,but i did get the floor board cut out,started to work on the rudder pedals,and mounted the horizontal stab.Not much done but it feels like it's starting to come together.
I got to looking at the elevator at it looks like it has about a 1/2 crown from end to end so i will ether remake it or cut out the leading edge and replace it.
Posted by: jody miller, August 1, 2011, 4:03am; Reply: 101
Got the rudder peddles took care of today. ;D
started with...

Drilled out the pin and the pin holes to accept a AN4 bolt...

Then cut out a little so that the tension collar would not bind...

drilled/tapered the holes in the peddles...

Posted by: jody miller, August 1, 2011, 4:08am; Reply: 102
Applied the grip tape....

started fitting everything together..


The washer on the lower section is there to hold the spring end in its new location...

Posted by: jody miller, August 1, 2011, 4:10am; Reply: 103
Almost done/checking for any binding...

In the plane...


;D
Posted by: iter, August 1, 2011, 6:28am; Reply: 104
Good job! Thank you for the photos.
Ari.
Posted by: Ricardo, August 1, 2011, 12:21pm; Reply: 105
Posted by: Bob Daly, August 1, 2011, 1:59pm; Reply: 106
I hope you have an heir Jody, because somebody will inherit this airplane. Absolutely amazing and bullet-proof details :o
Posted by: jody miller, August 1, 2011, 11:30pm; Reply: 107
Thanks guys for the good words!
Stay tuned for next weeks episode where i install the hot tub and the stripper pole. ;D
Posted by: jody miller, August 31, 2011, 5:34am; Reply: 108
Today turned out to be a pretty good day.After Harold posted the pics of his built in trim tab I decided to do a little table saw hacking and got the built.Still need to add the plywood to it and the rest of the elevator.I also glued up rib #21 and 22.Only 2 more to build!!!! ;D ;D ;D ;D Other than the battery being dead in my camera everything seemed to just fall right into place.
:)
Posted by: 1307 (Guest), September 1, 2011, 2:21am; Reply: 109
Im ready to hack into my elevator too. I love the ideas on this board!
Posted by: superswamper, November 17, 2011, 1:17am; Reply: 110
Jody,
Don't feel like your the only one! I'm in consruction as well and the last few years have been hell. I Own a plumbing business and have for the last 26 years, five years ago i had 23 employees! i now employ three and have a hard time keeping them busy. I too thought about selling my project at one time! im sure glad that i didn't. When I have a bad day working on the plane helps me cope. Yours is one of the best builds that I have seen on here in the four years that I have been a member it would be a shame to get rid of it. This board is just not about building planes, If you ever need to talk we are all here. I think that goes for alot of us!!
Posted by: jody miller, November 18, 2011, 9:37am; Reply: 111
superswamper,
Thank you for the kind words.My little bird has truly been one of the high points in my life so far.I dont think she's the best out there but i dont think she's the worst ether.At least i hope not!It's been a labor of love and somewhat of a creative outlet for me.
I had posted this as a reply to tony in the himax landing gear thread but i will add it here also.
"I sure hope i dont have to sell it ether.Beleave me that i will and am doing everything I can to keep that from happening.I thought last year was ruff but boy was i wrong!This year has been the worst ever as far as money goes.I finally said to hell with self employment and may have a shot at a job with a company that a friend works for.Hopefully i will find something soon.In the last 3 years I have watched our bank account slowly disappear and sold off the last bit of stocks we had this year.It's just not looking good for the home team right now.On a side note...I have been broke before and sprung back so there is always hope,Plus you guys aint going to get rid of me that easy!"
jody miller
Posted by: 1229 (Guest), November 18, 2011, 4:59pm; Reply: 112
I've been in plumbing for about seven years,here in calif it all ground too a stop all at once.I am a family of there and as of last month our income droped again,this time all the way down to 7000 a year. With out harming my loved ones Monetarily i still find it possible too buy small bits here and there. Maybe skin a fin or something small keep your hand in it and your subconscious will have a list of other ways ta get ur done. for me i traded my copenhagen for wing ribs,(a little harder to spit) lmao.
long ramble short
keep on smile'in
Posted by: jody miller, January 3, 2012, 6:13am; Reply: 113
Posted by: jody miller, January 3, 2012, 6:15am; Reply: 114
Posted by: jody miller, February 25, 2012, 1:42am; Reply: 115
The door bell rang today and it was Santa dressed as a ups man....Had the big brown truck and everything!Must be a ruff economy at the north pole too!
This is what he brought me...


:)
Posted by: theecoop, February 25, 2012, 12:57pm; Reply: 116
Posted by: aeronut, February 25, 2012, 1:16pm; Reply: 117
Way to go Jody; you will have plenty of storage space for that liquid gold we call gas. ;)
Posted by: James Z., February 25, 2012, 2:39pm; Reply: 118
Santa delivered my wing tanks yesterday too. He really does get around!
Posted by: jody miller, February 27, 2012, 2:24am; Reply: 119
Posted by: Dick Rake, February 27, 2012, 6:14am; Reply: 120
Jody,
It's going to a crime to cover up workmanship like that. Varnish that one and hang on your wall and then then build another one to a lower standard like the rest of us did and put the fabric on that one.
Dick
Posted by: jody miller, March 5, 2012, 3:12am; Reply: 121
Small update!
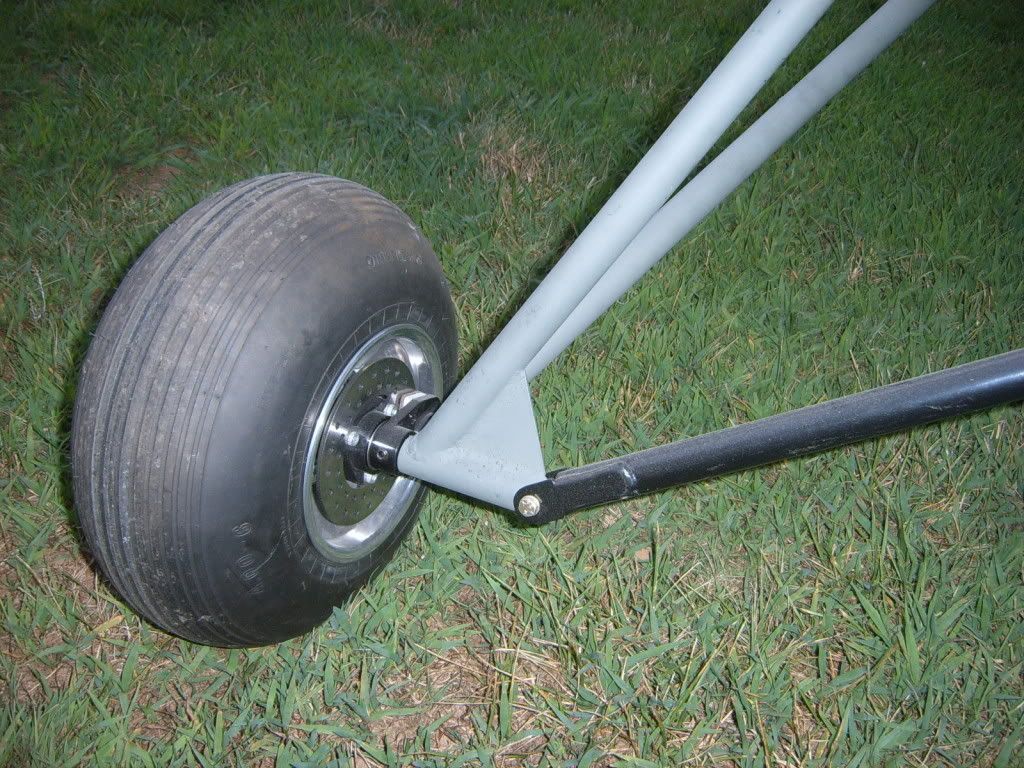
I got some new tires mounted up,hinged the elevator and made and installed the brackets and braces for the tail feathers.Did all this this past Friday.Will try to get some photos for you guys posted this week..depending on my work schedule.It took a while but now that i have a little (motivation) back in my pockets i am going to try and get this thing finished! ;D
Posted by: PUFF, March 5, 2012, 12:43pm; Reply: 122
Posted by: jody miller, March 9, 2012, 2:57am; Reply: 123
Got a chance to take the photos today..
my new tires


The elevator

Posted by: jody miller, March 14, 2012, 9:10pm; Reply: 124
Another part to the puzzle. :)


Posted by: aeronut, March 14, 2012, 9:58pm; Reply: 125
Looking good Jody; that is a great looking tail wheel you have there and the main wheel tires are a good addition. :)
Posted by: Peteohms, March 14, 2012, 11:24pm; Reply: 126
Quoted from 1229
I've been in plumbing for about seven years,here in calif it all ground too a stop all at once.I am a family of there and as of last month our income droped again,this time all the way down to 7000 a year. With out harming my loved ones Monetarily i still find it possible too buy small bits here and there. Maybe skin a fin or something small keep your hand in it and your subconscious will have a list of other ways ta get ur done. for me i traded my copenhagen for wing ribs,(a little harder to spit) lmao.
long ramble short
keep on smile'in
Come to Austin. Building boom in my neighborhood.
Pete
Posted by: jody miller, April 22, 2012, 3:32pm; Reply: 127
Frank aka (flyfergy) had posted this on facebook a while back.It was a new years eve night at his house that set me on my path to build.My how time fly's.That's me on the left,frank on the right and you guys know what is on the floor in the middle.Just thought i would share the start of it all here.

Posted by: jody miller, April 22, 2012, 3:37pm; Reply: 128
Work has been crazy so i have not had much time to work on my plane but i am off all next week so i hope to try and get something done on it. :)
Posted by: aeronut, April 22, 2012, 3:39pm; Reply: 129
Another Minimax in the gestation period. Ya gotta love it. :)
Posted by: jody miller, June 4, 2012, 12:33am; Reply: 130
Been working out of town a good bit so i have not had much time to work on the plane but thought i would give a quick update before i head out to Nashville for the week.
I made a little headway on a wing..flyfergy came over today and helped me do a test fit. :)


8)
Posted by: Garyk, June 4, 2012, 12:41am; Reply: 131
Question for all of you HiMax builders,
What is the maximum height of the pilot that would not have him or her looking into the wing roots ?
Gary
Posted by: airbiker, June 4, 2012, 5:15pm; Reply: 132
Gonna sell plans for those custom wing stands? :)
Real similar to a set I had once.
Ian
Posted by: pkoszegi, June 4, 2012, 7:09pm; Reply: 133
Gary, I sit on a car seat foam I am 170 cm tall, and I guess I would need to be at least 185 cm to look into my wingroots. But than its really troublesome to fold your legs to climb in, unless you are a circus acrobat. (my instrument panel looks different now)
Posted by: superswamper, June 5, 2012, 1:31am; Reply: 134
Jody,
You have a C-Box on your 503, I thought they could only be a B-Box? Are you sure that will work?
~Jim
Posted by: PUFF, June 5, 2012, 11:59am; Reply: 135
Where'd you get the plans for the Landing gear... Aren't they "spring" type gear?
Posted by: jody miller, June 7, 2012, 2:15am; Reply: 136
Question for all of you HiMax builders,
What is the maximum height of the pilot that would not have him or her looking into the wing roots ?
Gary
Gary,
I'm 6'2" and I raised the wing 2 inches to get a better field of view.
jody
Posted by: jody miller, June 7, 2012, 2:34am; Reply: 137
Gonna sell plans for those custom wing stands? :)
Real similar to a set I had once.
Ian
Plans should sell real well..Thats the most action that custom wing stand has seen in almost 12 years of marriage! ;D
jody
Posted by: jody miller, June 7, 2012, 2:39am; Reply: 138
Jody,
You have a C-Box on your 503, I thought they could only be a B-Box? Are you sure that will work?
~Jim
c box will bolt right up on a provision 8 block.Not sure about the older models.I also have a clutch in it..should be neat to fire it up with out the prop spinning.
jody
Posted by: jody miller, June 7, 2012, 3:00am; Reply: 139
Where'd you get the plans for the Landing gear... Aren't they "spring" type gear?
Puff,
I have no plans for the gear,Its my own design.I do have the patterns that i made for the brackets at home somewhere.If you can weld or know someone that does then its not hard to make.If you decide to make a set just let me know and i can get you some measurements/angles and pics of what i built.I should be back home tomorrow and through the weekend but not sure about next week.Just give me a yell on here and i will get you my cell# and i will walk you through what i built.
jody
Posted by: jody miller, January 25, 2013, 4:49pm; Reply: 140
Just a quick update...
I have not worked on my plane in a while,but i did buy a new 3 blade prop from powerfin.
:)
Posted by: fwagoner, January 25, 2013, 8:19pm; Reply: 141
Great stuff Jody! Very inspirational...
Fritz
...1% done
Posted by: jody miller, January 31, 2013, 7:54am; Reply: 142
Great stuff Jody! Very inspirational...
Fritz
...1% done
Thank you!looking forward to reading about your build.
jody
Posted by: jody miller, February 14, 2013, 5:50am; Reply: 143
Guess it's time for an update! :)
I got some shots with me in them for a change...you have been warned! ;D
catching the left wing up to the right.


Getting the tank setup figured out.No shave november got extended...alittle to long!

Posted by: jody miller, February 14, 2013, 5:54am; Reply: 144
Posted by: jody miller, February 14, 2013, 6:00am; Reply: 145
more on the D cell and finish up on the fuel tank.


I have a prop cover project that i have been working on but will post that in a different thread.
8)
jody
Posted by: fwagoner, February 14, 2013, 3:47pm; Reply: 146
At Last, more build pictures! Don't forget to take a bunch of aileron detail photos when the time comes.
Posted by: jody miller, April 13, 2013, 5:46am; Reply: 147
With work work keeping me away from home its tuff to get much done and keep you guys updated.Over the past month or so i been trying to knock out the D cell.It's been a slow go but I almost have one completed. :)
This was when i was sealing Both spar's and D cell pcs.


Posted by: jody miller, April 13, 2013, 5:47am; Reply: 148
Posted by: jody miller, April 13, 2013, 5:48am; Reply: 149
Posted by: jody miller, April 13, 2013, 5:50am; Reply: 150
Posted by: Dick Rake, April 13, 2013, 6:43am; Reply: 151
Jody,
Outstanding workmanship. It will be a-shame to cover it up but I'm sure the covering/paint job will equal your wood working skills.
Dick
Posted by: aeronut, April 13, 2013, 8:04am; Reply: 152
Looking GOOD Jody. :) Houston we are a go for launch, after the fabric of course. ;)
Posted by: 104 (Guest), April 13, 2013, 12:28pm; Reply: 153
Awesome - this great to see. Thanks for sharing!
Posted by: Phernando, April 13, 2013, 1:13pm; Reply: 154
Very nice!! I like the strap clamps!
Posted by: Ricardo, April 14, 2013, 3:48am; Reply: 155
Posted by: jody miller, April 14, 2013, 5:39am; Reply: 156
Thanks guy's!I am hoping to finish the D cell on this wing tomorrow then start the process all over on the other wing next weekend.Wish work was not taking me away from home so much but i got to eat and need plane parts! ;D
jody
Posted by: RedBird, April 14, 2013, 6:02am; Reply: 157
Anybody else be glad when Jody's max is done and covered so that his woodwork can stop putting the rest of us to shame? !... 8)
Posted by: 104 (Guest), April 14, 2013, 3:30pm; Reply: 158
Anybody else be glad when Jody's max is done and covered so that his woodwork can stop putting the rest of us to shame? !... 8)
:) Damn thats the truth! Wait until I get going - you will feel better really fast, don't worry :)
Posted by: jody miller, April 15, 2013, 4:26am; Reply: 159
I'm trying to get it done.LOL ;D
Got the front lift strut brackets in place and put the last pc of ply on the leading edge of the left wing today.Hoping to start the ply on the right wing next weekend.
jody
Posted by: fwagoner, April 20, 2013, 3:14am; Reply: 160
Jody,
It looks like you have some extra diagonals in the wing bay next to the tank. Looks like they're going to the top of the rib. I don't see those in the plans, is that your own deal? I'm getting ready to glue in my "tank floor" so I'm surfing around for info.
Thanks
Fritz
Posted by: jody miller, April 20, 2013, 3:48am; Reply: 161
fwagoner
They are fabric braces that are installed per the plans that come with the larger wing tanks.Are you going to use the 5 gallon or 7gallon tanks?If you are not shooting for 103 then i would recommend that you go ahead and set your wings up for the larger tanks now while you are building so that the larger tanks would always be an option in the future. ;)
jody
Posted by: fwagoner, April 20, 2013, 1:51pm; Reply: 162
Thanks Jody,
I'm not shooting for part 103 so I'm planning on two 7 gallon (6 gallon?) tanks. I didn't realize that there was a different setup for the larger tanks. I'd better get my tanks ordered before I glue something in that I'll regret.
...looking forward to the next episode of "Project Sawdust"
Fritz
Posted by: jody miller, April 22, 2013, 2:11am; Reply: 163
Got 2 of the 3 pcs of ply on the D cell on the other wing this weekend.Hoping to get the last one on before i head back out for work tomorrow.Drove to aircraft spruce yesterday and walked out with one small bag of stuff and a $300 dollar lighter wallet...but its getting me closer to the finish line!Did not take any photos cause it would look like the others posted of the wings but hope to start cutting the ailerons loose next weekend and will take a few photos then.
jody
Posted by: aeronut, April 22, 2013, 8:36pm; Reply: 164
Glad to hear your making progress. Those little bags of goodies can be a little heavy on the wallet as we all know. If we did not have Aircraft Spruce we would be in deep do do; so I pay the price and hope they stay in business.
Posted by: jody miller, April 29, 2013, 7:12am; Reply: 165
Glad to hear your making progress. Those little bags of goodies can be a little heavy on the wallet as we all know. If we did not have Aircraft Spruce we would be in deep do do; so I pay the price and hope they stay in business.
Glad to be making progress too!This past year has been pretty ruff on me with work taking me away from home so much and my divorce after 12 years of marriage did not help things at all.I am lucky that spruce east is only 35 miles from me so i try to build up a list and give tim a visit.The guy is a blast to cut up with and to me its worth the gas money just to go hang out and shoot the bull while they pull my order.
jody
Posted by: fwagoner, April 29, 2013, 2:38pm; Reply: 166
If I lived 35 miles from AS or Wicks I'd be broke all the time.
Posted by: jody miller, May 18, 2013, 8:07pm; Reply: 167
Been pretty busy lately but I managed to work a little airplane time in every now and then.I am getting closer to getting the wings finished.I got the ply on the leading edge of both ailerons and decided to close off the trailing edge of the wings to help keep bugs out.I even managed to sneak in a wing test fit...will try to get some photos posted in a day or so...Now time for a nap!lol :)
jody
Posted by: fwagoner, May 19, 2013, 10:59pm; Reply: 168
...Now time for a nap!
Hey Jody,
You up yet? Let's see the next episode;)
Posted by: jody miller, May 20, 2013, 12:37am; Reply: 169
Ok...naps over..lol ;D
after cutting the ailerons loose...


Posted by: jody miller, May 20, 2013, 12:39am; Reply: 170
Posted by: jody miller, May 20, 2013, 12:43am; Reply: 171
Thinking about sealing the trailing edge...

aileron test fit...

Posted by: jody miller, May 20, 2013, 12:48am; Reply: 172
Posted by: jody miller, May 20, 2013, 12:50am; Reply: 173
Posted by: jody miller, May 20, 2013, 12:54am; Reply: 174
Posted by: jody miller, May 20, 2013, 12:58am; Reply: 175
test fit of aileron after adding ply to back of the wing...


Dang...now i need another nap!lol
:)
jody
Posted by: nschmoker, May 20, 2013, 3:19am; Reply: 176
Well done Jody! I am going to seal up my trailing edge also.
Neil
Posted by: fwagoner, May 20, 2013, 5:04pm; Reply: 177
...my strategy is to wait for Jody to figure things out and post pictures.
Posted by: steve.owen, May 20, 2013, 10:10pm; Reply: 178
That's what I'm doing. I have no problem learning from someone elses mistakes. I can also see where things are supposed to go. That way I don't have to fly upside down or sideways. Great work Jody. I hope mine turns out half as good as yours. :)
Posted by: jody miller, July 7, 2013, 2:37am; Reply: 179
Just a quick update.
Almost got all the wood construction done on both wings.Will post pics when i can.I try to squeeze in some airplane time when i am home but lately i have spent more time in a motel bed than my own.I hope to be posting that i am done with the wings in a few weeks,we will see if work will let me.
jody
Posted by: Phil, August 1, 2013, 5:59pm; Reply: 180
Nice custom built Jody.
Phil
Posted by: Arthur Withy, August 2, 2013, 1:02am; Reply: 181
Jody your doing a superb job on your himax.
Wonderful building skills and great photos.
What engine are you going to use..?
regards Arthur
Posted by: JonF, August 9, 2013, 5:26pm; Reply: 182
Read the whole thread at a sitting and enjoyed it immensely. It kind of feels like stopping a movie just before it's done!
Amazing craftsmanship, Bravo Zulu!
Jon
Posted by: jody miller, March 3, 2014, 5:18am; Reply: 183
It's been quite some time since I have updated this but I haven't had much time to work on my bird bu here is an update..
Last weekend I got the itch and went down stairs to work on my bird. Was turning on the radio and all of the sudden I heard one hell of a crashing sound behind me. I look back and the wing I had hanging on the wall was laying in the floor...my heart sank!! One of the screws that it was hanging on sheered off. There was not much damage but I feel lucky that it happened with me at home instead of in another state working. The wing is now repaired and I can get back to finishing the build on the other..not much left to do to it.
I took a trip yesterday morning to spruce and picked up most of my covering supplys. Going to wait until I get a little closer before ordering the glue from stewart. I have another 503 that should be here this friday..think I am going to put it on the airbike. Also have a new muffler on the way.
hope to be posting up some built wing pics soon.
jody
Posted by: fwagoner, March 9, 2014, 3:23pm; Reply: 184
... heard one hell of a crashing sound behind me. I look back and the wing I had hanging on the wall was laying in the floor
jody
I had a wing hanging from the ceiling and hit it with garage door. It just knocked some aileron ribs off, no problem, but I know how it feels.
I'm looking forward to some more pics!
Fritz
Posted by: jody miller, March 14, 2014, 12:55pm; Reply: 185
Stopped at spruce yesterday and picked up a few things. When I got home I managed to install the wing tank covers on both wings. Took some photos but dont know how to resize them on this phone so I will post them when I can.
As it stands, I only need to sand and varnish the wings and they will be ready for covering. :)
jody
Posted by: aeronut, March 14, 2014, 7:59pm; Reply: 186
Those pictures of the bare bones look great. Working for living is a pain; but you got to eat. If you do not eat bad things will happen. ;)
Posted by: Keith103, October 31, 2016, 5:07pm; Reply: 187
Is there a follow-up on this build ? Just curious.
Simply went off the radar !
Posted by: bigblockz8, December 11, 2016, 11:15pm; Reply: 188
Is there a follow-up on this build ? Just curious.
Simply went off the radar !
Doesn't seem like there is :-/ I checked the username and they haven't been back on since 2014. It is a bummer because it was a great log.
Posted by: jody miller, December 28, 2016, 2:29pm; Reply: 189
I'm still around,and still have sawdust and the airbike sitting in the garage. Long story short...devorce,job that keeps me traveling a lot,motorcycle/wreck and keeping honeybees. I have pretty much everything needed to finish sawdust just not much time on hand. Had a member email me recently and that made me realize just how long it's been sense I worked on the plane or visited you guys on here. Merry belated Christmas and happy new year!
Jody
Print page generated: May 23, 2024, 8:14pm