|
|
 Phil Phil |
|
 Ace Ace Posts: 1,071
Time Online: 15 days 4 hours 23 minutes
|
[td]
[/td]http://www.lonesomebuzzards.com/cgi-bin/forum/Blah.pl/Blah.pl?m-1257948991/s-166/highlight-Philippine+born+minimax/#num166
It's been 10 years had passed since this build started and should I say: "Classic miniMAX"? LOL.
And yes, don't asked why our ol' image turned completely an amazing look! Perseverance still a thing to talk about...well a good friend, Bob Hoskins has brought me back on track reminded and encouraged. Thanks Bob!
Reviewed this thread to traced what has been done with ideas shared by fellow builders.
Meanwhile, I considered this build as complete in terms of items receipt recently but need careful installation before aircraft registration.( even ultralight should be registered in the Phils.)
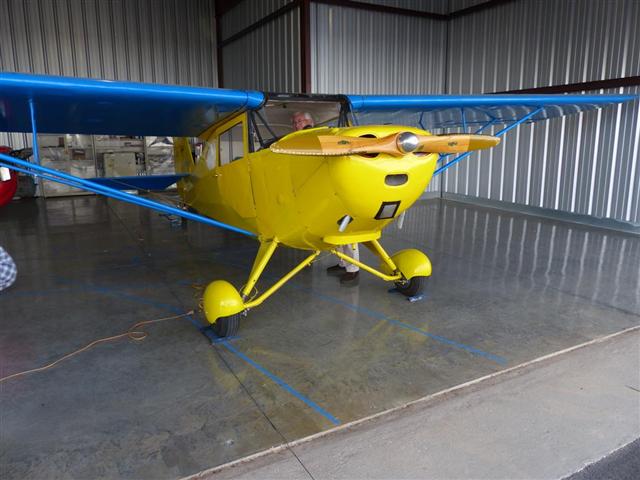
Here, is the latest update of build a final set-up for cockpit.
Best Regards,
Phil V |
|
|
|
|
|
| Phil |
|
Ace
Posts: 1,071
Time Online: 15 days 4 hours 23 minutes
|
Instrument panel final set-up.
|
|
|
|
|
|
| Bob Hoskins |
|
 Fly Safe AcePosts: 1,208
Time Online: 38 days 16 hours 39 minutes
|
Hey Phil
That is a great instrument panel. Glad you got it all together. Now the next thing is to get it in the air. All the Max's fly great so that is no problem. Make sure you get the proper training if you need it. ALWAYS pays to be safe. Make sure you keep us informed on your progress. I am 77 and still at it. I don't tear up the sky's, but rather putt around in it, LOL. As long as your are in good health go for it. You will love your Max. Building it your self too, can't beat that!!!
Bob |
| Fly safe and have fun. |
|
|
|
|
|
| aeronut |
|
 blue sky and tail winds to everyone AcePosts: 1,560
Time Online: 28 days 22 hours 31 minutes
|
Congratulations Phil. I would like to see the smile on your face after the first flight and I am also looking to see some air to ground pictures of your beautiful country. Best wishes for your first flight.  |
| never surrender; never give-up |
|
|
|
|
|
| aeronut |
|
blue sky and tail winds to everyone AcePosts: 1,560
Time Online: 28 days 22 hours 31 minutes
|
Phil did you know that there are 200 different kinds of termites in the Philippines. And your worried about sharks LOL.  |
| never surrender; never give-up |
|
|
|
|
|
| Phil |
|
Ace
Posts: 1,071
Time Online: 15 days 4 hours 23 minutes
|
Congratulations Phil. I would like to see the smile on your face after the first flight and I am also looking to see some air to ground pictures of your beautiful country. Best wishes for your first flight.
Thanks! Sure I will. Phil |
|
|
|
|
|
| Ricardo |
|
 Videos in UTube: ral1951 AcePosts: 2,772
Time Online: 75 days 23 hours 15 minutes
|
Instrument panel final set-up.
Very Nice! Congratulations Phil . Enjoy the rides. |
|
|
|
|
|
| Phil |
|
Ace
Posts: 1,071
Time Online: 15 days 4 hours 23 minutes
|
Very Nice! Congratulations Phil . Enjoy the rides.
Thanks, Ricardo! |
|
|
|
|
|
| Phil |
|
Ace
Posts: 1,071
Time Online: 15 days 4 hours 23 minutes
|
Plumbing Rotax 277. Running single cylinder engine has more vibration...
Do you guys with this engine type used bulb primer? My concerned is wear and tear of item that may cause to engine out.
What do you think?
Regards,
Phil
|
|
|
|
|
|
| PUFF |
|
 Ace AcePosts: 1,518
Time Online: 34 days 6 hours 18 minutes
|
I had trouble with primer bulbs like that one. They would come apart, or leak. I plumbed mine direct and just used a mustard bottle to get it started by spraying a little directly into the throat. There are also push-pull primers that can be used and mounted in the cockpit. |
|
|
|
|
|
| Greg Doe |
|
Ace
Posts: 256
Time Online: 40 days 14 hours 20 minutes
|
I have a cheap panel mounted plunger primer. I got mine from Lockwood for $9.95. The best thing is you can watch the gas go through the primer line, and feel the resistance, so that with a little practice, you don't flood the engine. |
|
|
|
|
|
| The Termite |
|
Ace
Posts: 588
Time Online: 5 days 3 hours 12 minutes
|
Put the Rotax remote enrichment circuit(choke)on your engine. Add an inline electric Facet pump. You don't have to hardwire it in, use a lighter plug. On cold mornings, pre-flight, normal checks, then get in. Turn on the master switch. Turn on the aux switch. Plug in the Facet pump plug. LISTEN. When it quits fast pumping, unplug, add choke, 1/4 throttle, and hit the start switch. Bet you it cranks....... Guys.....this stuff ain't hard. Just follow the basic Rotax instructions, add Rainbow Aviation's Rotax feeding tips...... Life gets much better.  |
|
|
|
|
|
| PUFF |
|
Ace
Posts: 1,518
Time Online: 34 days 6 hours 18 minutes
|
I thought there wasn't one out there that didn't have the enrichment circuit. |
|
|
|
|
|
| Greg Doe |
|
Ace
Posts: 256
Time Online: 40 days 14 hours 20 minutes
|
My original Bing carburetor had a choke, but the one I'm using now doesn't have one. Chokes have been known to leak. I know of cases where operators have deactivated them. Obviously an electric pump requires a power source. For me personally, I find a $10.00 plunger primer the simplest solution. LIKE, what does "hit the start switch mean"? |
|
|
|
|
|
| Phil |
|
Ace
Posts: 1,071
Time Online: 15 days 4 hours 23 minutes
|
To keep it simple I opted not to used any item in line between pulse pump to carb. Bing has choke on it for priming obviously cranking prop before ignition 'Contact' is a must. Tee fitting in line with shut off valve installed located at the lowest portion of the system that will be part of my pre/ post flight chores...Draining sediments and/or drain for emptying tank. Does Murphy's Law has something to be with? Lol.
Regards,
Phil
|
|
|
|
|
|
| LSaupe |
|
Flight Leader  Posts: 161
Time Online: 1 days 10 hours 40 minutes
|
Why priming before ignition "on"? When she is ready to go she will fire off. Always double check the Rotax fuel circuit installation manual. For many years (and maybe this is still the case) in-line electric fuel pumps were specifically not allowed in the manual. Issues with pressure drop when not in use and excessive pressures on the pulse pump etc.
I have run both the plunger primer circuits and the enrichment circuits. Both have worked fine. I tend to like the plunger circuits a bit more as it allows for faster starts, and an option to be able to quickly kill the engine if your grounding circuit fails (i.e. fast flooding). Also can be used as a manual fuel pump to get to a safe landing area in your are not already in a gravity feed situation. |
|
|
|
|
|
| texasbuzzard |
|
 airbike Buzzard AcePosts: 1,238
Time Online: 8 days 23 hours 51 minutes
|
Hi Phil, I assume you are going to hand prop your engine and not useing a battery. I had the same setup on my 277 powered max103 and only had a pulse pump and a plunger primer in the fuel line. Squeeze bulbs have been known to fail. I started mine by watching the primer line as I watched the fuel enter the intake manifold then I would make sure the throttle was at idle then flipped the prop a few times with the ignition was on. If it did not fire I would push the plunger one more time and the engine would usually fire then I would keep adding fuel till it would idle on it’s own. This technique will work even if the carb is dry as the pulse pump will rapidly fill the bowl. The 277 will food easily so don’t over do it.
Monte |
|
|
|
|
|
| Phil |
|
Ace
Posts: 1,071
Time Online: 15 days 4 hours 23 minutes
|
Decided to retained primer bulb by tapping two tee fitting from main fuel line and installed fuel shut off
valve to closed circuit after priming or carb bowl filled, that relieved pressure in prime bulb from pulse pump while closed shut off valve prevent leaked if bulb fails.
|
|
|
|
|
|
| Phil |
|
Ace
Posts: 1,071
Time Online: 15 days 4 hours 23 minutes
|
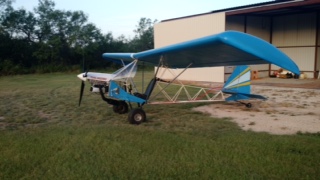
Simple firewall forward set-up.
|
|
|
|
|
|
| Phil |
|
Ace
Posts: 1,071
Time Online: 15 days 4 hours 23 minutes
|
Playing with or fitting a 6-1/2" carbon fiber spinner.
|
|
|
|
|
|
| texasbuzzard |
|
airbike Buzzard AcePosts: 1,238
Time Online: 8 days 23 hours 51 minutes
|
Phil I have always liked spinners as they seem to dress up the nose....looks good. Another note concerning the ignition coil mount. Always use 4 screws to mount the coil as I had 2 on my 277 and it eventually cracked due to vibration.
Monte |
|
|
|
|
|
| aeronut |
|
blue sky and tail winds to everyone AcePosts: 1,560
Time Online: 28 days 22 hours 31 minutes
|
Very cool spinner. |
| never surrender; never give-up |
|
|
|
|
|
| Phil |
|
Ace
Posts: 1,071
Time Online: 15 days 4 hours 23 minutes
|
Always use 4 screws to mount the coil as I had 2 on my 277 and it eventually cracked due to vibration.
Monte, 277 has only three threaded hole for ignition coil in the crankcase provided for. And yes, only two were used the third unused (encircled red).
Wondering how you managed 4 screws on it. The bracketed coil mount screwed is (encircled green) then mounted into crankcase( in blue). I'm still figuring how it is done? I mean 4 screw configuration.
Phil
|
|
|
|
|
|
| texasbuzzard |
|
airbike Buzzard AcePosts: 1,238
Time Online: 8 days 23 hours 51 minutes
|
Phil my 277 was converted to cdi and they probably used a different coil. my coil was black and had a square pole thru the body of the coil with 4 holes. your coil looks like a better design.
monte |
|
|
|
|
|
| Phil |
|
Ace
Posts: 1,071
Time Online: 15 days 4 hours 23 minutes
|
Phil my 277 was converted to cdi and they probably used a different coil. my coil was black and had a square pole thru the body of the coil with 4 holes. your coil looks like a better design.
monte
This engine was purchased brand new from Airscrew Performance in cdi converted version but I dont know if the ignition coil was original from rotax. Phil |
|
|
|
|
|
| Phil |
|
Ace
Posts: 1,071
Time Online: 15 days 4 hours 23 minutes
|
Today the muffler is mounted but it seems the spring bracket little bit far from muffler's centroid.
Do the indicated yellow arc line is the proper location for this? At least, would lessen the header's stress?
Phil
|
|
|
|
|
|
| Greg Doe |
|
Ace
Posts: 256
Time Online: 40 days 14 hours 20 minutes
|
I put two on mine. Each one is up against the ribs in the canister. There is also a back up safety cable that runs inside each spring. I don't want it to fall off! 277 Rotax. |
|
|
|
|
|
| Phil |
|
Ace
Posts: 1,071
Time Online: 15 days 4 hours 23 minutes
|
I put two on mine. Each one is up against the ribs in the canister. There is also a back up safety cable that runs inside each spring. I don't want it to fall off! 277 Rotax.
Retained a single spring canister holder with 1/8" stainless flexible safety cable on it plus safety wires on 3 header springs. Phil |
|
|
|
|
|
| Phil |
|
Ace
Posts: 1,071
Time Online: 15 days 4 hours 23 minutes
|
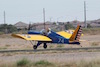
I have done W&B recently.This max is equip with brakes, flaperons, 5 gal. fuel tank, rotax 277 engine and basic flight instruments that includes magnetic compass, ASI, Altimeter, CHT/EGT Gauge, Tiny Tach, bank indicator and Yaeso Handheld radio. Aircraft empty weight is 264 lbs. Standard pilot's weight (me) is 200#. I opted to add 5.5# lead ballast at -28" arm just under the engine. This is for favorable cg of 14.47" location from L.E with 4 gallons fuel. The 1989 max manual recommended cg envelop is 13 to 16.2" from L.E. I'll be at our aeromodel airfield by end of this month for photo session needed for a/c reg. documentation, engine break-in and few taxi test.
Phil
|
|
|
|
|
|
| Dick Rake |
|
 Home phone 602-999-3715/Mini-max with Hirth 2704 AcePosts: 755
Time Online: 40 days 13 hours 26 minutes
|
Phil,
On my original Kawasaki 440 installation I used a single spring mount per the plans and it was located near the end of the canister and within 5 hours the header had cracked. I moved the mounting point to where the exhaust pipe balanced and I haven't had a problem since. I still used a single spring with a safety cable inside. I did the same thing when I switched to the Hirth 2704 engine and have had no problems.
Your Max is looking good!
Dick |
|
|
|
|
|
|


 Logged


