|
|
 ITman496 ITman496 |
| October 31, 2018, 12:52am |
|
 Ace Ace Posts: 411
Time Online: 1 days 23 hours 31 minutes
|
I'm having trouble organizing transport of my plane from where I bought it to where I am. I want to know, as it would make it a lot easier.. How difficult is the tail to remove? Is it a nightmare, or not that bad? |
|
|
|
|
|
| Stilson |
|
Flight Leader  Posts: 136
Time Online: 1 days 5 hours 36 minutes
|
Absolutely no problem what so ever provided it is stock/standard. |
|
 Logged Logged |
|
|
|
|
| ITman496 |
|
Ace
Posts: 411
Time Online: 1 days 23 hours 31 minutes
|
Sweet! Thank you. That makes trailers easier to find.. |
|
|
|
|
|
| Keith103 |
|
 Ace AcePosts: 632
Time Online: 13 days 6 hours 31 minutes
|
It takes about 3 to 4 minutes to remove and about 5 to 6 minutes to assemble everything back. You need to detach 7 connections: 4 bolts connecting horizontal stabilizer to aluminum brackets in the fuselage, two rudder cables ( just remove the cotter pin from the clevis bolt on the rudder horn on either side.), and the elevator teleflex cable from the elevator horn. Till you get the plane ready for flight, you could just always leave the 3 cables disconnected , which means you just take out 4 bolts to disconnect the whole tail unit. If you need to detach the vertical fin from the rest of the tail unit, then an additional three bolts are to be removed ( 2 on the bottom of the vertical stabilizer and one bolt where the two tail struts meet on top.) There is no need to remove the tail struts fully , just fold them down after removing the top bolt. If the bird has a cockpit-adjustable trim tab on the elevator ( unlikely), one more dis-connection may be involved. |
|
| Logged |
|
|
|
|
| ITman496 |
|
Ace
Posts: 411
Time Online: 1 days 23 hours 31 minutes
|
Sounds good! I am wanting to remove the surfaces for transport on an open deck trailer (since the company box truck is occupied this weekend and next..) and I wanted to make sure I remove all of the fragile aerodynamic surfaces so they don't get wrecked in the wind of driving. Glad to hear its easy! |
|
|
|
|
|
| Greg Doe |
|
Ace
Posts: 256
Time Online: 40 days 14 hours 20 minutes
|
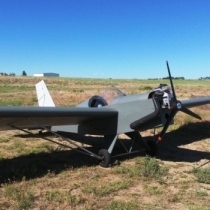
ITman496 Team had two different methods for bracing the rudder. One version used aluminum rods, and one used cables. It looks like yours has cables. The cable arrangement has cables under the stabilizer to the lower fuselage longeron. The rod arrangement does not have any bracing below the stab, but has two extra attachments to the fuselage at the trailing edge of the stab. These attachments are just like the attachments at the leading edge of the stab, where bolts pass through the stab into aluminum brackets attached to the fuselage top longeron. I only mention this so that you are not confused about how the stab is removed. I think Keith1100's explanation is for the rod arrangement? Just unbolt, or disconnect everything that's holding it together, and you will be fine. |
|
|
|
|
|
| ITman496 |
|
Ace
Posts: 411
Time Online: 1 days 23 hours 31 minutes
|
Yeah, I figured as much, thank you! My only worry was that there might be bolts that could no longer be accessed once the fabric has been attached to the aircraft. |
|
|
|
|
|
| PUFF |
| November 1, 2018, 11:53am |
|
 Ace AcePosts: 1,518
Time Online: 34 days 6 hours 18 minutes
|
Easiest way would be to set up a camera and film it so you don't get too confused about how it goes back. |
|
|
|
|
|
| ITman496 |
| November 1, 2018, 12:06pm |
|
Ace
Posts: 411
Time Online: 1 days 23 hours 31 minutes
|
Good idea! I will do that. |
|
|
|
|
|
|


