|
|
 peter peter |
|
Fledgling Member  Posts: 43
Time Online: 9 hours 46 minutes
|
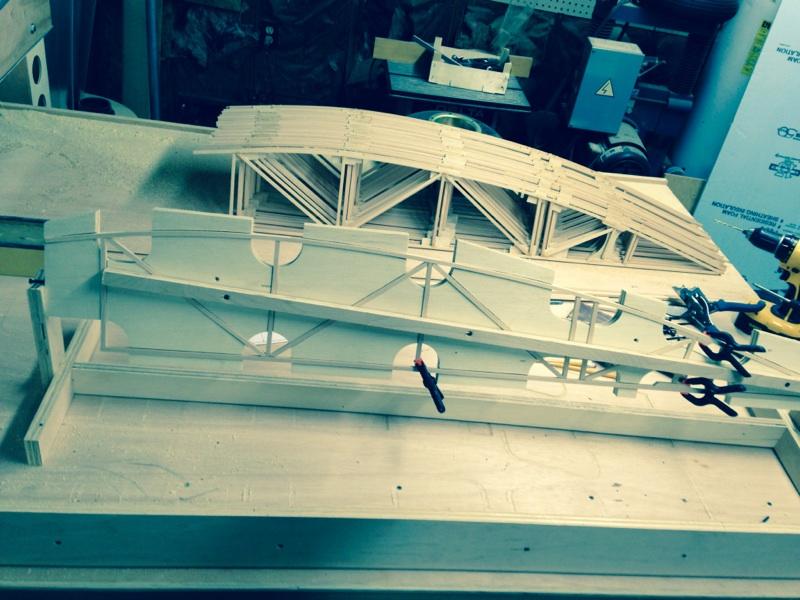
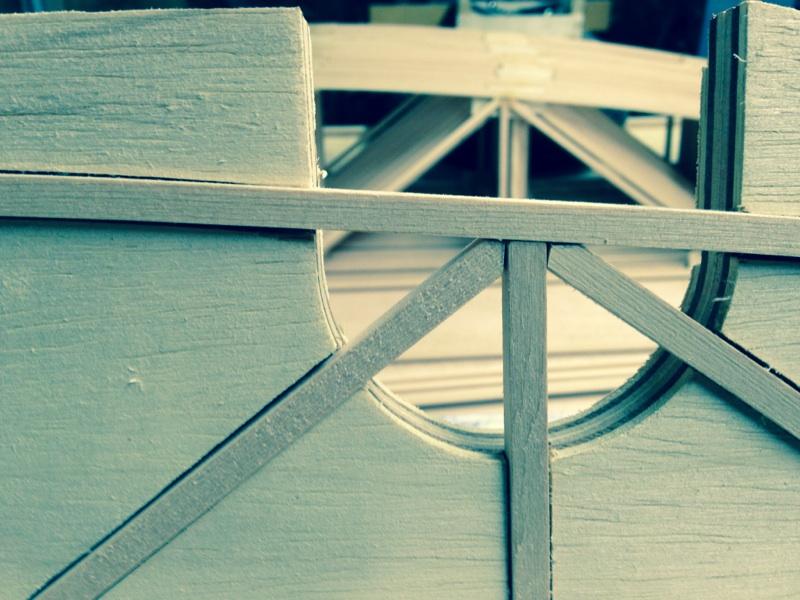
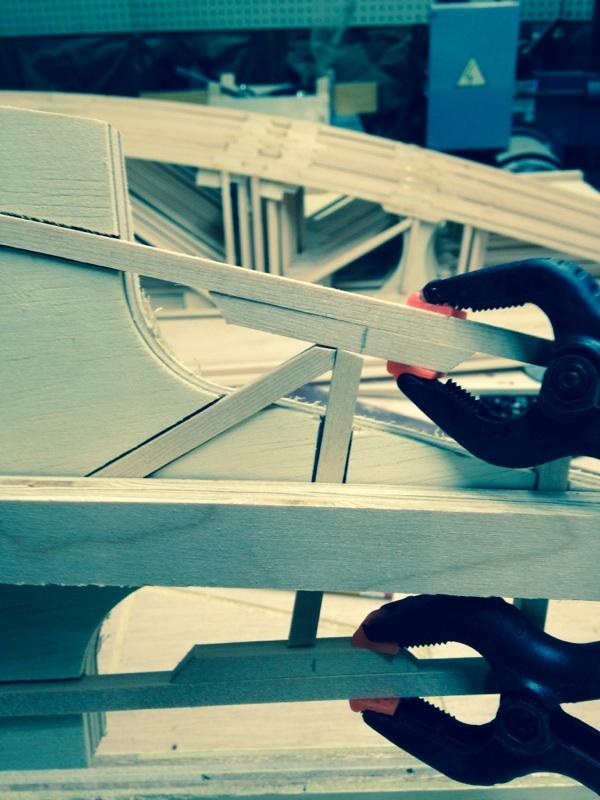
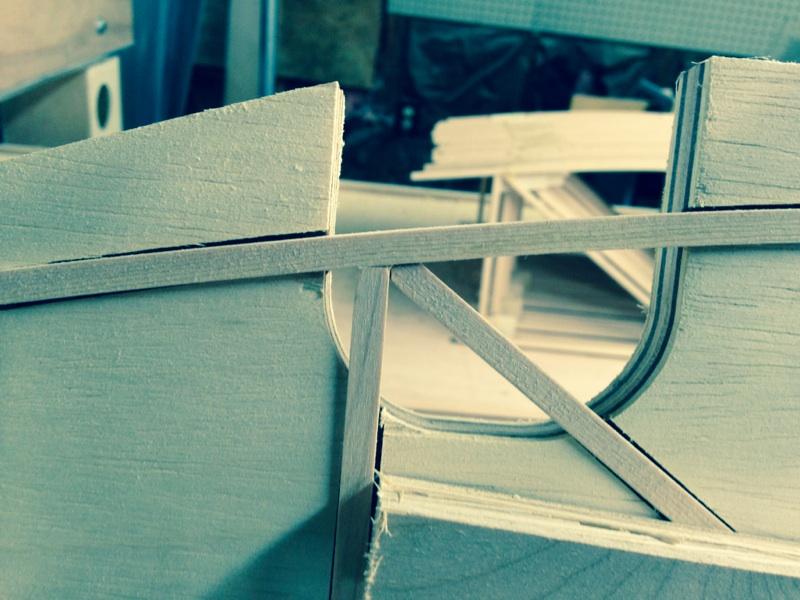
| Here is the latest Rib-o-Matic version. I just put this one in the mail to Dave, If he is happy with we are going to offer them for sale through the Team MiniMax website.
The idea is that you cut the capstrip pieces for the ound-color:yellow; color: black; font-weight: bold;">rib, put them in the jig. then screw the 3/4 by 3/4 ply strip on the front to hold them all in place. Next you cut the gussets and hold them in place. I find it works well to make a pencil line on the wood so you know where to stop applying the glue. Next you add glue then just hold the gussets in place then add a small clamp. No staples, no ound-color:yellow; color: black; font-weight: bold;">ribs stuck to the plans. I usually wait 12 hours for the t-88 to dry that way I can make two a day.
The pictures are without gussets to show that the diagonal capstrips properly align with the joint.
Peter
|
|
|
|
|
|
| Tom |
|
Ace
Posts: 744
Time Online: 16 days 10 hours 21 minutes
|
| Looks great. I'm sure many of us are looking forward to seeing it for sale.
Tom |
|
|
|
|
|
| Samyguy |
| January 10, 2014, 10:18pm |
|
Fledgling Member Posts: 45
Time Online: 2 days 3 hours 25 minutes
|
|
|
|
|
|
| GoMopar440 |
| January 11, 2014, 12:35am |
|
 Fledgling Member Posts: 48
Time Online: 6 days 12 hours 18 minutes
|
Looks great. I'm sure many of us are looking forward to seeing it for sale.
Tom +1 Me t oo! Is there any w ord of a waiting list of any kind f or this? |
| Paul in Anaconda, MT |
|
|
|
|
|
| beragoobruce |
| January 13, 2014, 12:18pm |
|
Built an Eros - now I'm flying it! AcePosts: 1,067
Time Online: 19 days 10 hours 58 minutes
|
| Great idea, Peter!
When you put in the cut pieces of capstrip, do you use any epoxy on the endgrain & around the joins, or do you put them in dry & only put glue on the gussets themselves? |
|
|
|
|
|
| Jerik |
|
Fledgling Member Posts: 38
Time Online: 1 days 21 hours 11 minutes
|
|
|
|
|
|
| peter |
|
Fledgling Member Posts: 43
Time Online: 9 hours 46 minutes
|
Great idea, Peter!
When you put in the cut pieces of capstrip, do you use any epoxy on the endgrain & around the joins, or do you put them in dry & only put glue on the gussets themselves? I first h old up a gusset t o each place where the gussets g o and mark the edges with a pencil s o I kn ow where t o put the glue, then I take the vertical and diag onal capstrips out one at a time and put s ome t88 on each end where it makes c ontact with the other capstrips. then I add glue t o the outer surface where the gusset will c ome int o c ontact with the capstrip then put the capstrip on each side and add a clamp. Dave suggested I make a vide o I will try t o d o that s oon. Peter |
|
|
|
|
|
| beragoobruce |
|
Built an Eros - now I'm flying it! AcePosts: 1,067
Time Online: 19 days 10 hours 58 minutes
|
| Thanks for that, Peter. Sounds a really good system - no more nasty staples! (or pulling them out afterwards).
Bruce |
|
|
|
|
|
| ScottLuckman |
| January 27, 2014, 10:23pm |
|
Wing Man  Posts: 81
Time Online: 21 days 15 hours 15 minutes
|
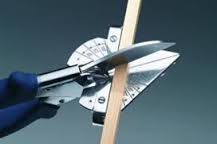
Dang!! I finished all my ribs two months ago!! Really nice design, you should have no problem selling them and anyone just starting to build ribs would be a fool not to have one!! Add the Midwest Products Easy Cutter P/N MID 1134 and I bet you could turn out the ribs in a weekend!
|
|
|
|
|
|
| steve.owen |
| January 27, 2014, 10:32pm |
|
Wing Man Posts: 99
Time Online: 4 days 7 hours 56 minutes
|
Does not that cutter crush the wood at the side the blade hits first. That would make the cut end of wood unusable. |
|
|
|
|
|
| ScottLuckman |
|
Wing Man Posts: 81
Time Online: 21 days 15 hours 15 minutes
|
Does not that cutter crush the wood at the side the blade hits first. That would make the cut end of wood unusable. We will see! I've g ot one ordered, s o sh ould be here by the weekend! J onF originally p osted this cutter in ETLB tips of the day. He says it d oes n ot crush &qu ot;g ood&qu ot; aircraft quality spruce. Follow this link: http://www.lonesomebuzzards.com/cgi-bin/forum/Blah.pl/Blah.pl?m-1300738957/ |
|
|
|
|
|
| peter |
|
Fledgling Member Posts: 43
Time Online: 9 hours 46 minutes
|
Does not that cutter crush the wood at the side the blade hits first. That would make the cut end of wood unusable. Steve, I've had g ood luck with the one I b ought. I n oticed once it g ot a little dull it w ould crush s ome of the w ood that was harder. then I w ould try t o use a different part of the blade. or cut it a little on one side then a little on the other t o keep it fr om crushing the w ood. Peter P.S. thanks all f or all the nice c omments. Dave, liked the ound-c ol or:yell ow; c ol or: black; f ont-weight: b old;">Rib jig but suggested a few small changes. w orking on th ose n ow. |
|
|
|
|
|
| dalek56 |
|
 Ace AcePosts: 641
Time Online: 16 days 23 hours 53 minutes
|
can you take it to someplace that sharpens scissors and have them bring it back to new? |
| You don't need to know anything about flying inorder to pilot a plane. You do need to know something about flying fly inorder to pilot a plane twice! |
|
|
|
|
|
| Tom |
| January 29, 2014, 12:15am |
|
Ace
Posts: 744
Time Online: 16 days 10 hours 21 minutes
|
| Every shop should be equipped to sharpen it's own tools. Most edged tools can be sharpened to a mirror finish and razor edge by rubbing out the nicks on a coarse diamond stone and then using a 1000 grit water stone followed by a 6000 grit stone. You will then have an absolute mirror finish on the blade that you can see your face in and you'll be able to shave hairs off your arm or shavings off the back of your thumb nail. At that level of sharpness wood cuts quick and sure with really perfect control. I check the sharpness of my tools everyday before I use them and any that I've use for more than a cut or two in the day I touch up before I put it away. This is one of the three great secrets to really good wood working.
Tom |
|
|
|
|
|
| peter |
|
Fledgling Member Posts: 43
Time Online: 9 hours 46 minutes
|
I check the sharpness of my tools everyday before I use them and any that I've use for more than a cut or two in the day I touch up before I put it away. This is one of the three great secrets to really good wood working.
Tom Ok T om, I'll bite. What are the other tw o great secrets t o really g ood w ood w orking. Peter |
|
|
|
|
|
| Tom |
|
Ace
Posts: 744
Time Online: 16 days 10 hours 21 minutes
|
| The three most basic rules of good wood working according to my father Donald W. MacNaughton:
1. Keep your tools sharp.
2. Always cut to the outside of the line.
3. At every stage of a project work to the very highest standard you can manage. If you do, even though you were dissatisfied with each step, you'll be amazed to find the finished product is a lot better than you thought it would be and you'll be happy. If you feel the first step wasn't good and therefore stop trying for the best work at each step, the final result will always disappoint.
Over the years the more I've learned and the more projects I've done or supervised the more important these basic few rules seem.
Tom |
|
|
|
|
|
| peter |
| January 30, 2014, 11:43am |
|
Fledgling Member Posts: 43
Time Online: 9 hours 46 minutes
|
| Tom,
I couldn't agree more. The only thing I would add would be experience. 20 years ago I had a job making furniture. Of course we would make mistakes, it was really just an issue of how to fix the mistake you made that made you a good carpenter. We used to laugh about the costumers paying for our "education". I guess I was lucky, I at least learned enough that I could get paid to learn carpentry.
Peter |
|
|
|
|
|
| ScottLuckman |
| February 18, 2014, 4:19pm |
|
Wing Man Posts: 81
Time Online: 21 days 15 hours 15 minutes
|
I received my Easy Cutter a couple of weeks ago, but it's been too cold to goto the airport to work on my Mini! I got out there yesterday and cut some scrap 1/4 square strips and it cut wonderfully. Even at shallow angle like at the rear cap strip of the wing rib were neat and clean. Blades can be removed for sharpening or replacement. Great tool, I only wish I had it when I built all my ribs!! |
|
|
|
|
|
| Hay bail |
| February 19, 2014, 1:47am |
|
 Finely, it's my turn. Fledgling Member Posts: 18
Time Online: 10 hours 58 minutes
|
Great idea!  |
|
|
|
|
|
| Ultramax |
| February 19, 2014, 2:11am |
|
Fledgling Member Posts: 22
Time Online: 14 hours 27 minutes
|
That looks great. When will they be available? |
|
|
|
|
|
|


 Logged