I am machine-texturing the Aluminum paneling to be used on my cowling and tank covers (don't know the proper term for this process). I'm not particularly happy with my results. There must be a better method than what I'm using. I am using a 2 inch sanding arbor in a drill. I dab rubbing compound on the aluminum sheet and, beginning with a new sanding disk, begin grinding each spot for up to a minute. After grinding a couple of spots, the sandpaper wears down, and eventually has no grit at all. At this point the rubbing compound is doing all the work. My results are uneven, and i know the pattern could be varied. Perhaps overlapping the spots would produce a better look. Is there an easier way to do this process? Different tools, etc.?
Thanks radfordc, Very helpful. No wonder I couldn't turn up anything on Google under "engine turning." Sounds like most of this stuff is done mechanically with a stationary lathe or drill press. I'm doing it by hand because I can't reach the interior of a two foot wide sheet on my drill press. Looks like the available commercial mandrels are limited to 1" diameter and smaller, which quadruples the amount of work, compared to my 2" mandrel! I don't understand how you use the Scotchbrite pad? Do you cut it to shape for the mandrel you're using? How do you attach it? Does it stick to a hook-and-loop type surface - similar to the surface of the 2" sandpaper mandrel I'm using? Assuming this is possible, what type of grinding paste/solution would work with the Scotchbrite? Sounds like you've had some experience with this.
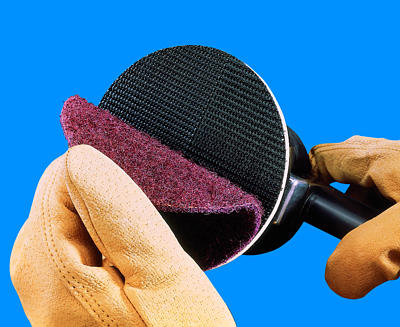
Bill, you can buy scotch brite pads for your 2" arbor. I know Harbor Freight sells them and maybe McMaster Carr. They make the quick twist style of attachment.
A quick follow up - bought a couple of Scotch Brite-type pads at the supermarket today. Cut one to fit my 2" arbor. Tried it out this evening, using WD40 as a lube. It does work better than my sanding disks did. A little more texture in the swirls and a lot easier to wipe down than the rubbing compound I was using. Radfordc's posts were very helpful, especially the fpm metals site, which gives a good idea of the possibilities for patterning. From that, I saw that I could just overlap the pattern I had already done (I have one 2' x 4' sheet I wouldn't want to do from scratch again!). I'll post some more photos after I do a bit more work.
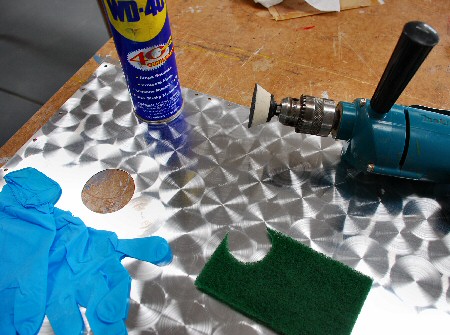
After changing materials via suggestions from the board members, here's what I came up with: Everything I used is in the photo. A 2" sanding arbor, a piece of Scotch Brite-style material cut to fit it, a drill, a pair of Nitrile gloves, and some WD40 for lubricant. Each swirl required approx. 30-40 seconds of fairly heavy pressure. As I went along I realized I could use just a tiny amount of WD40 to get a good result. It wipes clean pretty easily, but does make a bit of a black mess in the process (thus the gloves). I'm still working with the pattern to get a result I'm satisfied with. Overall, it works pretty well, just takes quite a bit of time.
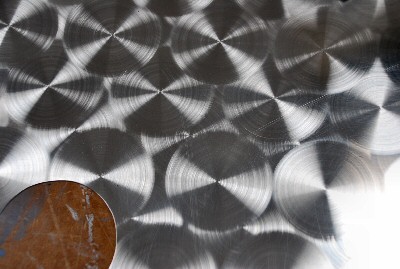
I have some more overlaps to do there. I'm playing with one of the patterns I saw on the FPM metals site. Trying to utilize the patterns I had already done (see first photo). The pressure does make a difference. Doing this by hand rather than on a drill press makes it more of an art than a science. I'm not looking for perfection. Just wanted a finish that was more attractive than bare Aluminum. Interestingly, it doesn't seem to hide scratches. It's hard to see in the reduced image above, but there is a scratch i somehow introduced into the surface after burnishing it. Unfortunately, I think that's the nature of any unpainted Aluminum surface.


 Logged