|
|
 PoconoJohn PoconoJohn |
| February 5, 2024, 11:31pm |
|
Wing Man  Posts: 99
Time Online: 1 days 8 hours 9 minutes
|
Despite making the nose ribs as perfectly as I can to the plans AND carefully placing them on the spar AND presoaking/bending the leading edge plywood.....when the leading edge plywood is wrapped around, it doesn't have total contact with the nose ribs. I stapled it to the stringer, then pulled tight to the upper spar and stapled that, them lower area and stapled that.
Anyone else experience this problem? If yes, what did you do? (I noticed in the Youtube video by Dennis he apparently had this happen and he mentioned sticking a shim in the gap. Not sure how much of a gap he had though or how extensive these areas were).
Thank you.
John C
|
|
|
|
|
|
| Fenix |
| February 6, 2024, 12:37am |
|
Fledgling Member  Posts: 31
Time Online: 9 hours 40 minutes
|
Yes the leading edge skin is one of the trickier parts of the assembly, largely due to the problem you indicate. It's been about 30 years since I did that but this is what I can remember:
I put the plywood in a fixture that pretty much formed it to the final shape and wet it with a spray bottle of water and reclamped in the fixture every day for about a week to preform it. You indicate that you also did a preforming procedure.
Then I took the somewhat preformed pieces and fitted them onto the wing. I think I put a small aircraft nail with the head cut off, one on each end of each of the three (per wing) leading edge skins in the top spar to "index it in the correct position. From this position I trimmed the edge that will be a "seam". I left the ends and aft portions hang a bit long and trimmed them after final gluing. While the piece was temporarily in place I reached in and marked the location of the ribs and spars on the plywood. For this reason I started at the tip and worked to the root since the root rib has a big hole in it to reach in.
Then I scuff sanded the rib and spar cap locations on the plywood skins and varnished the rest of the interior.
I glued the pieces on from the tip to the root also so after each was glued in place I could reach in and varnish the remaining bare wood areas beside each rib. Or maybe I put the glue on the skins "extra wide" to cover any areas not varnished. I think I had both ideas but don't remember for sure which I ended up doing.....
To actually glue a skin in place (the part you inquired about) I applied glue to the assembly and then put a panel in place over the index nails in the spar (with associated index holes in each wing skin piece). I then stapled the piece in place along the top spar cap. Then I "wrapped" the Ldg Edge ply around the nose stringer and against the lower spar cap. Really handy to have a helper at this point, but I don't recall that I did.....
To sort of hold the assembly in this position I took big C lamps (or furniture clamps. Now harbor freight has nice clamps for this) and put one end on the top spar cap and one on the lower spar cap to clamp the ldg edge piece in place. I put a few along the length of the ldg edge ply. NOt really tight, just trying to hold it somewhat in place. Of course the C clamps have to be behind the spar, and the entire wing assembly has to have the nose hanging off of the workbench/assembly table. AND the wing needs to be secured flat on the flat table becasue this is where you will lock in any twist.
Then to actually get the ply ldg edge nicely fitted and in contact with the ribs:
I made "rubber bands" of various lengths by cutting them from a truck or tractor inner tube. I made them about an inch wide. The shortest ones that can be made are cut straight across the tube. But you can cut longer ones if you cut them diagonally across the inner tube. I had to experiment some with the desired length to get the desired tension.
To put a "rubber band" in place: I put a stick (about 3/4" by 3/4" square and longer than the spar is tall) upright behind the spar (again the spar has to be hanging off the edge of the work bench). Of course the stick would interfere with the ldg edge ply which, at this point, is probably still longer (wider?) than it needs to be and projecting beyond the spar cap. So I took some short wood blocks and placed one between the stick and each of the spar caps (upper and lower) just behind the spar which kept the stick from interfering with the ldg edge ply. Then I hooked a rubber band over the top of the stick, pulled it around the front of the leading edge, and hooked it again over the stick protruding down on the bottom side.
I put one rubber band at each rib. Maybe a few more but I think it is just one at each rib. Don't recall for sure. While looking inside the leading edge D Tube from the open end I could see where the ply was not in contact with the rib. I would slide shims (either door shims from Lowe's or just pieces of scrap spruce about an inch wide by 1/4" thick or so and 4 to 8 inches long) under the rubber bands where needed. Sometimes I'd have to shove a couple in the same spot, or turn it "up on edge", etc. to get the required pressure. It was a "trial and error" of adjusting the shims until I was in good contact everywhere with the rib. The rather large area that the shims were in contact with kept it from forming "divets" which would happen if you attempted to staple the ply to the ribs where needed.
As I fussed with the shims I would release the C clamps so that the skin could "flow" across the lower spar cap as I "worked out the slack" by adding more shims to force the ply against the ribs. Once I was satisfied with the rib contact I put a row of staples into the lower spar cap to get good contact all along the length. And may have also clamped some long boards along the length of the spar caps to keep the spring in the leading edge ply from popping the staples out overnight..... I don't recall if that appeared to be required or not. I'd think not, but it was long ago......
Good luck John!
|
|
|
|
|
|
| PoconoJohn |
|
Wing Man Posts: 99
Time Online: 1 days 8 hours 9 minutes
|
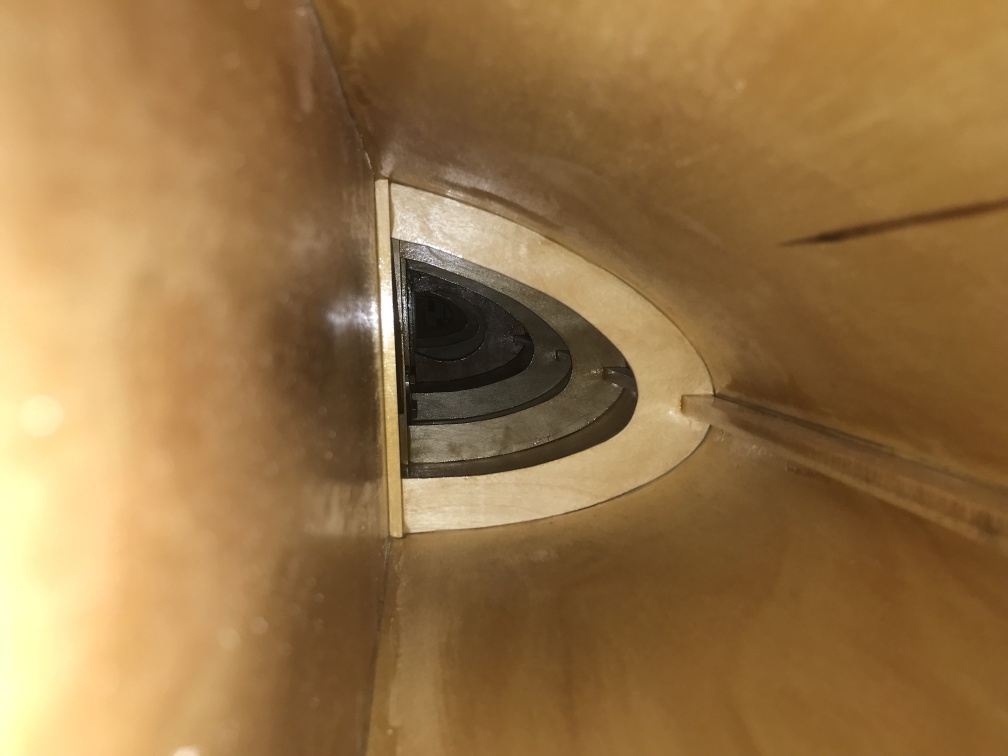
Thank you for explaining how you did it. Heres a photo of all the bungees and rubber bands helping to hold it in place while I stapled it. I now have to think about how to fix it. I'm not too keen about cutting the leading edge off and sanding/filing the glue off the wing; and starting over. I'll definitely use your nail idea to position it; sounds easier than lining it up on my pencil marks. So I guess when I do this again, I place shims between the rubber bands and plywood where there's no contact with the nose rib. I'm not sure I'll be able to see everywhere inside, so maybe run long shims in a few spots the entire section length to tighten it up? Hmmm......
Thank you again!
|
|
|
|
|
|
| Fenix |
|
Fledgling Member Posts: 31
Time Online: 9 hours 40 minutes
|
From your picture it looks like, yes, you're pretty much there except the shims. In some cases I took a 1/4" by .75 or 1.25" shim and turned them "on edge" because that much pressure was needed at a problem spot. Yes, putting long strips sort of the entire length would help but IIRC there was not too much trouble looking inside with a flashlight from the open end if you start at tip and work to root. Or if you plan wingtips I guess you can also cut an opening at the tip and see in from there.
If you staple the leading edge stringer in place you'll need to leave it "free" at the top and bottom spar cap until is is all in place so you can "work the slack" out of the plywood while pushing it down against the ribs.
If you do opt to remove the ply I might suggest something like this (IIRC): Cutting big sections out with a moto tool with a drill bit or Roto Zip bit chucked up in it (or router bit) to plunge into the ldg edge and cut big holes in it. Then you can look in the big holes and cut pretty closely to the ribs and spars without cutting into any ribs or spars. Then sand away the rest with a variety of sanders, sanding blocks, sanding drums, etc. This should be a pretty controlled operation. It's also possible that if you cut the big holes in the ply but leave a couple inches hanging off each rib and spar cap that you might be able to grab the overhand and "peel" away a lot of the remaining plywood.
I guess it depends on how fussy you are and how happy you are with the rest of the project and dissatisfied you are with the ldg edge skin, but what I saw in the picture you posted looks airworthy and will probably not affect the performance. Many planes have an aluminum ldg edge tacked on which gives much less torsional resistance than what you have already glued on. Also the dual struts of the minimax (one each to main and aft spar) take care of a lot of the torsional loads, at least out to where the struts attach. Outboard of that...... not so much.
|
|
|
|
|
|
| PoconoJohn |
|
Wing Man Posts: 99
Time Online: 1 days 8 hours 9 minutes
|
Thank you again for your help and I'll definitely use your suggestions. I especially like the headless nails idea for easily locating the plywood on the upper spar. I'll probably work from the top and then wrap it around the stringer to the bottom.
I'll have to look at it tomorrow and decide what to do (start over or leave it)...and how I'll put it on next time.
John C |
|
|
|
|
|
| gangeli |
| February 7, 2024, 12:54pm |
|
Fledgling Member Posts: 41
Time Online: 4 days 9 hours 10 minutes
|
What worked for me was to wet and preform the ply leading edge and then use a continuous paracord to wrap it in place, before stapling top and bottom of front spar. One section at a time. I did not staple to the RS-4 leading edge. I had good contact at all the nose ribs.
|
|
|
|
|
|
| mullacharjak |
|
 Ace Ace Posts: 277
Time Online: 3 days 20 hours 43 minutes
|
I saw someone using aluminum straps in this area.i think the strap would put more downward pressure against the rib.
|
|
|
|
|
|
| PoconoJohn |
|
Wing Man Posts: 99
Time Online: 1 days 8 hours 9 minutes
|
Before I remove the piece that's on, I'm going to experiment on another section and I'll look for paracord. Not sure why paracord might work better, but I'll give it a shot. Meanwhile, I was wondering if I could make a nose rib doubler based on the current shape of the plywood. It wood be a perfect fit. I would just need to get it inside and glued against the current nose ribs. Hmmm. |
|
|
|
|
|
| Fenix |
|
Fledgling Member Posts: 31
Time Online: 9 hours 40 minutes
|
I'd think that, if necessary, shims could also be placed under the paracord.
Gluing doublers or "doubler sections" onto the nose ribs that fit snugly against the leading edge plywood in its current position/shape should restore "structural integrity" to the D-Tube section, if there were any such concerns.
It will not correct the shape, of course, but I doubt that the minor change (from the plans) in leading edge shape will be noticeable.
So it sounds like you might have an idea for a good "fix". Would you be able to reach in and glue such pieces in place? |
|
|
|
|
|
| nitrobill |
|
Wing Man Posts: 95
Time Online: 1 days 8 hours 17 minutes
|
I preformed the sheeting, then stapled to the top of the spar, then took ratchet straps and went around each nose rib and around the rear spar and cranked it down but not too tight and then staple the bottom spar, it turned out perfect. |
|
 Logged Logged |
|
|
|
|
| PoconoJohn |
|
Wing Man Posts: 99
Time Online: 1 days 8 hours 9 minutes
|
Tomorrow I will check if I can reach into the D-section, perhaps using something to hold a doubler and attach it to the current nose ribs.
If it works, then I think I'll need to do this to all nose ribs so it all matches. And I'll do it for the other wing yet to be built (all the pieces are already made).
I'll look into ratchet straps. I still don't understand how anything else will give better results than the bungee cords and rubber bands I used. I'll have to experiment.
Still leaning to doing it over...but I want to make sure before such a drastic action. I'll have to be careful removing the T88 from the spar and nose pieces.
John C |
|
|
|
|
|
| gangeli |
|
Fledgling Member Posts: 41
Time Online: 4 days 9 hours 10 minutes
|
Reading again your firs post I see you stapled the ply at three point: top cap of spar, RS4 leading edge and bottom cap of spar. Did you stapled the ply before apply the straps (bungee cords)? If so that could be the reason you could not pull it tightly. If I remember correctly, I initially only put very few staples at the top cap of the spar only, just to keep the ply from slipping, then I pulled tightly with the paracord and only after that i stapled at the bottom cap of the spar and also added more staples at the top. I'm not saying is the best way to do it, but it worked for me.
|
|
|
|
|
|
| PoconoJohn |
|
Wing Man Posts: 99
Time Online: 1 days 8 hours 9 minutes
|
I put a few staples into the RS4 to hold it in position. Half of the bungees were in place before stapling the top and bottom.
I'll certainly check into stronger bungees (paracord or ratchet) and check the fit next time.
John C
|
|
|
|
|
|
| Keith103 |
| February 13, 2024, 5:55am |
|
 Ace AcePosts: 632
Time Online: 13 days 6 hours 26 minutes
|
Despite making the nose ribs as perfectly as I can to the plans AND carefully placing them on the spar AND presoaking/bending the leading edge plywood.....when the leading edge plywood is wrapped around, it doesn't have total contact with the nose ribs. I stapled it to the stringer, then pulled tight to the upper spar and stapled that, them lower area and stapled that.
Anyone else experience this problem? If yes, what did you do? (I noticed in the Youtube video by Dennis he apparently had this happen and he mentioned sticking a shim in the gap. Not sure how much of a gap he had though or how extensive these areas were).
Thank you.
John C
Yes, you can shim the gap if it is wide enough to insert a shim.. In my wing I found a very tiny gap in one of the ribs, I just left it as is. This gap happens, IMO, if the ply is too wide. Ply width should exactly match the outer gluing distance from rear of top spar cap to rear of bottom spar cap measured along the outer edge of the nose D rib. It can even be 1/16 inch too narrow, but not 1/16 inch too wide. While gluing, the rubber band clamping does not allow the excess ply width to extend behind the rear of the 2 spar caps, so the extra ply leaves you with a gap along the front half of the D. |
|
| Logged |
|
|
|
|
| PoconoJohn |
| February 13, 2024, 8:41pm |
|
Wing Man Posts: 99
Time Online: 1 days 8 hours 9 minutes
|
Thank you. With help, we installed the center piece. I checked the fit ahead of time and saw where gaps would likely occur. I made shims from the same wood as nose pieces and shaped each to fit like a puzzle. The outer edge was shaped to match the leading edge. These were glued on the edge of the nose rib in the problem spots. This mostly worked, but I still some gaps in spots, in which I shoved a small piece of wood while the glue was good. Using nails as suggested by Fenix (thank you!), we placed the ply to the spar bottom (wing was flipped to make this easier) and then stapled all along. Flipped the wing over right side up. Then pulled tight around the stringer up to the upper spar and used clamps to hold it there. Then stapled that. The ply seems to be totally covering one spar surface and half of the the other (we started from the top at the tip section, but center section we started at the bottom because the strut fitting is there). Gangeli, I forgot to bungee before stapling  Next time (third times the charm), I'll make sure to flip the wing over and then get bungees on. I just received a bunch that fit tight. The ply at the tip I left intact. I made doublers for the areas with gaps and now the leading edge is tight on all nose ribs/doublers. I'm not at all enjoying this part of the build. Four more to go.  |
|
|
|
|
|
| Fenix |
| February 21, 2024, 3:57am |
|
Fledgling Member Posts: 31
Time Online: 9 hours 40 minutes
|
I agree that the leading edge ply was among the least fun parts. But with prior planning and setup it can be done well.
As Keith stated, having ply that is longer than the distance from the top spar around the nose and across the bottom spar can create problems in strapping it in place when the ply extends behind the spar caps. I did the first build making sure the ply was a bit (1/16" - 1/8") shorter than the distance needing to be covered.
On the second build I intentionally left the plywood about 1/2" longer on top and bottom and just put shims behind the spar where the straps (or in my case sticks to hold the "rubber bands) were so the "problem" of having plywood too long was eliminated. Then I cut the ply back to the spar using a flush cut router bit which gave a really clean and even fit. I radiused or scalloped the overhanging ply where it intersected with the ribs and intended to sand the overhanging ply "tabs" down to blend them in with the ribs for a nice transition for the fabric. (That is the real reason I let the ldg edge ply overhang the spars but it also eliminated the need to carefully position the ply) I think this would be a fine idea. But what I did instead was was glue 1/2" wide plywood strips onto the rib capstrips which gave me a lot of fabric to rib glue area (given the mini max is not rib stitched) and the ply "capstrips" butted up against the ends of the tabs created by the overhanging leading edge ply. It gave a nice look but was probably not needed and added a bit of weight and work.
|
|
|
|
|
|
| PoconoJohn |
| February 22, 2024, 1:57am |
|
Wing Man Posts: 99
Time Online: 1 days 8 hours 9 minutes
|
Thank you! This wing is about done. We cut the aileron off. Will soon pack it away and start on the other wing. The leading edges should go better now that I have some experience to help.
John C |
|
|
|
|
|
|